How to Install Nginx Proxy Manager on Ubuntu 22.04|20.04
Posted March 23, 2024

Nginx Proxy Manager allows configuring Nginx-related proxies. However, Nginx Proxy Manager is a GUI. This means you will use a UI to manage what you have to do manually using the Nginx proxy server. In this guide, you will learn how to install and set up Nginx Proxy Manager on Ubuntu 22.04|20.04.
This Nginx Proxy Manager on setup should work on Ubuntu 22.04|20.04|18.04. You will learn:
- How to install Docker with Nginx Proxy Manager on your Ubuntu
- Using Docker Compose and SQLite to run a Nginx Proxy Manager Ubuntu server instance.
- How to expose and access Nginx Proxy Manager on the web.
- Using Nginx Proxy Manager GUI to manage proxies.
Ready? Dive into this example tutorial and Install Nginx Proxy Manager on Ubuntu 22.04|20.04 like a pro
Getting Nginx Proxy Manager Ready on Ubuntu 22.04|20.04
Now, for you to create a Nginx Proxy Manager, you must use Docker. This means Nginx Proxy Manager can be used without Docker. Unless you are using an LXC container.
In Nginx Proxy Manager docs, it says you must have Docker ready on your Ubuntu machine. The NPM project is packaged with Docker and Docker is Needed:

Let’s get Docker running on Ubuntu so we can spin an Nginx Proxy Manager instance correctly.
Installing Docker for Nginx Proxy Manager on Ubuntu
Based on the above observation, Docker must be running before you attempt to install Nginx Proxy Manage. Let’s go to the Ubuntu machine and get the Docker engine ready in the following steps:
- Update and upgrade Ubuntu package index:
sudo apt update
sudo apt upgrade -y
- Go ahead and run the following command to install all the side packages the Docker needs:
sudo apt install curl apt-transport-https ca-certificates software-properties-common
- Create a secure key to let Ubuntu install Docker securely:
sudo mkdir -p /etc/apt/keyrings
curl -fsSL https://download.docker.com/linux/ubuntu/gpg | sudo gpg --dearmor -o /etc/apt/keyrings/docker.gpg
sudo chmod a+r /etc/apt/keyrings/docker.gpg
- Now, add the Docker engine repository to the Ubuntu APT sources:
echo "deb [arch=$(dpkg --print-architecture) signed-by=/etc/apt/keyrings/docker.gpg] https://download.docker.com/linux/ubuntu $(lsb_release -cs) stable" | sudo tee /etc/apt/sources.list.d/docker.list > /dev/null
- Next, update the newly added repository and install all Docker packages from Docker CE and extra packages such as Docker compose:
sudo apt-get install docker-ce docker-ce-cli containerd.io docker-buildx-plugin docker-compose-plugin
- Finally, verify Docker and Docker Compose are ready as such:
sudo systemctl status docker

Getting Nginx Proxy Manager Ready using Docker Compose
I will use Docker Compose to create an Nginx Proxy Manager container. In your Ubuntu machine/server, create a docker-compose.yml file as follows:
version: '3.9'
services:
  app:
    # container name
    container_name: nginx-proxy-manager
    # Nginx Proxy Manager image
    image: 'jc21/nginx-proxy-manager:latest'
    # Restart policy
    restart: unless-stopped
    ports:
      - '80:80'    # Public HTTP Port
      - '443:443'  # Public HTTPS Port
      - '81:81'    # Admin Web Port

    environment:
      DB_SQLITE_FILE: "/data/database.sqlite"  # Location of SQLite DB file
      DISABLE_IPV6: 'true' # Disable IPv6 if not enabled on host

    # Persisting data and Let's Encrypt certificates
    volumes:
    # persistent NPM data
      - ./data:/data
      # Map Let's Encrypt directory
      - ./letsencrypt:/etc/letsencrypt
You need to know that:
- Nginx Proxy Manager will use
jc21/nginx-proxy-manageras the base image for its container. It gets the Nginx Proxy Manager image from the Docker Hub repository maintained by the user jc21 - You have three ports policy, 80, 81, and 443. They will manage the HTTP traffic to reach the Nginx Proxy Manager service.
- Nginx Proxy Manager needs a database. You will create an SQLite database file within the container.
- You must add the volumes for persistent storage and Let’s Encrypt SSL certificates.
If you want to use MariaDB/MySQL instead of SQLite, check this jc21 Nginx Proxy Manager w/ Docker Compose and MariaDB Aria Container guide.
Running Nginx Proxy Manager on Ubuntu
Once you have your docker-compose.yml file ready, navigate to this file location and tun your Ubuntu NPM container as follows:
sudo docker compose up -d

This should make Ubuntu ready to access Nginx Proxy Manager. You will use 81as the Admin Web Port.
This means you will access NPM GUI on the web using port 81 as http://your_server_ip:81 as such:

Accessing Nginx Proxy Manager on Ubuntu
You now need to log in to your Nginx Proxy Manager Ubuntu UI using the following details:
- Email:
[email protected] - Password:
changeme
You must change the default details and add your user details:

Once done, you will have your Nginx Proxy Manager Dashboard running on Ubuntu as such:

Managing SSL certificates and Proxy Hosts
You can now start managing SLL certificates the right way. All you need to go to the SSL section and add your details as such:

Then add your details as such:

Nginx Proxy Manager will manage the following Hosts:
- Proxy Hosts
- Redirection Hosts
- Streams
- 404 Hosts
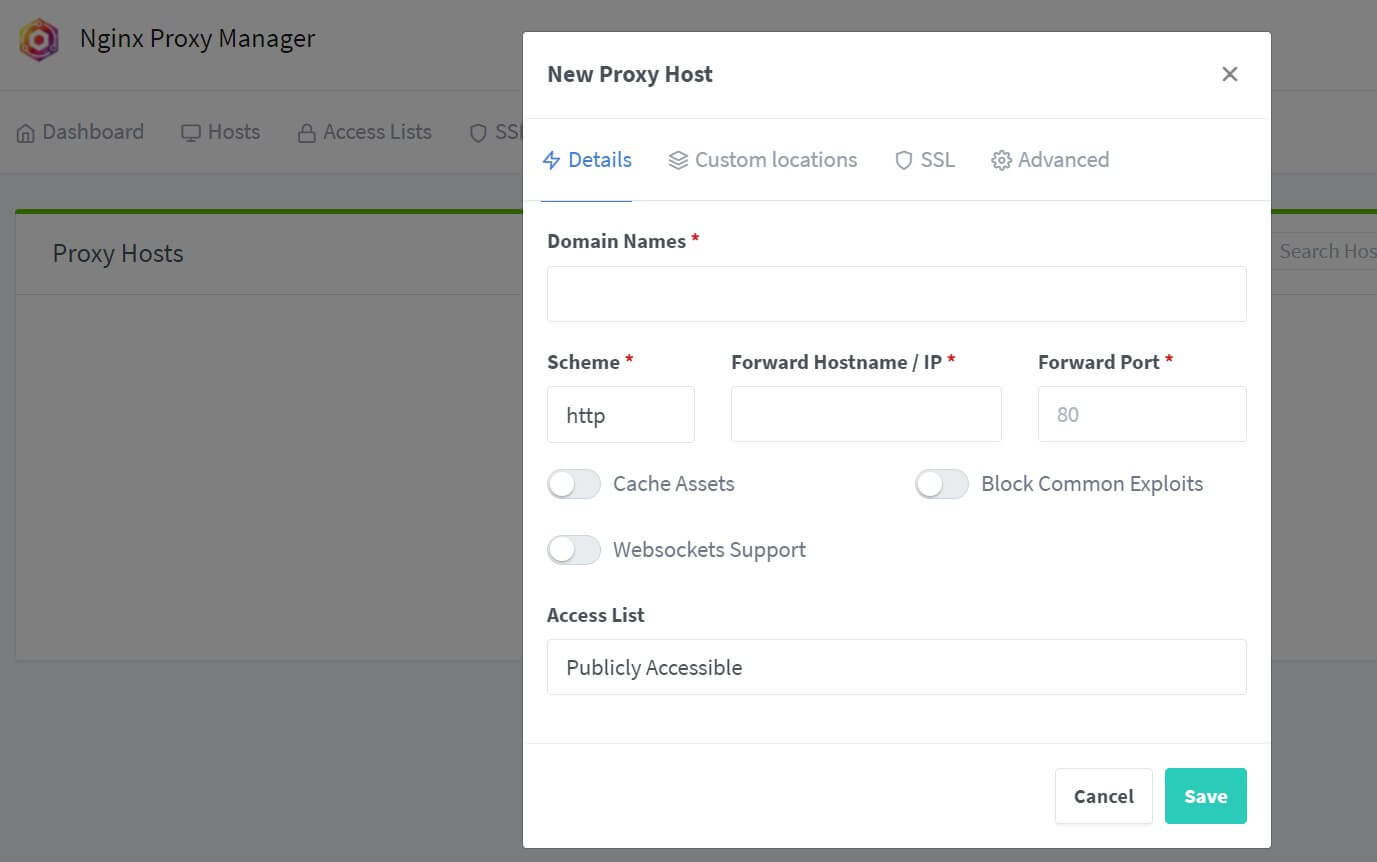
For example, a Proxy Host will add a domain name, post your application is running on and the application IP address:

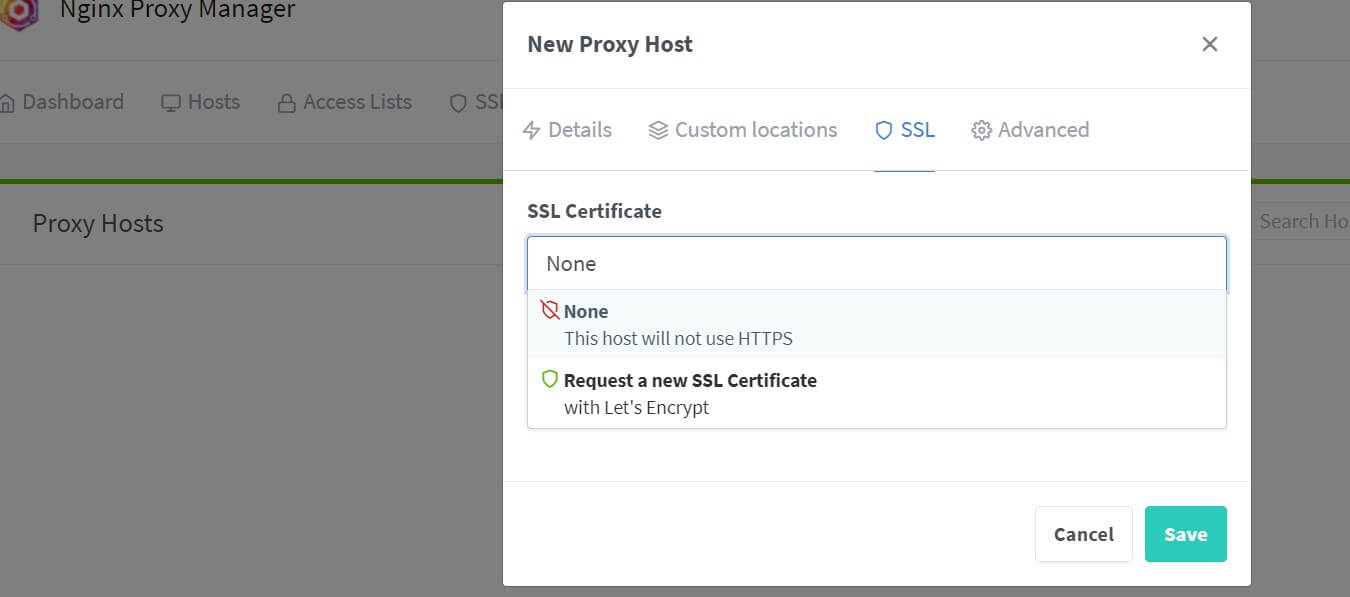
You can at the same time add lets encrypt SSL to this host on the SSL tab:

Conclusion
You now have Nginx Proxy Manager running on Ubuntu 22.04|20.04|18.O4. You’ve learned:
- How to install Docker with Nginx Proxy Manager on your Ubuntu
- Using Docker Compose and SQLite to run a Nginx Proxy Manager Ubuntu server instance.
- How to expose and access Nginx Proxy Manager on the web.
More Related Articles:
-

Run Portainer Behind Nginx Reverse Proxy Manager and HTTPS
Mar 2, 2024
-

Install jc21 Nginx Proxy Manager w/ Docker Compose/MariaDB Aria Container
Mar 5, 2024
-

Perfect PHP Web Server Dockerfile Example with Nginx
Apr 22, 2024
-

Caddy 2 Reverse Proxy Server with Docker and Docker Compose Example
Mar 23, 2024