4 Elegant Ways to Use Pinia Persist and Persistent States
Posted September 9, 2023

States data should persist between reloads. Dive in and learn how to add Pinia persist and rehydration to Pinia on refresh states. You will create persisted Pinia states across reloads in these 4 Pinia state persistence shots. These four ways will let you harness the power of Pinia Persist and persistent states in your Vue.js and Nuxt 2|3 apps.
Pinia is your official Vue.js state management library. However, Pinia does not by itself persist states and its data. If you want to instruct Pinia to persist the whole state to the local storage whenever it changes, you must solve this behavior yourself and let Pinia save states data. Along this Pinia Persist tutorial, you will learn:
- How to add Pinia Persist states data to Vue.js and Nuxt 3
- You will use methods such localStorage, Pinia persist plugins and VueUse to add Pinia persist state on page refresh and save data.
Ready? Dive in and Persist Pinia states like a Pro.
Prerequisites to Persist Pinia States
This tutorial is a step-by-step guide to adding Pinia persist states to your Vue and Nuxt apps,
- Ensure you have an existing Vue pinia project. This is a perfect way to get started.
- If you are a Typescript enthusiast, this is a go-to Vue pinia guide.
Creating a Pinia Persist Example Apps
To follow along, let’s create one basic Vue pinia example.
- Step One: Your Pinia store; this guide will persist as follows:
// src/store/TaskStore.js
import { defineStore } from 'pinia';

export const useTodoStore = defineStore('todo', {

  state: () => ({
    todos: [],
  }),

  actions: {

    addTodo(task) {
      this.todos.push({ id: Date.now(), task, completed: false });
    },
    toggleTodoCompletion(todo) {
      todo.completed = !todo.completed;
    },

    updateTodoStatus(todoId, status) {
      const todo = this.todos.find((todo) => todo.id === todoId);
      if (todo) {
        todo.completed = status;

      }
    },

    removeTodo(todo) {
      this.todos = this.todos.filter(t => t.id !== todo.id);
    },
  },
});
- Step Two: Interact with this store in your
App.vueas such:
// src/App.vue
<template>
  <div class="app">
    <h1 class="app-title">ToDo App</h1>
    <input
      class="task-input"
      v-model="newTask"
      @keyup.enter="addTodo"
      placeholder="Add a new task"
    />
    <ul class="task-list">
      <li v-for="todo in todos" :key="todo.id" class="task-item">
        <input type="checkbox" :checked="todo.completed" @change="toggleTodoStatus(todo.id, !todo.completed)"/>
        <span :class="{ completed: todo.completed }">{{ todo.task }}</span>

        <div class="task-actions">
          <button class="task-delete" @click="removeTodo(todo)">Delete</button>
        </div>
      </li>
    </ul>
  </div>
</template>

<script setup>
import { useTodoStore } from "./stores/TaskStore";

import { ref, computed } from "vue";

const todoStore = useTodoStore();
const newTask = ref("");
const todos = computed(() => todoStore.todos);
const addTodo = () => {
  if (newTask.value.trim() !== "") {
    todoStore.addTodo(newTask.value);
    newTask.value = "";
  }
};

const toggleTodoStatus = (todoId, status) => {
  todoStore.updateTodoStatus(todoId, status);
};
const removeTodo = (todo) => todoStore.removeTodo(todo);
</script>

<style scoped>
.app {
  font-family: Arial, sans-serif;
  text-align: left;
  margin: 20px auto;
  max-width: 500px;
}

.task-actions {
  margin-left: auto;
  display: flex;
}

.app-title {
  font-size: 30px;
  margin-bottom: 10px;
}

.task-input {
  width: 400px;
  padding: 8px;
  font-size: 16px;
  border: 1px solid #ccc;
  border-radius: 4px;
  margin-bottom: 10px;
}

.task-list {
  list-style: none;
  padding: 0;
}

.task-item {
  display: flex;
  align-items: center;
  margin-bottom: 5px;
  padding: 16px;
  font-size: 20px;
  width: 400px;
  border: 1px solid #ddd;
  border-radius: 4px;
}

.completed {
  text-decoration: line-through;
  font-style: italic;
}

.task-delete {
  background-color: #12acf9;
  color: white;
  border: none;
  border-radius: 4px;
  padding: 5px 10px;
  cursor: pointer;
  margin-left: auto;
}
</style>
- Step Three: Make sure you have Pinia up and running in your
main.jsfile as follows:
import { createApp } from 'vue'
import {createPinia} from 'pinia'
import App from './App.vue'

createApp(App)
.use(createPinia())
.mount('#app')
- Step Four: Run your
npm run devcommand to get your Pinia Store app running. Here is an example of what it looks like:
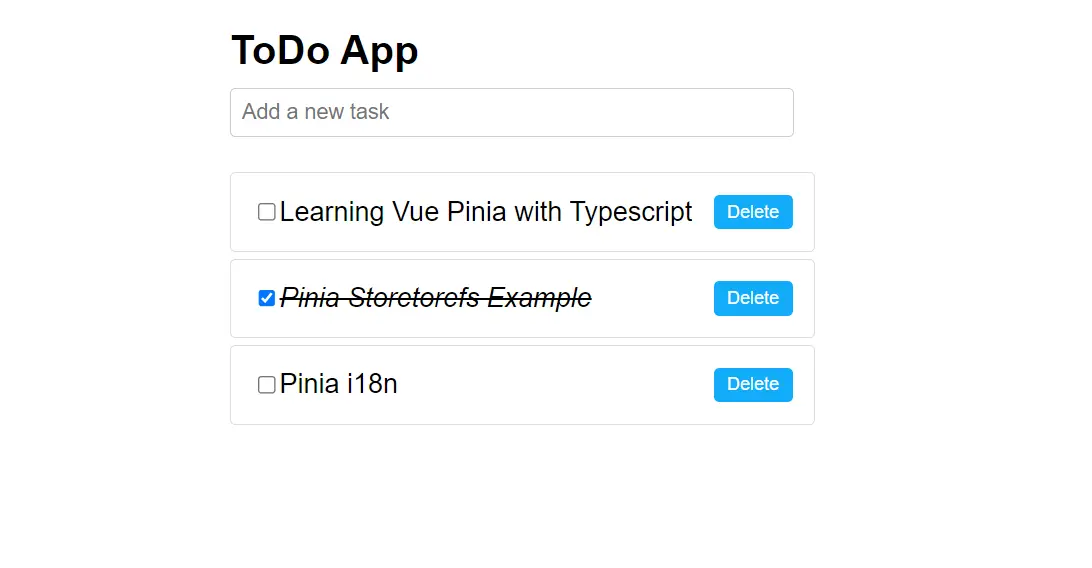
If you refresh your page, the added items will get lost.
Note: There is nothing wrong with Pinia behaving this way, and it’s only you to add the persistent behavior if needed.
Let’s now dive in and add the three ways to use Pinia persist and persistent states in this app.
Solution One: Persist Pinia Using Default Browser LocalStorage
Your browser uses LocalStorage to store web data. And Pinia can use it to save reactivity updates that persist in any Pinia State.
To manage a Persistent Pinia state to LocalStorage, you need three methods to add, update, or delete a state from storage.
Here is how Pinia and LocalStorage use them:
-
Pinia
stateandlocalStorage.getItemfor fetching states. -
To add states, Pinia uses
this.todos.push, the equivalent oflocalStorage.setItem()on localStorage.
You need to watch these two main duos when persisting a Pinia state to local storage.
Add localStorage, update your store to save todos state as follows:
import { defineStore } from 'pinia';

export const useTodoStore = defineStore('todo', {

  state: () => ({
    todos: JSON.parse(localStorage.getItem("todos")) || [],
  }),

  actions: {

    saveTodos() {
      localStorage.setItem("todos", JSON.stringify(this.todos));
    },

    addTodo(task) {
      this.todos.push({ id: Date.now(), task, completed: false });
      this.saveTodos();
    },

    toggleTodoCompletion(todo) {
      todo.completed = !todo.completed;
      this.saveTodos();
    },

    updateTodoStatus(todoId, status) {
      const todo = this.todos.find((todo) => todo.id === todoId);
      if (todo) {
        todo.completed = status;
       this.saveTodos();
      }
    },

    removeTodo(todo) {
      this.todos = this.todos.filter(t => t.id !== todo.id);
      this.saveTodos();
    },
  },
});
Pinia being reactive, IT triggers reactivity updates using actions. You must target them to achieve persistence with Pinia.
So, calling this.saveTodos() in your actions will capture all state’s re-rendered updates to localStorage.
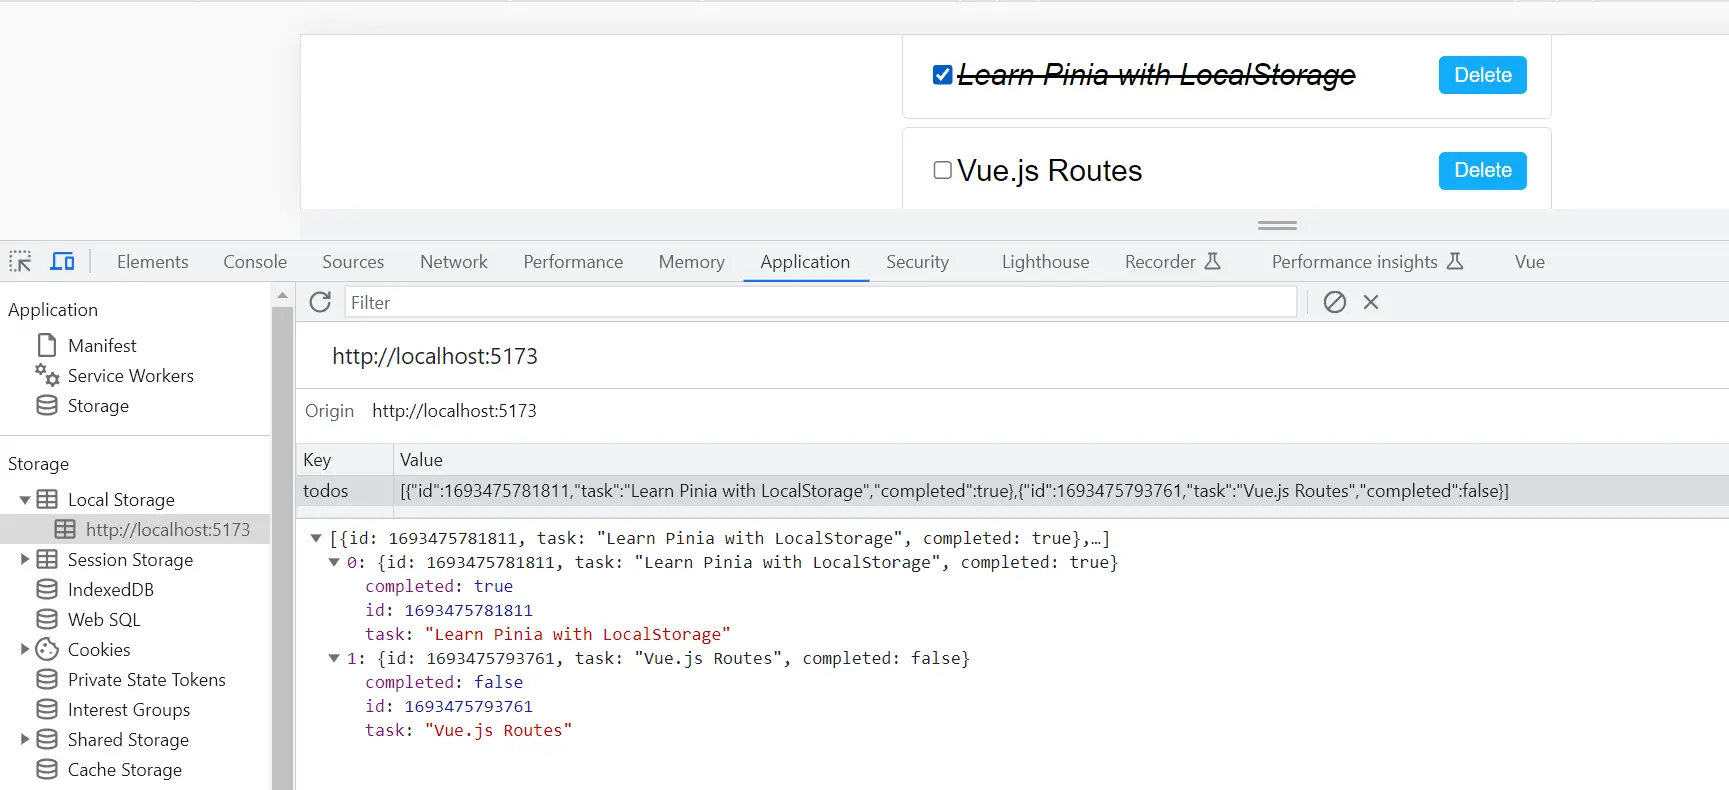
If you add new todos, they will be persisted. You can verify this by restarting your app. Or, to be on the safer side, navigate to browser Inspect and check the Application localStorage as follows:
Default localStorage seems like the longer approach here. Let’s use other handly methods that only need a few lines of code:
Solution Two: Pinia persistent states using VueUse with useStorage
Vue.js supports Reactive LocalStorage out of the box. useStorage is a built-in storage layer to browser LocalStorage.
To use useStorage, install VueUse in your app:
npm install @vueuse/core
In your Pinia store, import useStorage from VueUse:
import { useStorage } from '@vueuse/core'
All you need to do is initialize useStorage in your object todos: [] as follows:
import { defineStore } from 'pinia';
import { useStorage } from '@vueuse/core'

export const useTodoStore = defineStore('todo', {
  state: () => ({

    // Initialize todos from local storage or use an empty array
    todos: useStorage('todos', [])
  }),

  actions: {...

});
Restart your app and check if this Pinia persist is working as expected.
Solution Three: Pinia persistent states using VueUse with useLocalStorage
useLocalStorage uses the same concept as useStorage to bind Pinia states to LocalStorage. It returns a writable state directly within the state() as follows:
import { defineStore } from 'pinia';
// add useLocalStorage from VueUse
import { useStorage } from '@vueuse/core'

export const useTodoStore = defineStore('todo', {
  state: () => ({

    // useLocalStorage here to Initialize todos from local storage or use an empty array
    todos: useLocalStorage('todos', [])
  }),

  actions: {...

});
Solution Four: Using Pinia Persistedstate Plugin
If you need to advance your Pinia persistence, pinia-plugin-persistedstate saves a whole state into LocalStorage:
install pinia-plugin-persistedstate as follows:
npm i pinia-plugin-persistedstate
pinia-plugin-persistedstate requires you to initialize your pinia instance to use the plugin. You will import it and update the main.js file as follows:
import { createApp } from 'vue'
import {createPinia} from 'pinia'
import App from './App.vue'
import piniaPluginPersistedstate from 'pinia-plugin-persistedstate'

const pinia = createPinia()
pinia.use(piniaPluginPersistedstate)

createApp(App)
.use(pinia)
.mount('#app')
Then call persist: true in your store file, and Pinia will do its magic to persist states as follows:
import { defineStore } from 'pinia';

export const useTodoStore = defineStore('todo', {
  state: () => ({
    todos: [],
  }),
 actions: {...
  },
  persist: true,
});
You can also update piniaPluginPersistedstate with the LocalStorage key value as follows:
import { defineStore } from 'pinia';

export const useTodoStore = defineStore('todo', {
  state: () => ({
    todos: [],
  }),
 actions: {...
  },
    persist: {
    storage: localStorage,
    key: 'local-todos',
},
});
Restart your app and verify these changes in your browser’s local storage.
Conclusion
The piniaPluginPersistedstate is robust, and you can explore its Advanced Usage only to select the states you want to persist instead of using the above default example that persist the whole state. This way, you can:
- Force the persistence to manually trigger Pinia persist to storage on Vue and Nuxt.
- Force Pinia rehydration.
- Creating multiple persistence per every store you have.
- Reload states and let Pinia persist them on refresh.
Written By: