Deploying MySQL and phpMyAdmin On K3s Kubernetes Cluster
Posted July 13, 2024

This guide teaches you how to perfectly run a MySQL database with Kubernetes K3s cluster. K3s has been the lightweight Kubernetes distribution alternative. We will install it and discuss all the steps we need to get the MySQL Kubernetes cluster up and running. Along the guide.
We’ll create a phpMyAdmin cluster access MySQL within K3s. We’ll learn:
- How to create MySQL Kubernetes K3s deployments and Services.
- Pesisitng MySQL data within the K3s cluster.
- How to use phpMyAdmin with K3S and access a MySQL Kubernetes cluster.
Ready? Now dive in and spin up a K3s Kubernetes cluster for your MySQL and phpMyAdmin services.
Why K3s Kubernetes with MySQL
Kubernetes itself is enough to get MySQL cluster ready. But in this case, Kubernetes gives you the option to other distributions like K3s. K3s will still use the same manifest as the classical Kubernetes.
In our case, K3s tend to be lightweight and more compact compared to the standard Kubernetes. This is great when running resource consuming services like MySQL. You get:
- An optimized low-resource Kubernetes environment. We will be able to use minimal CPU and memory resources and still run a fully working K3s MySQL cluster.
- K3s is fully compatible with standard Kubernetes APIs. This means any Kubernetes background remains the same.
- It is to deploy a K3s MySQL cluster to Homelabs, Iots, and local developments.
- K3s is easier to set up and you don’t need any additional tools the classical Kubernetes needs.
Prerequisites
To follow along with this guide, you only need to be familiar with Kubernetes and running the kubectl commands.
Please Note: This tutorial will only use K3s to create and deploy a single instance MySQL Kubernetes instance.
Installing K3s Kubernetes
In our previous guide, we covered how to install k3s. Please check How to Install K3s on Ubuntu to learn more.
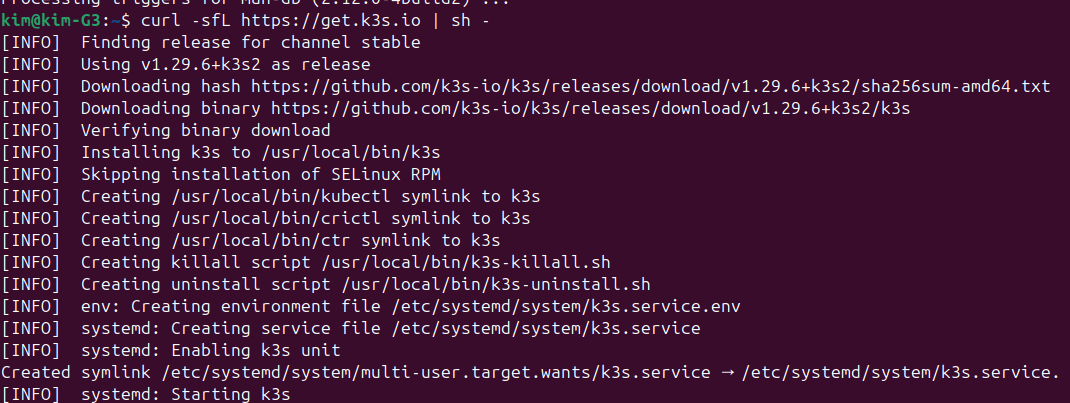
You will need to run the following command to get K3s installed:
curl -sfL https://get.k3s.io | sh -
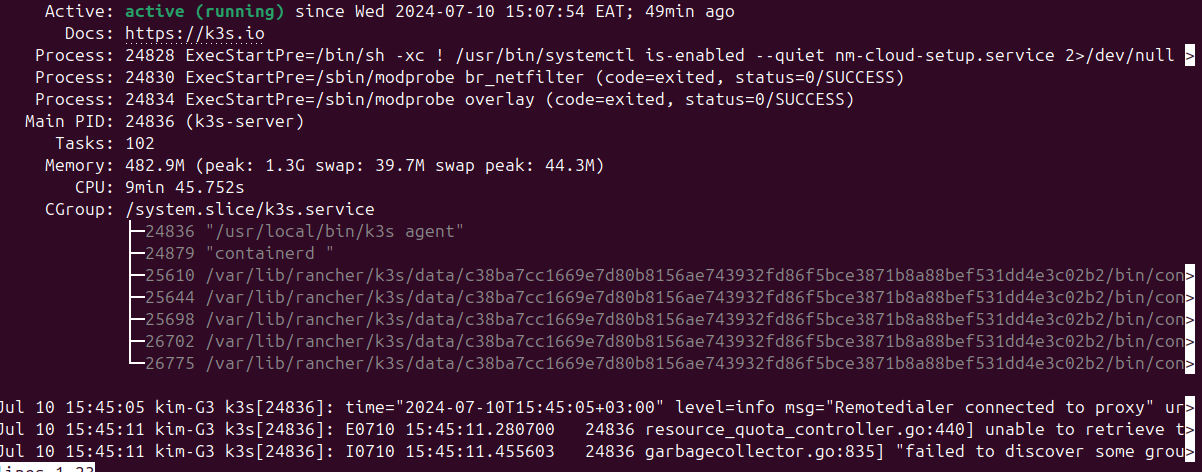
Make sure you confirm the K3s server is ready with this systemctl command that checks the status of a k3s Service :
sudo systemctl status k3s
However, due to permission issues, you might get a k3s.yaml/KUBECONFIG error. In such a case, run the following command and the error will be resolved:
curl -sfL https://get.k3s.io | K3S_KUBECONFIG_MODE="644" sh -s -
Creating MySQL Persistent Kubernetes Volume
The data just on your K3s MySQL server will change. The database will get updated with new database, new tables, and records and you develop your Apps. These entities must remain as so, even when you stop or restart a MySQL cluster.
Kubernetes will let you create PersistentVolume to let K3s add MySQL storage to a given host path. Here, you tell k3s the capacity of your storage and its host path.
Go to your working directory and create a pv.yaml file.
touch pv.yaml
Your K3s MySQL storage will be as follows:
apiVersion: v1
kind: PersistentVolume
# Metadata, PersistentVolume labels
metadata:
  # Name of the PersistentVolume
  name: mysqldb-pv-storage
  # Labels to categorize the PersistentVolume
  labels:
    # Label to indicate the type of storage
    type: local
# the PersistentVolume
spec:
  # Sorage class
  storageClassName: manual
  # The capacity of the PersistentVolume
  capacity:
    # The amount of storage available
    storage: 5Gi
  # Access modes for the volume
  accessModes:
    # The volume can be mounted
    # as read-write by a single node
    - ReadWriteOnce
  # the path on the host
  # Where the volume is stored
  hostPath:
    # Path on the host machine
    path: "/mnt/k3s-data/mysql"
Use the command to get the volume ready:
kubectl apply -f pv.yaml
######OutPut########
# persistentvolume/mysqldb-pv-storage created
#############
PersistentVolume is provisioned by an administrator. This means its resources are independent of a given pod (in this case MySQL). This means, that in MySQL pod (as a user), you will need to create a Persistent Volume Claim (PVC) to consume PV resources.
PVC will request access to the hostPath (/mnt/k3s-data/mysql) to read/write. In such a case, if MySQL pod will ever need storage to preserve its data, it requests that storage from PVC. Kubernetes (K3s) will finally bind the PVC to PV and the pod can then mount the PVC as a volume to use the storage.
touch pvc.yaml
apiVersion: v1
# kind object of PersistentVolumeClaim
kind: PersistentVolumeClaim
# PersistentVolumeClaim Metadata
metadata:
  name: mysqldb-pv-claim-storage
# PersistentVolumeClaim
spec:
  # The storage class to use
  storageClassName: manual
  # Define the access modes
  accessModes:
    # The volume can be mounted as read-write
    - ReadWriteOnce
  # resources request
  resources:
    requests:
      # Request 5Gi of storage
      storage: 5Gi
You will need to apply this PVC with this command:
kubectl apply -f pvc.yaml
######OutPut########
# persistentvolume/mysqldb-pv-storage created
#############
Confirm if these two volume claims are ready using these commands:
$ kubectl get pv
NAME                 CAPACITY   ACCESS MODES   RECLAIM POLICY   STATUS   CLAIM                              STORAGECLASS   VOLUMEATTRIBUTESCLASS   REASON   AGE
mysqldb-pv-storage   5Gi        RWO            Retain           Bound    default/mysqldb-pv-claim-storage   manual         <unset>                          12m
$ kubectl get pvc
NAME                       STATUS   VOLUME               CAPACITY   ACCESS MODES   STORAGECLASS   VOLUMEATTRIBUTESCLASS   AGE
mysqldb-pv-claim-storage   Bound    mysqldb-pv-storage   5Gi        RWO            manual         <unset>                 13s
Creating a MySQL Deployment using K3s Kubernetes
A deployment is Kubernetes manifest to create pods and run MySQL server. K3s will use Deployment to Manage the lifecycle of the MySQL cluster.
You will create a manifest file as a Kubernetes Deployment. This deployment will act as a higher-level abstraction to manage the MySQL deployment. It does so by creating and managing a set of replica Pods.
The same deployment will get assigned the MySQL storage from the above PVC via the custom hostname set on your local machine.
Othe this Kubernetes k3s MySQL deployment will be:
- Setting up MySQL variables
- Adding MySQL root passwords
- Adding a MySQL user
- Initializing a new database.
Create this file to get the file ready:
touch mysqldb-deployment.yaml
Your MySQL manifest should look as follows:
apiVersion: apps/v1
# Deployment kind
kind: Deployment
# Deployment Metadata
metadata:
  name: mysqldb-deployment
spec:
  # Selector to match pods with the label "app: mysqldb-deployment"
  selector:
    matchLabels:
      app: mysqldb-deployment
  # Strategy for updating pods
  # Recreate means to delete existing pods before creating new ones
  strategy:
    type: Recreate
  # pods Deployment Template
  template:
    # pods labels Metadata
    metadata:
      labels:
        app: mysqldb-deployment
    spec:
      # The containers in the pod
      # MySQL
      containers:
        - image: mysql:8.0  # MySQL Docker image
          name: mysqldb-deployment  # container Name
          env:  # Environment variables for the container
            - name: MYSQL_ROOT_PASSWORD
              value: root_pass  # MySQL Root password
            - name: MYSQL_DATABASE
              value: test_db  # Name of the database to create
            - name: MYSQL_USER
              value: test_user  # database user
            - name: MYSQL_PASSWORD
              value: user_pass  # Password for the database user
          ports:
            - containerPort: 3306  # MySQL container Port
              name: mysql  # Name of the port
          volumeMounts:
          # mount volumes
            - name: mysqldb-k3s-storage
            # Path inside the container where the volume will be mounted
              mountPath: /var/lib/mysql
      volumes:
        - name: mysqldb-k3s-storage  #  volume name
          persistentVolumeClaim:
            claimName: mysqldb-pv-claim-storage  # PersistentVolumeClaim to use
Let’s break down this code example:
- The whole manifest deploy pod for K3s MySQL cluster.
- Kubernetes API will create a MySQL container using the MySQL base image.
- You’ll set the environment variables that MySQL will initiate when Kubernetes creates the pods. These are created under the
envsection. - MySQL uses port 3306. The point remains as default. Ensure this port is open and can be allocated.
Use this command to deploy MySQL with K3s:
kubectl apply -f mysqldb-deployment.yaml
######OutPut########
# kubectl apply -f mysqldb-deployment.yaml
#############
Give Kubernetes a few minutes to provision your MySQL pod and use the following command to confirm is the container is ready:
$ kubectl get pods
######OutPut########
NAME                                 READY   STATUS    RESTARTS   AGE
mysqldb-deployment-d48f879cf-jkb5t   1/1     Running   0          91s
Running K3s MySQL Pod with Kubernetes Service
A Kubernetes service exposes a container so you can use it. Once the Pod has allocated port 3306 to MySQL, Kubernetes will then need an access point using the Kubernetes service.
And create something simple as such:
touch mysqldb-service.yaml
# the API version
# service object
apiVersion: v1
kind: Service
# Metadata for the Service
metadata:
  name: mysqldb-service
spec:
  # the ports exposed by the Service
  ports:
    # The port that the Service will expose
    - port: 3306
  # Selector to match pods with the deployment label
  # app: mysqldb-deployment
  selector:
    app: mysqldb-deployment
  # Set up a headless service with cluster IP
  clusterIP: None
kubectl apply -f mysqldb-service.yaml
######OutPut########
# service/mysqldb-service created
#############
Running the K3s Kubernetes Container-persistent-storagester with MySQL
Everything is now to you will need to execute these commands as such:
- Run the deployment:
kubectl apply -f mysqldb-deployment.yaml
- Expose the deployment with a Kubernetes service:
kubectl apply -f mysqldb-service.yaml
Give Kubernetes time to set everything up and use the following command to confirm if the MySQL pod is ready:
kubectl get pods
NAME                                 READY   STATUS    RESTARTS   AGE
mysqldb-deployment-d48f879cf-jkb5t   1/1     Running   0          6m28s
Note: In this case, the pod name will be
mysqldb-deployment-d48f879cf-jkb5tTo access the database, un an interactive Kubernetes shell to access the above pod as such:
kubectl exec --stdin --tty pod-name -- /bin/bash
## For exmaple#
kubectl exec --stdin --tty mysqldb-deployment-d48f879cf-jkb5t -- /bin/bash
Access the Mysql Shell with this command:
mysql -p
$ kubectl exec --stdin --tty mysqldb-deployment-d48f879cf-jkb5t -- /bin/bash
bash-5.1#
bash-5.1# mysql -p
Enter password:
The Next step is to add the MySQL password as added in the MYSQL_ROOT_PASSWORD. Here, the password will be root_pass, or whatever value you added as such:
bash-5.1# mysql -p
Enter password:
Welcome to the MySQL monitor.  Commands end with ; or \g.
Your MySQL connection id is 9
Server version: 8.0.38 MySQL Community Server - GPL

Copyright (c) 2000, 2024, Oracle and/or its affiliates.

Oracle is a registered trademark of Oracle Corporation and/or its
affiliates. Other names may be trademarks of their respective
owners.

Type 'help;' or '\h' for help. Type '\c' to clear the current input statement.

mysql>
You now have access to the MySQL database. You can run a command to access the database. For this case, K3s will have initialized MySQL with a test_db. You’ll use:
SHOW DATABASEs;
Command to check such:
mysql> SHOW DATABASES;
+--------------------+
| Database           |
+--------------------+
| information_schema |
| mysql              |
| performance_schema |
| sys                |
| test_db            |
+--------------------+
5 rows in set (0.02 sec)
You can now use this shel to interact with your database. However, this must be the longest way to access MySQL.
phpMyAdmin is a nice tool to get graphical access to MySQL servers. Let’s now use K3s and Kubernetes and access MySQL with phpMyAdmin.
Accessing MySQL with phpMyAdmin on Kubernetes
Just like MySQL, you will use a Kubernetes manifest to create a K3s deployment.
However, in this case, the phpMyAdmin must be in communication with the MySQL pods. You will need to set environment variables with:
- The hostname and the container name of the above created MySQL service,
mysqldb-service. - The port opened to listed MySQL connections, 3306 and
MYSQL_ROOT_PASSWORDto login to phpMyAdmin UI.
Go ahead and create a new file:
touch phpmyadmin-deployment.yaml
Add MySQL phpMyAdmin deployment as follows:
# Define the API version for the deployment object
apiVersion: apps/v1
# Specify the kind of object being created, in this case, a Deployment
kind: Deployment
# Metadata for the Deployment, including the name and labels
metadata:
  # Name of the Deployment
  name: mysql-phpmyadmin-ui
  # Labels to categorize the Deployment
  labels:
    app: mysql-phpmyadmin-ui
# Specification of the Deployment
spec:
  # Number of pod replicas to run
  replicas: 1
  # Selector to match pods
  # label is "app: mysql-phpmyadmin-ui"
  selector:
    matchLabels:
      app: mysql-phpmyadmin-ui
  # Deployment Template for the pod
  template:
    # pods Metadata
    metadata:
      labels:
        app: mysql-phpmyadmin-ui
    spec:
      containers:
        # name the container
        - name: mysql-phpmyadmin-ui
          # Docker image as phpMyAdmin
          image: phpmyadmin/phpmyadmin
          # Define the ports for the container
          ports:
            # phpMyAdmin Port container listens on
            - containerPort: 80
          # container Environment variables
          env:
            # Hostname of the MySQL server
            # (As named in MySQL deployment)
            - name: PMA_HOST
              value: mysqldb-service
            # Port of the MySQL server
            - name: PMA_PORT
              value: "3306"
            # Root password for MySQL
            # (As added in MySQL deployment)
            - name: MYSQL_ROOT_PASSWORD
              value: root_pass
Deploy this cluster to K3s using this command:
kubectl apply -f phpmyadmin-deployment.yaml

######OutPut########
# deployment.apps/mysql-phpmyadmin-ui created
#############
The pods should be ready:
$ kubectl get pods
NAME                                   READY   STATUS    RESTARTS   AGE
mysql-phpmyadmin-ui-77cfd87b5c-vx7sc   1/1     Running   0          69s
mysqldb-deployment-d48f879cf-jkb5t     1/1     Running   0          46m
To access phpMyAdmin on the web, you’ll use NodePort which maps to the pod’s port 80. Create a new service file:
touch phpmyadmin-service.yaml
Update the file and let the service access the mysql-phpmyadmin-ui container as follows:
apiVersion: v1
# kind of object
# a Service
kind: Service
# Service Metadata
metadata:
  # Name of the Service
  name: mysql-phpmyadmin-service
# Specification of the Service
spec:
  # type of Service
  # NodePort
  type: NodePort
  # Selector to match pods
  # Label "app: mysql-phpmyadmin-ui"
  selector:
    app: mysql-phpmyadmin-ui
  # ports exposed
  ports:
    # The protocol OF THIS Service
    - protocol: TCP
      # Port the Service will expose
      port: 80
      # Target port on the pod
      # Service will forward traffic here
      targetPort: 80
kubectl apply -f phpmyadmin-service.yaml

######OutPut########
# service/mysql-phpmyadmin-service created
#############
Let’s check the created services.
kubectl get svc
You will get:
$ kubectl get svc
NAME                       TYPE        CLUSTER-IP     EXTERNAL-IP   PORT(S)        AGE
kubernetes                 ClusterIP   10.43.0.1      <none>        443/TCP        2d5h
mysql-phpmyadmin-service   NodePort    10.43.55.170   <none>        80:31058/TCP   43s
mysqldb-service            ClusterIP   None           <none>        3306/TCP       44m
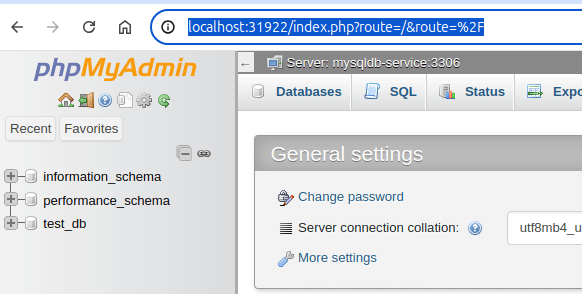
The main focus here is the mysql-phpmyadmin-service. You will need to check its PORT(S) Based on this example, I have 80:31058/TCP. This means the phpMyAdmin will get accessed on http://localhost:31058/ on the web:

You will use the values to log in:
 - name: MYSQL_USER
              value: test_user  # database user
 - name: MYSQL_PASSWORD
              value: user_pass  # Password for the database user
Enter:
- The
test_useras username. - Password will be the value of MYSQL_ROOT_PASSWORD which is
user_pass
Delete all MySQL K3s Resources
To delete all the resources used in this guide, use these commands:
kubectl delete -f pv.yaml
kubectl delete -f pvc.yaml
kubectl delete -f mysqldb-deployment.yaml
kubectl delete -f mysqldb-service.yaml
kubectl delete -f phpmyadmin-deployment.yaml
kubectl delete -f phpmyadmin-service.yaml
Conclusion
You have learned how to perfectly create and run a MySQL database with Kubernetes K3s cluster. You learned:
- How to create MySQL Kubernetes K3s deployments and Services.
- Pesisitng MySQL data within the K3s cluster.
- How to use phpMyAdmin with K3S and access a MySQL Kubernetes cluster.
Written By: