Add localHost Domain HTTPS with Let's Encrypt SSL Certificate Issuer | SelfSigned
Posted November 16, 2023
Learn how to secure your local domain with an easy step-by-step guide on acquiring an SSL certificate for your local domain from Let’s Encrypt. A self-signed certbot certificate issuer to local SSL, alias Localhost Network.
In this section, we will be discussing how to use a Let’s Encrypt SSL certificate issuer to secure your local host domains. In summary, you will learn:
- Why do you need an SSL certificate for a local domain.
- The best way to add a local issuer certificate with certbot, OpenSSL, or let’s encrypt.
- Add your Chrome, Postman, or Firefox local SSL certificate.
- Step-by-step process of acquiring an HTTPS certificate for a local domain from Let’s Encrypt.
- How to add local domain SSL certificate on Windows, Linux, and macOS.
- How to add local domain SSL localhost certificate to Browsers such as Chrome, Mozilla Firefox, and Postman.
Even Google advocates local domains to adopt HTTPS SSL encryption. Dive in and Boost your Localhost Network trust. Let’s encrypt local domains!
What you Need to Create SSL HTTPS Certificate for Local Domain
Local domains SSL certificates create secure communication between your browser and the server, even in a local environment. It encrypts data, prevents unauthorized access, and enables the use of HTTPS for testing and development purposes.
You will need:
- A working HTTPS local server. Here ia guide to Create a HTTPS Server on NodeJS with Express & CreateServer.
- Basic Understanding of SSL/TLS.
Why Do You Need a Self-Signed SSL Certificate for Your Localhost Network?
Don’t underestimate the importance of securing your local domain on your local machine. The development environment, most of the time, ignores secure protocols. Localhost SSL certificate encrypts sensitive information transmitted between your browsers and your server. So, to say, you will avoid potential security breaches and ensure their data stays safe.
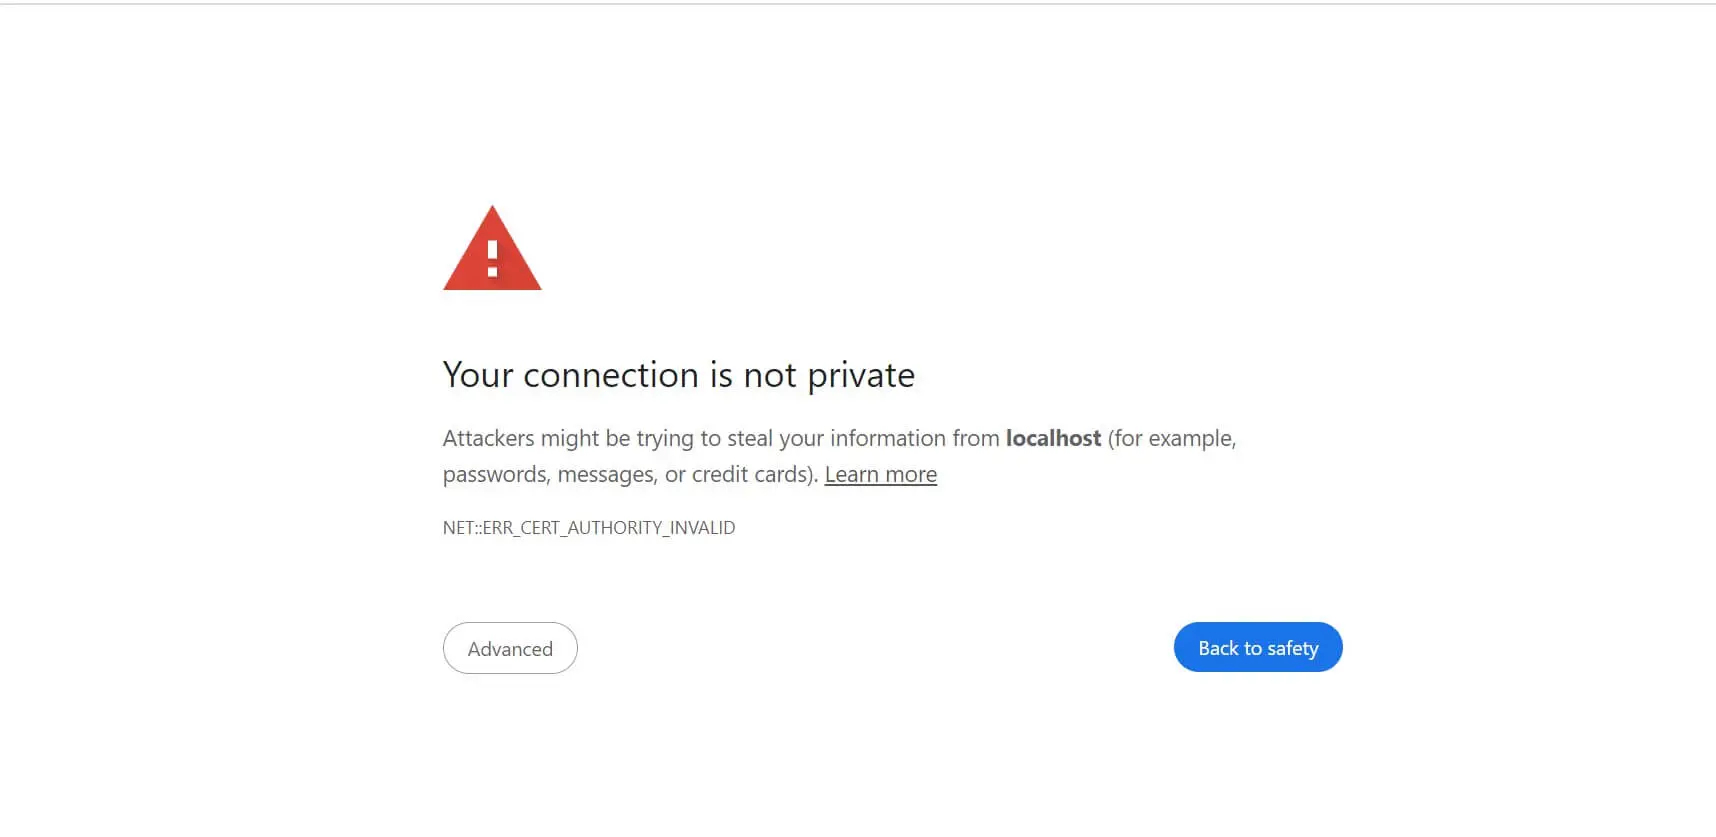
Seeing the “HTTPS” in your URL and the padlock icon before your domain assures information is safe and that you are taking the necessary measures to secure your data. For the development environment, you need to mirror production HTTPS. This way, you avoid seeing the security concern messages, such as the following in Chrome:
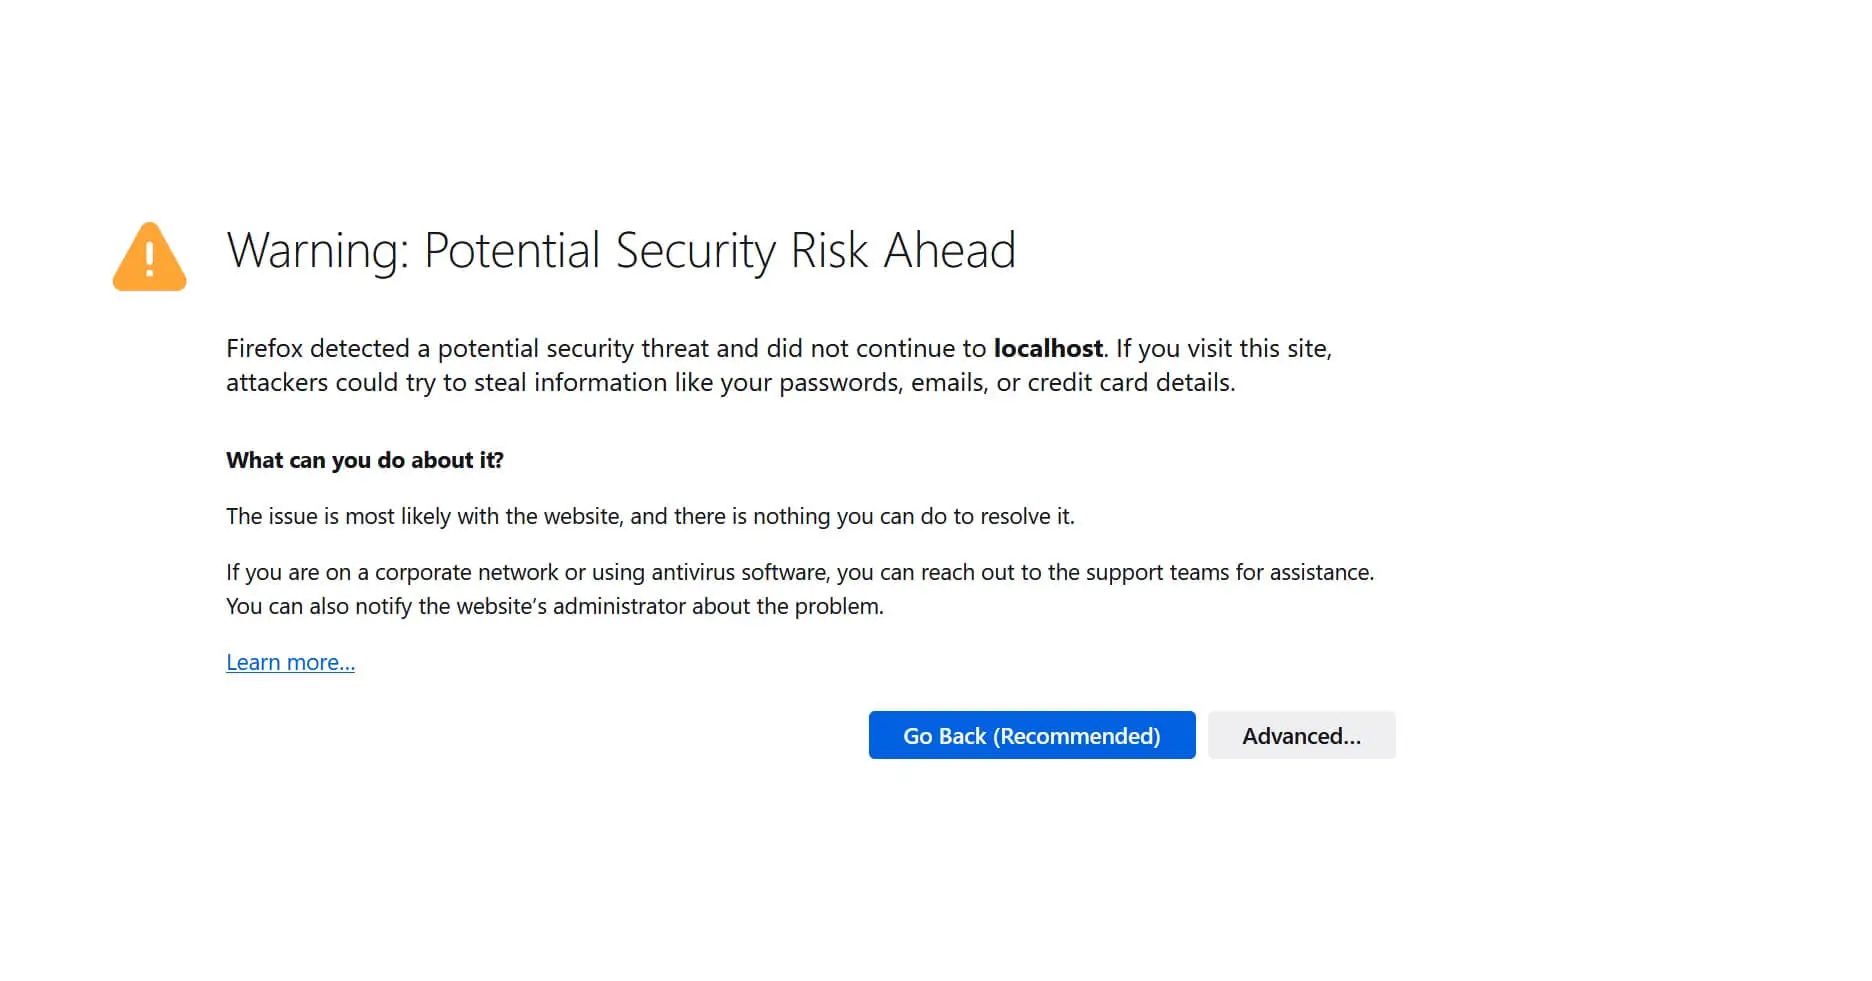
Even Firefox isn’t left behind on this, and the gist is the same:
Why Choose Let’s Encrypt for Local Domain SSL Certificate Issuer?
The reason to choose Let’s Encrypt for your local domain is that it is free. Obtaining an SSL certificate from other providers can be costly, considering you only need it for local HTTPS SSL.
Let’s Encrypt SSL certificates are trusted by major Web browsers. Their open certificate authority (CA) and automated process make setting up HTTPS encryption on your local domain a breeze.
The Meat: Step-by-Step Process of Adding Local Domain SSL Certificate Issuer from Let’s Encrypt
Now that you understand the dos and don’ts of having an SSL certificate for your local domain, it’s time to acquire one. Let’s dive in and get let’s encrypt cert ready for localhost. Follow these steps:
Step 1: Install Let’s Encrypt CA Certificate using OpenSSL
You must install Let’s Encrypt on your operating system before proceeding. No providers have a CA certificate for localhost domains. It is locally hosted and only owned by your computer. In this case, you need to Self-Sign the CA yourself, actually generating a root CA certificate locally.
Follow these instructions for your OS.
Step 2: Acquiring Local Root Certificate for macOS and Linux
A digital Certificate is a combination of private keys. To generate a Root Certificate, you need to generate a private key. This is done differently based on your OS. Here is how Unix-like operating systems generate the key:
- For macOS, you might have to install OpenSSL, so run the following command:
brew install openssl
- Almost Every Linux distro has OpenSSL installed on the fly. If so, you can use your distro install command and get OpenSSL ready.
While on macOS and Linux Certificate set up, create a directory to manage your certificates as follows:
mkdir cert
cd cert
Now generate local CA private key using OpenSSL:
openssl genrsa -out CA.key -des3 2048
You will be required to provide a security passphrase for your .key files. Do so when prompted. Make sure you use this passphrase as you need it later:
$ openssl genrsa -out CA.key -des3 2048
Generating RSA private key, 2048 bit long modulus (2 primes)
............................................................+++++
................................................................................+++++
e is 65537 (0x010001)
Enter pass phrase for CA.key:
Verifying - Enter pass phrase for CA.key:
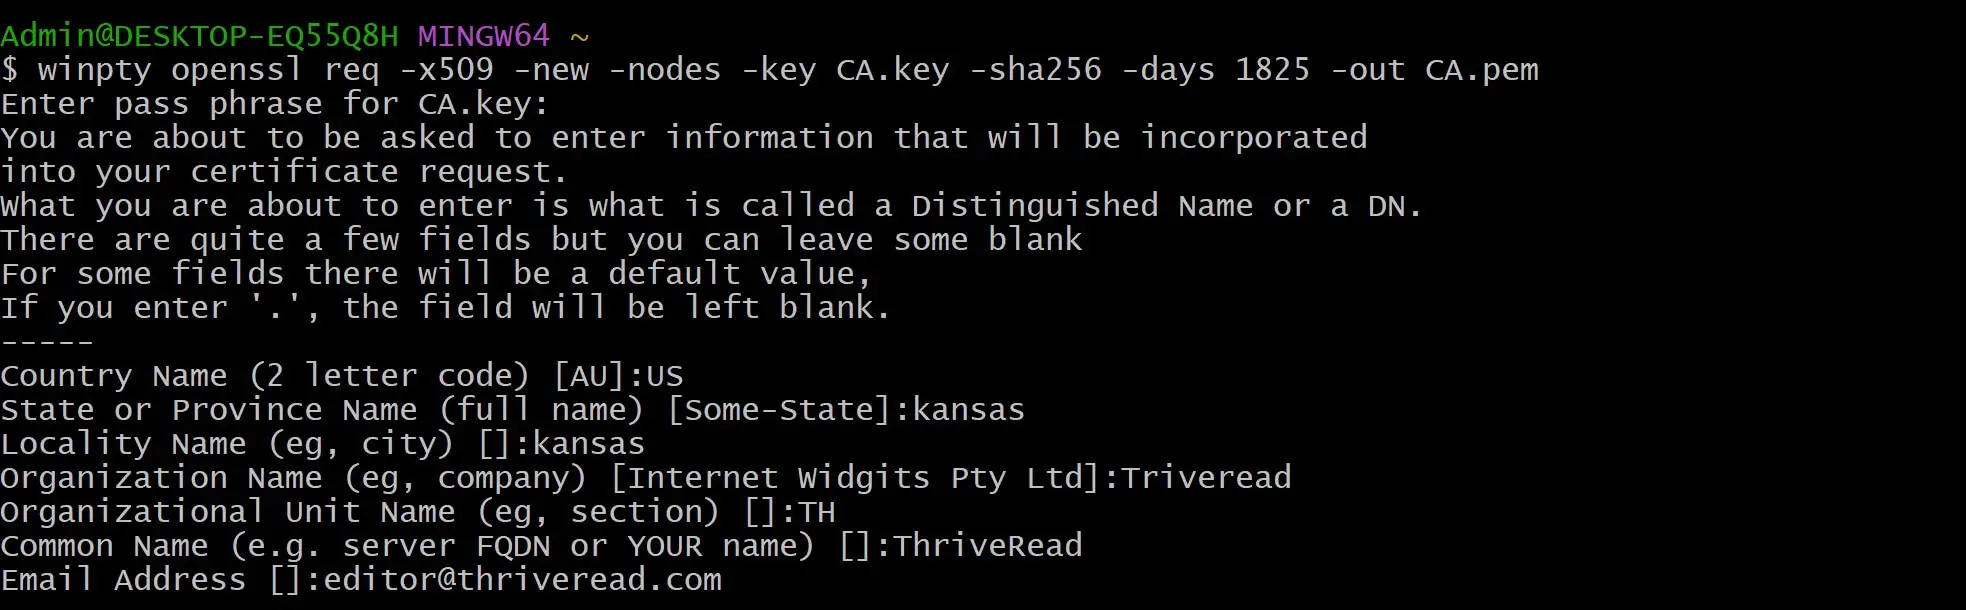
The next step is generating a root certificate using the following command:
openssl req -x509 -new -nodes -key CA.key -sha256 -days 1825 -out CA.pem
This is where you need your previous passphrase to access your .key file. Do so as well to other prompted fields:

At this point, you have your Linux or macOS CA ready. You have the Root SSL certificate ready.
Step 3: Acquiring Local Root Certificate for Windows
If you are looking to run an HTTPS local domain SSL certificate on Windows, you can most likely use Windows Subsystem for Linux (WSL). Then, follow the above Linux-based steps.
But indeed, the simple way is to have Git for Windows as it has OpenSSL that you can use right on your Git Bash utility.
First, create a directory to manage your certificates as follows:
mkdir cert
cd cert
Then open the cert directory with your Git Bash utility and generate the Private key using the following command:
winpty openssl genrsa -des3 -out CA.key 2048
Here is your simple output, obviously after adding a passphrase when prompted:
$ winpty openssl genrsa -des3 -out CA.key 2048
$ openssl genrsa -out CA.key -des3 2048
Generating RSA private key, 2048 bit long modulus (2 primes)
............................................................+++++
................................................................................+++++
e is 65537 (0x010001)
Enter pass phrase for CA.key:
Verifying - Enter pass phrase for CA.key:
You will then generate a root certificate using the following command:
winpty openssl req -x509 -new -nodes -key CA.key -sha256 -days 1825 -out CA.pem
Add your pass keys and other optional information when prompted:
If you are want to use a zero-config setup to create local trusted development certificates, check this guide and learn how to use Mkcert on Windows|Linux|Ubuntu with Localhost SSL HTTPS Certificates
Step 4: Letting Your OS Trust the Created Root SSL CA Certificate
At this point, you are the CA for the computer you own. However, your computer still can figure out how to use and trust the certificate you generated. Here is how to add:
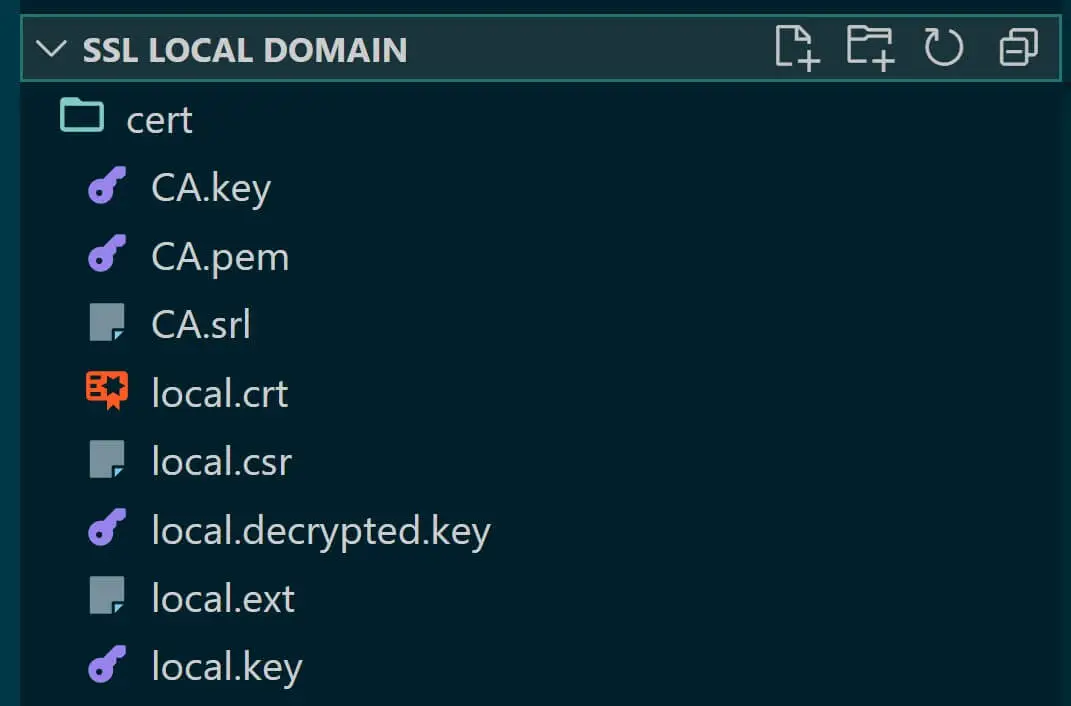
In your working directory cert, create a new file local.ext:
touch local.ext
Open this file based on the editor you are using, for example:
nano local.ext
Step 5: Creating a Local Domain SSL Certificate
This local.ext file will define the Subject Alternative Name (SAN) for the certificate. It contains the configuration for DNS and the IP address you want to add SSL to. In this, you will use the localhost equivalent of IP 127.0.0.1 . Add the following to your file:
# SpecifY the attributes for the certificate

# Set authorityKeyIdentifier to identify the key and issuer of the certificate
authorityKeyIdentifier = keyid,issuer

# Define basicConstraints, indicating this certificate is not a Certificate Authority (CA)
basicConstraints = CA:FALSE

# Specify the allowed key usages for the certificate
keyUsage = digitalSignature, nonRepudiation, keyEncipherment, dataEncipherment

# Define the subject alternative names section
subjectAltName = @alt_names

# This section includes alternative names for the certificate

[alt_names]
# Specify DNS name(s)
DNS.1 = localhost

# Define LOCAL IP address
IP.1 = 127.0.0.1
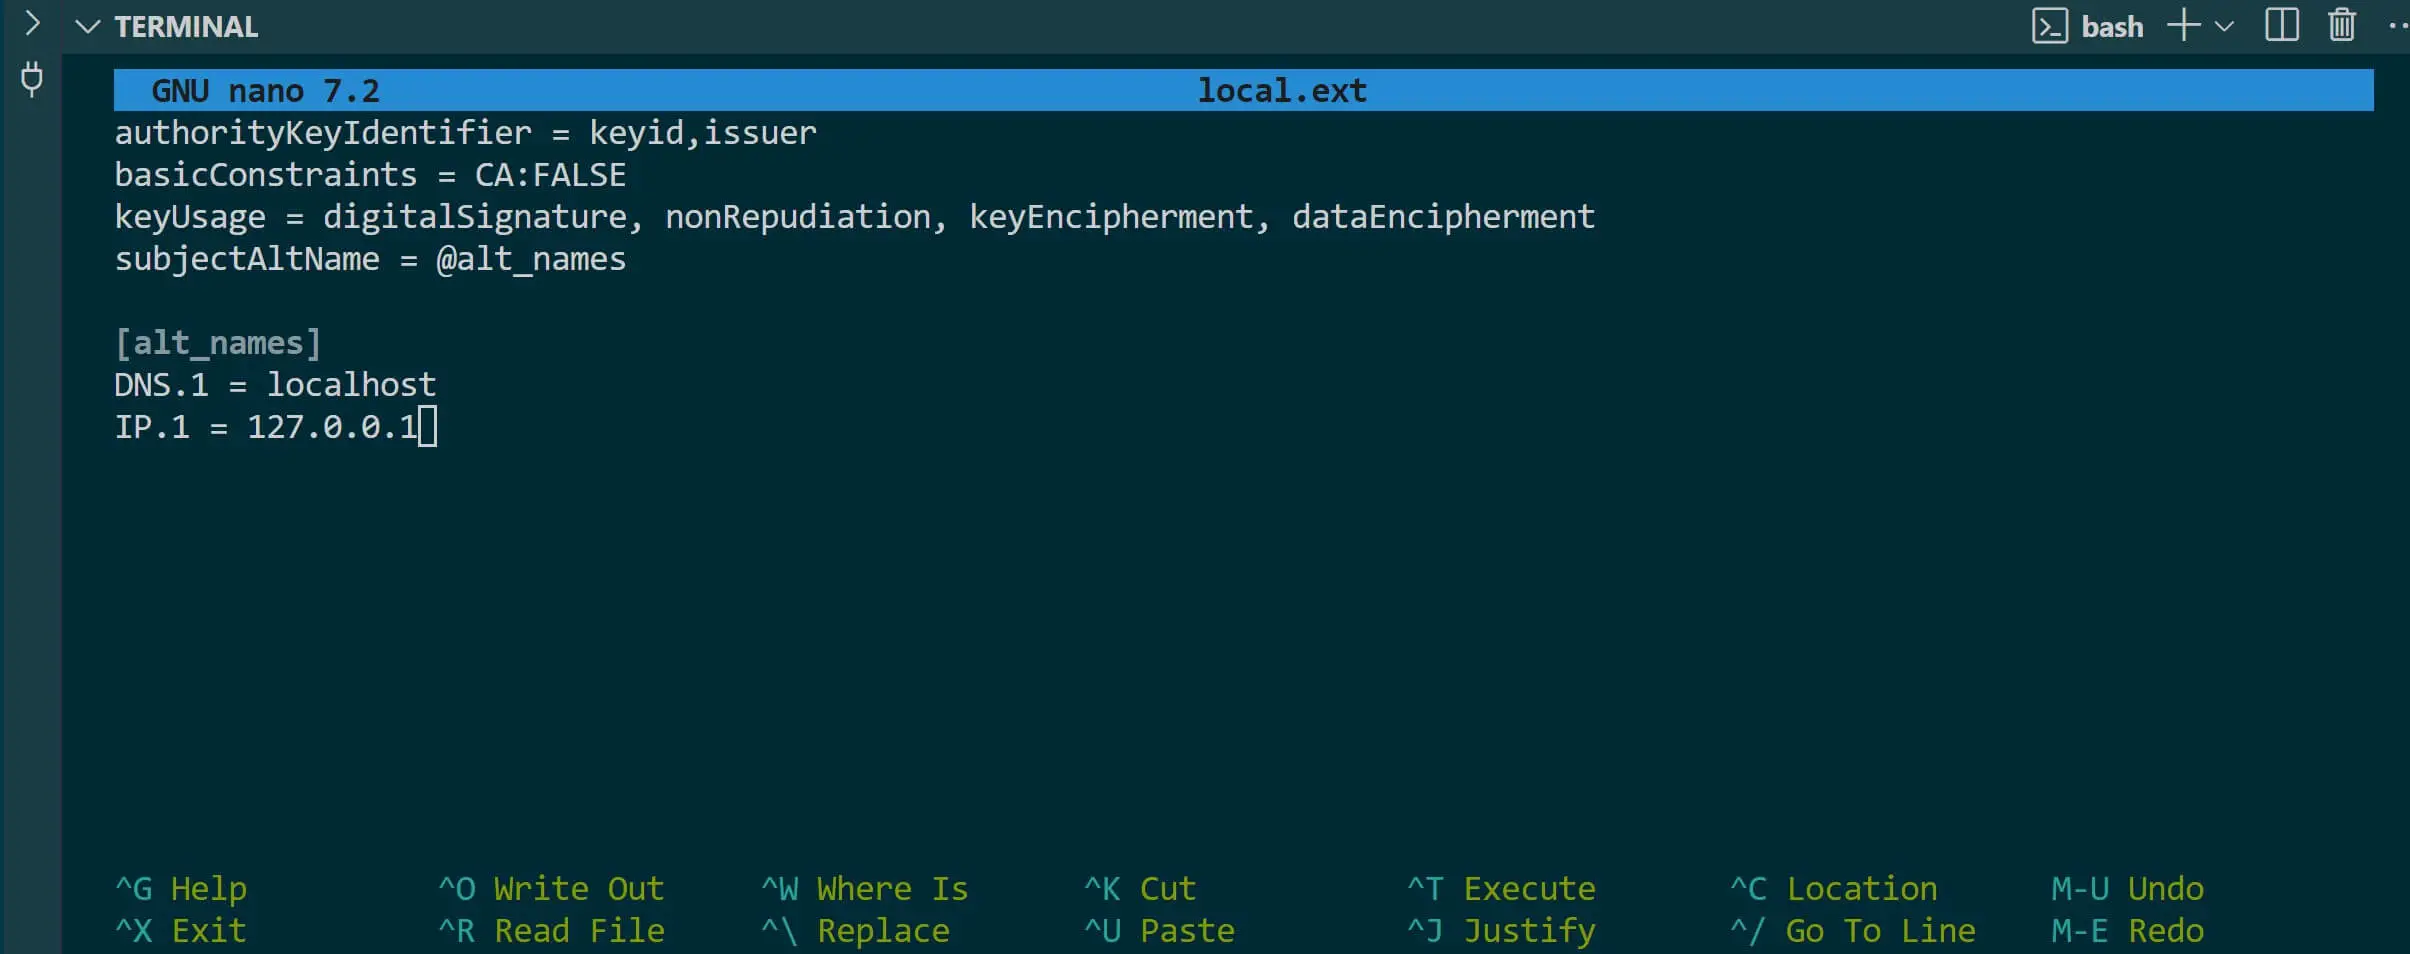
Save your file and exit your editor.
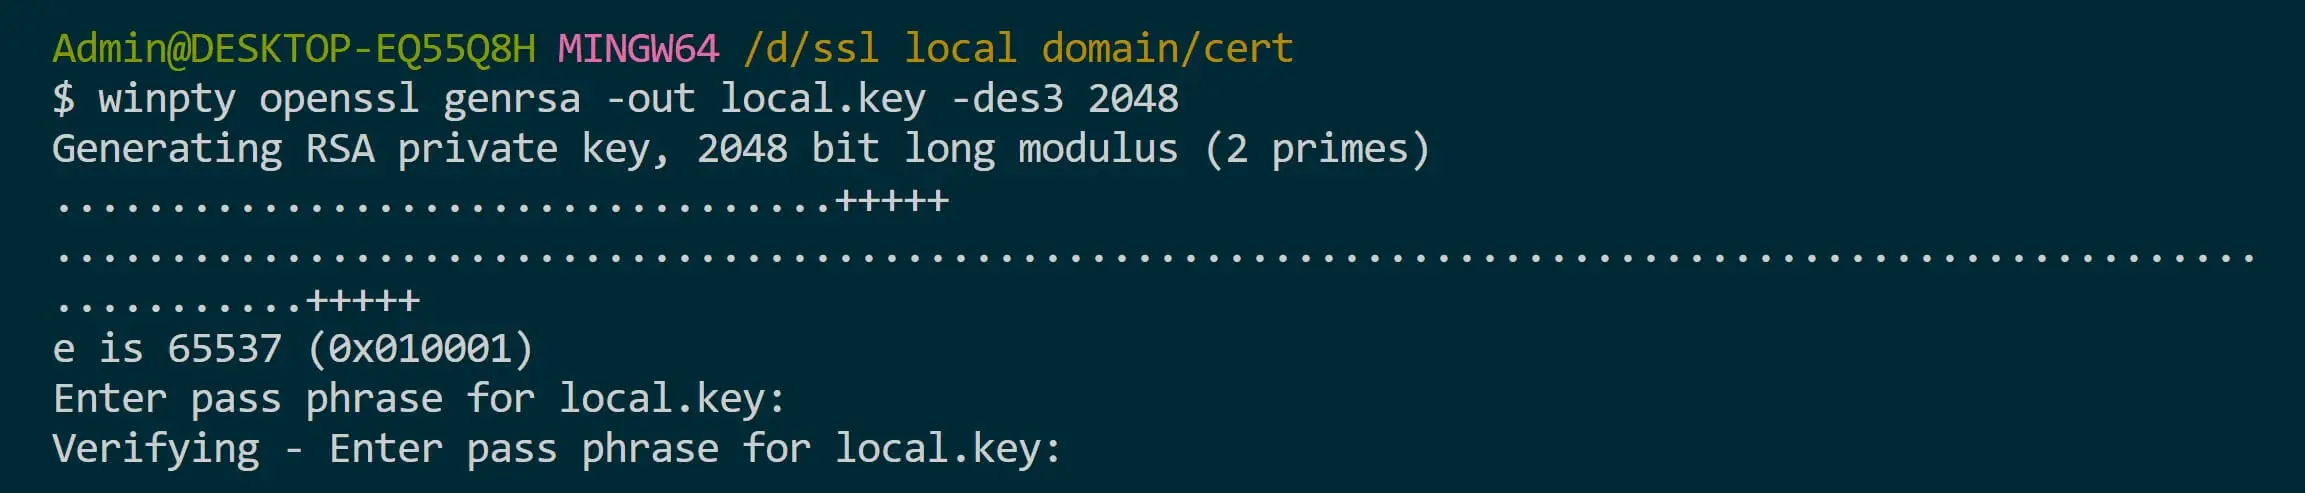
Step 6: Generate CSR (Certificate Signing Request) Keys
Now let’s generate CSR key for local.ext using the following command:
# Linux/macOS
openssl genrsa -out local.key -des3 2048
# Windows Git Bash
winpty openssl genrsa -out local.key -des3 2048
Once done, it is time to generate the actual CSR:
# Linux/macOS
openssl req -new -key local.key -out local.csr
# Windows Git Bash
winpty openssl req -new -key local.key -out local.csr
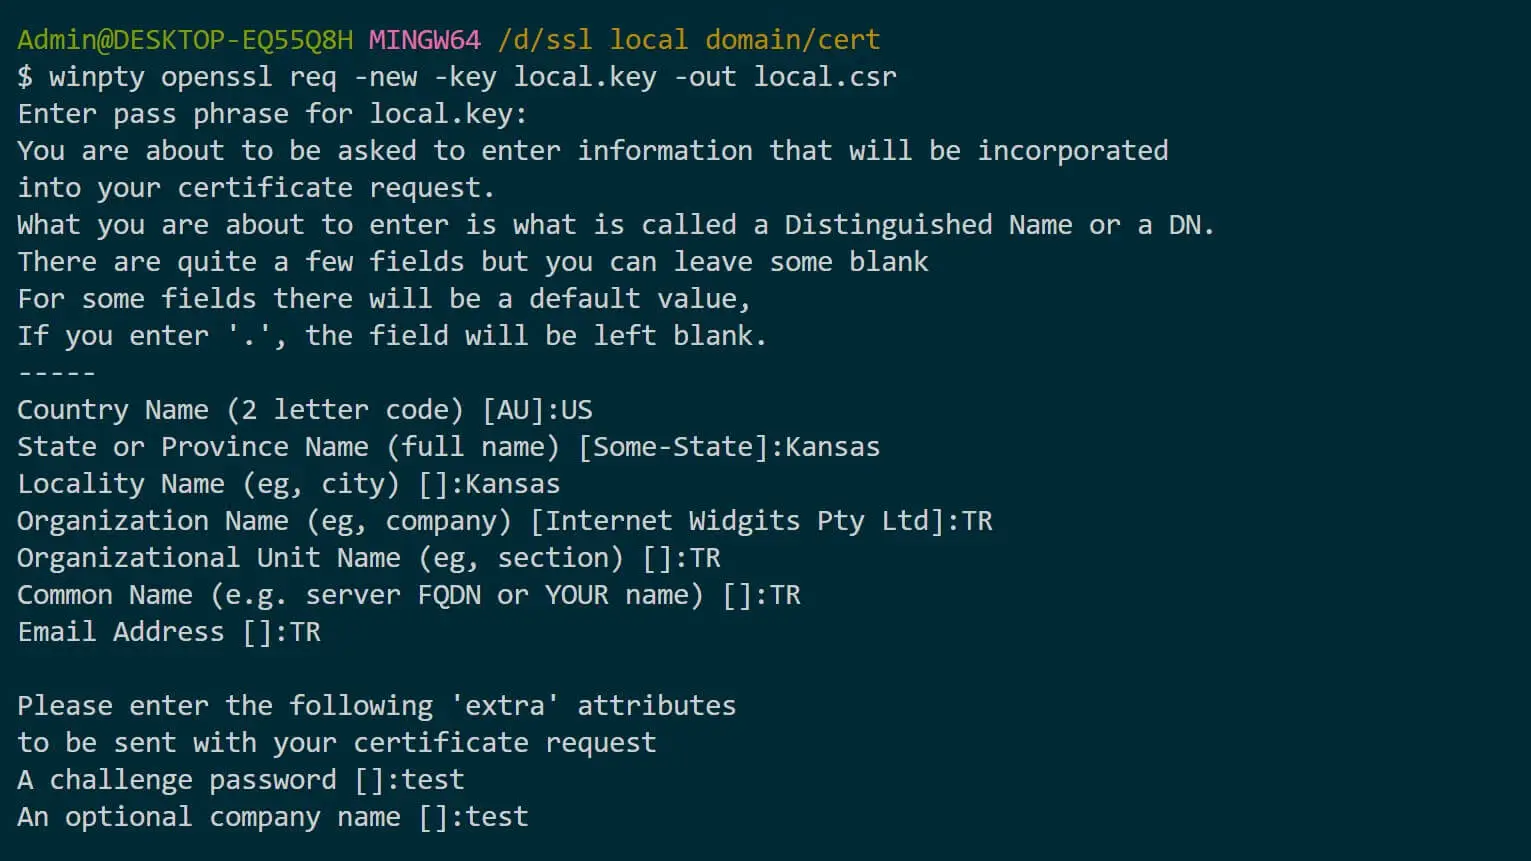
This way, you can now get your CA key and sign the certificate. Make sure you are executing this command in your cert path and that your CA.pem reflects as such. You will be required to add the CA.pem passphrase you used earlier:
# Linux/macOS
openssl x509 -req -in local.csr -CA ./CA.pem -CAkey ./CA.key -CAcreateserial -days 3650 -sha256 -extfile local.ext -out local.crt
# Windows Git Bash
winpty openssl x509 -req -in local.csr -CA ./CA.pem -CAkey ./CA.key -CAcreateserial -days 3650 -sha256 -extfile local.ext -out local.crt

Now, here you will have CSR ready in a local.csr file. Your CA will be updated on the CA.pem file to validate the certificate as safe.
The Certificate created will be valid for ten years. However, the certificate needs to access the local.key, and it can only do so if the key is decrypted. So run the following command:
# Linux/macOS
openssl rsa -in local.key -out local.decrypted.key
# Windows Git Bash
winpty openssl rsa -in local.key -out local.decrypted.key

Step 7: Deploying Your Self-Signed Local Domain SSL Certificate to your Computer
We said you are now the CA. Your computer has the key but still can’t use it. Here is You will load the certificate:
Keep in mind this approach will add the certificate globally, and any browser you have will have access to the key:
On macOS, run the following command from your cert directory where the CA.pem is located:
sudo security add-trusted-cert -d -r trustRoot -k "/Library/Keychains/System.keychain" CA.pem
For Linux-based distros, you will use ca-certificates as follows:
- Install ca-certificates:
sudo apt-get install -y ca-certificates
- In your
certdirectory, copy theCA.pemfile to the/usr/local/share/ca-certificatespath as follows:
sudo cp /cert/CA.pem /usr/local/share/ca-certificates/CA.crt
- Now Update the Linux certificate store:
sudo update-ca-certificates
On Windows, the process will use GUI as follows:
- Launch Windows consoles using the Windows + R keys
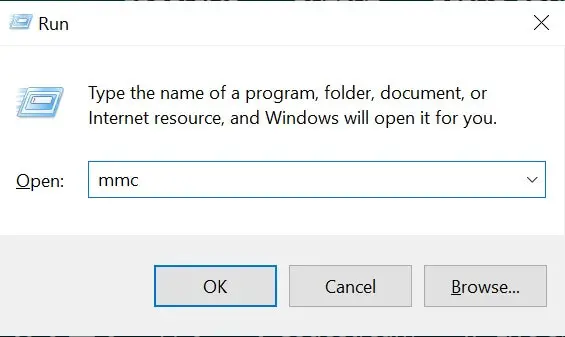
- Add
mmcand click OK to launch the following Window:
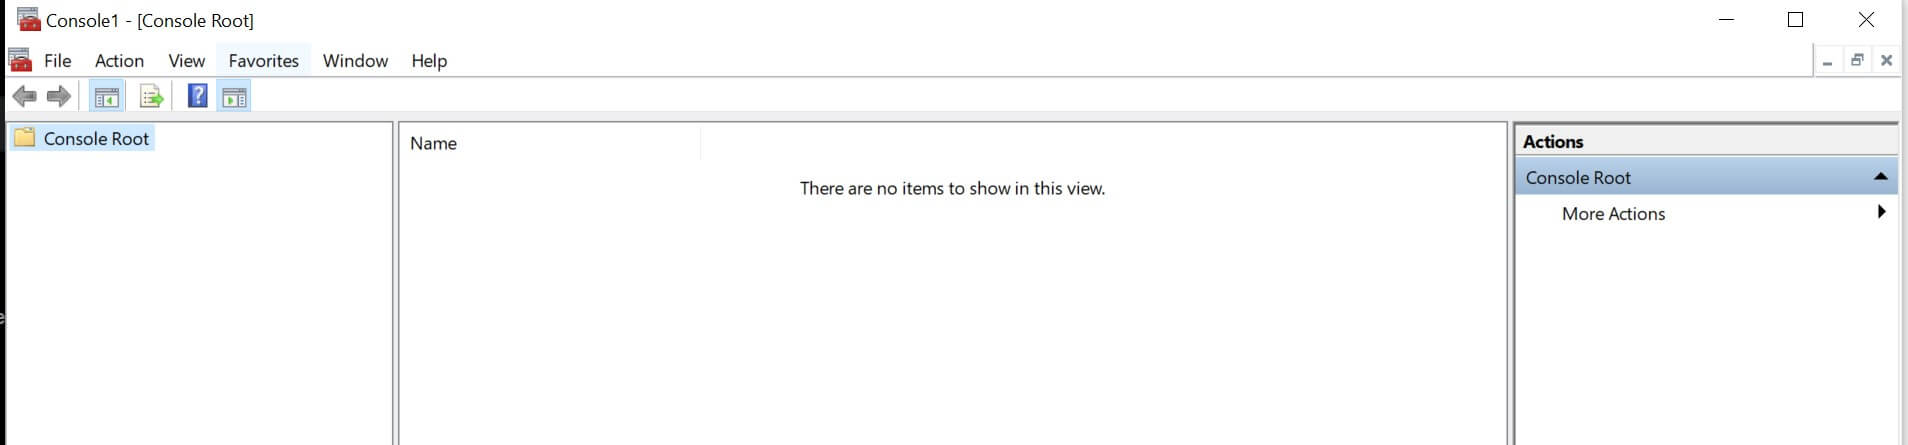
- Navigate to Files> Add/Remove Snap-in > Certificate > Add:
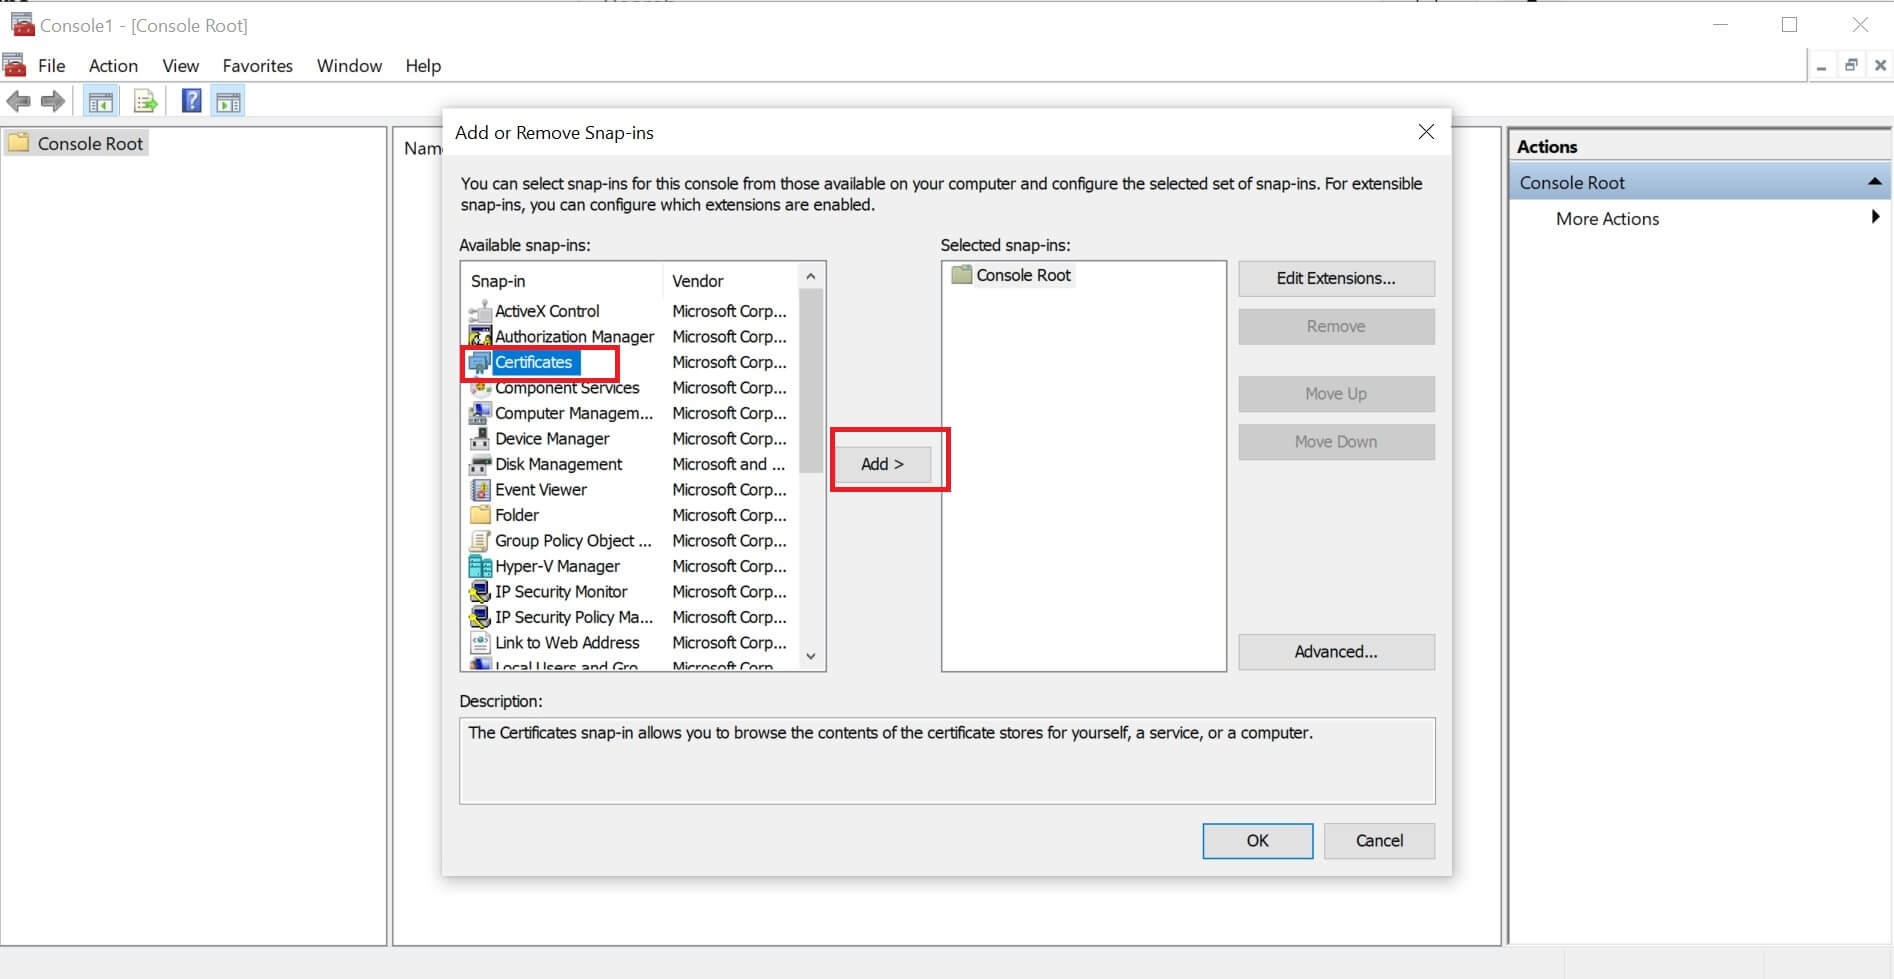
-
Here select Computer Account > Next > Local Computer > Finish > OK:
-
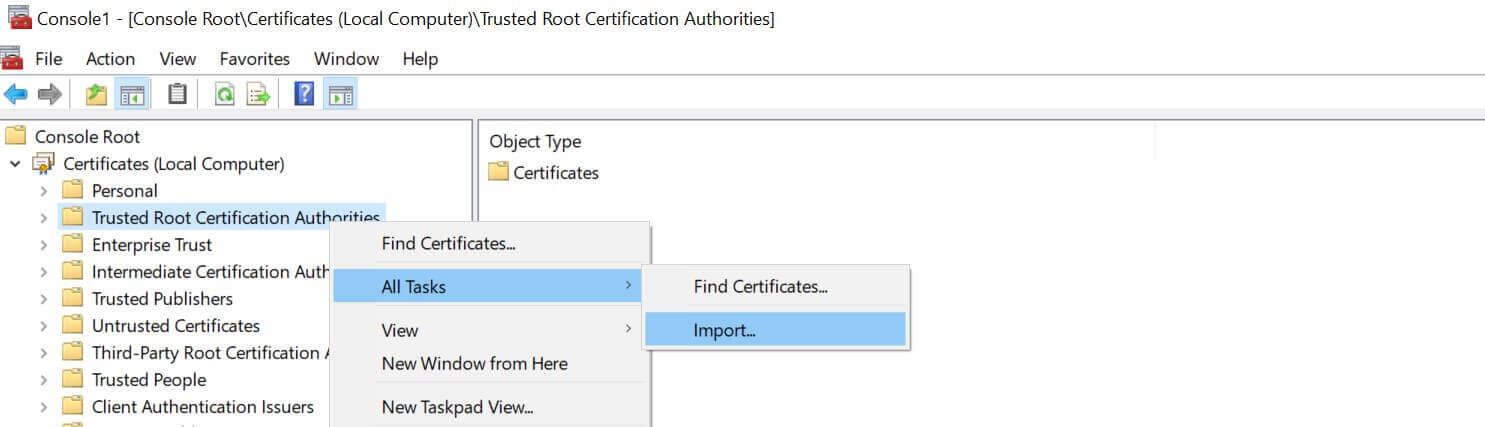
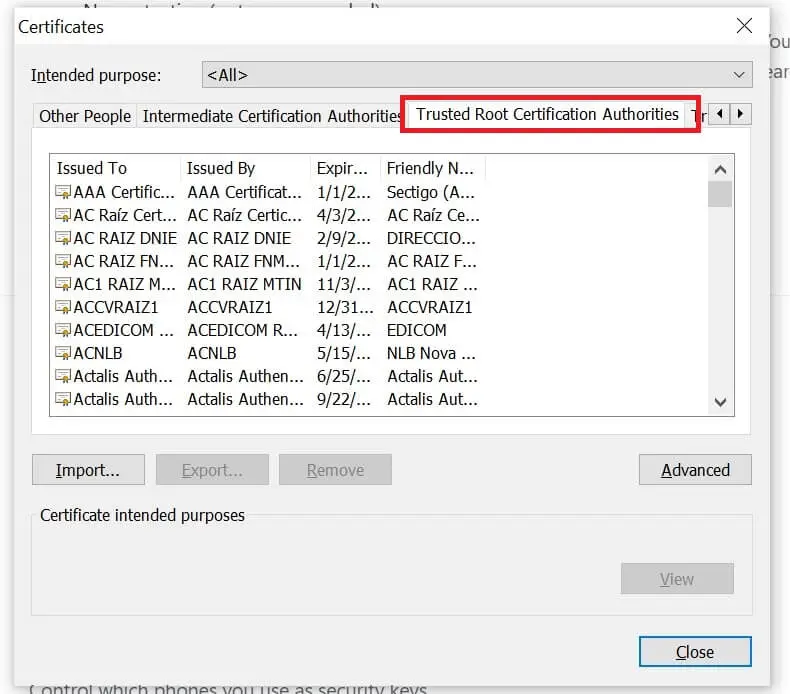
Expand Certificates (local Computer) and right click Trusted Root Certification Authorities > All Tasks > Import:
-
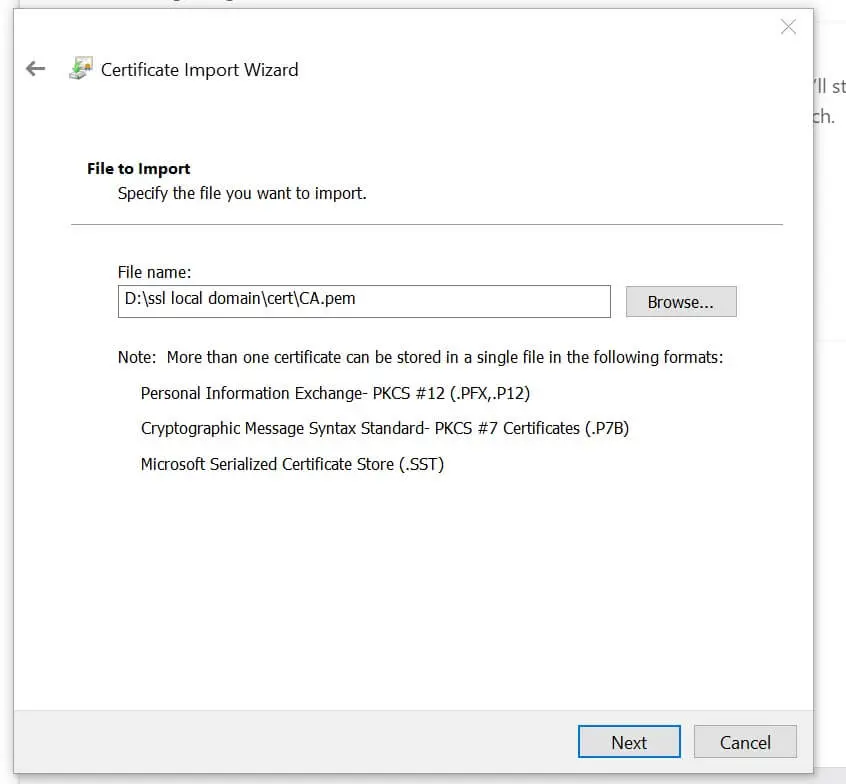
This will launch a Certificate Import wizard, and you need to click Next > Browse.
-
Navigate to your
certdirectory where your CA is stored. You will need to ensure your Explorer has All Files(.) selected, then locate yourCA.pemfile > Open > Next > Place all certificates in the following store > Next > Finish and the Import should be successful.
Step 8: Testing SSL Certificate for Local Domain
It’s time to use your new SSL certificate. Your computer is now ready to secure your localhost domains with HTTPS using the self-signed SSL certificate you just created.
To test this example, I will create a simple Node.js server as follows:
Be sure you create an index.js file that has path access to the ./cert/local.decrypted.key and ./cert/local.crt files as follows:
const https = require('https');
const fs = require('fs');

// Read the key and certificate files
const options = {
// Read the private key file
  key: fs.readFileSync('./cert/local.decrypted.key'),
  // Read the certificate file
  cert: fs.readFileSync('./cert/local.crt')
};

// Create an HTTPS server using the key and certificate
const server = https.createServer(options, (req, res) => {
  // Handle incoming requests
  res.writeHead(200); // Set the response status code
  res.end('Hello world!'); // Send the response content
});

// Define the port number for the server to listen on
const port = 3000;

// Start the HTTPS server and listen on the specified port
server.listen(port, () => {
// Display a message when the server starts
  console.log(`Server is listening on https://localhost:${port}`);
});
Run the following command to start the server:
node index.js
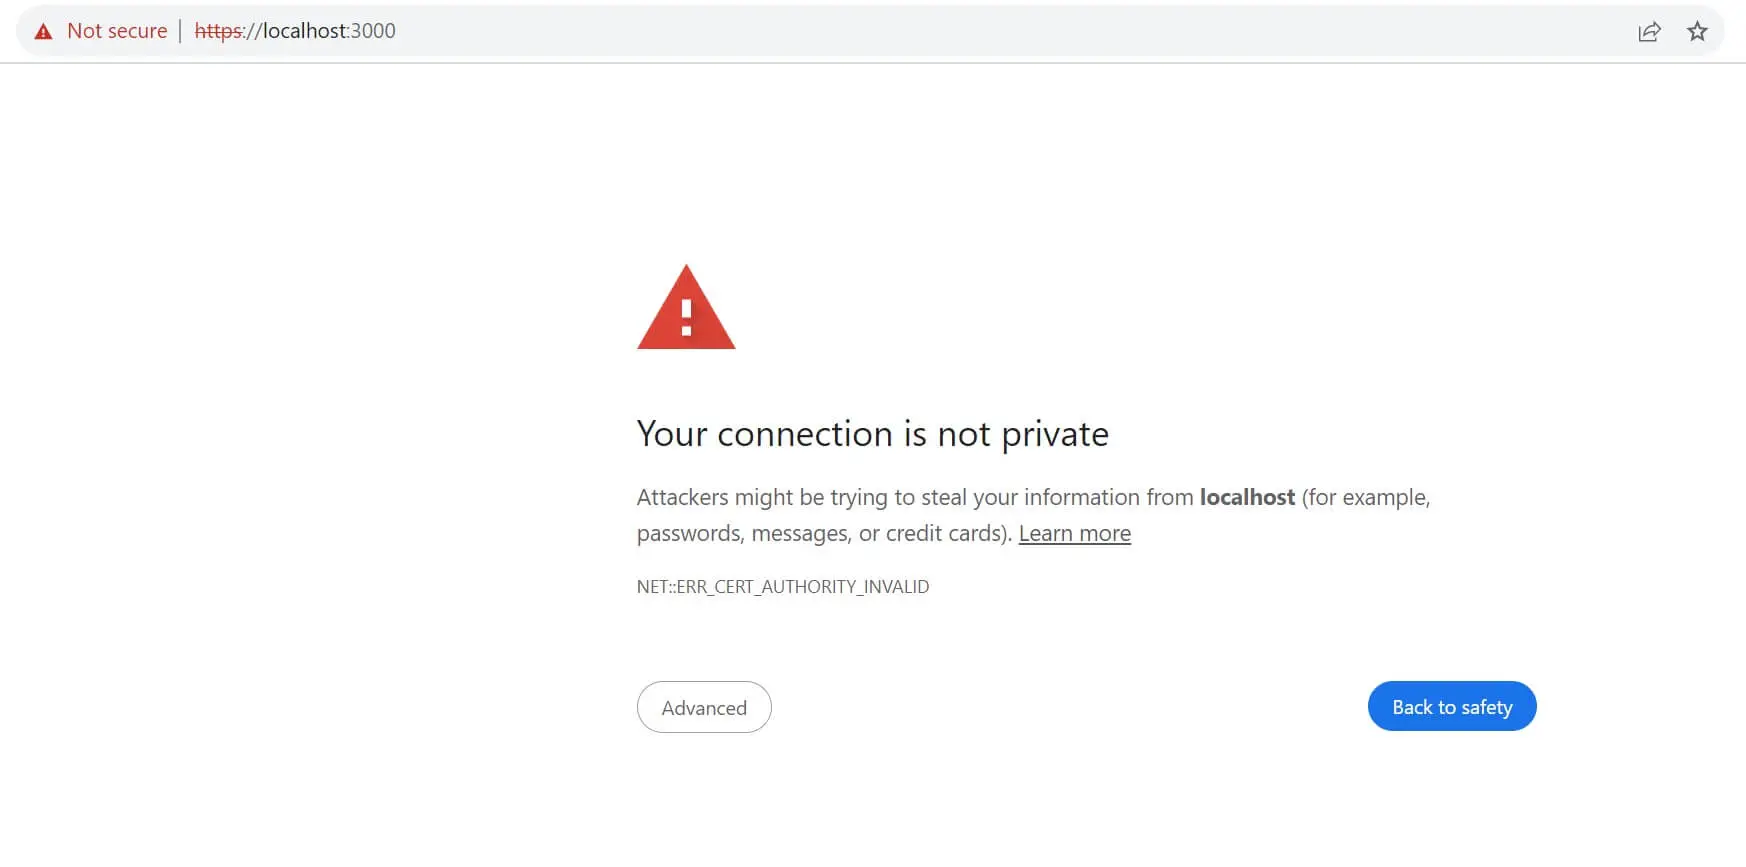
This exposes an HTTPs localhost URL to port 3000 as https://localhost:3000/. At first, if you access this on a browser, it will give you a security error as follows:
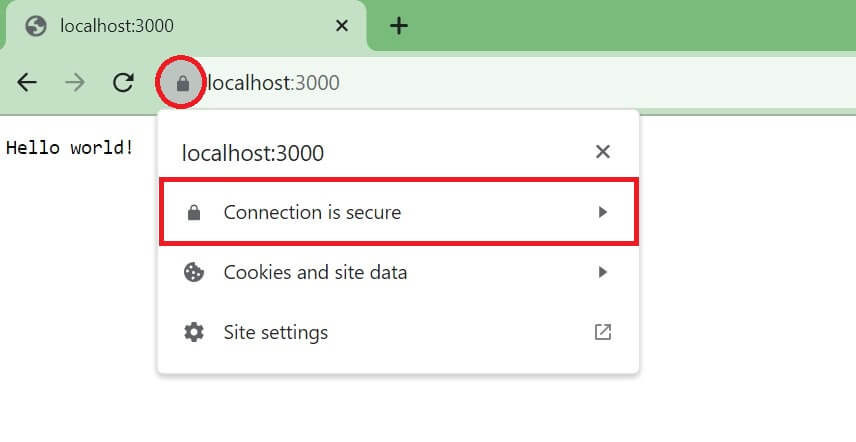
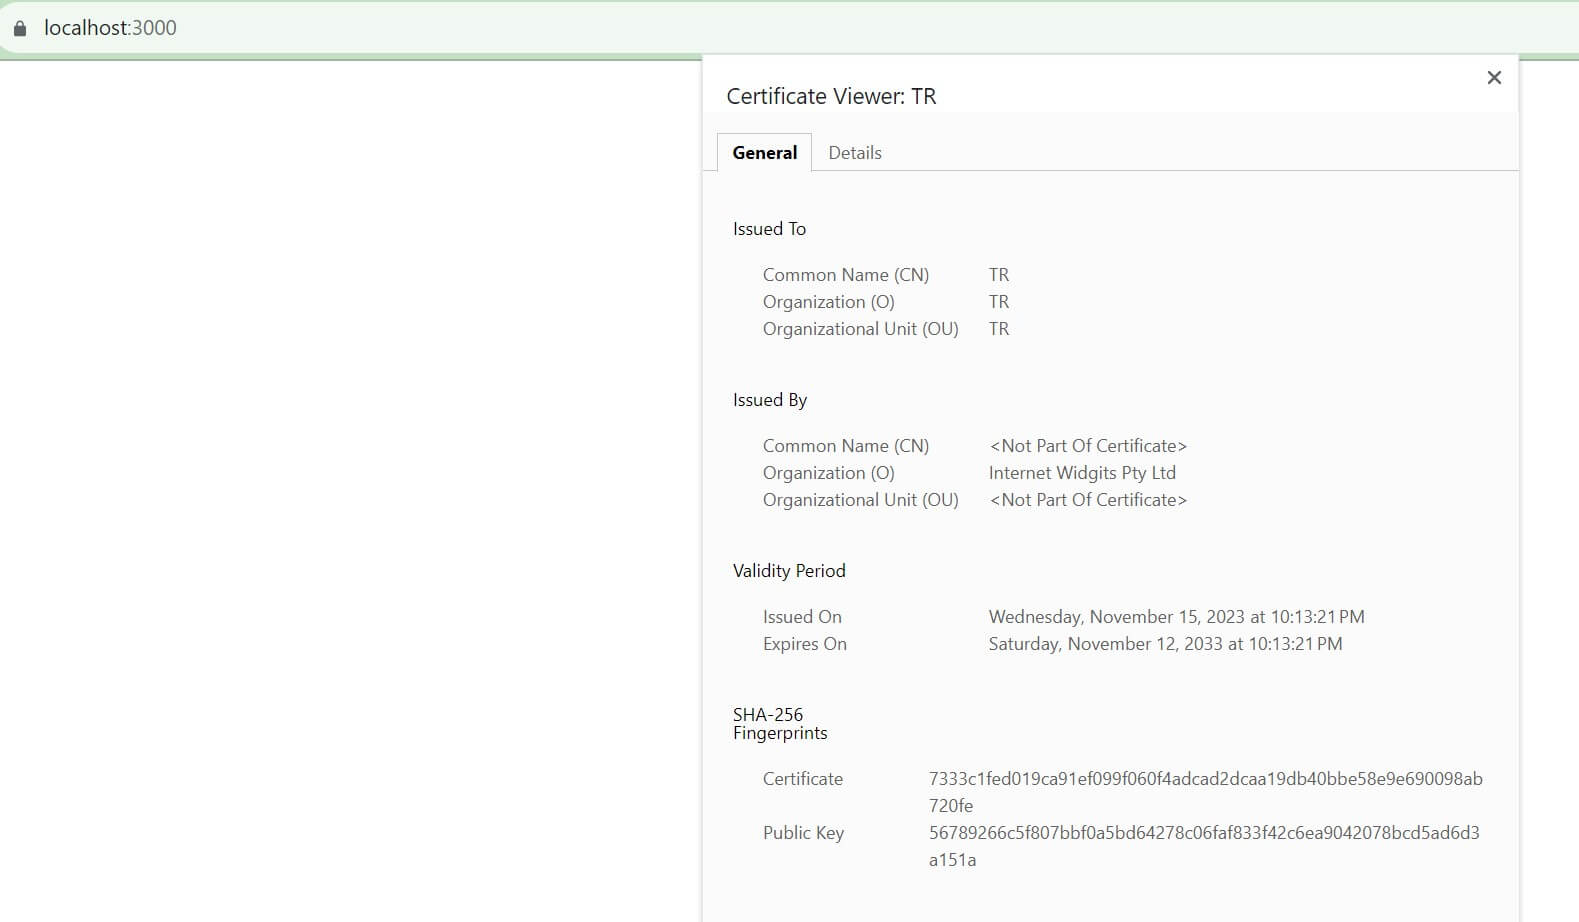
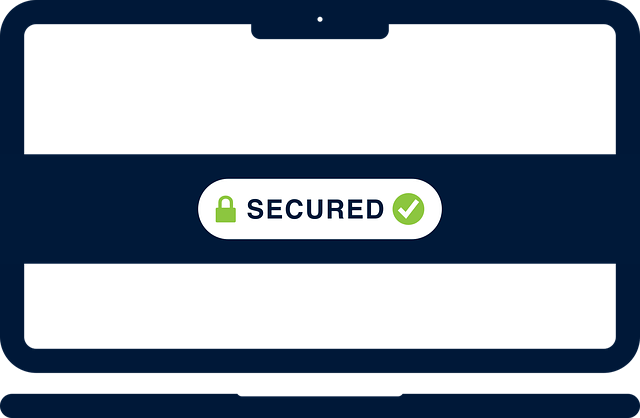
But because you have your local domain SSL certificate, the connection will be secure as follows:
What if this didn’t work for you? Then, you might need to restart your browser or use private/incognito tabs.
Alternatively, you can add your CA directory to your browser as follows:
Step 9: Manually Deploy Self-Signed Local Domain SSL Certificate to Chrome
Here is how to manually add the Let’s Encrypt local domain SSL certificate on Chrome:
- Go to setting > Privacy and security > Security > Manage certificates:
- At this point ensure you have Trusted Root Certification Authorities selected then Click import > Next > Browser and load your
CA.keyfile. Have All Files(.) selected so you can be able to view the.pemfile.
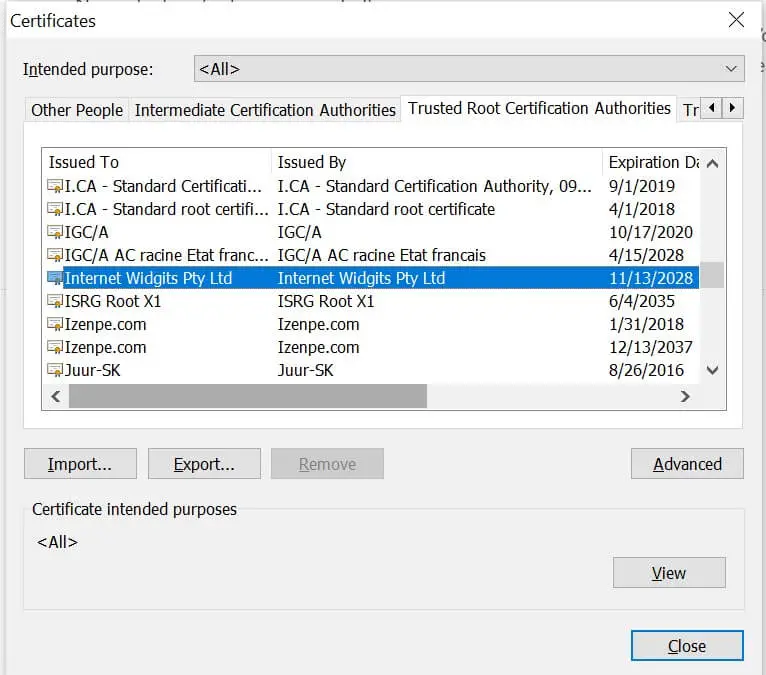
- Click Next > Place all certificates in the following store > Next > Finish. You have CA ready:
Now you can restart your browser or use Incognito mode to test https://localhost:3000/.
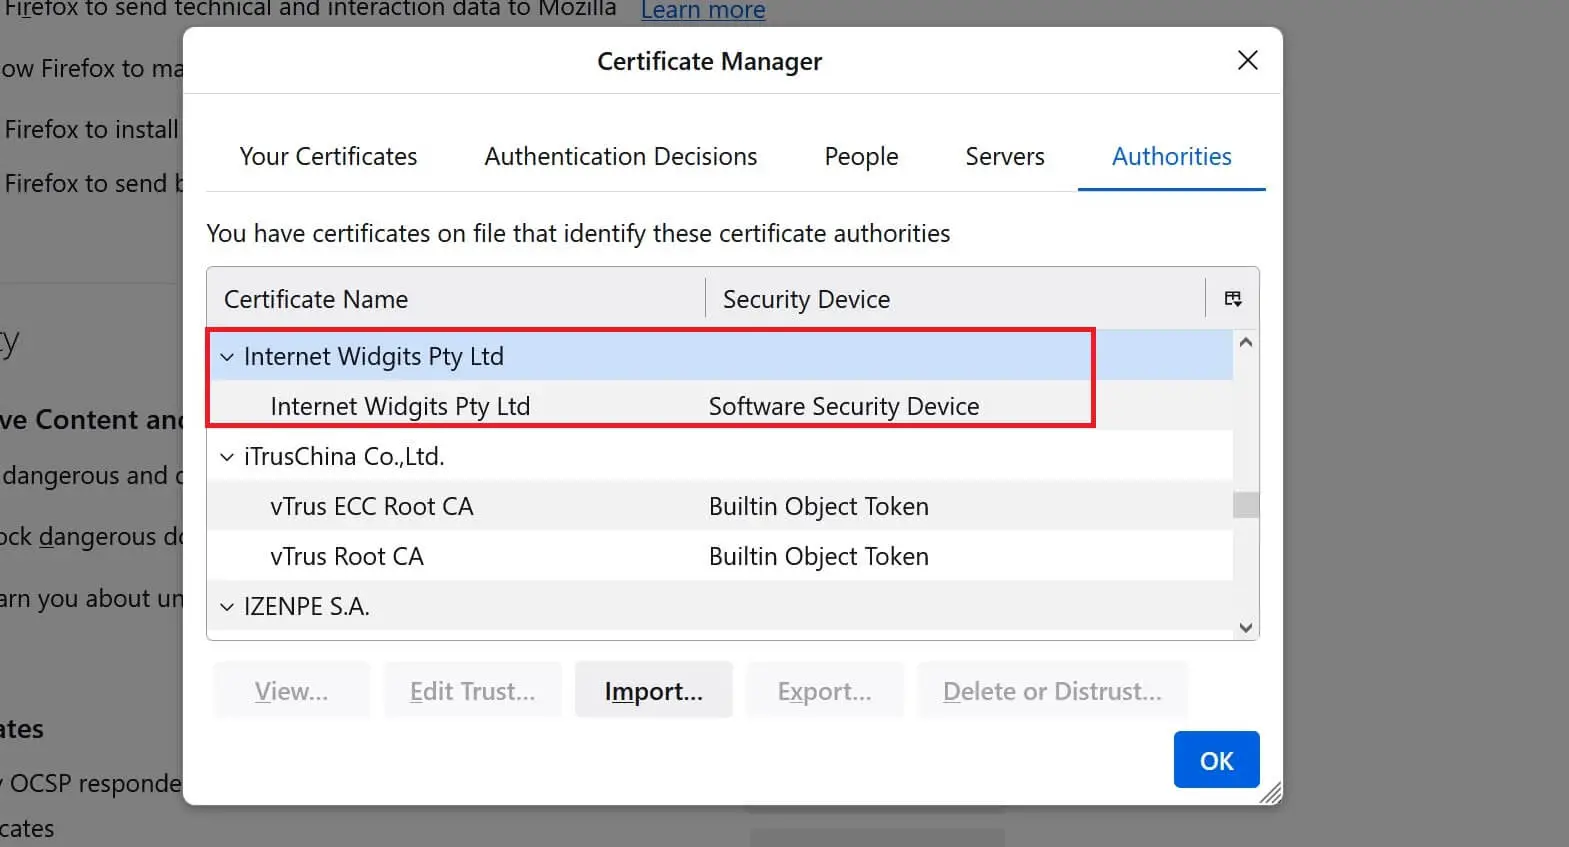
Step 10: Manually Deploy Self-Signed Local Domain SSL Certificate to Mozilla Firefox
If you’re using Mozilla Firefox, load the local domain SSL certificate as follows:
- Go to setting > Privacy & security.
- Scroll to Certificates and click View Certificates:
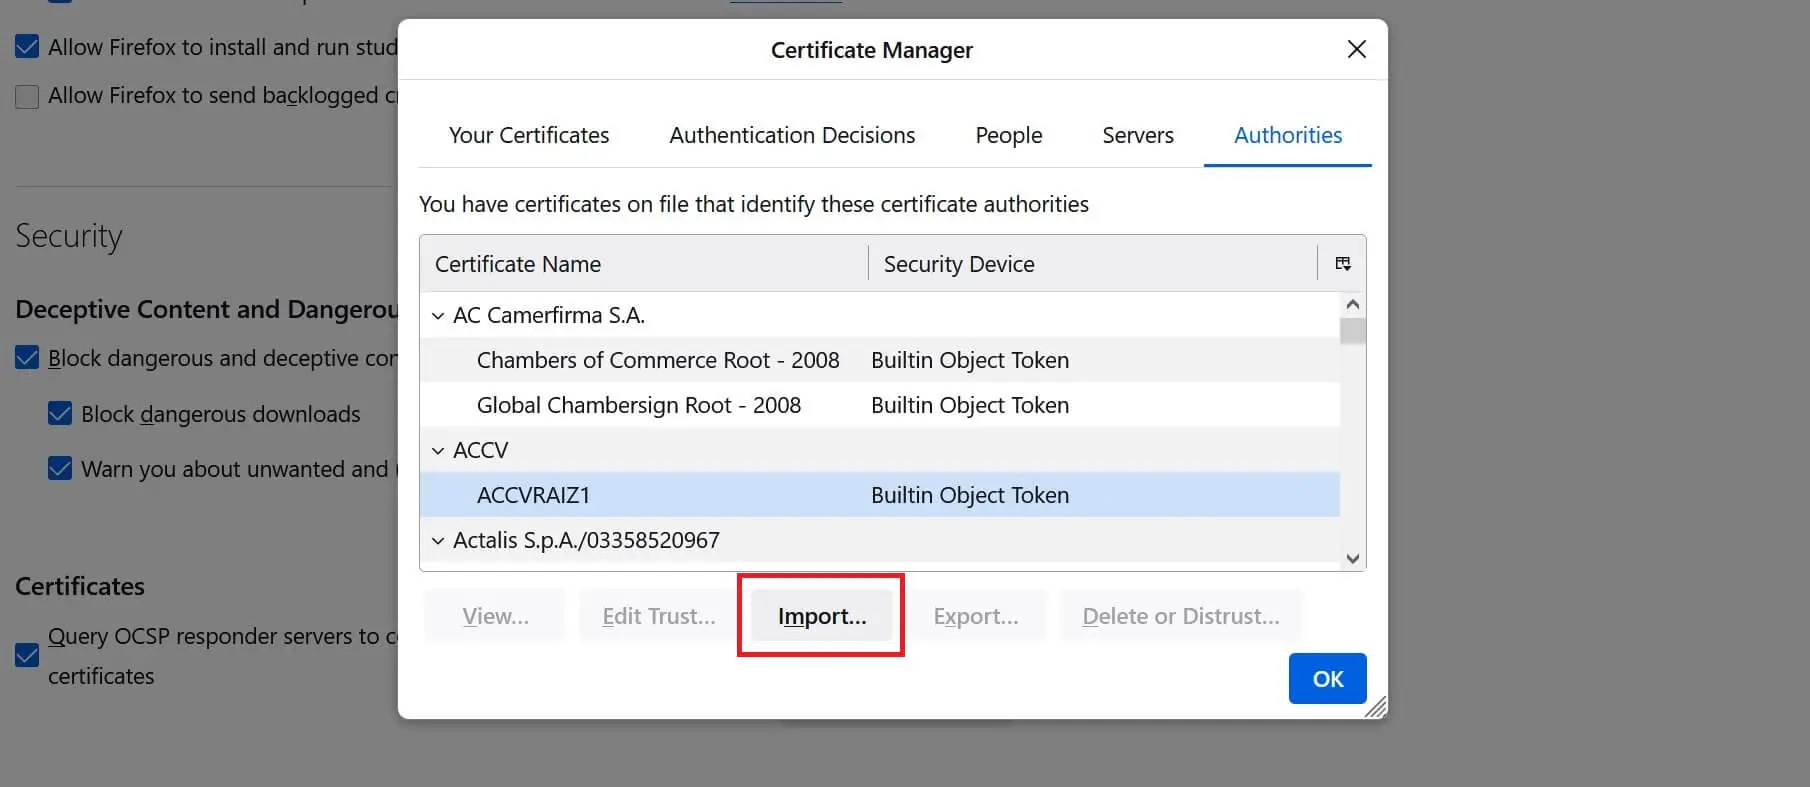
- Click import > select
CA.pemfile > Open - Now make sure you have Trust this CA to identify websites and Trust this CA to identify email users selected as follows:
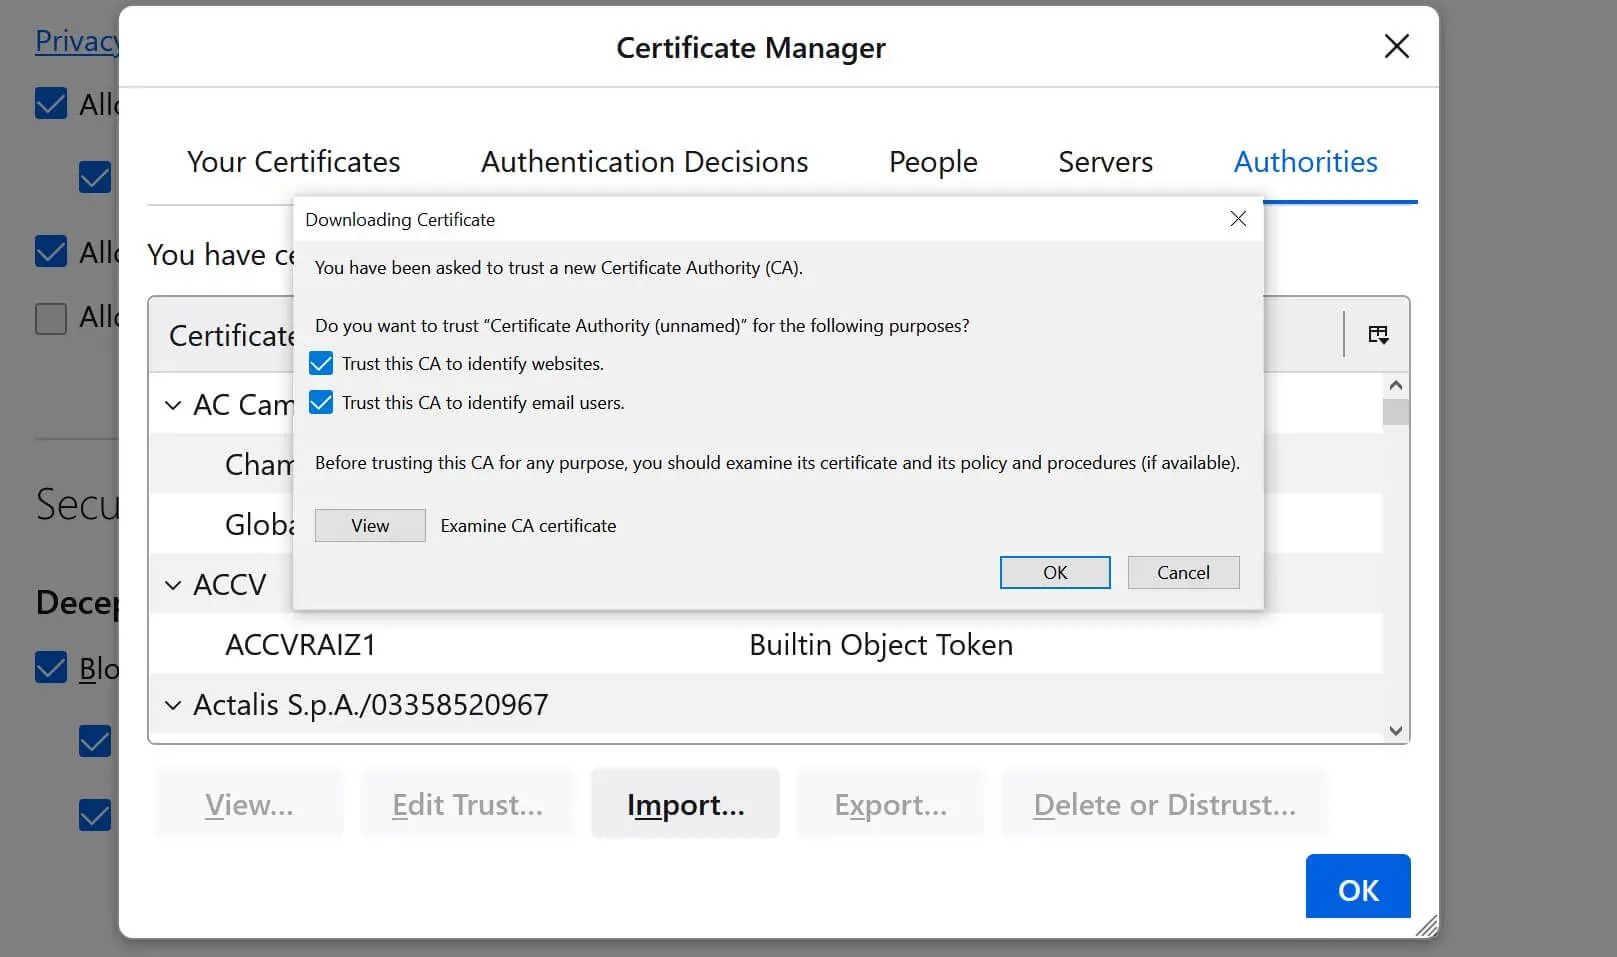
- Your CA is ready. Click Okay and your local SSL certificate is now available:
Step 11: How to Add HTTPS Local Domain SSL Certificate to Postman
What if you are using API development platforms such as Postman to manage and test your local HTTPS API?
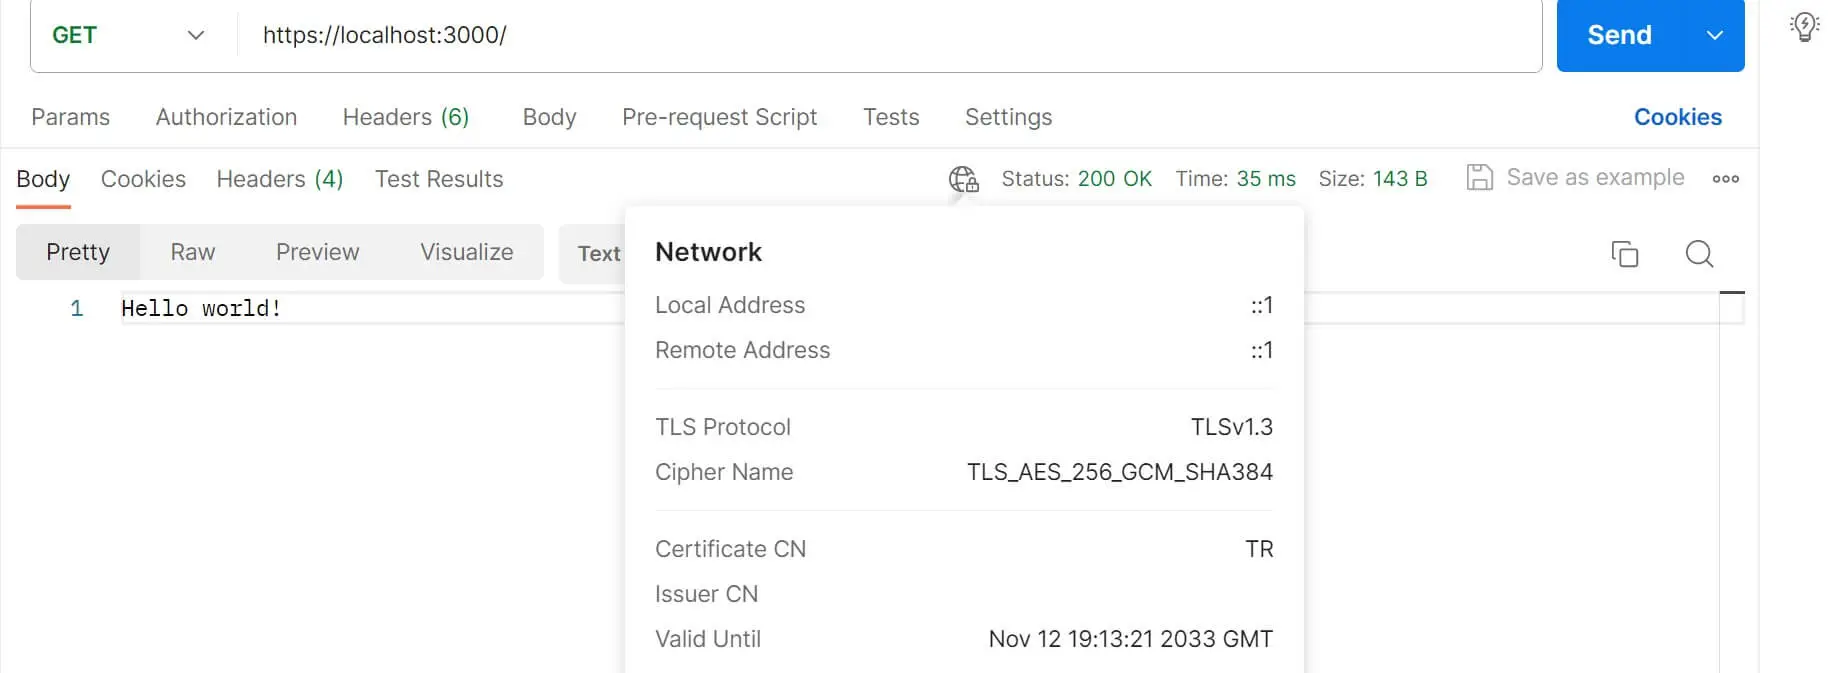
Below is a response from Postman sending a GET request to https://localhost:3000/:
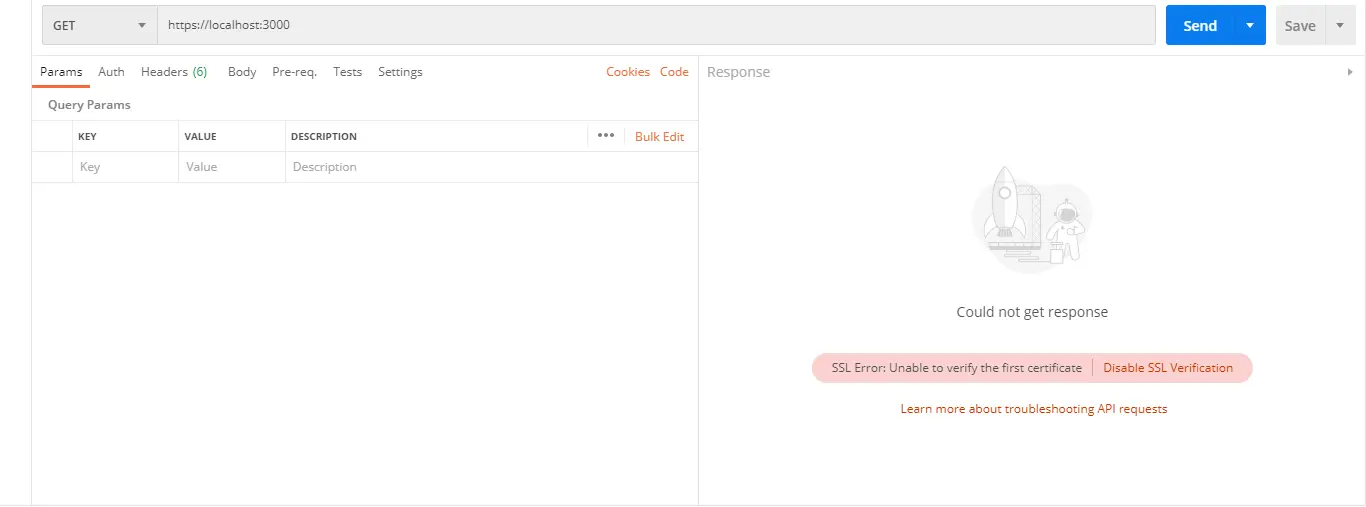
If you’re lucky, Postman shows a RED ALERT icon. Postman can’t be able to verify if your local domain SSL certificate is valid or not.
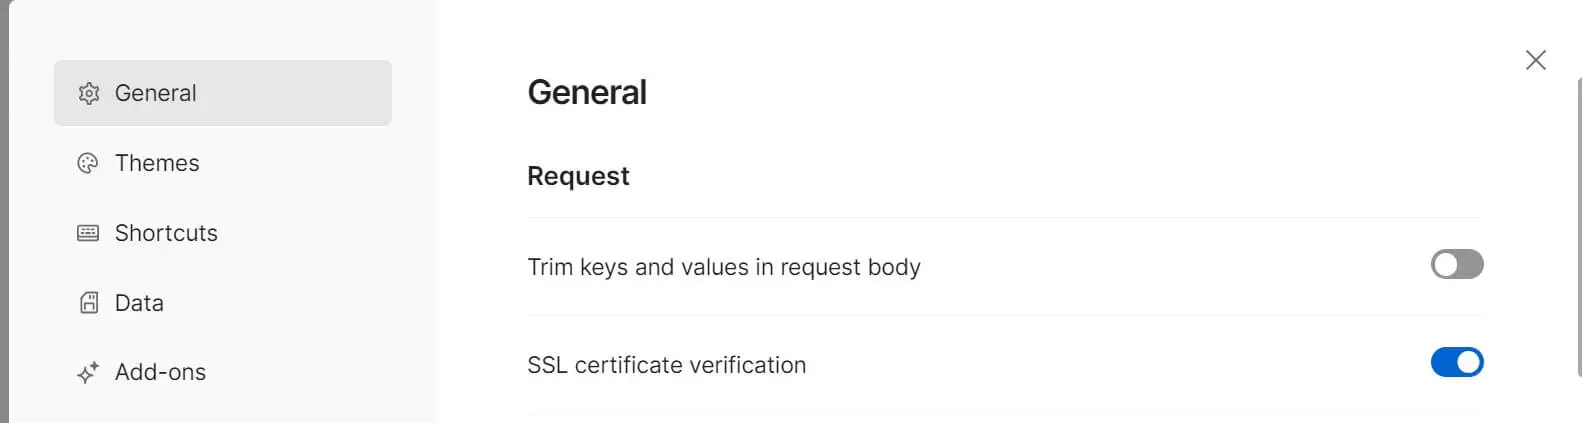
So go to Postman settings and ensure SSL certificate verification is selected:
Next, go to Certificates > enable CA certificates then browse and select PEM file which is your CA.pem file:
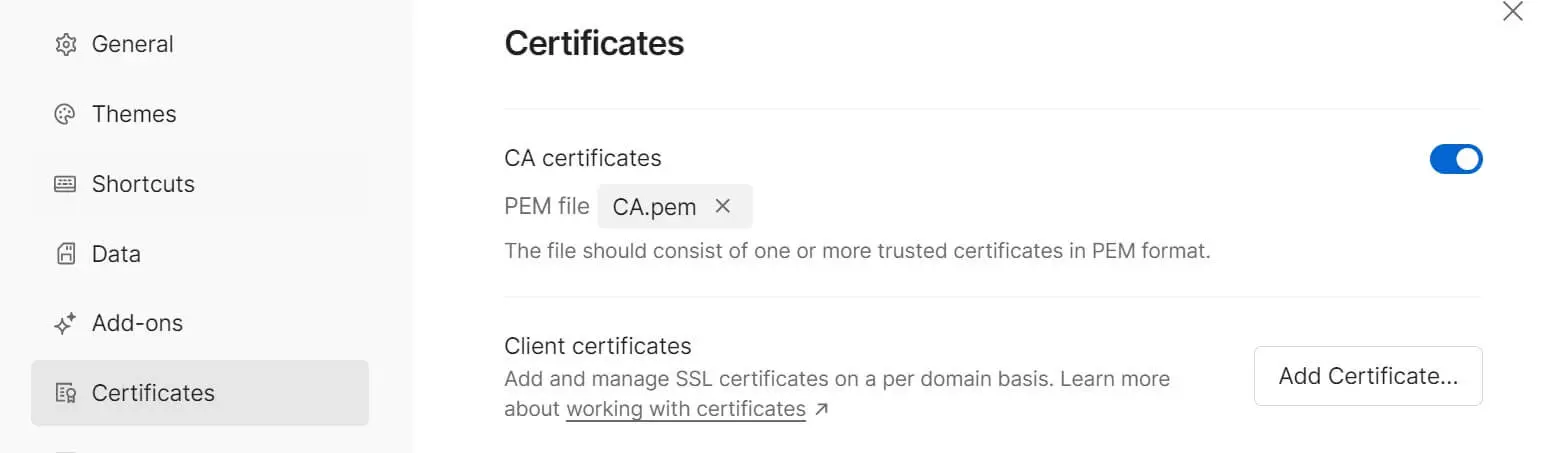
Now send your request, and your local SSL certificate is valid and ready:
Let’s Encrypt SSL Certificate for Local Domain (Not Localhost)
To get a Let’s Encrypt certificate for a domain other than localhost, you’ll need to have a publicly accessible domain and follow these general steps:
- Ensure your domain is publicly accessible and properly configured with a DNS record.
- Install Certbot or another ACME client.
- Run Certbot with the domain you want to secure:
certbot certonly --standalone -d example.com - Follow the prompts to generate and install the certificate.
Best Practices for Local Domain SSL Certificates
Now that you have added HTTPS to your local domain using a Let’s Encrypt SSL certificate issuer follow some best practices to ensure your local domain SSL certificate is secure:
- Use a valid SSL certificate for your local domain.
- Keep your SSL certificate up-to-date.
- Use strong encryption and hashing algorithms such as AES-256 encryption and SHA-256 hashing algorithm.
- Regularly check for vulnerabilities in your SSL setup with tools like SSL Labs.
- In case of a breach or suspected breach, revoke your SSL certificate and issue a new one.
Conclusion
Congratulations on successfully adding HTTPS to your local domain using a Let’s Encrypt self-signed SSL certificate issuer. Remember to follow best practices when it comes to local domain SSL certificates.
The key takeaway is to ensure you have a secure connection for your local domain. This guide helped you to set up a local domain SSL certificate. In summary, you have learned:
- Why do you need an SSL certificate for a local domain.
- The best way to add a local issuer certificate with certbot, OpenSSL, or let’s encrypt.
- Add your Chrome, Postman, or Firefox local SSL certificate.
- Step-by-step process of acquiring an HTTPS certificate for a local domain from Let’s Encrypt.
- How to add local domain SSL certificate on Windows, Linux, and macOS.
- How to add local domain SSL localhost certificate to Browsers such as Chrome, Mozilla Firefox, and Postman.
Written By:
Joseph Chege
More Related Articles:
-

Install Mkcert on Windows|Linux|Ubuntu with Localhost SSL HTTPS Certificates
Nov 16, 2023
-
How to Add Self Signed SSL Certificate in Nodejs Server
Jan 21, 2024
-
Create a Localhost HTTPS Server on NodeJS with Express and CreateServer
Nov 16, 2023
-

Host WordPress on AWS EC2 Ubuntu AMI with SSL Domain Name
Sep 22, 2023