Create|Generate|Run Sequelize CLI db Migrations With Nodejs
Posted February 12, 2024

Sequelize provides you with a CLI that will let you Create/Generate a migration file using the npx migration:create –name create table_name command. You then use the npx sequelize-cli db:migrate command to run database Migrations for your Node.js-based application. This way Sequelize CLI will auto-create your database tables and populate it using Node.js Sequelize code. You only need a few commands to get to this goal.
In this guide, you will learn how to use Sequelize CLI. Sequelize CLI will then allow you to run commands to create/generate and run Sequelize Migrations to a PostgreSQL database using Node.js. In summary, you will learn:
- How to use Sequelize CLI to create Node.js and a Sequelize project.
- Using Sequelize to generate Migrations and Model files.
- Generating Sequelize migration from Models.
- How to run a generated Sequelize Migrations and populate your tables with commands such as npx sequelize-cli db:migrate.
- How to undo or revert Sequelize created Migrations.
- The best way to add Sequelize migrations while using Sequelize associates. This let’s use Sequelize migration with fields such as foreign keys.
- How to Undo and revert existing migrations.
- You will use this Sequelize Migrations setup to create a Node.js API with Express.
Ready? Dive into this guide and Create|Generate|Run Sequelize CLI db Migrations with Node.js.
What you Need to Get Sequelize CLI Migrations Ready
Before attempting to use Sequelize CLI to generate and run your Migrations, ensure:
- Node.js is ready on your computer.
- Have prior Knowledge working with Sequelize and Node.js.
Related: Create Node.js App with Sequelize ORM and SQLite Database
- At least have one Running relational database. I will use PostgreSQL in this guide. However, MySQL and other related databases work perfectly with this setup.
What is Sequelize Migrations
Sequelize Migrations is a feature for Sequelize ORM. Creating Database Migrations will make it easier to manage changes to the database schema over time in a structured and reproducible way.
Sequelize Migrations defines incremental changes to the database schema through JavaScript files. This way, you will track and apply these changes across your application.
If you are creating databases using Sequelize Migrations you get the:
- Database schema versioning to track table structure changes. You can Revert to previous states if necessary.
- You will achieve atomicity as if an error occurs during migration, Sequelize automatically rolls back the previous working transaction to maintain database integrity.
- Migrations are only defined using JavaScript files with
upanddownfunctions.
Related: Easy Guide to Running Sequelize Migrations with Typescript
Why Use Sequelize CLI to Create DB Migrations
To generate and run Sequelize Migrations, you need a Sequelize CLI. It has all the commands you need for managing Sequelize projects when generating and running migrations. You’ll get:
- Sequelize CLI built-in Commands to manage Migrations.
- Sequelize CLI automatically loads database configuration settings
- Sequelize CLI creates a unified environment for managing database schema changes.
Let’s now dive in and use Sequelize CLI to Overall, create, generate, and run Sequelize migrations with Sequelize ORM in a Node.js project.
Creating a Sequelize Node.js app
Be sure you’re in your working directory and get Node.js ready:
npm init -y
You will need the following dependencies:
- Sequelize ORM to abstract over SQL databases.
- pg or mysql2 - PostgreSQL client library for Node.js or MySQL if you are using MySQL server.
- Sequelize CLI to provide command-line tools Sequelize Migrations
- Express if you want to extend this setup and create a Node.js express API with Sequelize migrations.
Run the following command to install them:
npm install sequelize express mysql2 pg
You will need to install Sequelize CLI as a dev dependency:
npm install --save-dev sequelize-cli
Your app is ready.
Initializing Sequelize Migrations with Sequelize CLI
You don’t have to create your Node.js Sequelize app from scratch. Once you have the above packages ready; you will use the Sequelize CLI. Run the following command:
npx sequelize-cli init
You will get the following directories:
configwith aconfig.jsonfile to create database connections.modelsto store your Sequelize model files.migrationsfor storing your migration files.seedersIf you plan to use seeders, this directory will store your seed files.
Adding Sequelize Database Migrations Configurations
You will use the config/config.json file in your project to configure your database connection settings.
This should be straightforward. Add the details of the database you are using and the connection details as you need them.
Because I’m running the application locally and using PostgreSQL, I will create a shop database and then add the details to the config/config.json file under development as follows:
   "username": "postgres",
   "password": "pass",
   "database": "shop",
   "host": "127.0.0.1",
   "dialect": "postgres",
   "migrationStorageTableName":"migrations"
Note that you must chode dialect as the database server you are using. If MySQL updates these details as such
Also, the "migrationStorageTableName":"migrations" part is optional. During migrations, Sequelize will create a table to save migrations history. In this case, we want the table to be created with the name migrations. Choose your ideal name.
Creating your First Sequelize Migration
Let’s say you want to add Sequelize migrations to a Product table. The following command will be perfect:
npx sequelize-cli migration:generate --name create-products
However, you still want to create a model while running a Sequelize CLI migration command. Therefore, you will choose to create Migrations and Models using one single command.
In this case, you want to have a Model generated at the same time as the Migration files. However, you will need to provide at least one attribute with its related date and time, I used the Product name as follows (We will add other attributes along the way):
npx sequelize-cli model:generate --name Products --attributes name:string

Now you have:
- A new model was created at
\models\products.js. You can now go ahead and update the attributes to the application model as follows:
'use strict';
const {
  Model
} = require('sequelize');
module.exports = (sequelize, DataTypes) => {
  class Products extends Model {

   static associate(models) {
    // define association here
   }
  }
  Products.init({
   name: DataTypes.STRING,
   price: DataTypes.DECIMAL,
   inventory: DataTypes.INTEGER,
   created_at: DataTypes.DATE
  }, {
   sequelize,
   modelName: 'Products',
   tableName: "products",
   underscored: true,
   timestamps: true,
  });
  return Products;
};
Here, I added the following as attributes to Product mode:
   price: DataTypes.DECIMAL,
   inventory: DataTypes.INTEGER,
   created_at: DataTypes.DATE
At the same time, Sequelize will allow you modify your model with other attributes such as timestamps table names, etc as follows:
  Products.init({
   name: DataTypes.STRING,
   price: DataTypes.DECIMAL,
   inventory: DataTypes.INTEGER,
  }, {
   sequelize,
   modelName: 'Products',
   tableName: 'products', // Database table name
   underscored: true, // Use underscored naming convention for columns
   timestamps: true, // Automatically manage createdAt and updatedAt columns
   createdAt: "created_at",
   updatedAt: "updated_at",
  });
- New migration was created at
\migrations\20240212071957-create-products.js. Now it needs to match what attributes you have in your model. Updatemigrations\20240212071957-create-products.jsfile. Here, you will add price and inventory columns to the table definition, matching the model’s attributes as follows:
'use strict';
const { DataTypes } = require('sequelize');

module.exports = {
  up: async (queryInterface, Sequelize) => {
   // for some reasons make sure the Table name is products with small letter and not Products with caps
   // I test Products with CRUD API and the server failed to get the Products schema
   // The solution worked when I used products
   await queryInterface.createTable('products', {
    id: {
     allowNull: false,
     autoIncrement: true,
     primaryKey: true,
     type: Sequelize.INTEGER
    },
    name: {
     type: Sequelize.STRING
    },
    price: {
     type: Sequelize.DECIMAL
    },
    inventory: {
     type: Sequelize.INTEGER
    },
    created_at: {
     allowNull: false,
     type: Sequelize.DATE
    },
    updated_at: {
     allowNull: false,
     type: Sequelize.DATE
    }
   });
  },
  down: async (queryInterface, Sequelize) => {
   await queryInterface.dropTable('products');
  }
};
For some reason make sure the Table name is
productswith a small letter and notProductswith caps. I testedProductswith CRUD API and the server failed to get the Products schema. The solution worked when I usedproducts.
Running your First Sequelize Migration with Sequelize CLI
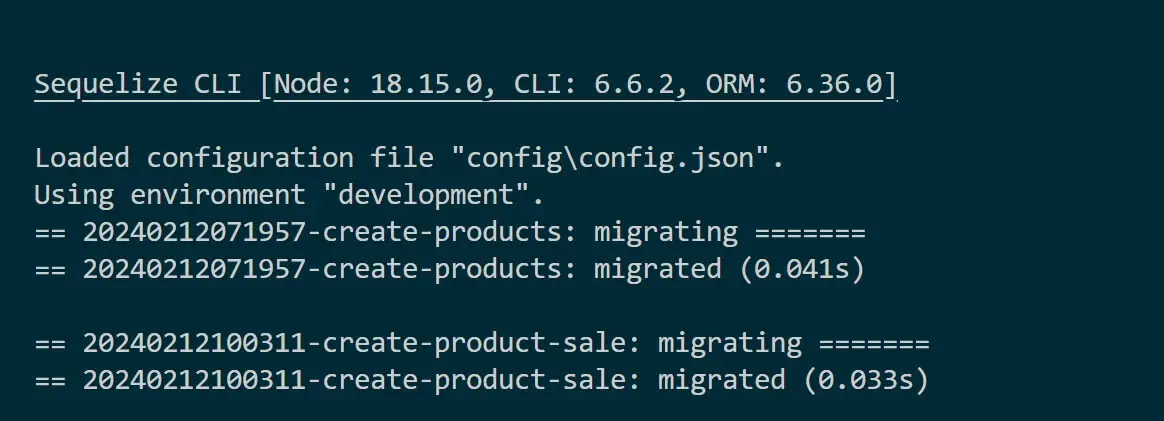
The moment has come and you are ready to run and apply your first Migration using the npx sequelize-cli db:migrate command.
At this moment, ensure you have your database server up and running. You also make sure you have the shop database ready.
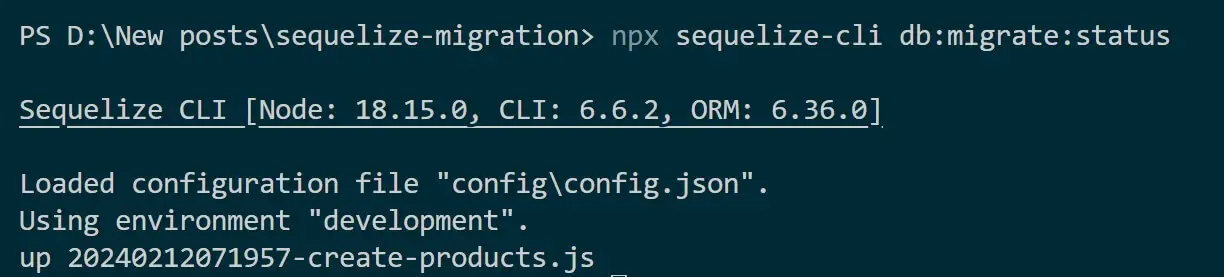
Go ahead and run the following command:
npx sequelize-cli db:migrate
And if you like to use the package.json file add a new script as such:
"migrate": "npx sequelize-cli db:migrate",
Then use the command npm run migrate:
Sequelize CLI will use npx sequelize-cli db:migrate and apply your migrations to your database as follows:

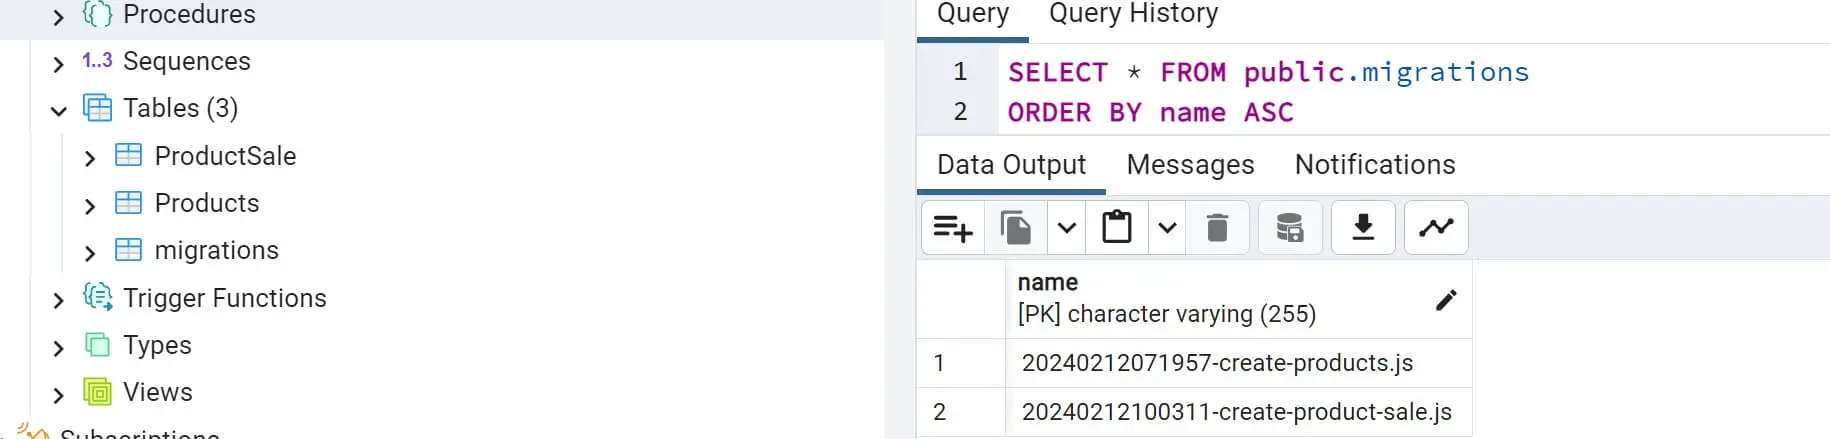
Now, confirm your database. Based on your migrations you should have everything ready as follows:
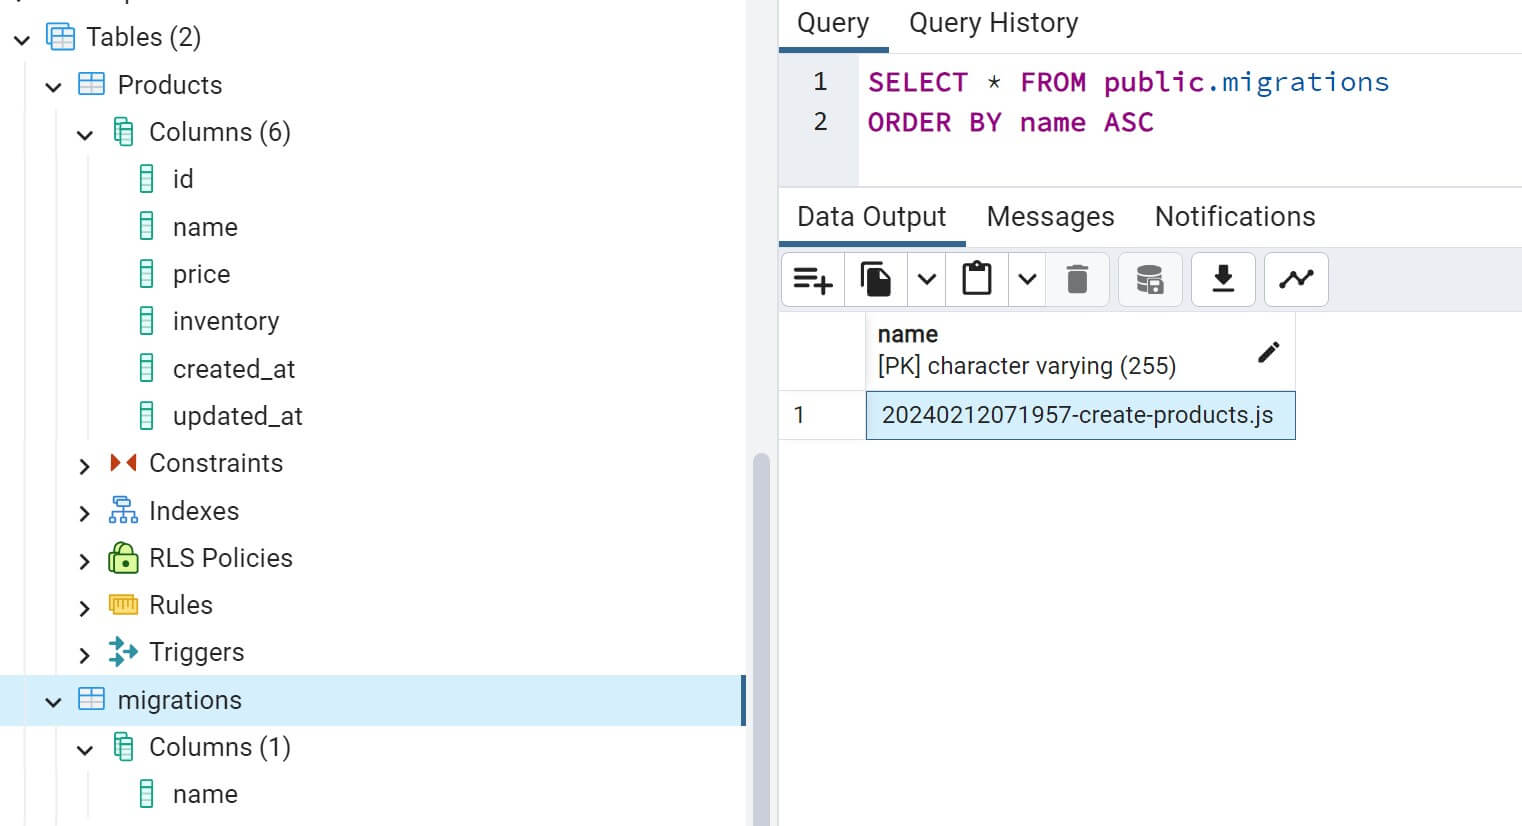
The Shop database will be populated with the table products and the migrations table will record the created migrations. Use npx sequelize-cli db:migrate:status command to track the current state of your database schema:
How to use Sequelize CLI and Undo Migrations with NPX
Sequelize supports atomicity. Every successful migration will be recorded in the migrations table.
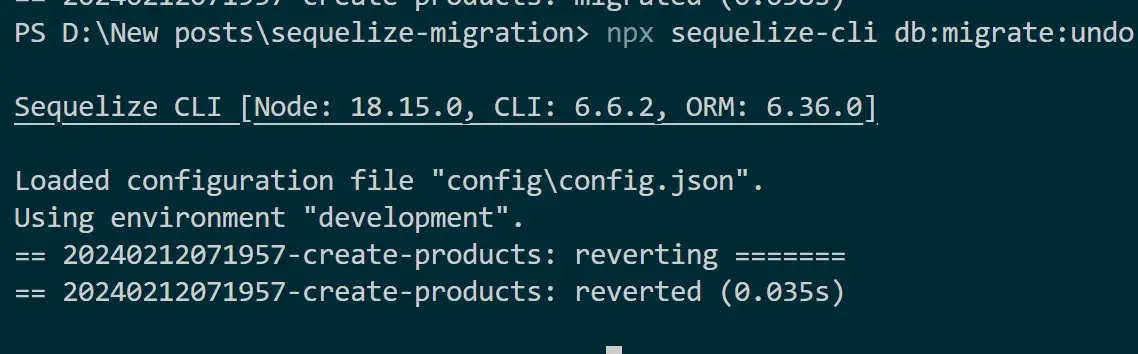
This means you can always revert to an existing migration. You only need to use npx sequelize-cli db:migrate:undo as Sequelize CLI will revert them as follows:
# undo(delete) table last created
npx sequelize-cli db:migrate:undo

# undo(delete) table all created
npx sequelize db:migrate:undo:all
#undo(delete) table selected
npx sequelize-cli db:migrate:undo --name 20240212071957-create-products.js
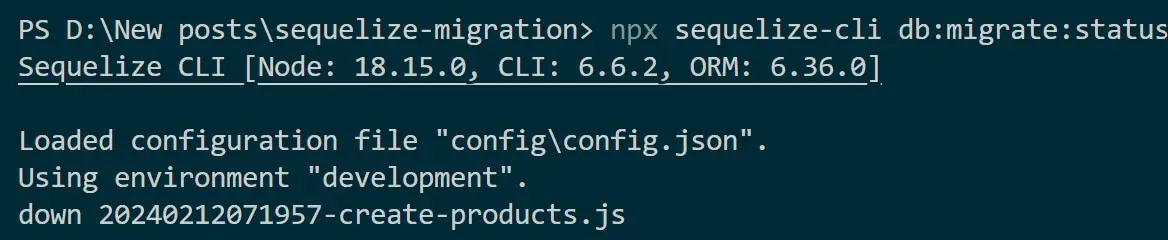
If you use npx sequelize-cli db:migrate:status command, Sequelize will tell you that the Migrations is in Down status:
Get the whole code used here on this GitHub repo.
Creating Migrations with Sequelize Associates
Sequelize associates define relationships between different models. You want to represent everything around associates within your migrations.
Each Model created with Sequelize CLI has an associate function within each model to establish associations with other models.
Now let’s say you want to add a ProductSale table in this case:
- Product has a one-to-many relationship with ProductSale
- ProductSale has a many-to-one relationship with the Product model
You only need to go ahead and create your models and migrations using Sequelize CLI as follows:
First, create the ProductSale migrations and its model as follows:
npx sequelize-cli model:generate --name ProductSale --attributes soldQuantity:integer
Now head over to the models/productsale.js file and make sure your model has the right associate as follows:
const { Model } = require('sequelize');


module.exports = (sequelize, DataTypes) => {
  // Extending the Model class to define ProductSale model
  class ProductSale extends Model {
   // Static method to define associations
   static associate(models) {

    // Define many-to-one relationship with Products model
    ProductSale.belongsTo(models.Products, { foreignKey: 'productId' });
   }
  }

  // Initialize ProductSale model with attributes and options
  ProductSale.init({
   productId: DataTypes.INTEGER,
   soldQuantity: DataTypes.INTEGER,
   subtotal: DataTypes.DECIMAL,
   sellingPrice: DataTypes.DECIMAL
  }, {
   sequelize, // Database connection instance
   modelName: 'ProductSale', // Model name
  });

  // Return the defined model
  return ProductSale;
};
Here, the Sequelize belongsTo method will tell the CLI; HEY, create an association between this (the source: ProductSale) and the provided target Product. The foreign key should be added as the source.
Now go to the migrations/20240212100311-create-product-sale.js file and update your Migrations script for ProductSale. This should have attributes with a foreign key relationship to Products. Use the “references” field as follows:
'use strict';
/** @type {import('sequelize-cli').Migration} */
module.exports = {
  up: async (queryInterface, Sequelize) => {
   // Create the 'ProductSale' table
   await queryInterface.createTable('productsale', {
    id: {
     type: Sequelize.INTEGER,
     primaryKey: true,
     autoIncrement: true,
    },

    productId: {
     type: Sequelize.INTEGER,
     allowNull: false,
     references: {
     // Name of the related table
      model: 'Products', //Or product based on your Product schema
      key: 'id', // Primary key of the related table
     },
    },
    soldQuantity: {
     type: Sequelize.INTEGER,
     allowNull: false,
    },
    subtotal: {
     type: Sequelize.DECIMAL,
     allowNull: false,
    },
    sellingPrice: {
     type: Sequelize.DECIMAL,
     allowNull: false,
    },
    createdAt: {
     type: Sequelize.DATE,
     allowNull: false,
    },
    updatedAt: {
     type: Sequelize.DATE,
     allowNull: false,
    },
   });
  },

  down: async (queryInterface, Sequelize) => {
   // Undo the creation of the 'ProductSale' table
   await queryInterface.dropTable('productsale');
  },
};
At the same time, you need to create an N:M association with a join table. The model Products that will be associated with ProductSale hasOne a relationship. Update the model/products.js file with Sequelize associate as follows:
'use strict';
const {
  Model
} = require('sequelize');
module.exports = (sequelize, DataTypes) => {
  class Products extends Model {

   static associate(models) {
    // define association here
    // Define one-to-many relationship with ProductSale
    Products.hasMany(models.ProductSale, { foreignKey: 'productId' });
   }
  }

  Products.init({
   name: DataTypes.STRING,
   price: DataTypes.DECIMAL,
   inventory: DataTypes.INTEGER,
   created_at: DataTypes.DATE
  }, {
   sequelize,
   modelName: 'Products',
   tableName: "products",
   underscored: true,
   timestamps: true,
   createdAt: "created_at",
   updatedAt: "updated_at",
  });
  return Products;
};
Now, you need to run your npx sequelize-cli db:migrate command as follows:
npx sequelize-cli db:migrate
Check your database to confirm these changes:
Appling Sequelize Migrations with Node.js Server
Once you have the Migrations ready, the next step is to use the same setup and create a CRUD Node.js API with Sequelize.
Let’s in this section create a very simple API using the generated Sequelize CLI Configurations.
To make it simple, I will only use the Products Model and Migrations. Consider removing the association with ProductSale before proceeding.
Because you have the model and database connection in your config.json file ready, let’s go directly to create the controllers and routes.
In the same project directory, add products.repo.js file. Here you now need to import your model and create your method. I only use create and fetch with Sequelize as follows:
const { Products } = require("./models");

exports.GetProducts = () => {
  return Products.findAll();
};

exports.AddProduct = (productsData) => {
  return Products.create({
   ...productsData,
   created_at: Date(),
  });
};
Create a products.router.js file to execute the above methods as follows:
const express = require("express");
const router = express.Router();
const ProductsRepo = require("./products.repo");


router.get("/products", async (req, res) => {
  try {
   var productsList = await ProductsRepo.GetProducts();
   return res.send(productsList);
  } catch (err) {
   console.log(err);
  }
});

router.post("/products", async (req, res) => {
  try {
   console.log(req.body);
   if (req.body) {
    const { name, price, inventory } = req.body;
    console.log(req.body);
    const ProductsData = await ProductsRepo.AddProduct({
     name,
     price,
     inventory,
    });
    res.send({ message: "data added !!", ProductsData });
   } else {
    console.log("no body found");
    res.send({ message: "body not found or available" });
   }
  } catch (err) {
   console.log(err);
   res.send(err);
  }
});

module.exports = router;
Now, create an index.js to run the server. Note that here you don’t need to create a new database connection. Just use what you already have in your file. Here is the complete code:
const express = require("express");
const config = require('./config/config.json');
const ProductsRouter = require("./products.router");
const Sequelize = require("sequelize");

const app = express();
app.use(express.json());
app.use(express.urlencoded({ extended: true }));

// Mounting routers

app.use("/api", ProductsRouter);

// Get the environment from the NODE_ENV environment variable, defaulting to 'development'
const env = process.env.NODE_ENV || 'development';
const dbConfig = config[env];

// Create Sequelize instance
const sequelize = new Sequelize(dbConfig.database, dbConfig.username, dbConfig.password, {
  host: dbConfig.host,
  dialect: dbConfig.dialect
});

// Test database connection
sequelize
  .authenticate()
  .then(() => {
   console.log('Connected to the database successfully.');
  })
  .catch(err => {
   console.error('Unable to connect to the database:', err);
  });

app.listen(3000, () => {
  console.log("listening on port 3000");
});
Ensure you have Express installed:
npm install express
Finally, run the node index.js command to start the server:
node index.js

Use http://localhost:3000/api/products to access the server and select products.

Or use Postman to send POST requests to http://localhost:3000/api/products and add items as follows:

Conclusion
In this comprehensive Node.js tutorial, you have learned how to create, generate, and run Sequelize Migrations with Sequelize CLI. You have learned:
- How to use Sequelize CLI to create Node.js and a Sequelize project.
- Using Sequelize to generate Migrations and Model files.
- How to run a generated Sequelize Migrations and populate your tables with commands such as npx sequelize-cli db:migrate.
- How to undo or revert Sequelize created Migrations.
- The best way to add Sequelize migrations while using Sequelize associates.
- How to Undo and revert existing migrations.
- Using Sequelize Migrations set up to create a Node.js API with Express.
Happy coding 🚀💥
Written By: