Docker Slim With Minimal Reduce Docker Image Size Strategies
Posted October 9, 2023

Do you want to slim your Docker Images? This guide discusses the best strategies to use and reduce your Docker Image sizes. Dive and learn how to reduce the size of the docker image.
Prerequisite to Docker Slimming Strategies
-
You are using Docker to minimize Docker image size. Thus, Docker Desktop must be installed and already running on your machine.
-
To effectively use the Docker slim strategies described in this guide, you will need a working application with a ready Dockerfile.
However, to make this step easier, I have created a Typescript app, the application code on this GitHub repository.
Using this example, you will add the right Docker slim strategies and reduce your Docker image size.
The last step of this guide used the DockerSlim plugin. This means this particular will only work on Linux/macOS/Ubuntu. If you are using Windows, you can follow along and reduce the Docker image size by approximately 85.5%.
And if you have DockerSlim installed, you can further reduce the remaining 15% of your image size by about 30 times. Download and install DockerSlim here
What You Will Learn
Along this reduce docker image size guide, you will learn:
- How to minimize and slim docker image size by at least 90%
- Create different Docker file strategies explaining how to decrease Docker image size step by step.
- Learn How to use Docker Slim to create Docker minimal images. You will install DockerSlim and use it to slim other containers in your docker environment.
So, let’s now dive and reduce your docker image size like a PRO.
Getting your Docker Image Ready
As stated earlier, you need a docker image. Based on this application, You will start using the following Dockerfile, then build up the docker slimming strategies:
First, clone this application:
git clone https://github.com/Rose-stack/Typescript-Nodejs
Change the directory to the cloned folder:
cd Typescript-Nodejs
Then run the following command to get your app ready:
npm install
# Use Node.js base image
FROM node:20
# Set the working directory in the container to /app
WORKDIR /app
# Copy package.json and package-lock.json (if they exist) to the working directory
COPY package*.json ./
# Install npm dependencies
RUN npm install
# Copy the rest of the application source code to the working directory
COPY . .
# Build the application
RUN npm run build
# Expose port 4000 for incoming connections
EXPOSE 4000
# Start the application with "npm start" when the container is run
CMD npm start
Let’s get the initial size of this simple application docker image size:
- Build your image:
docker build -t test-app .
Upon checking the built image, you will be surprised by the image size of this Hello World sample app:

The size is unreliable for use, especially in production environments. Let’s get these Docker slim strategies ready and create a reliable image.
How to Reduce Docker Image Size
Getting your Docker-size image down is easy; here are the main strategies you need to observe
- Always check your base image and use light alternative
- You don’t need to copy any unnecessary files on your Docker image
- Image layers matter, and you need to get them down.
- Multistage Builds has significant advantages to Slim Docker images
- The fun part: Docker tools like Docker Slim are the best choices.
Why not use these strategies one by one using this real example and see how much we can reduce on 1.25 GB Docker image
Use .dockerignore to Eliminate unnecessary files.
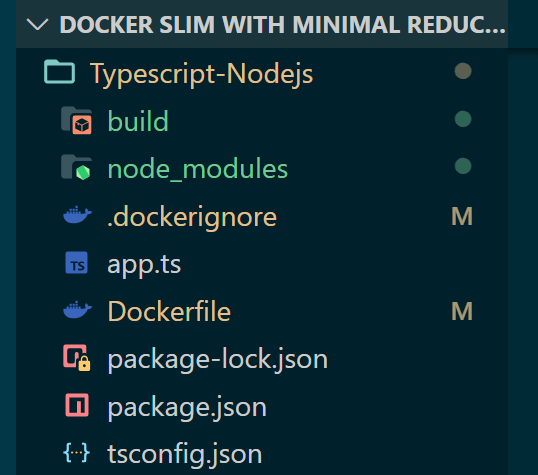
Taking this application example, you will have the following app structure.

Your COPY . . command will copy all files, even those you don’t need. You can eliminate some files based on what your Dockerfile needs.
In this example:
- node_modules folder will be created in the
RUN npm installcommand. - The build folder will be created by the
RUN npm run build. Dockerfileis executed on your terminal; you don’t need it inside your image.
All these folders and files aren’t supposed to be technically copied. You need to create a .dockerignore file to let Docker not use them. Then add what your image doesn’t need as follows:
.dockerignore
Dockerfile
node_modules
build
The folder and files you don’t need defer; ensure you check this step based on your application structure and how your Dockerfile.
Now rerun your build command docker build -t test-app . and check if this strategy reduced the size of the Docker image:
Getting a 1.25GB image down to 1.08 GB is impressive. You can only imagine the impact of this step. You have a huge pile of files you need to ignore:
Base Image and How it Reduces Size of Docker Image
The choice of your base image matters, and it is key in any image. In this example, you used FROM node:20 as the base.
What alternatives do you have? Well, you can use other variant image distributions, such as.
- Bullseye to minimize packages as a Debian distribution.
- Alpine Linux distributions of about ~5MB.
- A Slim variant to eliminate unnecessary packages.
So here I used - Alpine as follows:
# Use Node.js alpine base image
FROM node:20-alpine
# Set the working directory
WORKDIR /app
# Copy package.json and package-lock.json
COPY package*.json ./
# Install npm dependencies
RUN npm install
# Copy the application source code
COPY . .
# Build the application
RUN npm run build
# Expose port 4000
EXPOSE 4000
# Start the application
CMD npm start
It is as simple as adding FROM node:20-alpine on your Dockerfile. Then, rebuild your image with your docker build command.

Holy Molly! This must be one of the best strategies to reduce Docker image size. From 1.08 GB to 270 MB is just WOW.
Slim Docker Image layers
You need to understand each line of command on your Dockerfile creates a new layer on your Docker image. So, if you were running this application on Production, I would use the following Docker file:
# Use Node.js with Alpine Linux
FROM node:20-alpine
WORKDIR /app
COPY package*.json ./
# Copy the application source code
COPY . .
# Install dependencies
RUN yarn install
# Build the application
RUN npm run build
# Remove development dependencies
RUN rm -rf node_modules
# Install only production dependencies
RUN npm install --production
# Expose port 4000
EXPOSE 4000
# Start the application
CMD npm start
The Dockerfile file now builds an image of 370 MB.
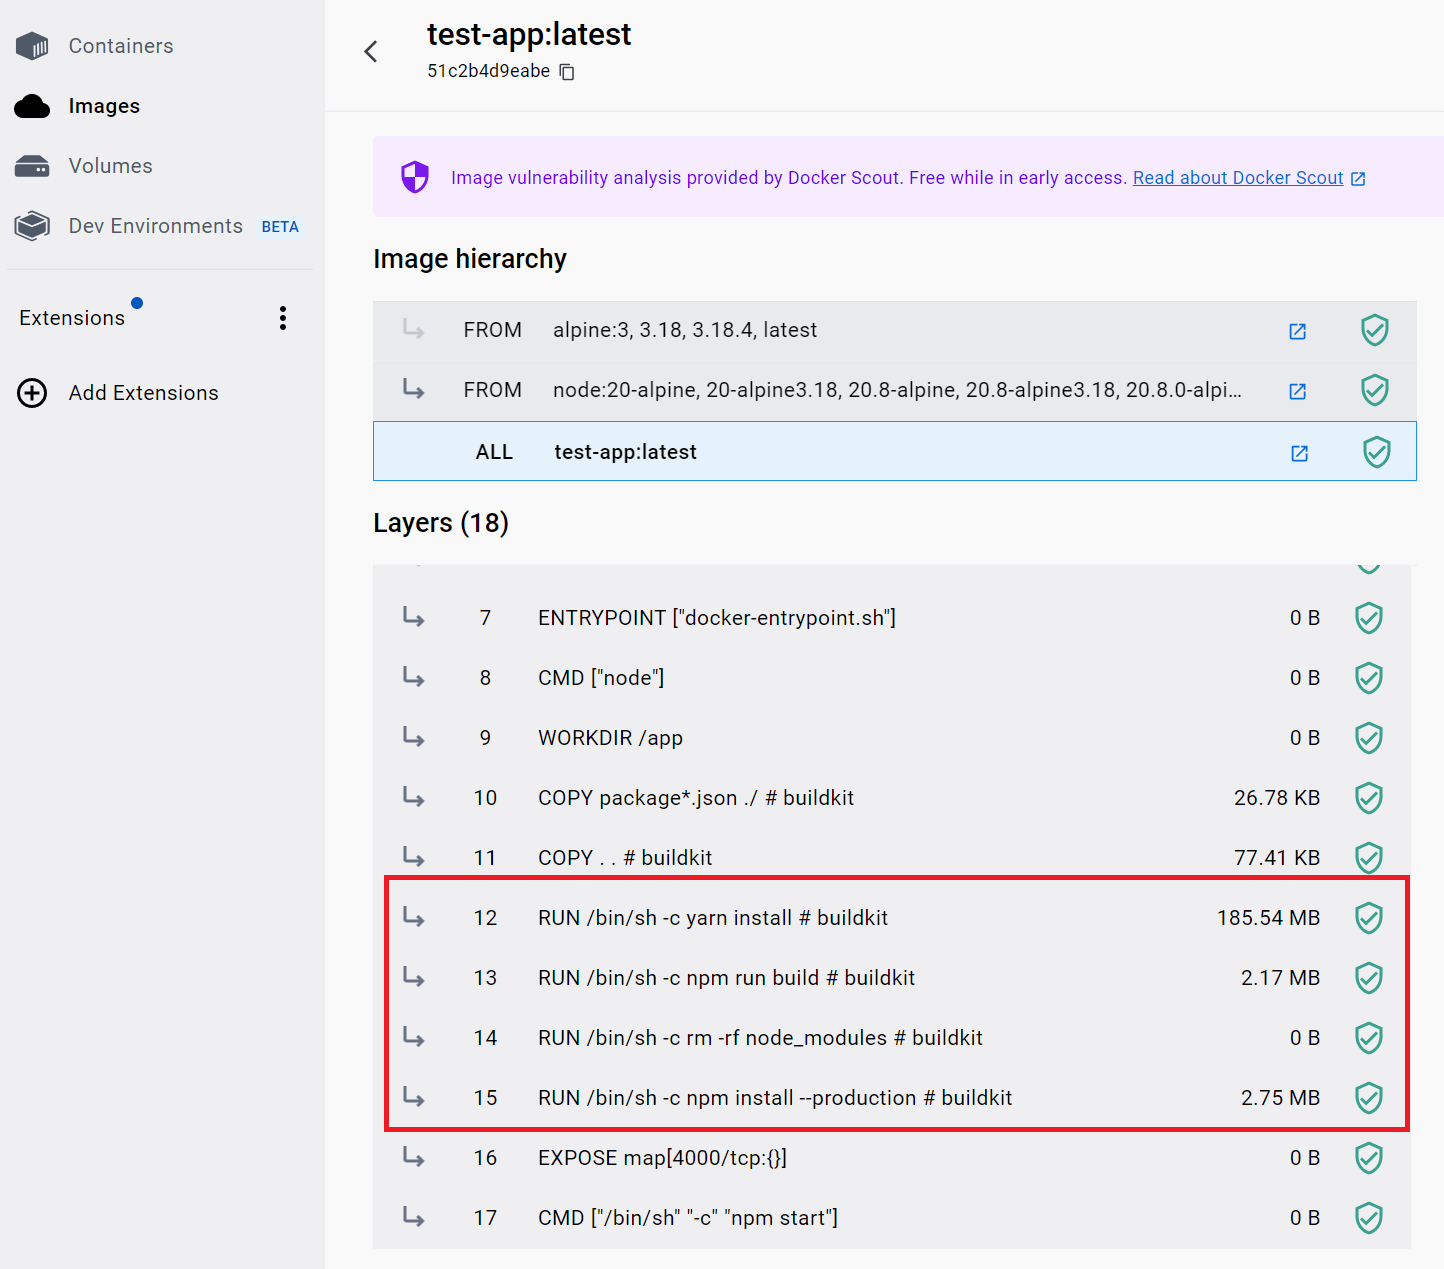
This will then add Docker image layers incrementally. However, you can nest your RUN commands. In this case, I have four RUN commands, meaning a layer each.
If you nest this command as one, it will get just one layer out of them. Here is a view of the current layers:

Below is how you will nest the RUN commands in your Docker files:
# Use Node.js with Alpine Linux
FROM node:20-alpine
WORKDIR /app
COPY package*.json ./
# Copy the application source code
# Build the application
# Remove development dependencies
# Install only production dependencies
COPY . .
# Install dependencies
RUN npm install && \
    npm run build && \
    rm -rf node_modules && \
    npm install --production
# Expose port 4000
EXPOSE 4000
# Start the application
CMD npm start
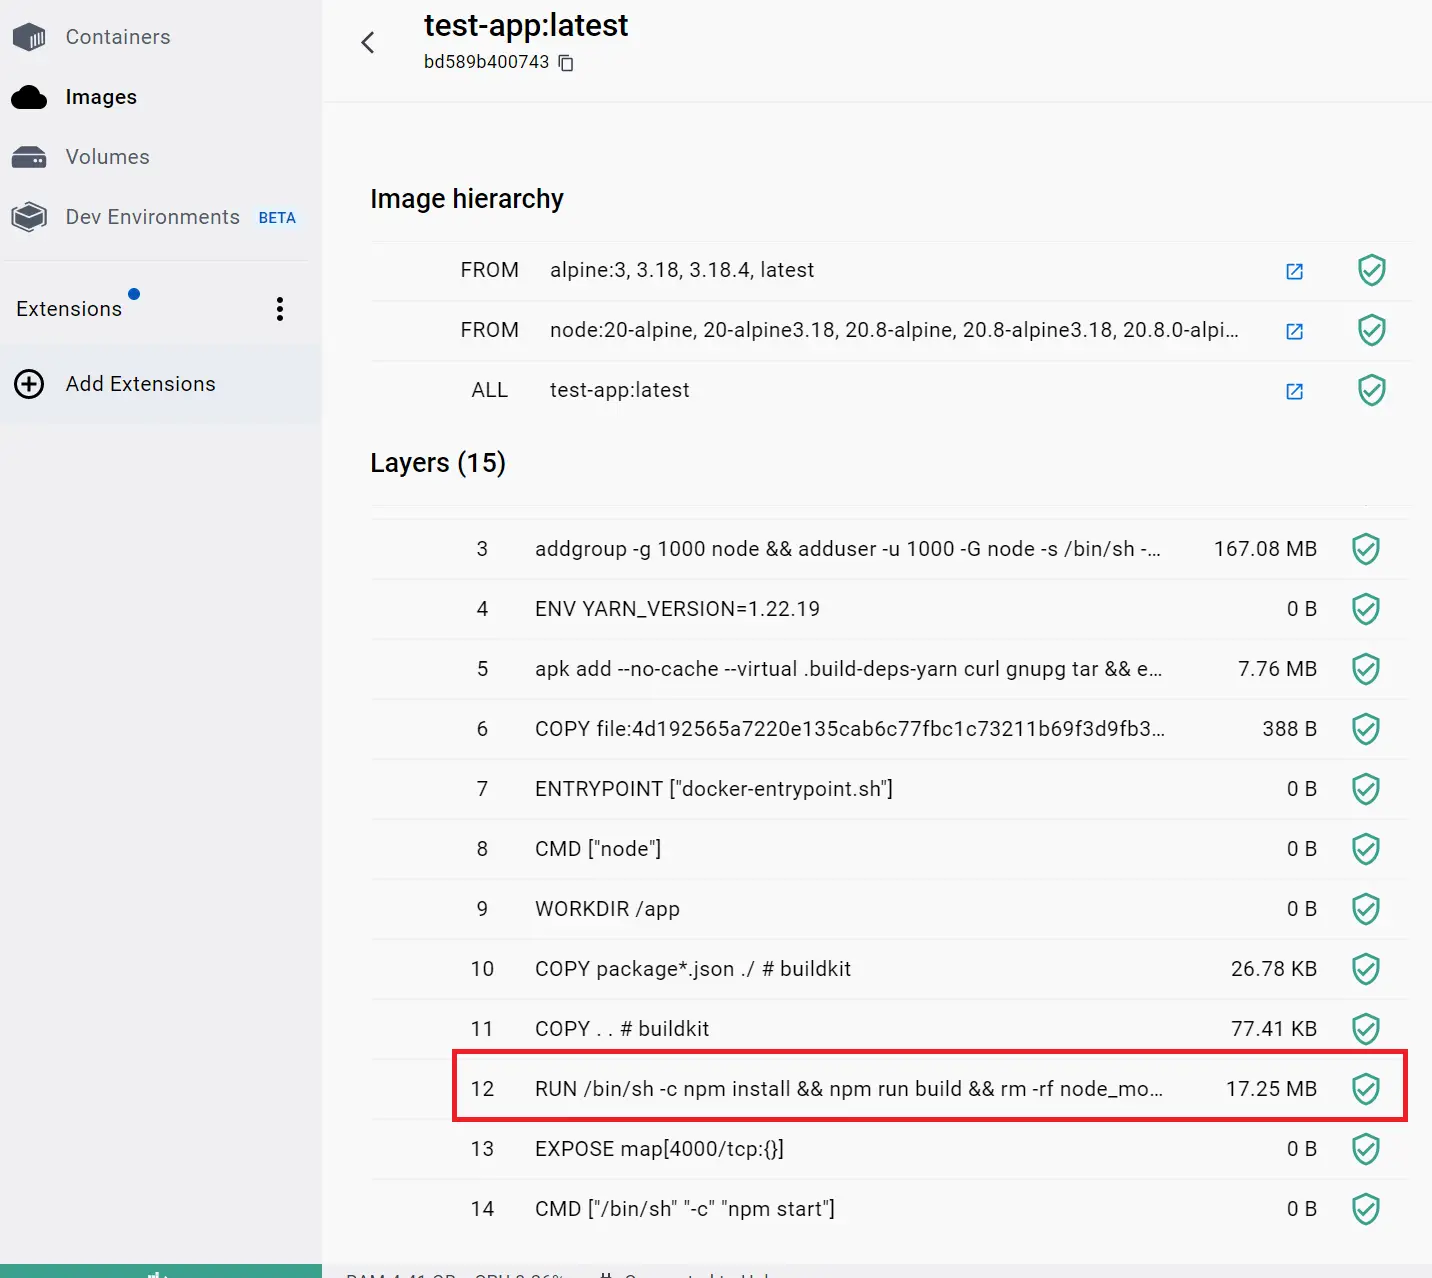
If you build the image, you will now have approximately 198 MB up to this point. And if you check the layers, they will reduce to 15 as follows:

Removing three layers slims the image from 370 MB to 198 MB. Please see how significant this step is in reducing the size of the Docker image.
How Multistage Builds Slims a Docker Image
So far, you have 198 MB as your current image size, from 1.2GB. If you use build pattern to bundle your application, you can reduce the size further.
In this case:
You create a two-step Dockerfile where the first step is only to build the image without affecting the image size.
Here is the new look of your Dockerfile when using the Multistage Build pattern:
#Stage One: Build
FROM node:20-alpine AS builder
WORKDIR /app
COPY . .
RUN npm install
RUN npm run build

#Stage Two: Final
FROM node:20-alpine AS final
WORKDIR /app
COPY --from=builder ./app/build ./build
COPY package*.json ./
RUN npm install --production
CMD npm start

# First stage: Building the application
FROM node:20-alpine AS builder
WORKDIR /app
# Copy the application source code to the builder stage
COPY . .
RUN npm install
RUN npm run build

# Second stage: Creating the final image
FROM node:20-alpine AS final
WORKDIR /app
# Copy the built application from the builder stage to the final stage
COPY --from=builder ./app/build ./build
COPY package*.json ./
# Install only production dependencies
RUN npm install --production
CMD npm start
Once you rerun docker build -t test-app . the new image size should be slimmer with a couple of MBs:

Using Docker Slim: The Docker Reduce Image Size Tool
Docker Slim builds your images with only the essential components. This will reduce your image size by 30 times.
How do you use DockerSlim?
First download and install DockerSlim.
Once you have DockerSlim ready, run the following DockerSlim --target command:
docker-slim build --target your_image_name
You need to replace your_image_name with the image name you built, in this case, test-app. The Docker Slim command will be:
docker-slim build --target test-app
This command will point to your image, and DockerSlim will do its magic. Did this step work for you? It should reduce 186 MB by 90.37%. If this was the same on your side, Congratulations. Leave a comment below and let us know the percentage of DockerSlim optimized.
Conclusion
Along with this reduce Docker image size guide, you have learned the following:
- How to minimize and slim Docker image size by at least 90%
- Create different Docker file strategies explaining how to decrease Docker image size step by step.
- How to use DockerSlim to create Docker minimal images. You will install DockerSlim and use it to slim other containers in your Docker environment.
I hope this was a helpful experience.


