Add All CORS Access Control Allow Origin in NodeJS Express Headers
Posted June 14, 2024

If you have worked with a Node.js and a localhost frontend server, this Node.js CORS error might be familiar:
Today, this guide will let you fix any Node.js CORS (Access Control Allow Origin) related erros with Express Headers. You will learn:
- Why CORS Error Exists and how to add cors headers with Node.js
- Using Express and Node.js to test CORS errors.
- How to whitelist and allows all CORS Origin with access control allow origin *.
- Access control allow origin for multiple domains
Related: Enabling NestJS CORS and Access Control Allow Origin (CORS)
Why Do you Think CORS Error Exists
Let’s say you have a web app accessed from example.com. This app requests the server domain api.example.com to fetch data. In this case, the browser will block server requests. This happens because the server using the domain api.example.com does not explicitly allow example.com to access its resources.
This will result to CORS errors. To allow the exchange of resources, you need to set up the appropriate headers in the server’s response. These headers indicate which cross origins are allowed to access the server’s resources.
What is Node.js CORS
CORS (Cross-Origin Resource Sharing) is a security feature implemented by web browsers to block web pages from requesting a different domain not similar to the web page domain. Its purpose is to prevent malicious websites from accessing sensitive information, such as user authentication credentials.
It’s also good to note that CORS is a browser feature. It is not a feature of the HTTP server protocol itself. This means it’s something you can handle when creating a server. However, when you create a client-side application that needs to connect to a server and is ruining on a different domain, you will need to enable CORS on the server to give the client access to resources.
Setting up the Application
Launch the terminal from your preferred directory and run the following command to initialize a Node.js project:
npm init -y
Along this guide, you will use the following dependencies:
- Express: For starting and handling the web server.
- CORS: For handling cross-origin access headers.
- Nodemon: For starting the development server.
Install the above dependencies by running the following two separate commands:
npm i express cors
npm i --save-dev nodemon
In your package.json file, add a script for starting the development server using Nodemon as follows:
{
    "dev":"nodemon app.js"
}
Create an app.js file that will host the application configurations and logic:
touch app.js
Implementing a Todos Route
To comfortably understand this concept, you will need to create a basic application. A todos example will be a perfect use case here. Go ahead and create it as follows:
Navigate to the app.js file and add the following changes:
- Import the necessary packages:
const express = require('express');
const cors = require('cors');
- Initialize the express application:
const app = express();
- Define the port where the application will be running on:
const PORT = process.env.PORT || 4000;
- Define an array with the todos for the Node.js app:
const todos = [
    {
        "id":1,
        "title":"Cooking Lunch",
        "completed":true
    },
    {
        "id":2,
        "title":"Coding a Node.js project",
        "completed":false
    },
    {
        "id":3,
        "title":"Going to the market",
        "completed":false
    },
    {
        "id":4,
        "title":"Doing Laundry",
        "completed":false
    }
];
- Define a GET route for fetching and returning the todos:
app.get('/', (req,res) => {
    return res.json({
        success:true,
        message:"Todos fetched successfully",
        data:todos
    })
});
- Start the application:
app.listen(PORT, () => console.log(`App started and running on PORT ${PORT}`));
Fetching Todos Without CORS Origin Headers
First, start the Node.js development server using the following command:
npm run dev
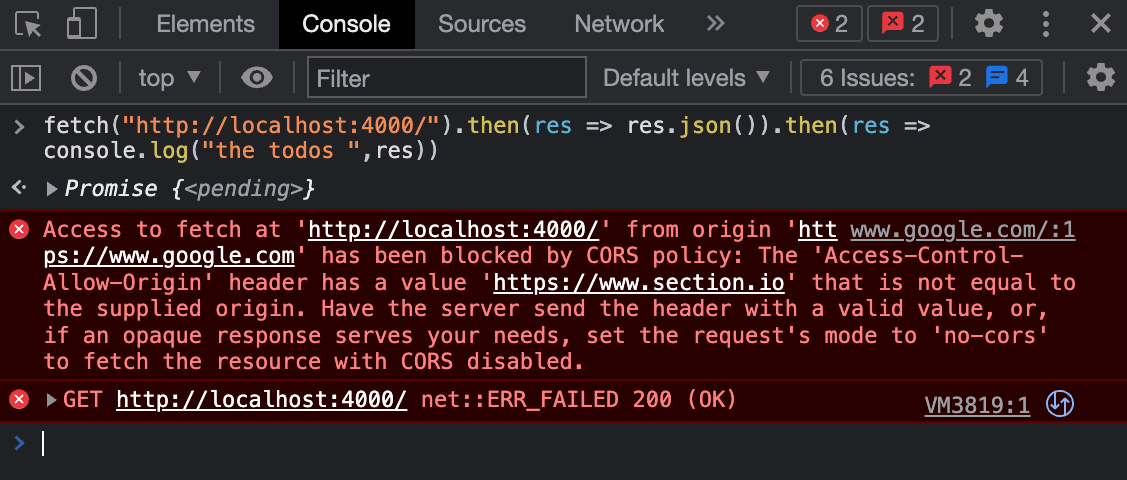
Go to https://www.google.com/ and open the developer console from there. In the developer console, do a fetch request to get the todos as below:
fetch("http://localhost:4000/").then(res => res.json()).then(res => console.log("the todos ", res));

This means you are using https://www.google.com/ as the origin, sending the request to the server on the http://localhost:4000/ server domain.
However, these are two different origins. Based on CORS policy, the server will reject the request to fetch the data to the https://www.google.com/. This is where the concept of CORS comes in handy.
The above response states that the origin https://www.google.com is not whitelisted to get the todos. Let’s whitelist it in the next step and see the result.
Enabling the CORS Origin Headers
Navigate to your app.js file. You now need to add the origin and whitelist so that the server can be able to share resources with it. The following examples should how to whitelist the https://www.google.com origin on the server:
app.use(cors({
    origin:"https://www.google.com"
}))
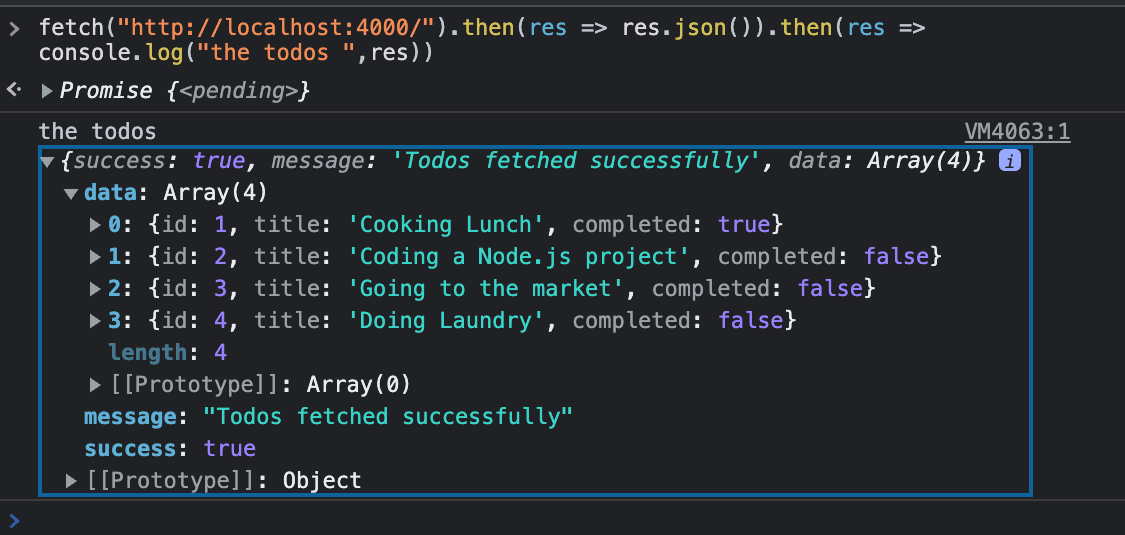
Rerun the fetch on the console for https://www.google.com. At this point, this origin has access to the CORS header. Thus, the security policy will allow it to get data from the server. Once you send the fetch() request using the browser console, the origin should now return the data as expected:
Whitelisting Multiple CORS Origins
Let’s say your API is accessed by different domains. This means you need to allow access to all the origins as needed. For example, if you send the fetch() request using a different domain, for example, https://www.bing.com, you will still receive the CORS error response.
Here is how you can add multiple origins that consume your server resources: In the app.js file, create an array of all the origins you want to whitelist as follows:
const whitelisted_origins = ["https://www.google.com","https://www.bing.com"];
- Define the origins on cors:
app.use(cors({
    origin:whitelisted_origins
}))
Rerun the fetch on either of the whitelisted origins. Test the fetch() using https://www.bing.com and the error should be resolves

Whitelisting All CORS Origins
Likewise, you can make the resource public and allows all origins to access the APPI data. In this case, navigate to your app.js file and change the origin configurations for CORS as shown below:
app.use(cors({
    origin:'*'
}))
Send the fetch request from the site. You should be able to get the todos regardless of the origin of sending the request.
Conclusion
CORS can be a problem when developing web applications that request a domain other than the one serving the web app. In this scenario, your server app need be configured to allow the client’s origin to access its resources.
Written By: