Add Secure Self-Signed SSL HTTPS Certificate to Node-RED
Posted February 20, 2024
This guide teaches you how to enhance Node-Red securing and add a valid SSL-signed certificate to access Node-Red over HTTPS. By default, traffic to your Node-RED instance is unencrypted. You use HTTP. This means you haven’t secured traffic between devices accessing Node-RED. That is why you need HTTPS added to a Node-RED server.
To secure Node-RED you need:
- Add a valid SSL HTTPs self-signed certificate to a Node-RED server.
- Add username and Password Authentication to restrict Node-Red access.
Let’s start with the first option and use OpenSSL to create a valid SSL-TLS that will let you encrypt Node-Red over HTTPS. You will learn:
- Generating a Node-Red Self-Signed SSL Certificate with OpenSSL.
- How to use Let’s Encrypt and add an HTTPS SSL Certificate to Node-Red.
- How to set Node-Red to always redirect HTTP to HTTPS
- Add a security layer to Node-Red using username and Password Authentication
Ready? Dive and Add a Secure HTTPS Self-Signed SSL Certificate to Node-RED with OpenSSL. It works with Let’s Encrypt as well.
Preliqusites to Adding a Secure SSL HTTPS Certificate to Node-RED
Before using OpenSSL or Let’s Encrypt to generate a Self-Signed SSL-TLS Certificate and access Node-Red over HTTPS, Node-Red must its Self be running on your computer.
If you want to use Certbot and Let’s Encrypt SSL Certificate, ensure you have a working Domain name and access to DNS.
This setup is created to work with Ubuntu, Debian, Windows, and Raspberry Pi. The steps will get SSL ready and Node-Red working on HTTPS based on these OS. Therefore, ensure you have Node-Red based on your OS. I have the following guides to help you set it up:
- Install and Run Node-RED on Debian
- Install and Run Node-Red on Raspberry Pi
- Install|Run Node-RED on Linux Ubuntu
- Installing|Running Node-Red on Windows for Windows
Once you have the Node-RED server ready based on your OS, it is time to add an SSL Secure Self-Signed Certificate and access this server on HTTPS.
For the first, part I will use Certbot, and Let’s Encrypt SSL Self-Signed SSL Certificate to add HTTPS to Node-RED as follows:
Using Certbot Let’s Encrypt SSL HTTPS Certificate with Node-RED
For this to work, your Node-RED server must be running. At the same time, you will need a domain name that points to your System IP address. It should be added as an A record as follows:
Here, I added a subdomain and the UP to my server to the DNS as follows:

This setup should give time for your IP to propagate with the DNS.
Go ahead and generate the Let’s SSL/TLS certs with Certbot as follows:
- Install Let’s Encrypt client. This should be the Certbot:
sudo apt update
sudo apt install certbot python3-certbot-nginx -y
- Now, with Let’s Encrypt, Node-RED will run Behind Nginx Reverse Proxy. Ensure Nginx is installed:
sudo apt update
sudo apt install nginx -y
If you want to use Nginx Proxy Manager. Please check the Next steps. I will show you how to create a Let’s Encrypt SSL certificate and access Node-RED with HTTPS using Nginx Proxy Manager UI
- Use Certbot to generate Let’s Encrypt HTTPS certs based on your domain (subdomain) name:
sudo certbot certonly --nginx -d nodered.your_domain.com
At this, you will prompted to add your email and other yes prompts. Make sure you add them correctly. Certbot should show a certificate successfully issued message is correct:
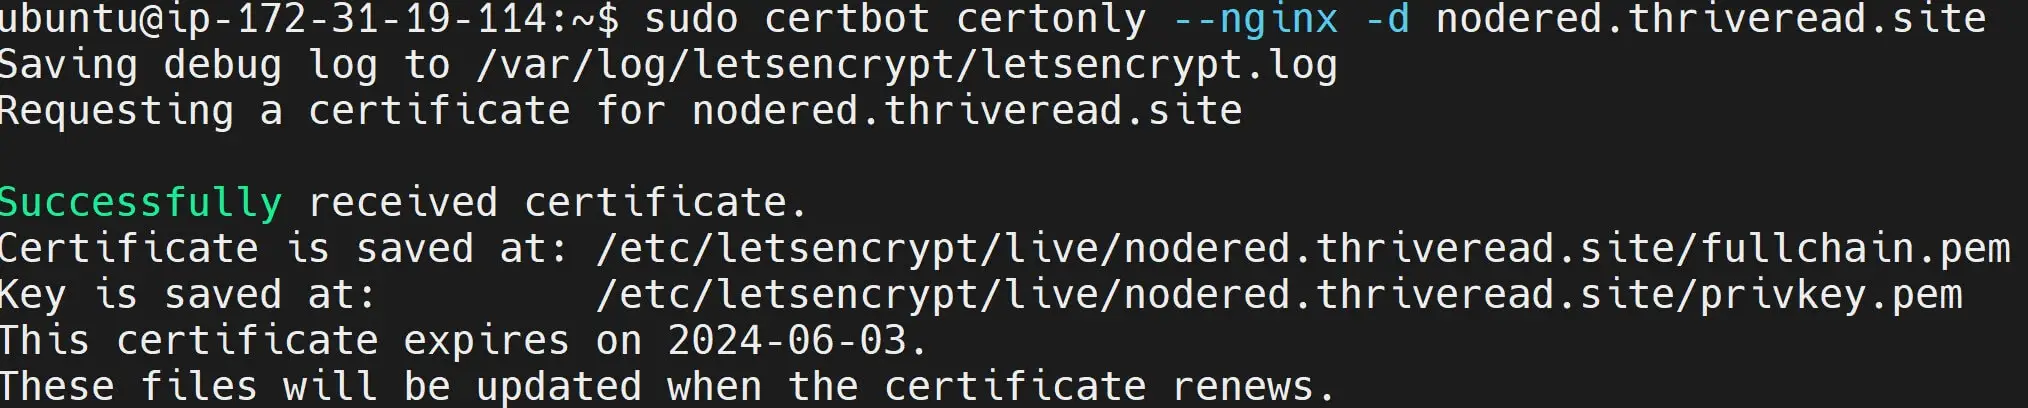
Certbot will create Self-Signed certificates based on your Domain. In my case, I have the certs saved to the following paths:
Certificate is saved at: /etc/letsencrypt/live/nodered.thriveread.site/fullchain.pem
Key is saved at:         /etc/letsencrypt/live/nodered.thriveread.site/privkey.pem
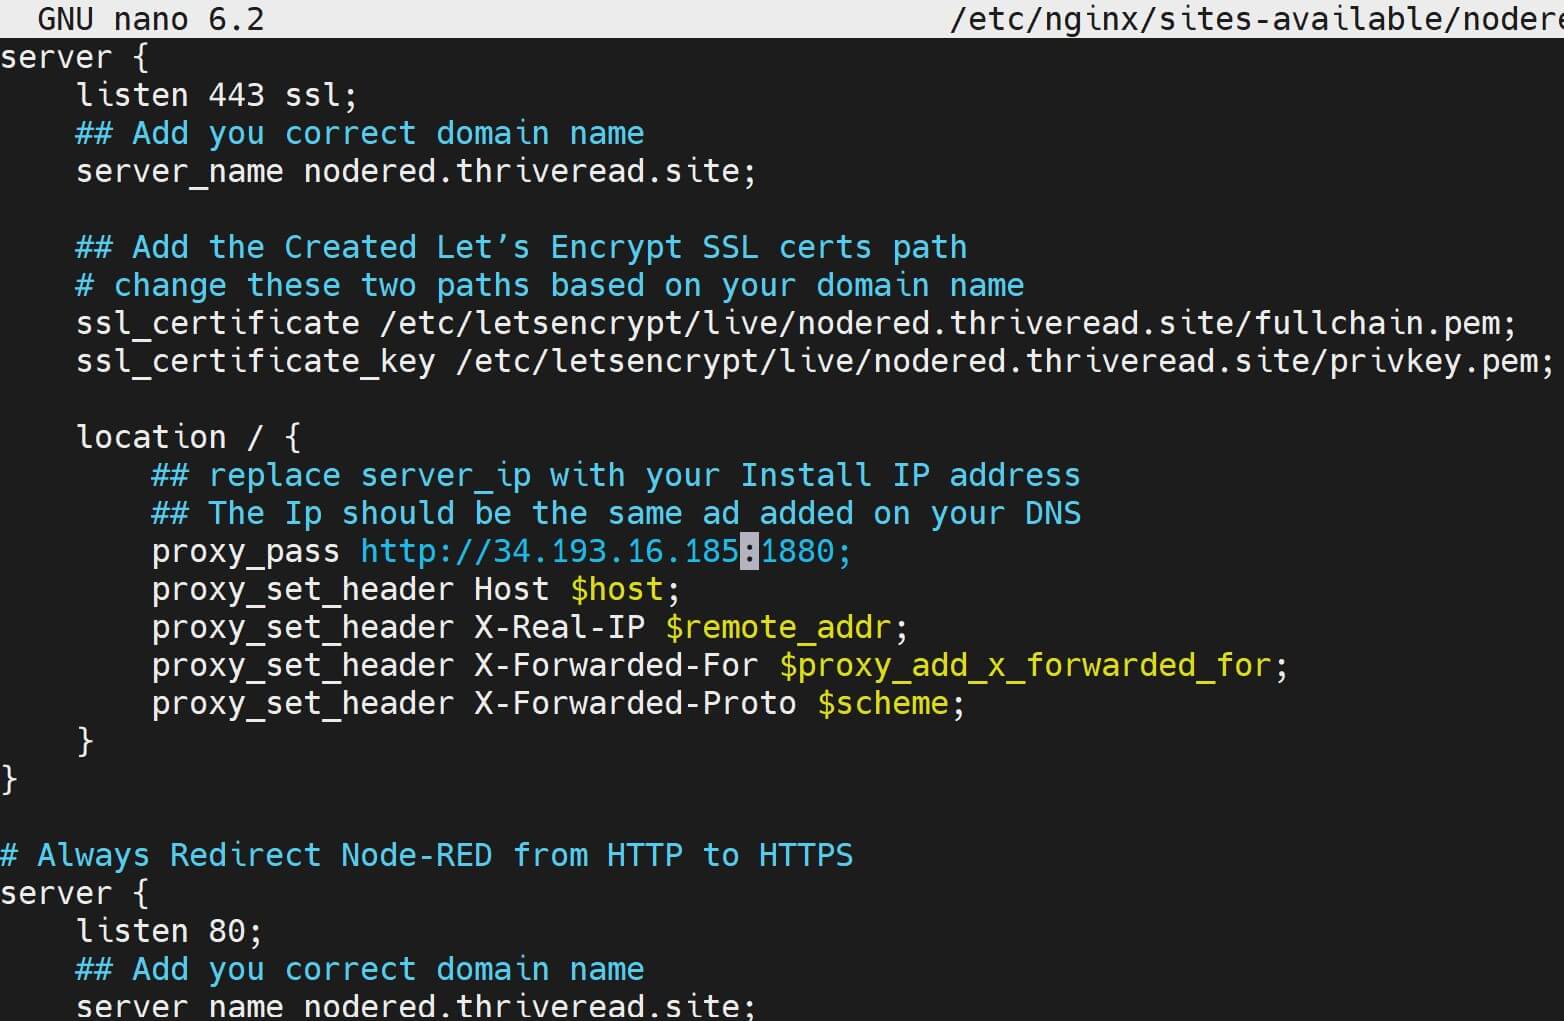
Creating Node-Red HTTPS Reverse Proxy Config with Self-Signed Certs
For Nginx to work as a Reverse Proxy for HTTPS, you will need the right configuration to tell Nginx where the Node-Red server and the create self-signed certs are located. Follow these steps:
- Create a Node-RED Nginx configuration file
sudo nano /etc/nginx/sites-available/nodered
You will add your Node-RED server running server, certs path, and your Domain as added in your DNS:
server {
    listen 443 ssl;
    ## Add your correct domain name
    server_name nodered.yourdomain.com;

    ## Add the Created Let’s Encrypt SSL certs path
    # change these two paths based on your domain name
    ssl_certificate /etc/letsencrypt/live/nodered.thriveread.site/fullchain.pem;
    ssl_certificate_key /etc/letsencrypt/live/nodered.thriveread.site/privkey.pem;

    location / {
        ## Replace server_ip with your Install IP address
        ## The IP should be the same ad added on your DNS
        proxy_pass http://server_ip:1880;
        proxy_set_header Host $host;
        proxy_set_header X-Real-IP $remote_addr;
        proxy_set_header X-Forwarded-For $proxy_add_x_forwarded_for;
        proxy_set_header X-Forwarded-Proto $scheme;
    }
}

# Always Redirect Node-RED from HTTP to HTTPS
server {
    listen 80;
    ## Add your correct domain name
    server_name nodered.yourdomain.com;
    # All Node-RED requests  to HTTPS
    return 301 https://$host$request_uri;
}
Accessing Node-RED with Certbot Let’s Encrypt HTTPS and SSL
You are almost there. First, ensure the added /etc/nginx/sites-available/nodered configuration is available as Nginx sites-enabled status:
sudo ln -s /etc/nginx/sites-available/nodered /etc/nginx/sites-enabled/
Next, confirm the added file is valid based on Nginx:
sudo nginx -t

Finally, reload Nginx to apply the changes:
sudo systemctl reload nginx
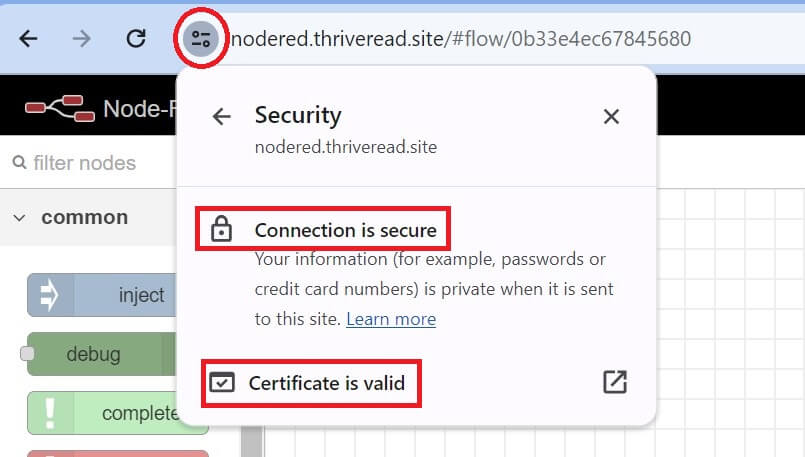
Node-RED should be accessed using HTTPS. For example: https://nodered.thriveread.site/. In your case https://nodered.domain_name/.
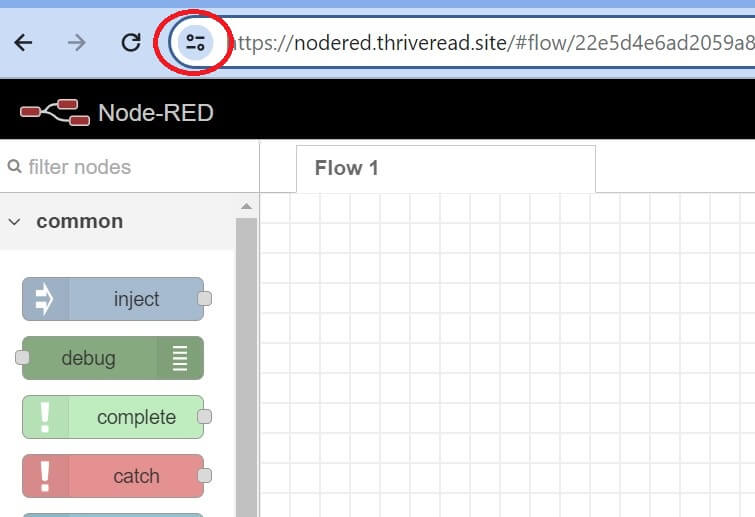
The connection is secure and the HTTPS SSL certificate is valid:
Adding Node-RED HTTPS SSL Certificates Using Nginx Proxy Manager
Suppose you don’t want to use Nginx directly. You have an Nginx Proxy Manager installed. Then Adding HTTPS and SSL self-signed will get even easier.
Nginx Proxy Manager offers a web-based interface for managing your proxy configurations. Its interface allows you to easily create, edit, and delete proxy hosts, SSL certificates, and other settings.
If you don’t have Nginx Proxy Manager, I have this Install Nginx Proxy Manager with Docker Compose guide that is perfect for you.
Once you have Nginx Proxy Manager on Port 81:
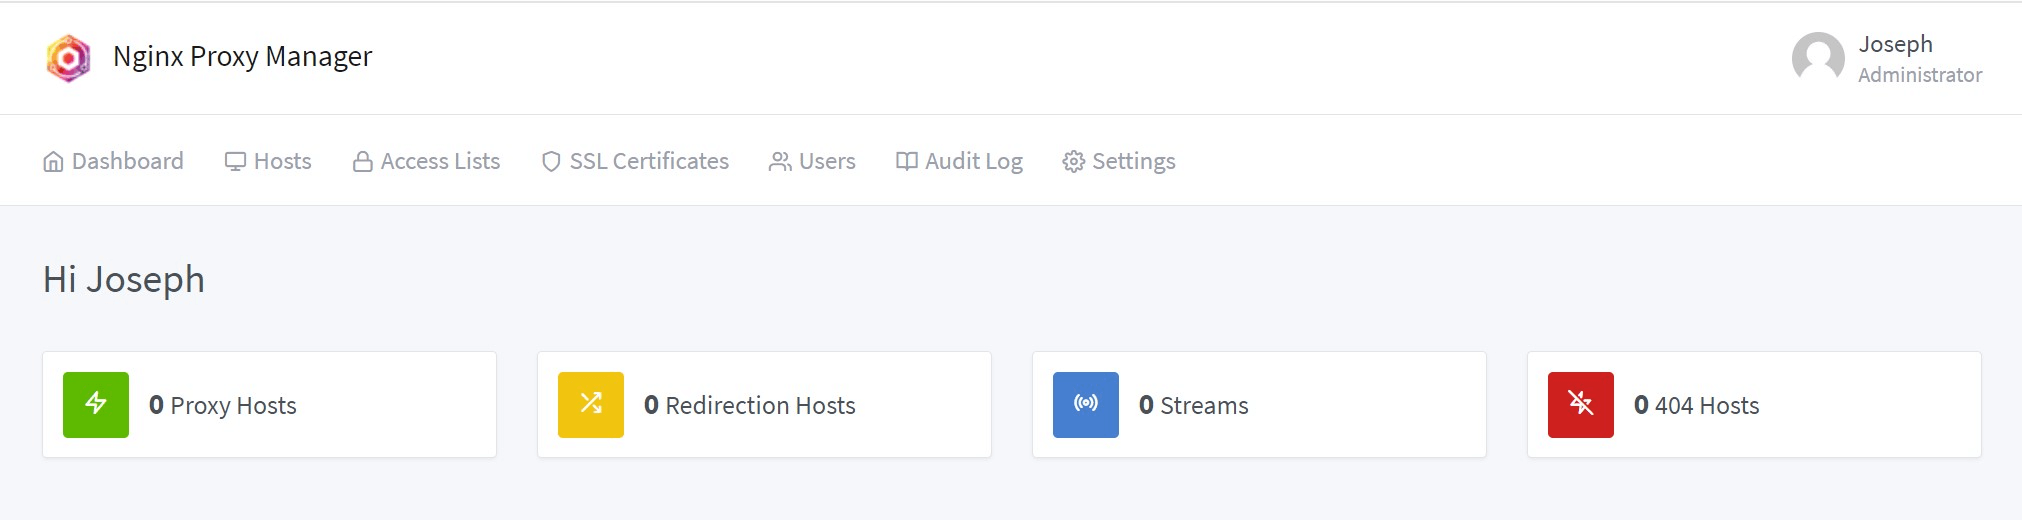
Proceed as follows:
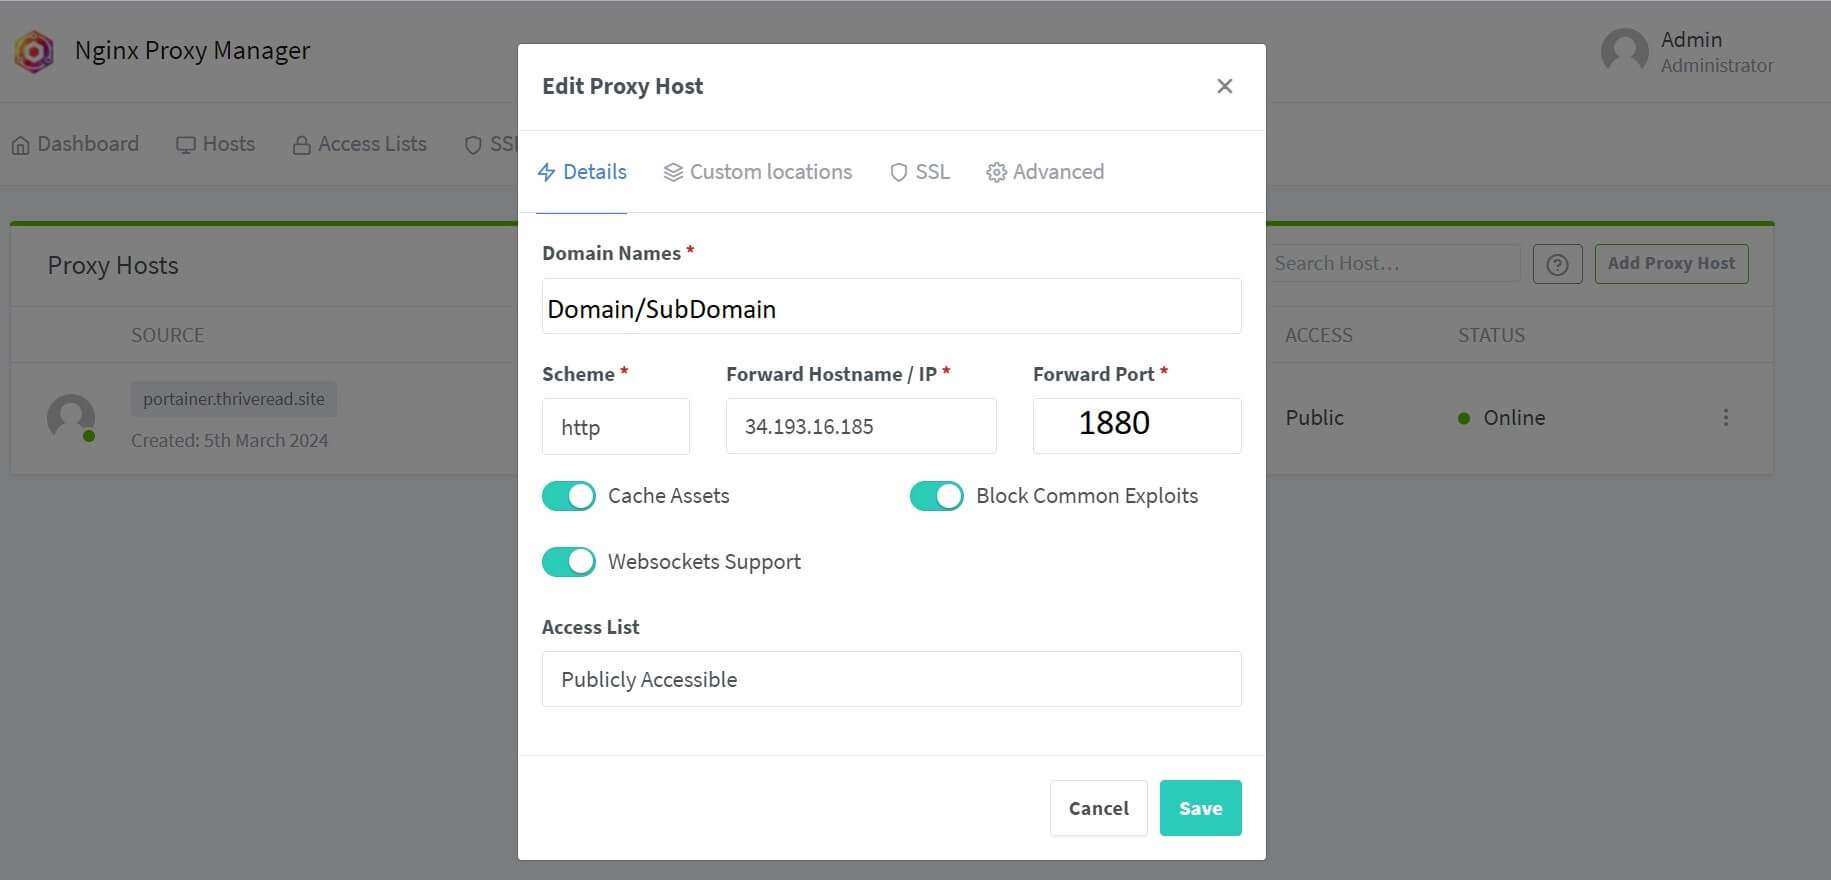
- Add a New Proxy and your Node-RED details as follows:
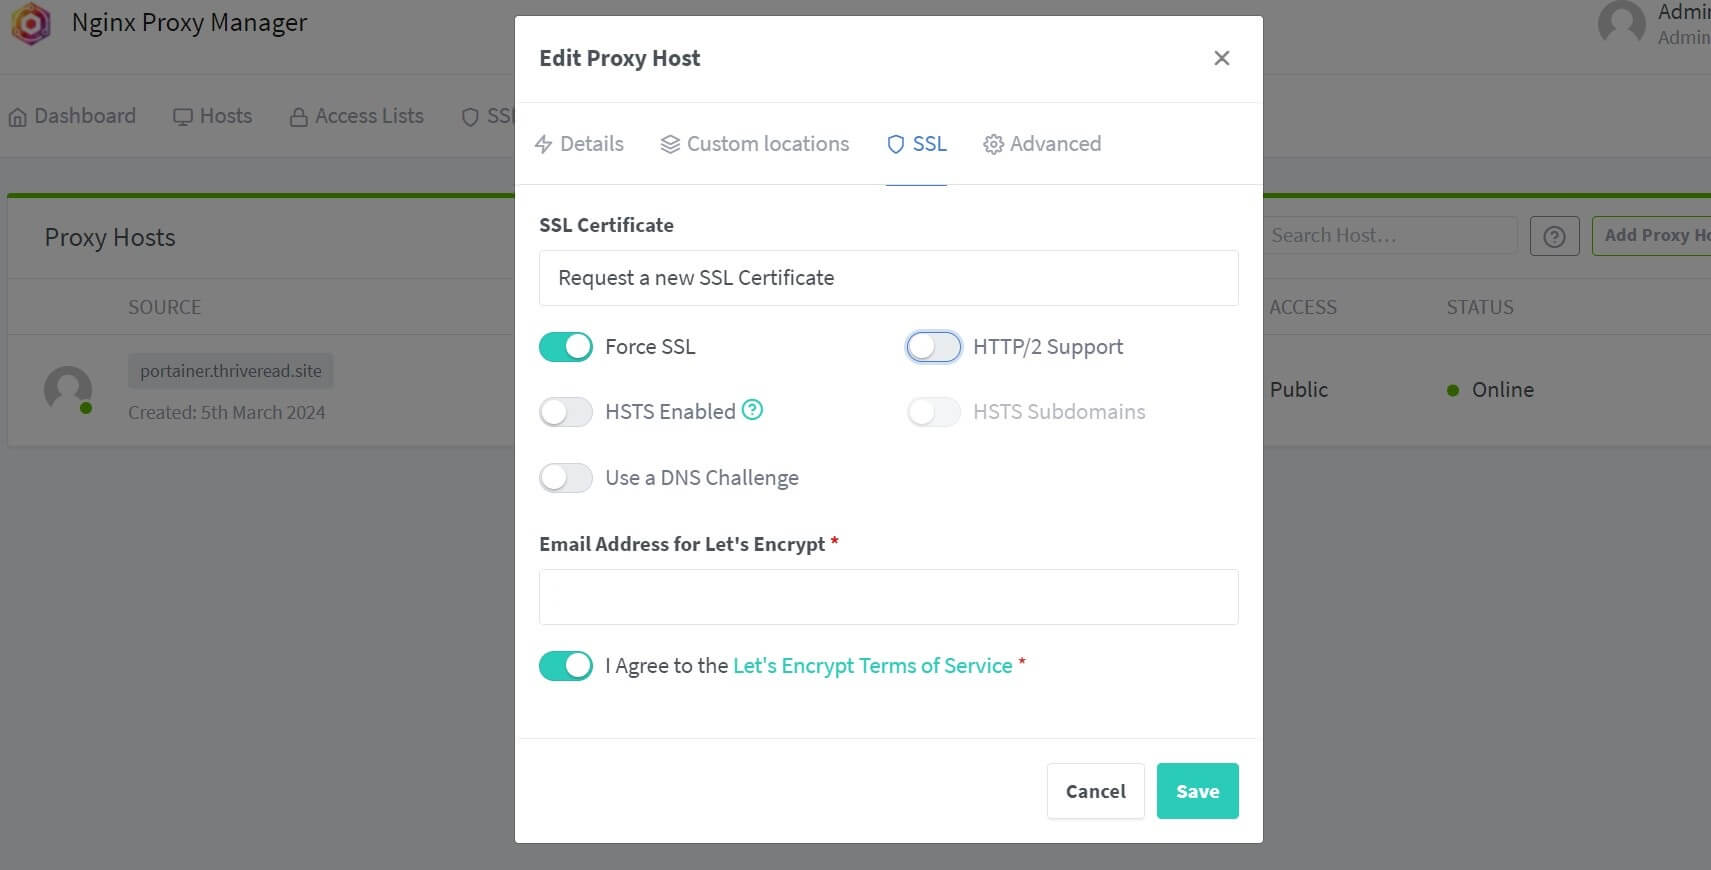
- Go to the SSL tab and add the Let’s Encrypt SSL certificate with HTTPS:
Using Node-RED and OpenSSL HTTPS Certificates
Enabling secure HTTPS access in Node-RED will add an SSL Certificate. This will encrypt the communication between the Node-RED server and clients. The self-signed certificates are generated by a Certificate Authority (CA). The common ones are:
- Certbot, and Let’s Encrypt (already covered)
- OpenSSL
- Mkcert
In the coming steps, you will use OpenSSL. If on Linux, OpenSSL is already installed. You just need to generate the SSL certificates.
If you are on Windows use Git for Windows to use OpenSSL with
winpty openssl <rest of the command>. MacOS will require you to install OpenSSL usingbrew install openssl.
The installed Node-RED binaries are stored in the ~/.node-red directory. In this path, create a new folder to store SSL certificates as follows:
mkdir ~/.node-red/certs
cd ~/.node-red/certs
Generating Self-Signed SSL/TLS Certificate for Node-RED HTTPS Server
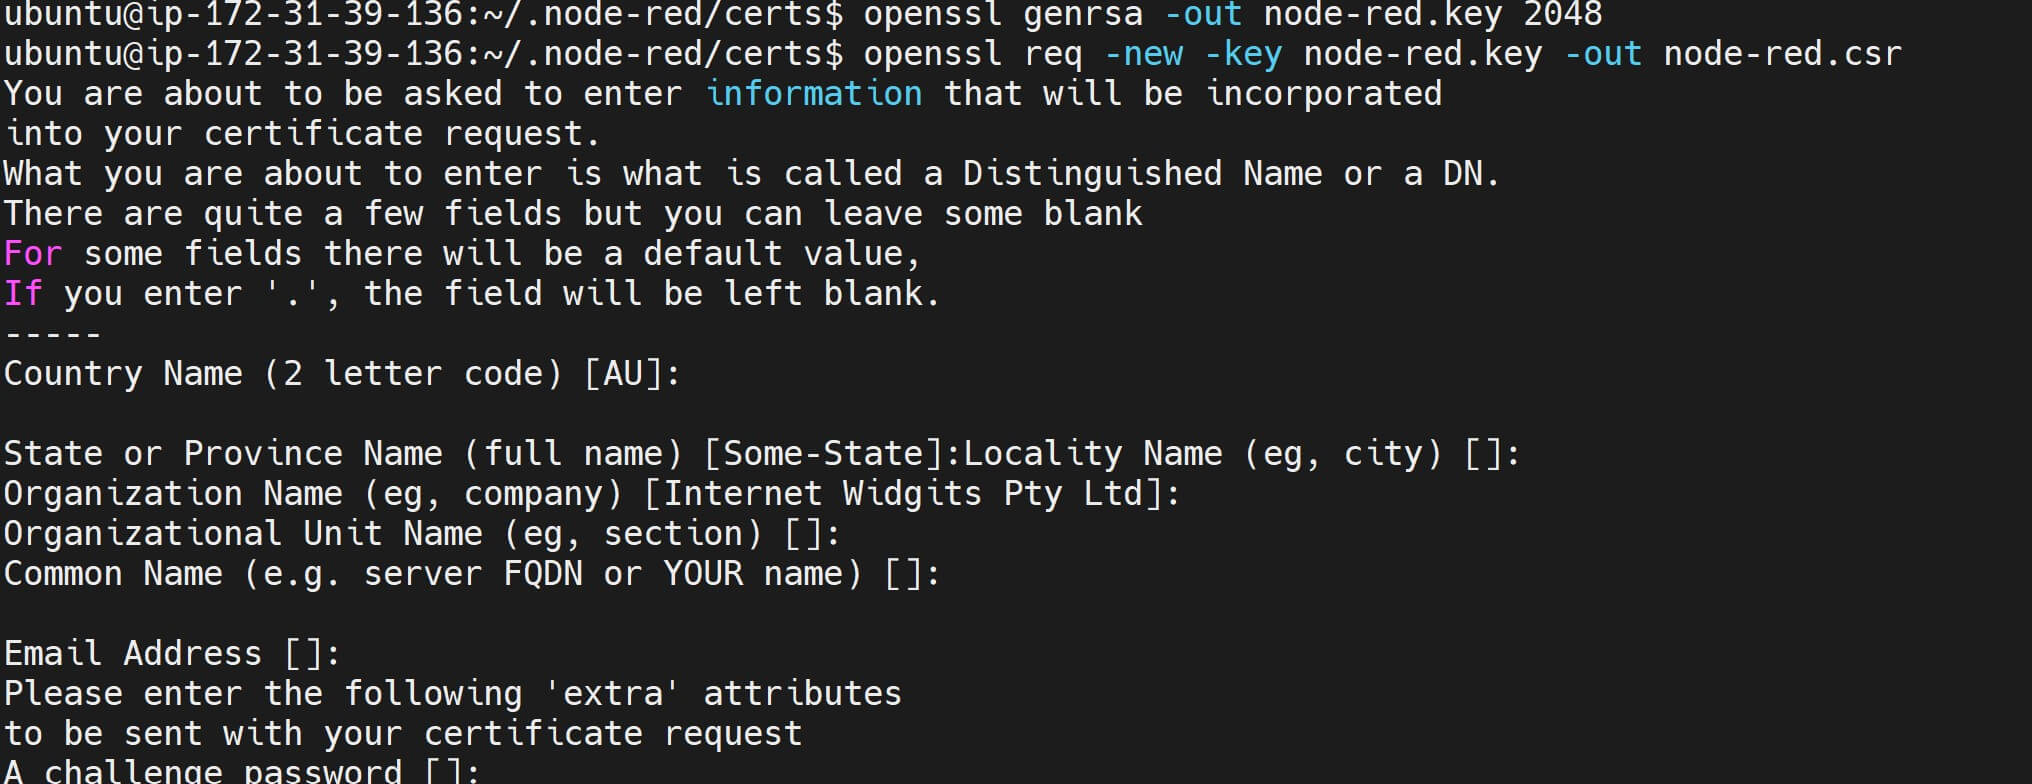
Now use OpenSSL to generate Node-Red SSL self-signed certificates as follows:
- Generates a new RSA private key
openssl genrsa -out node-red.key 2048
- Generates a Certificate Signing Request (CSR) using the private key generated in the previous step. The CSR contains information about the entity requesting the certificate (such as domain name, organization name, etc.). You will be prompted to provide this information interactively when you run this command:
openssl req -new -key node-red.key -out node-red.csr
- Sign the CSR using the private key generated earlier. This should create a self-signed SSL certificate (
node-red.crt) to secure HTTPS connections:
openssl x509 -req -in node-red.csr -signkey node-red.key -out node-red.crt

To confirm you have the key and the SSL certificate, use the ls command in your node-red/certs folder. You should have node-red.crt and node-red.key ready as follows:
ls

node-red.key: The private key used to secure the SSL connection.node-red.csr: The Certificate Signing Request, containing information about the entity requesting the certificate.node-red.crt: The self-signed SSL certificate, signed using the private key.
Configuring Node-RED to Use HTTPS with SSL Signed Certificate
You have a working self-signed SSL certificate. You now need to configure the setting of Node-Red to use HTTPS alongside the created SSL.
All Node-RED settings as saved in node-red/settings.js. Open it as follows:
nano ~/.node-red/settings.js
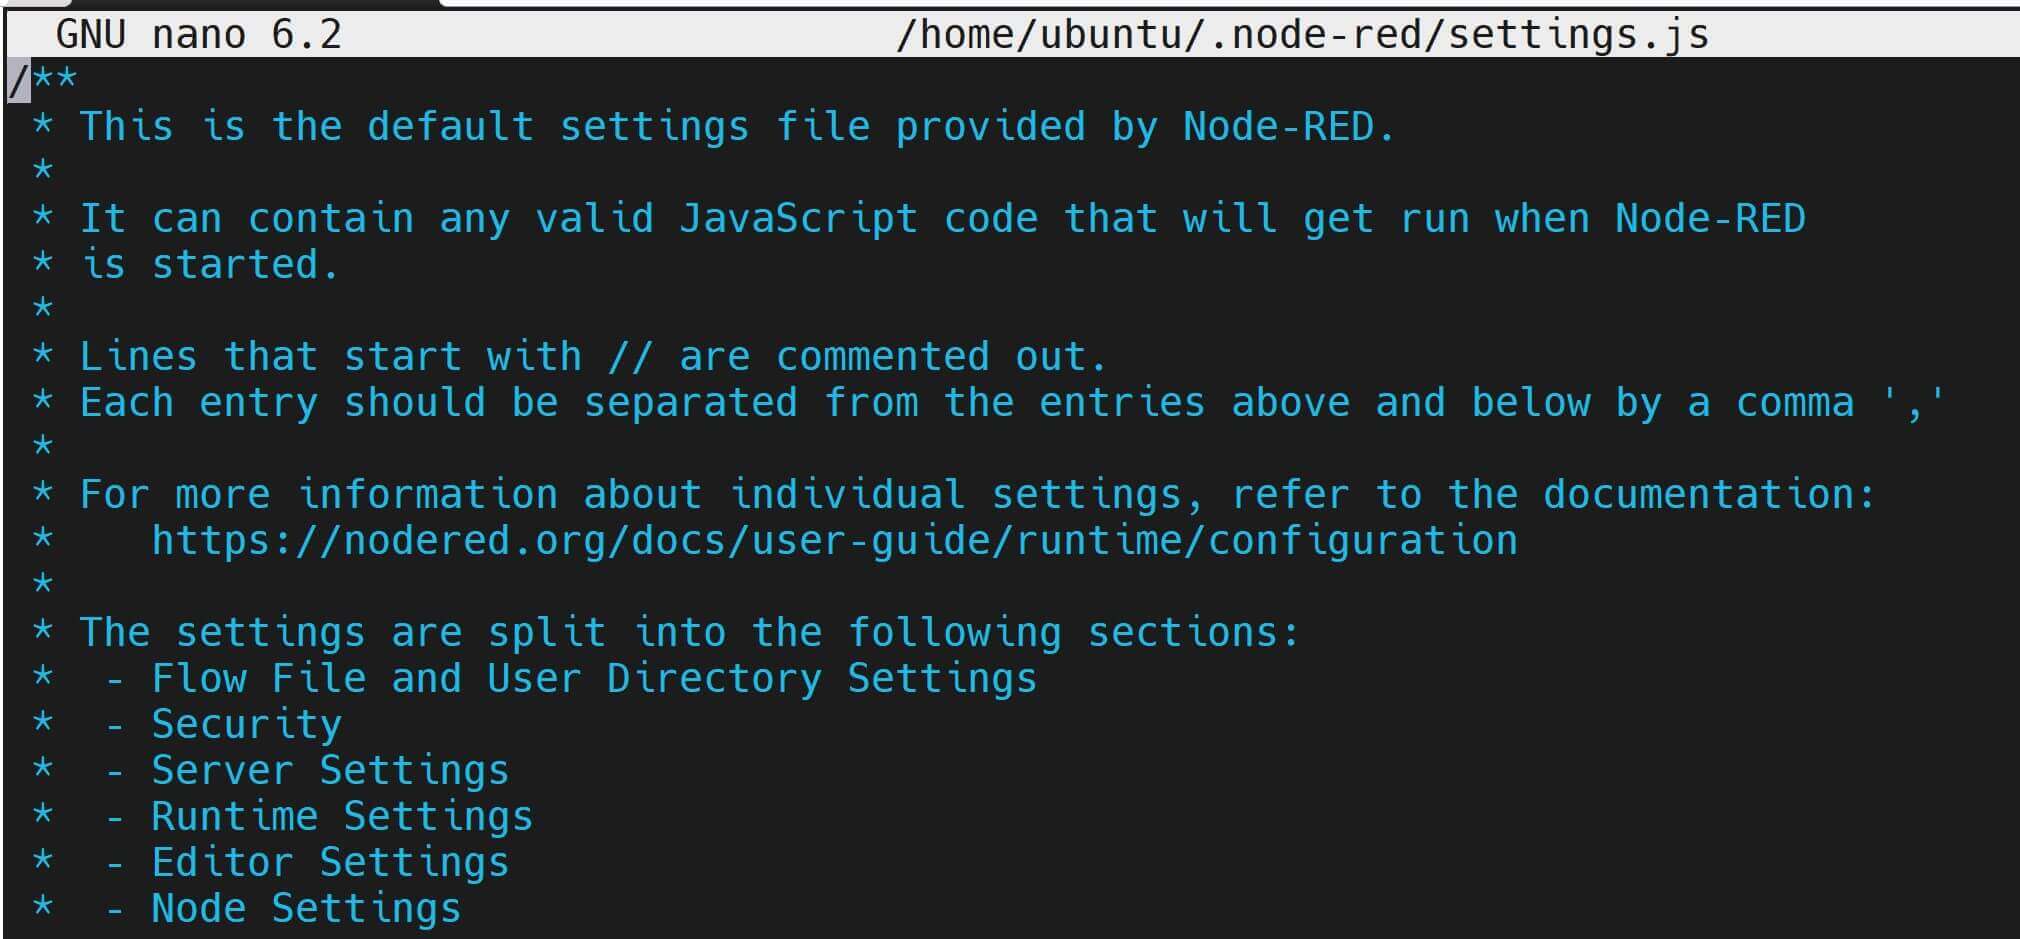
Go ahead and find the https section:
It’s here you need to Enable HTTPS to Node-RED by adding the SSL Certificate paths:
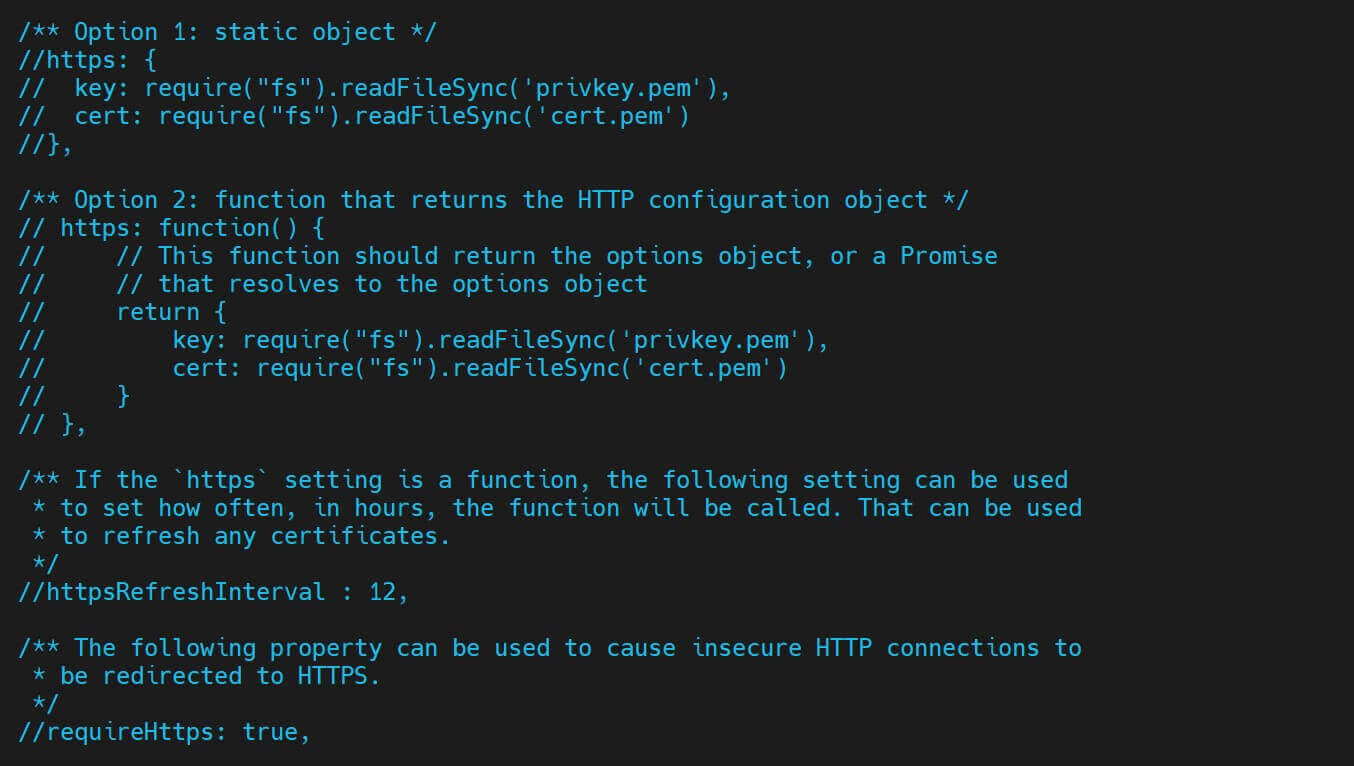
https: {
    key: require('fs').readFileSync('path/to/your/node-red.key'),
    cert: require('fs').readFileSync('path/to/your/node-red.crt')
},
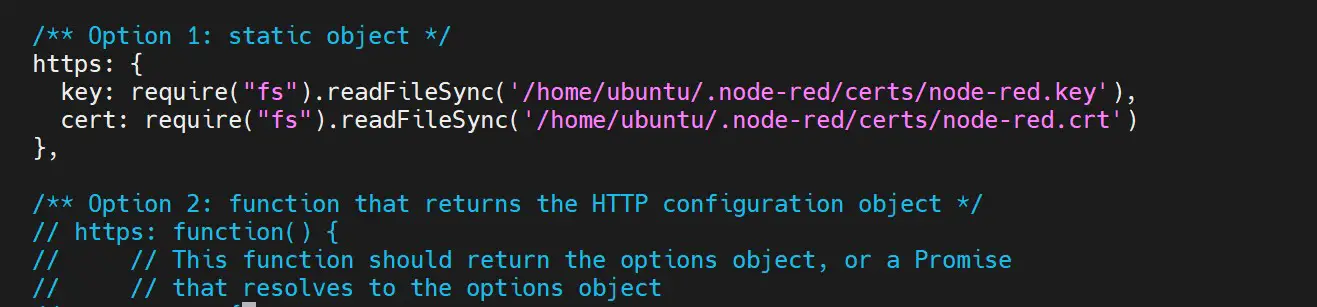
The cert files are located on node-red/certs based on how we generated the keys. This means you will uncomment the following section and the path as follows: You can choose to use Option 1 or Option 2:
https: {
    key: require('fs').readFileSync('/home/ubuntu/.node-red/certs/node-red.key'),
    cert: require('fs').readFileSync('/home/ubuntu/.node-red/certs/node-red.crt')
},
In this case, replace yourusername with your computer user name and save the changes:
Running Node-RED with HTTPS and SSL Certificate
- Use the following command to restart the server:
node-red restart
- The run it using:
node-red start
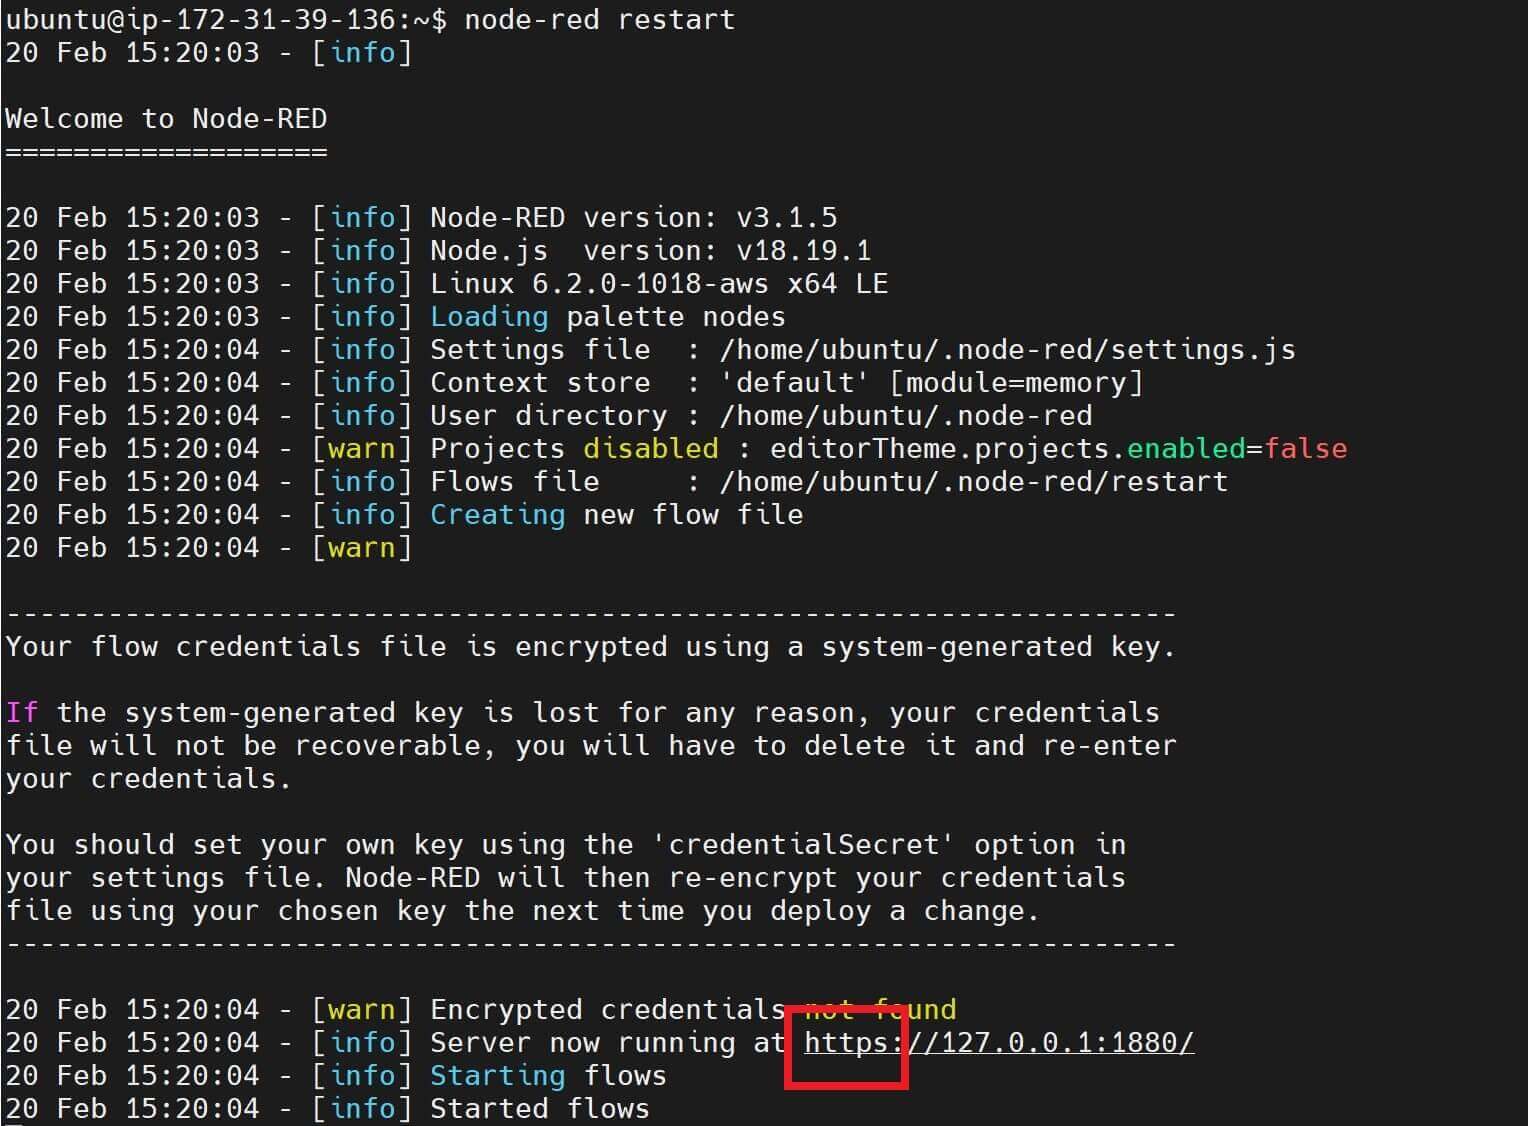
Check the above results. Node-RED is now running with the create SSL and now using HTTPS.
Now use HTTPS to access the Node-RED server.
Note:
- Make sure your firewall allows traffic on port 1880 (or whichever port you’ve configured for Node-RED).
- You’re using a self-signed certificate; your browser may show a warning about the certificate not being trusted. This is expected with self-signed certificates.
You might get the following error on Chrome if you are using a solid IP address and not your domain:
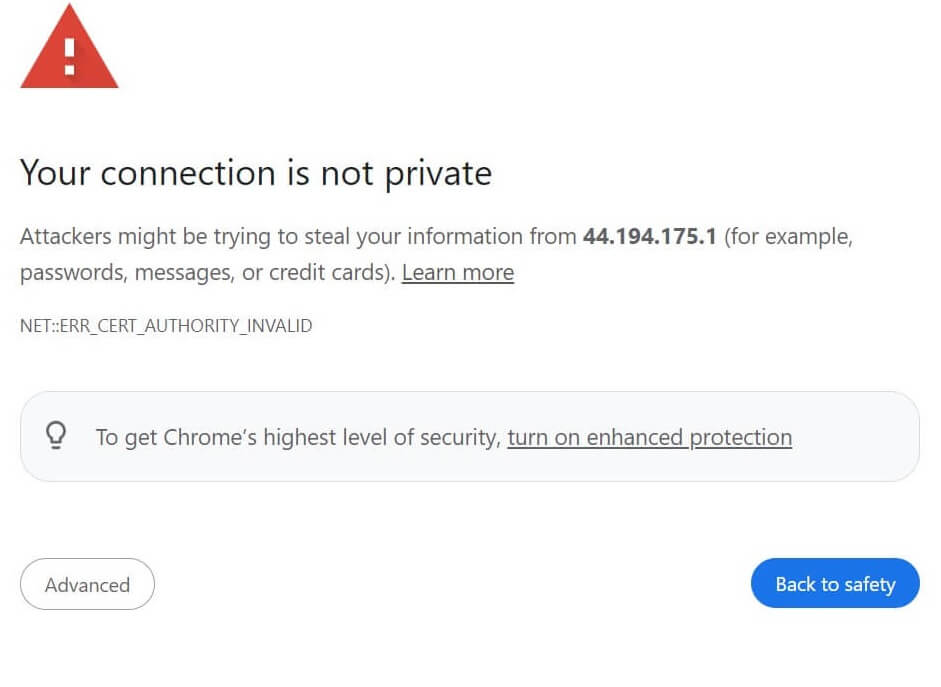
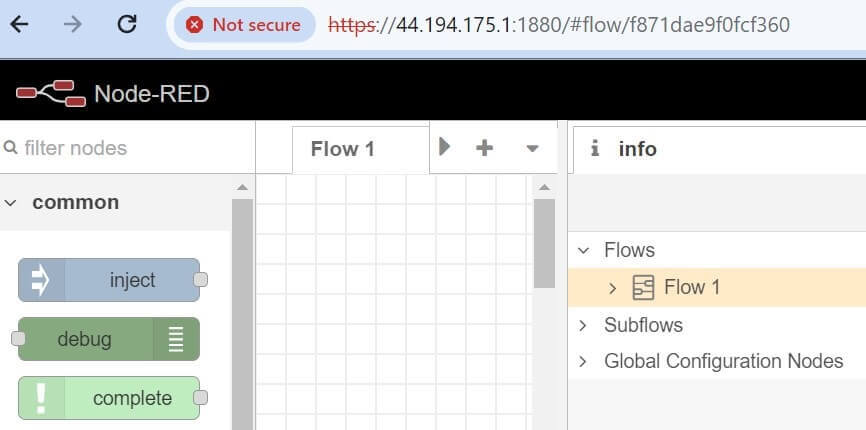
Regardless, Node-RED should work on HTTPS https://your_pi_ip:1880:
Configuring Node-RED to Redirect HTTP Requests to HTTPS
If you want to redirect HTTP requests to HTTPS, open the settings file:
nano ~/.node-red/settings.js
Uncomment the following section:

Now, you can always access Node-RED via HTTPS.
Securing Node-RED HTTPS with Authentication
To add an extra layer of security, add a username and password to your settings file as follows:
- Generate a password hash to use for authentication:
node -e "console.log(require('crypto').createHash('sha256').update(process.argv[1]).digest('hex'))" your_password_here
- Open your Node-RED settings.js file.
nano ~/.node-red/settings.js
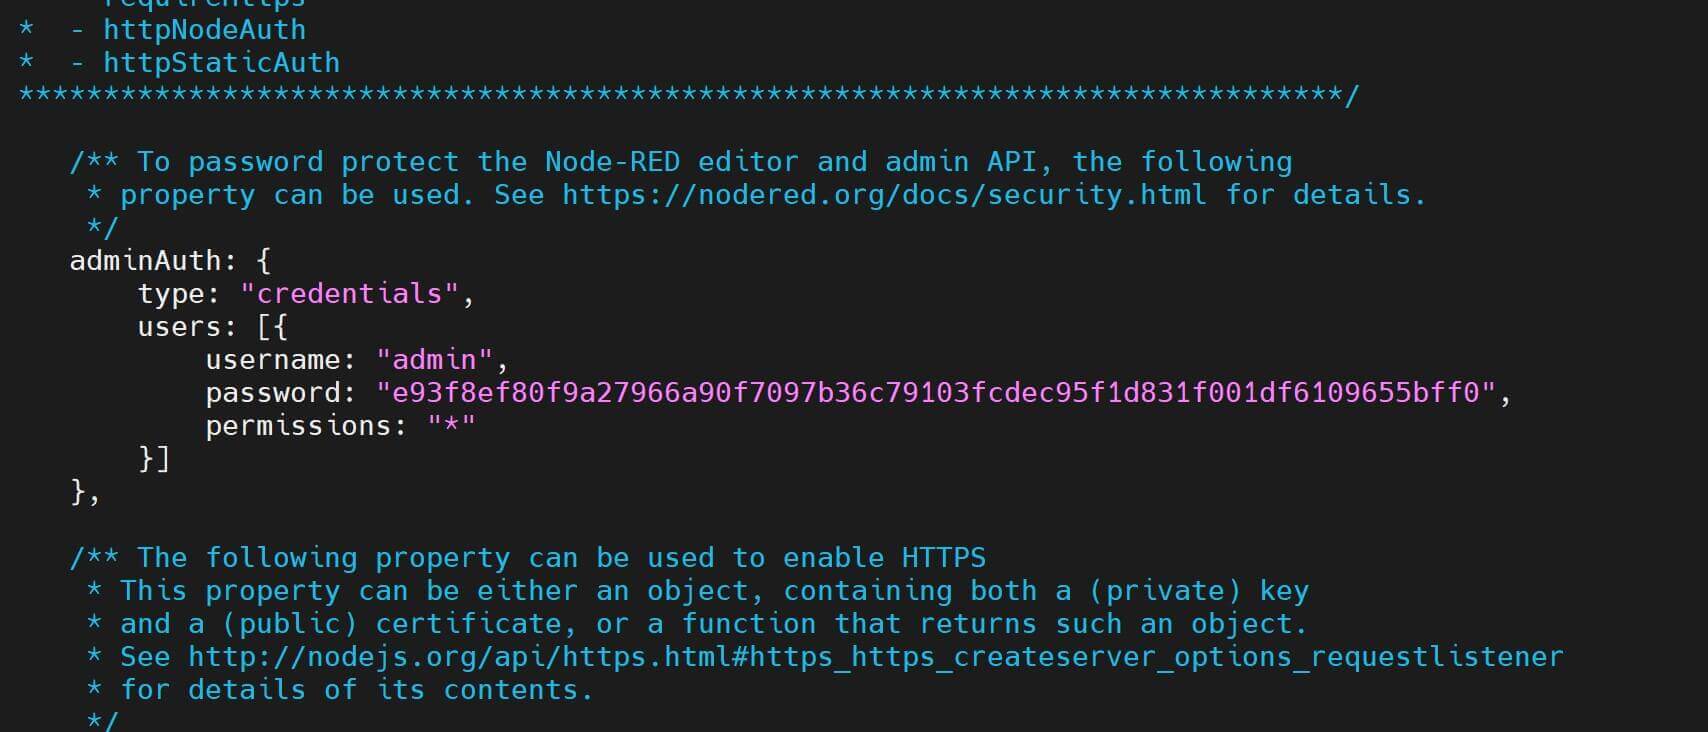
- Configure adminAuth Middleware and Uncomment or add the adminAuth section with username and password hash generated:
adminAuth: {
    type: "credentials",
    users: [{
        username: "admin",
        password: "your_password_hash",
        permissions: "*"
    }]
},
- Use the following command to restart the server:
node-red restart
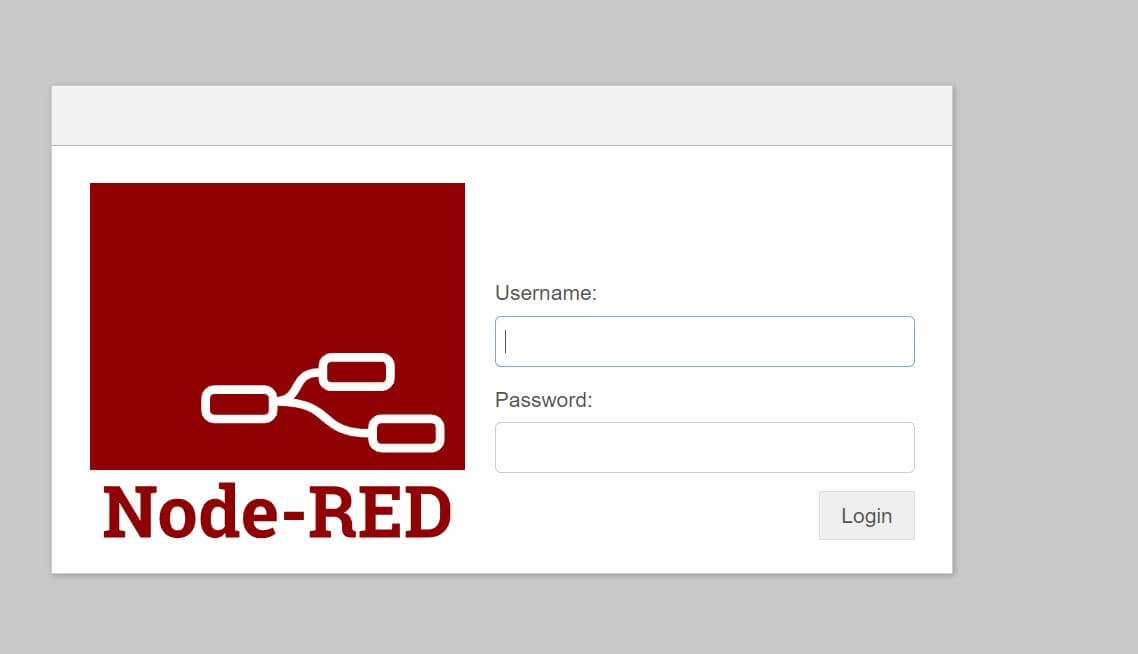
You should use the password and username to access Node-RED over HTTPS:
Conclusion
I hope you can now secure Node-RED with HTTPS. You have learned:
- Generating a Node-Red Self-Signed SSL Certificate with OpenSSL.
- How to use Let’s Encrypt and add an HTTPS SSL Certificate to Node-Red.
- How to set Node-Red to always redirect HTTP to HTTPS.
- Adding a security layer to Node-Red using username and Password Authentication.
Written By:
Joseph Chege
More Related Articles:
-

Easy Example Tutorial to Using Node-Red with SQlite
Jun 10, 2024
-

Caddy 2 Reverse Proxy Server with Docker and Docker Compose Example
Mar 23, 2024
-

How to Install Nginx Proxy Manager on Ubuntu 22.04|20.04
Mar 23, 2024
-

Install jc21 Nginx Proxy Manager w/ Docker Compose/MariaDB Aria Container
Mar 5, 2024