Easy Example Tutorial to Using Node-Red with SQlite
Posted June 10, 2024

This Tutorial teaches you how to store and read SQLite from Node-RED. You will use a file-based SQLite database and integrate it with a Node-RED server to manage automation data.
You will learn:
- Setting up Node-RED and installing SQLite
- How to create an SQLite note to add Node-RED database and tables.
- Reading and Adding data to SQLite
Ready? Let’s break down the steps to Using Node-Red with SQLite
Step 1: Setting up Node-RED installing SQLite
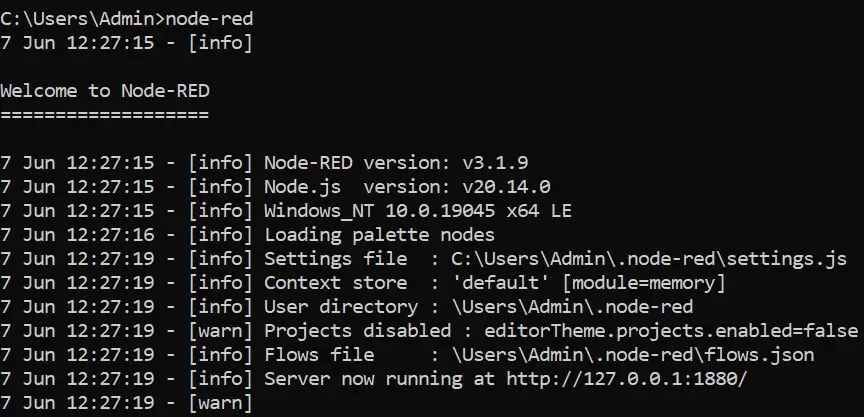
You don’t need a complex process to get your Node-RED ready. Ensure you have Node.js installed and run the following command to install Node-Red as a global module:
npm install -g --unsafe-perm node-red
Now, that the Node-RED is ready, start the server locally using the following command:
node-red
If you a still running this Node-RED setup locally, check the following steps to have it ready in your specific environment:
- Setting Up Node-Red with Portainer and Docker
- Install|Run Node-RED on Linux Ubuntu
- Running Node-Red on Windows
Step 2: Setting up Node-RED installing SQLite
Node-RED runs behinh Node.js. It uses NPM to manage modules such as SQLite. This means running the following command gets SQlite on Node-RED. However, you will need to access the Node-RED path and open ~/.node-red where the package.json file is located and install SQlite using NPM:
npm i --unsafe-perm node-red-node-sqlite
On the same ~/.node-red path, you will run the following command to let Node-RED load the installed SQlite module:
npm rebuild
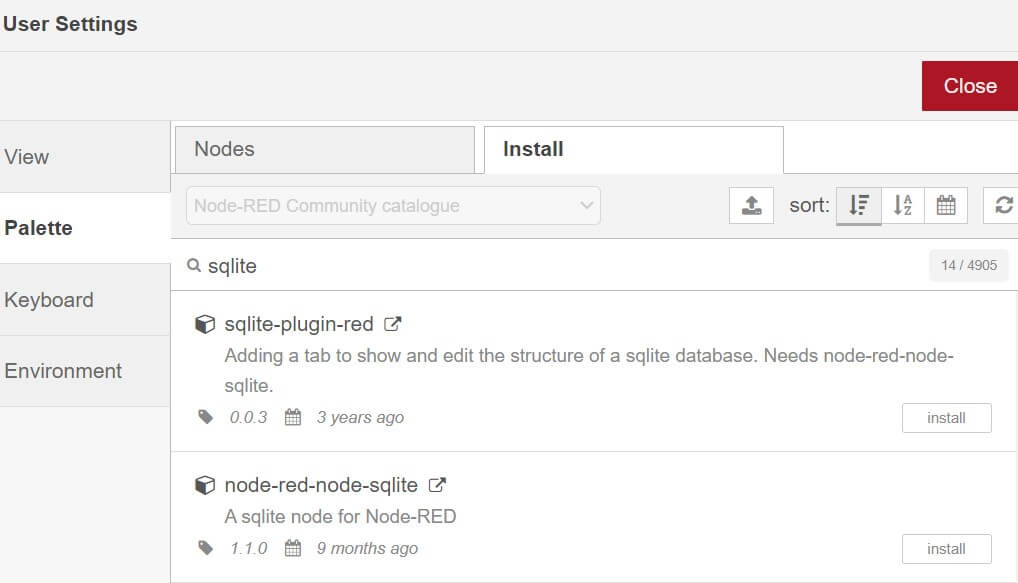
If the above process is hard, check these steps:
- Open Node-RED
http://127.0.0.1:1880/address on your browser. - Navigate to the menu select manage palette and go to the manage palette configuration box.
- Here, you will use the
Installand searchsqlite. Make sure you Install node-red-node-sqlite as such:
Step 3: Setting up SQLite with Node-RED
To allow access to a SQLite database, Node-RED must connect to the file system. Now, you need to ensure SQLite is installed on your machine. I used the sqlite3 command to check if SQLite is ready.
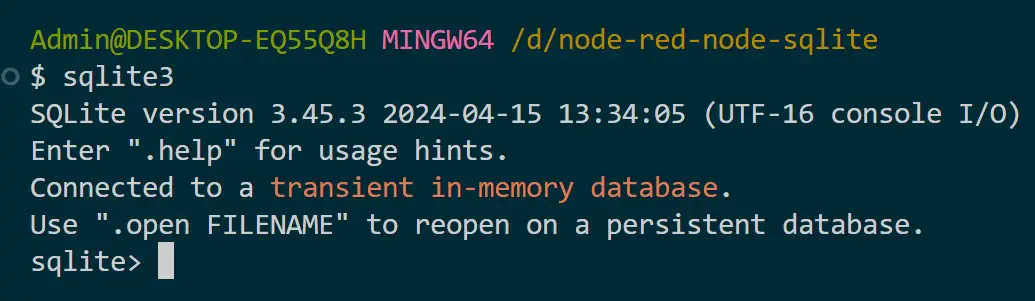
If you don’t have SQLite ready, check this post and install SQLite so Node-RED can access it.
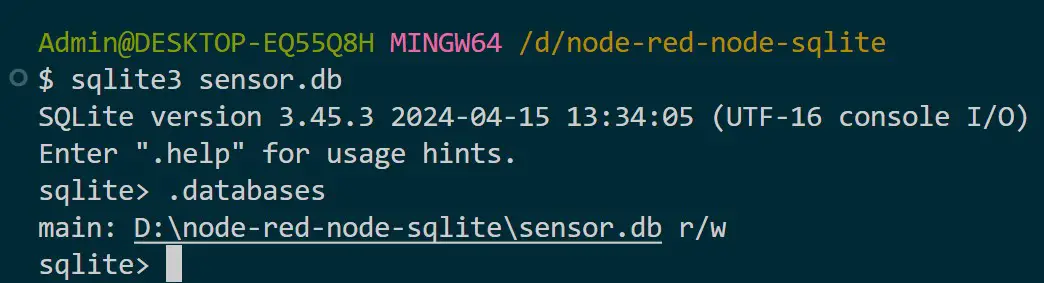
Go to the location you want to save the SQLite file and create a new database as follows:
- Start SQLite with a new database file:
sqlite3 sensor.db
- Use the following SQLite command to Verify Database Creation. You should also get the path of the created
sensor.dbdatabase with r/w permissions.
.databases
- Use the following command to create the Node-RED table you want to use:
CREATE TABLE sensors (id INTEGER PRIMARY KEY AUTOINCREMENT, name VARCHAR (255), value REAL, UNIT VARCHAR (100), timestamp DATETIME);
- At the same time use this command to ensure the table is ready:
.tables

- If you are using an SQLite viewer, you should be able to see the SQLite database as such:

Step 4: Connecting SQLite with Node-RED
The database is ready. To use it with Node-RED, you will have to load the path of your sensor.db file as follows:
- Go to the Node-RED dashboard and add the SQLite Node. Double-click it and you should have access to the Database properties:
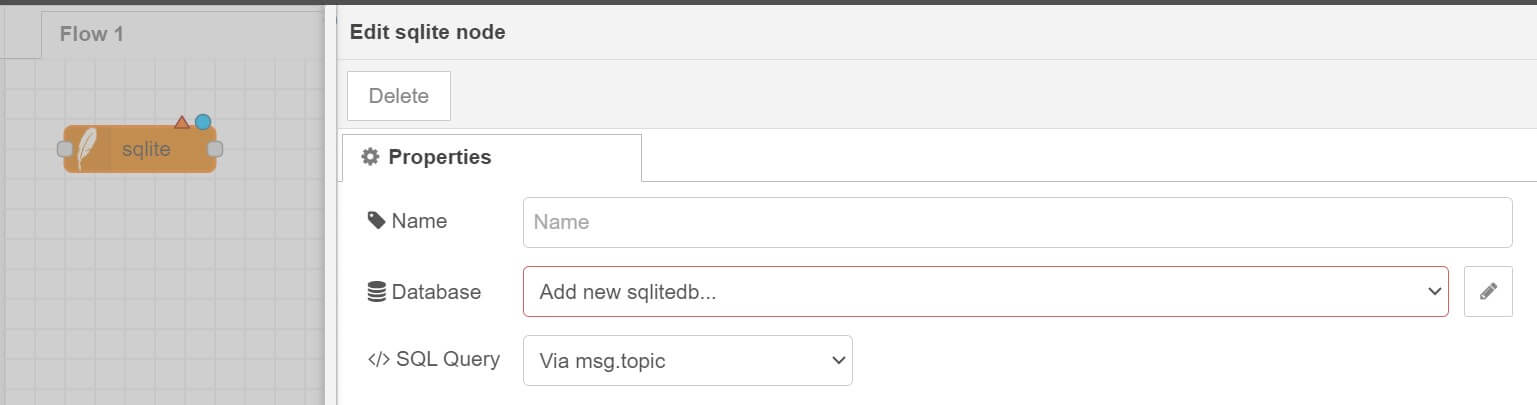
- Add the Node name.
- On the Add new SQLite sections navigate to the EDIT icon and add the
sensor.dbpath as follows:
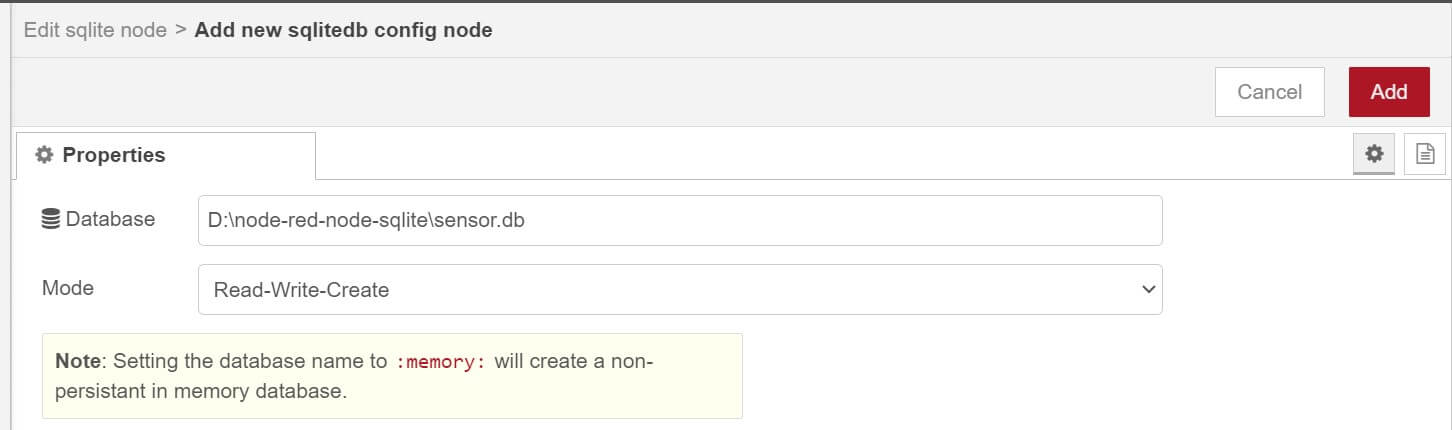
- Now add this path and click Done.
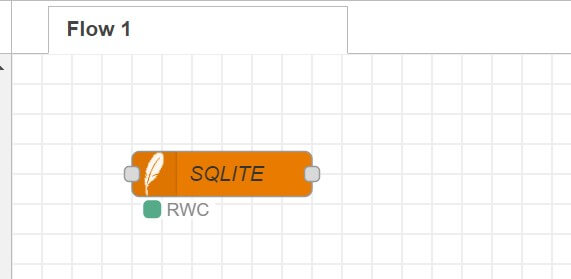
- Deploy your Node. If SQLite can connect to the
sensor.dbfile, you should have the RWC tag as follows:
Step 5: Adding Data to SQLite with Node-RED
SQLite is an SQLite database. It works the same way as you would with MySQL. In this case, you will send an INSERT command through Node-RED, and SQLite should pick the data and post it on your table.
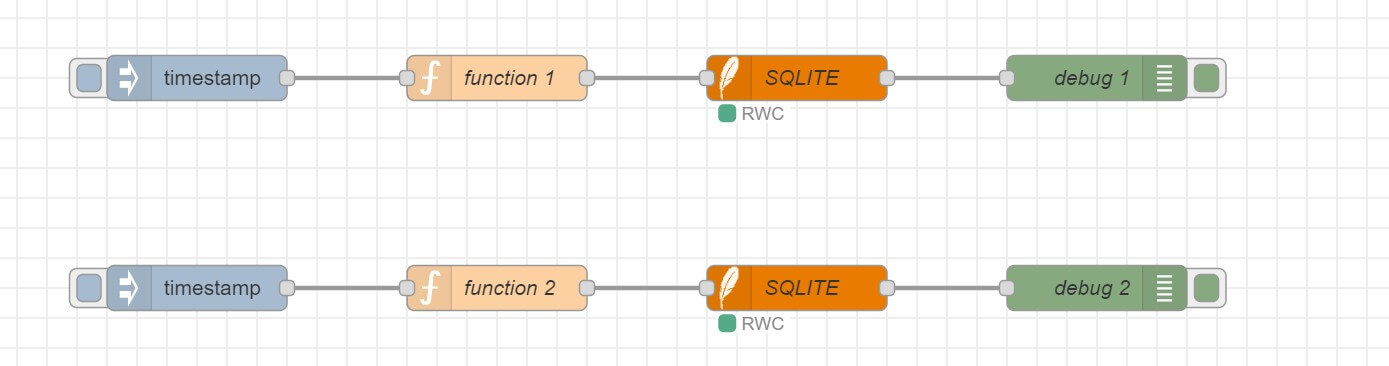
On your Node-RED flow, you will add a Function Node. Click on your Function and add the data you want to insert as follows:
msg.topic = "INSERT INTO sensors (id, name, value, UNIT, timestamp) VALUES (null, $val1, $val2, $val3, datetime(\"now\"));"
msg.payload = ['Sensor 1', 23, 'Temp']
return msg;
Add inject node and your flow should look as follows:

Finally, deploy the flow and inject it to record the new data. The newly added data should be ready in your sensor.db:

Step 6: Adding data to SQLite using Node-RED Prepared Statements
If the above step is hard, consider using the Prepared Statements. Here you will create a new flow. Your SQLite Node SQL Query should Read the Prepared Statement as follows:
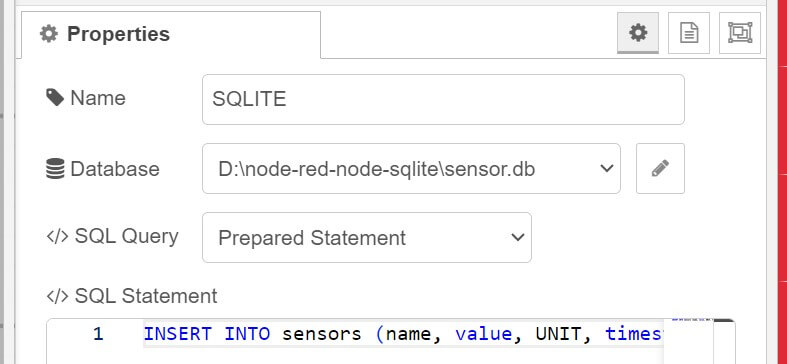
Add the SQL Statement you want to execute. Here is an example:
INSERT INTO sensors (name, value, UNIT, timestamp) VALUES ($val1, $val2, $val3, datetime("now"));
Now, add a function Node and make sure the above values are represented in the msg.params object as follows:
msg.params = { $val1:'Sensor 1', $val2: 47 , $val3: 'HUMID'}
return msg;
Again, deploy the flow and inject it to record the new data.
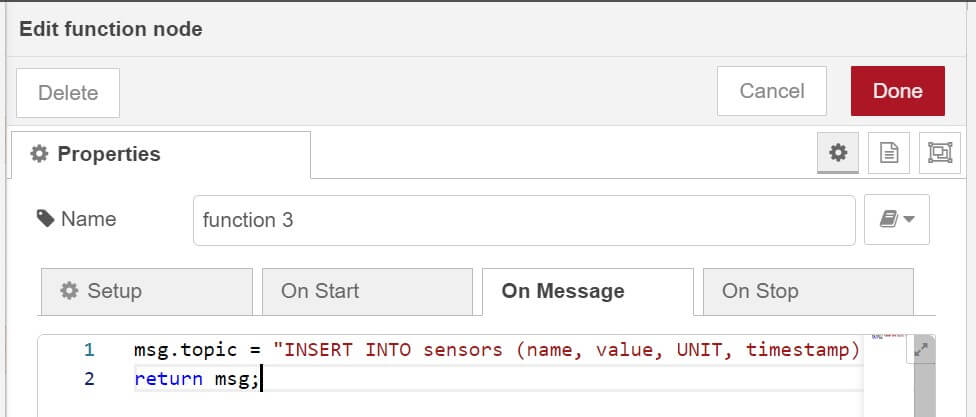
Step 6: Adding data to SQLite using Node-RED Batch Without Response
There is another way we can use to let Node-RED add data to SQLite. Instead of using Prepared Statements, use Batch Without Response. This lets us insert multiple records without getting a response from it.
Your SQLite Node should have Batch Without Response selected as follows:

You will then add a function node, with different INSERT commands as follows:
msg.topic = "INSERT INTO sensors (name, value, UNIT, timestamp) VALUES ('SENSOR 3', 23, 'VOLT',datetime(\"now\")); INSERT INTO sensors (name, value, UNIT, timestamp) VALUES ('SENSOR 4 ', 124, 'KM',datetime(\"now\"));"
return msg;
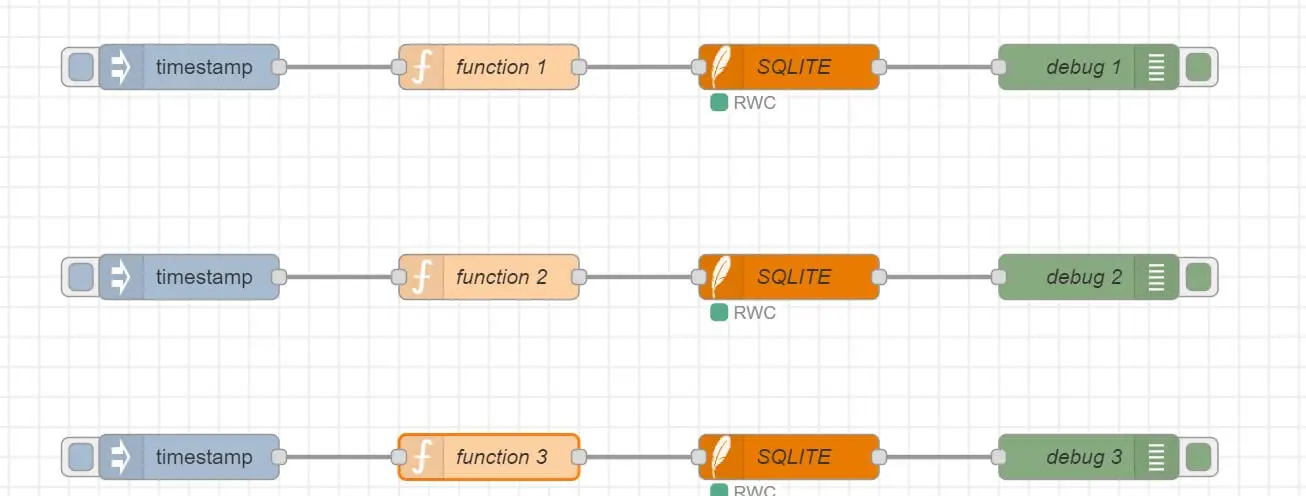
Now ensure your new flow is complete:
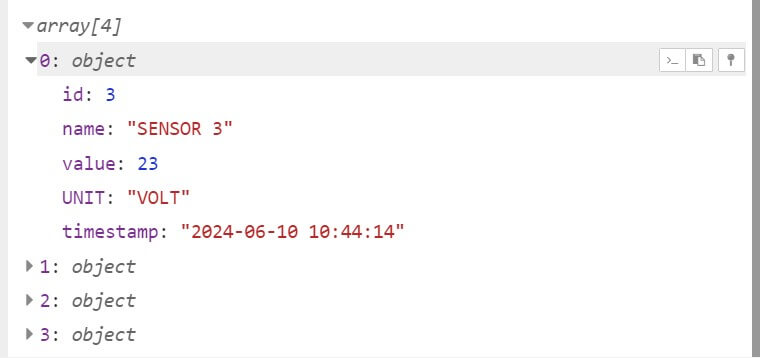
Once you deploy and inject the multiple batches, you should the added records on the sensors database as such:

Step 7: Selecting From SQLite
Read data uses the SELECT SQL command. You will use the SQLite Node with a Fixed Statement as follows:
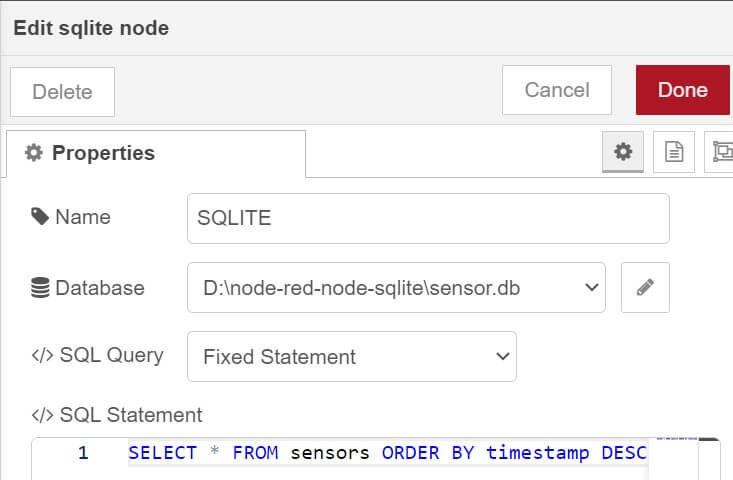
SELECT * FROM sensors ORDER BY TIMESTAMP DESC LIMIT 100;
Don’t forget to connect inject and Debug Nodes:

Deploy the new flow and send the query command into SQLite with Inject Node and check the debug for the selected sensor data:
Conclusion
That was a basic usage of the SQLite and Node-RED Red. I hope this example tutorial gets you started Using Node-Red with SQlite. Grab the whole nodes and flows as JSON here.
Written By:
Joseph Chege
More Related Articles:
-

Guide to Setting Up Node-Red with Portainer and Docker|HASS
Feb 28, 2024
-

Easy Example Guide to Using Node-Red with SQL Server|MSSQL
Feb 23, 2024
-

How to Connect Node-Red, Save|Select|Insert Data to MySQL Example Tutorial
Feb 22, 2024
-

Add Secure Self-Signed SSL HTTPS Certificate to Node-RED
Feb 20, 2024