Mastering K3s on macOS – Install and Provision K3s with K3D on macOS
Posted November 17, 2023

K3s is a production ready K8s distribution that runs on any OS, including macOS. If you’re having difficulties using K3s on macOS, this guide teaches you the step-by-step process of installing and provisioning a K3s cluster on Mac. In summary, you’ll learn the following:
- The perfect way to install K3s on macOS using K3D.
- How to provision a single Node K3s cluster on your macOS machine.
- Deploying any application using Kubectl, k3D, K3s, and macOS.
- Provisioning Kubernetes dashboard to manage any K3s cluster running macOS.
- Uninstall the k3s macOS cluster (if needed).
Dive in and extend your K3s cluster experience on macOS with K3D.
Prerequisites
Installing K3s on macOS is a hands-on guide. So, ensure you have the following:
- Homebrew installed on your computer.
Related: Install Single Node K3s on Ubuntu 20.04|22.04 Step-by-Step
- Docker installed and running on your machine.
- The minimum system requirements for any k3s installation is 1 vCPU, at least 1 GB RAM, and 20 GB of free disk space. If you have more specs, the better performance.
- Basic knowledge of working with K8s or K3s.
Why use K3D to Run K3s Clusters on macOS
When installing k3s on Mac (whether Mac M1 or other MacBook variants), you need to spin up a VM. If you install k3s binary on macOS with cURL, you’ll get the following message:
curl -sfL https://get.k3s.io | sh -

[ERROR] Can not find systemd or openrc to use as a process supervisor for k3s
This means you must use systemd/OpenRC, which needs a Linux layer on top of Mac. This is the problem. And that’s where K3D comes in.
K3D is a wrapper. It allows your to manage K3s clusters within the Docker container as the VM. Its approach gives you an easily configurable Kubernetes environment for local macOS machine using Docker containers.
You already know K3s itself is a lightweight. However, in a full-scale Kubernetes cluster that is resource-intensive, K3D is the way to go.
Because this is a local macOS setup, K3D will give you a lightweight and portable way to experiment with K3s features within a smaller-scale Kubernetes environment.
Let’s now learn the step-by-step process to get K3s up and running on your macOS computer.
Step 1: Installing and Setting up K3s on MacOS with K3D
At this point, ensure Docker is up and running. Then Launch your terminal and run the below command to install K3D:
brew install k3d
Before going to the next step, always make sure to verify that K3D has been installed:
k3d version
The response logged on your terminal should be similar to:
k3d version v5.6.0
k3s version v1.27.5-k3s1 (default)
Step 2: How to Provision a Single Node K3s Cluster on your macOS Machine
K3D is specifically created to provision the K3s cluster. To run one on macOS, use the following command and, K3D will create a K3s cluster out of the box:
k3d cluster create mycluster
You’re ready to run the kubectl command to manage your cluster. The first step is to confirm if the cluster has been created successfully:
kubectl get nodes

You can also get the cluster info to check if the Kubernetes control plane is up using the following command:
kubectl cluster-info

Step 3: Deploying Application Cluster using Kubectl, k3D, K3s, and macOS
Let’s test if this setup is working as expected. To do so, you’ll deploy an application to K3s.
You can use the yml deployment manifest to do so. However, to test if the K3s running on macOS is OK, this guide will deploy a Nginx app to the cluster:
Run the following command to deploy an Nginx cluster with two replicas on K3s as follows:
kubectl create deployment nginx-deployment --image nginx --replicas 2
This will create a K3s Nginx deployment on macOS. So, check if the deployment has been created successfully:
kubectl get deployment nginx-deployment
Your deployment should be READY as follows:

Now check if the pods are running:
kubectl get pods

Check if the Nginx deployment is exposed and its service is running:
kubectl get svc nginx-deployment

Step 4: Accessing K3s Application Running on Mac
It seems your app is running on ClusterIP. However, to expose the service, let’s expose the service via Port Forward.
kubectl port-forward your_pod_name 8888:80
Replace your_pod_name with a name of a running pod e.g., nginx-deployment-66fb7f764c-pnvdw. Check the
kubectl get podscommand.
Now, K3s will expose Nginx on 8888 and, you can access your deployed application. From the browser access port 8888 locally:
http://127.0.0.1:8888

Step 5: Provisioning Kubernetes Dashboard to Manage K3s Cluster Running macOS
Up to this point, you don’t have and GUI way to access K3s and manage your cluster and applications running on it.
For that purpose, you’ll deploy the Kubernetes dashboard and get visuals of what’s happening on K3s. Follow these steps:
- Define the deployment for the Kubernetes dashboard:
kubectl apply -f https://raw.githubusercontent.com/kubernetes/dashboard/v2.7.0/aio/deploy/recommended.yaml
- Confirm the deployment by getting the pods and services for
kubernetes-dashboard:
kubectl get pods,svc -n kubernetes-dashboard

- To access, kubernetes-dashboard service, replace it’s ClusterIP to NodePort using the following command:
kubectl patch svc kubernetes-dashboard --type='json' -p '[{"op":"replace","path":"/spec/type","value":"NodePort"}]' -n kubernetes-dashboard service/kubernetes-dashboard patched
- Confirm if the type has been changed successfully:
kubectl get svc -n kubernetes-dashboard

The type should now change from clusterIp to NodePort.
To securely access the admin dashboard, you’ll create a k3s-dashboard.yaml with instructions for the admin user and the roles.
In your k3s-dashboard.yaml file, you’ll:
- Define a
ServiceAccountwith the nameadmin-userin thekube-systemnamespace specifying the KubernetesapiVersionfor the resource. - Bind the
admin-userservice account to thecluster-admincluster-roleusing theRBAC clusterRolebinding* to give relevant permissions to theadmin-userservice Account on the Kubernetes cluster. - specify the entities to which the
clusterRoleis bound, that is theadmin-userserviceAccount on thekube-systemnamespace.
Here is your complete k3s-dashboard.yaml file to achieve the above:
# Defines a ServiceAccount named admin-user in the kube-system namespace
apiVersion: v1
kind: ServiceAccount
metadata:
  # name of the ServiceAccount
  name: admin-user
  # ServiceAccount is scoped to the kube-system namespace
  namespace: kube-system
---

# Defines a ClusterRoleBinding named admin-user
apiVersion: rbac.authorization.k8s.io/v1
kind: ClusterRoleBinding
metadata:
  name: admin-user
roleRef:
  # Refers to the API group for authorization
  apiGroup: rbac.authorization.k8s.io
  kind: ClusterRole
  # Grants the cluster-admin role
  # Grants the cluster-admin role, providing full control over the cluster
  name: cluster-admin
subjects:
- kind: ServiceAccount
  # Refers to the admin-user ServiceAccount
  name: admin-user
  # Refers to the admin-user ServiceAccount in the kube-system namespace
  namespace: kube-system
Your Kubernetes dashboard is ready and you can deploy it using the following command:
kubectl create -f k3s-dashboard.yml
Once completed, you’ll have admin-user ready and you can create a token for the user to access your cluster:
kubectl -n kube-system create token admin-user
The above command will output a token on your terminal. Copy and save it as you’ll use it in the next step.
Step 6: Accessing k3s Cluster on Kubernetes Dashboard from the Browser
To access the dashboard, expose the running kubernetes-dashboard cluster to a local port, 32370.
kubectl port-forward service/kubernetes-dashboard 32370:443 -n kubernetes-dashboard
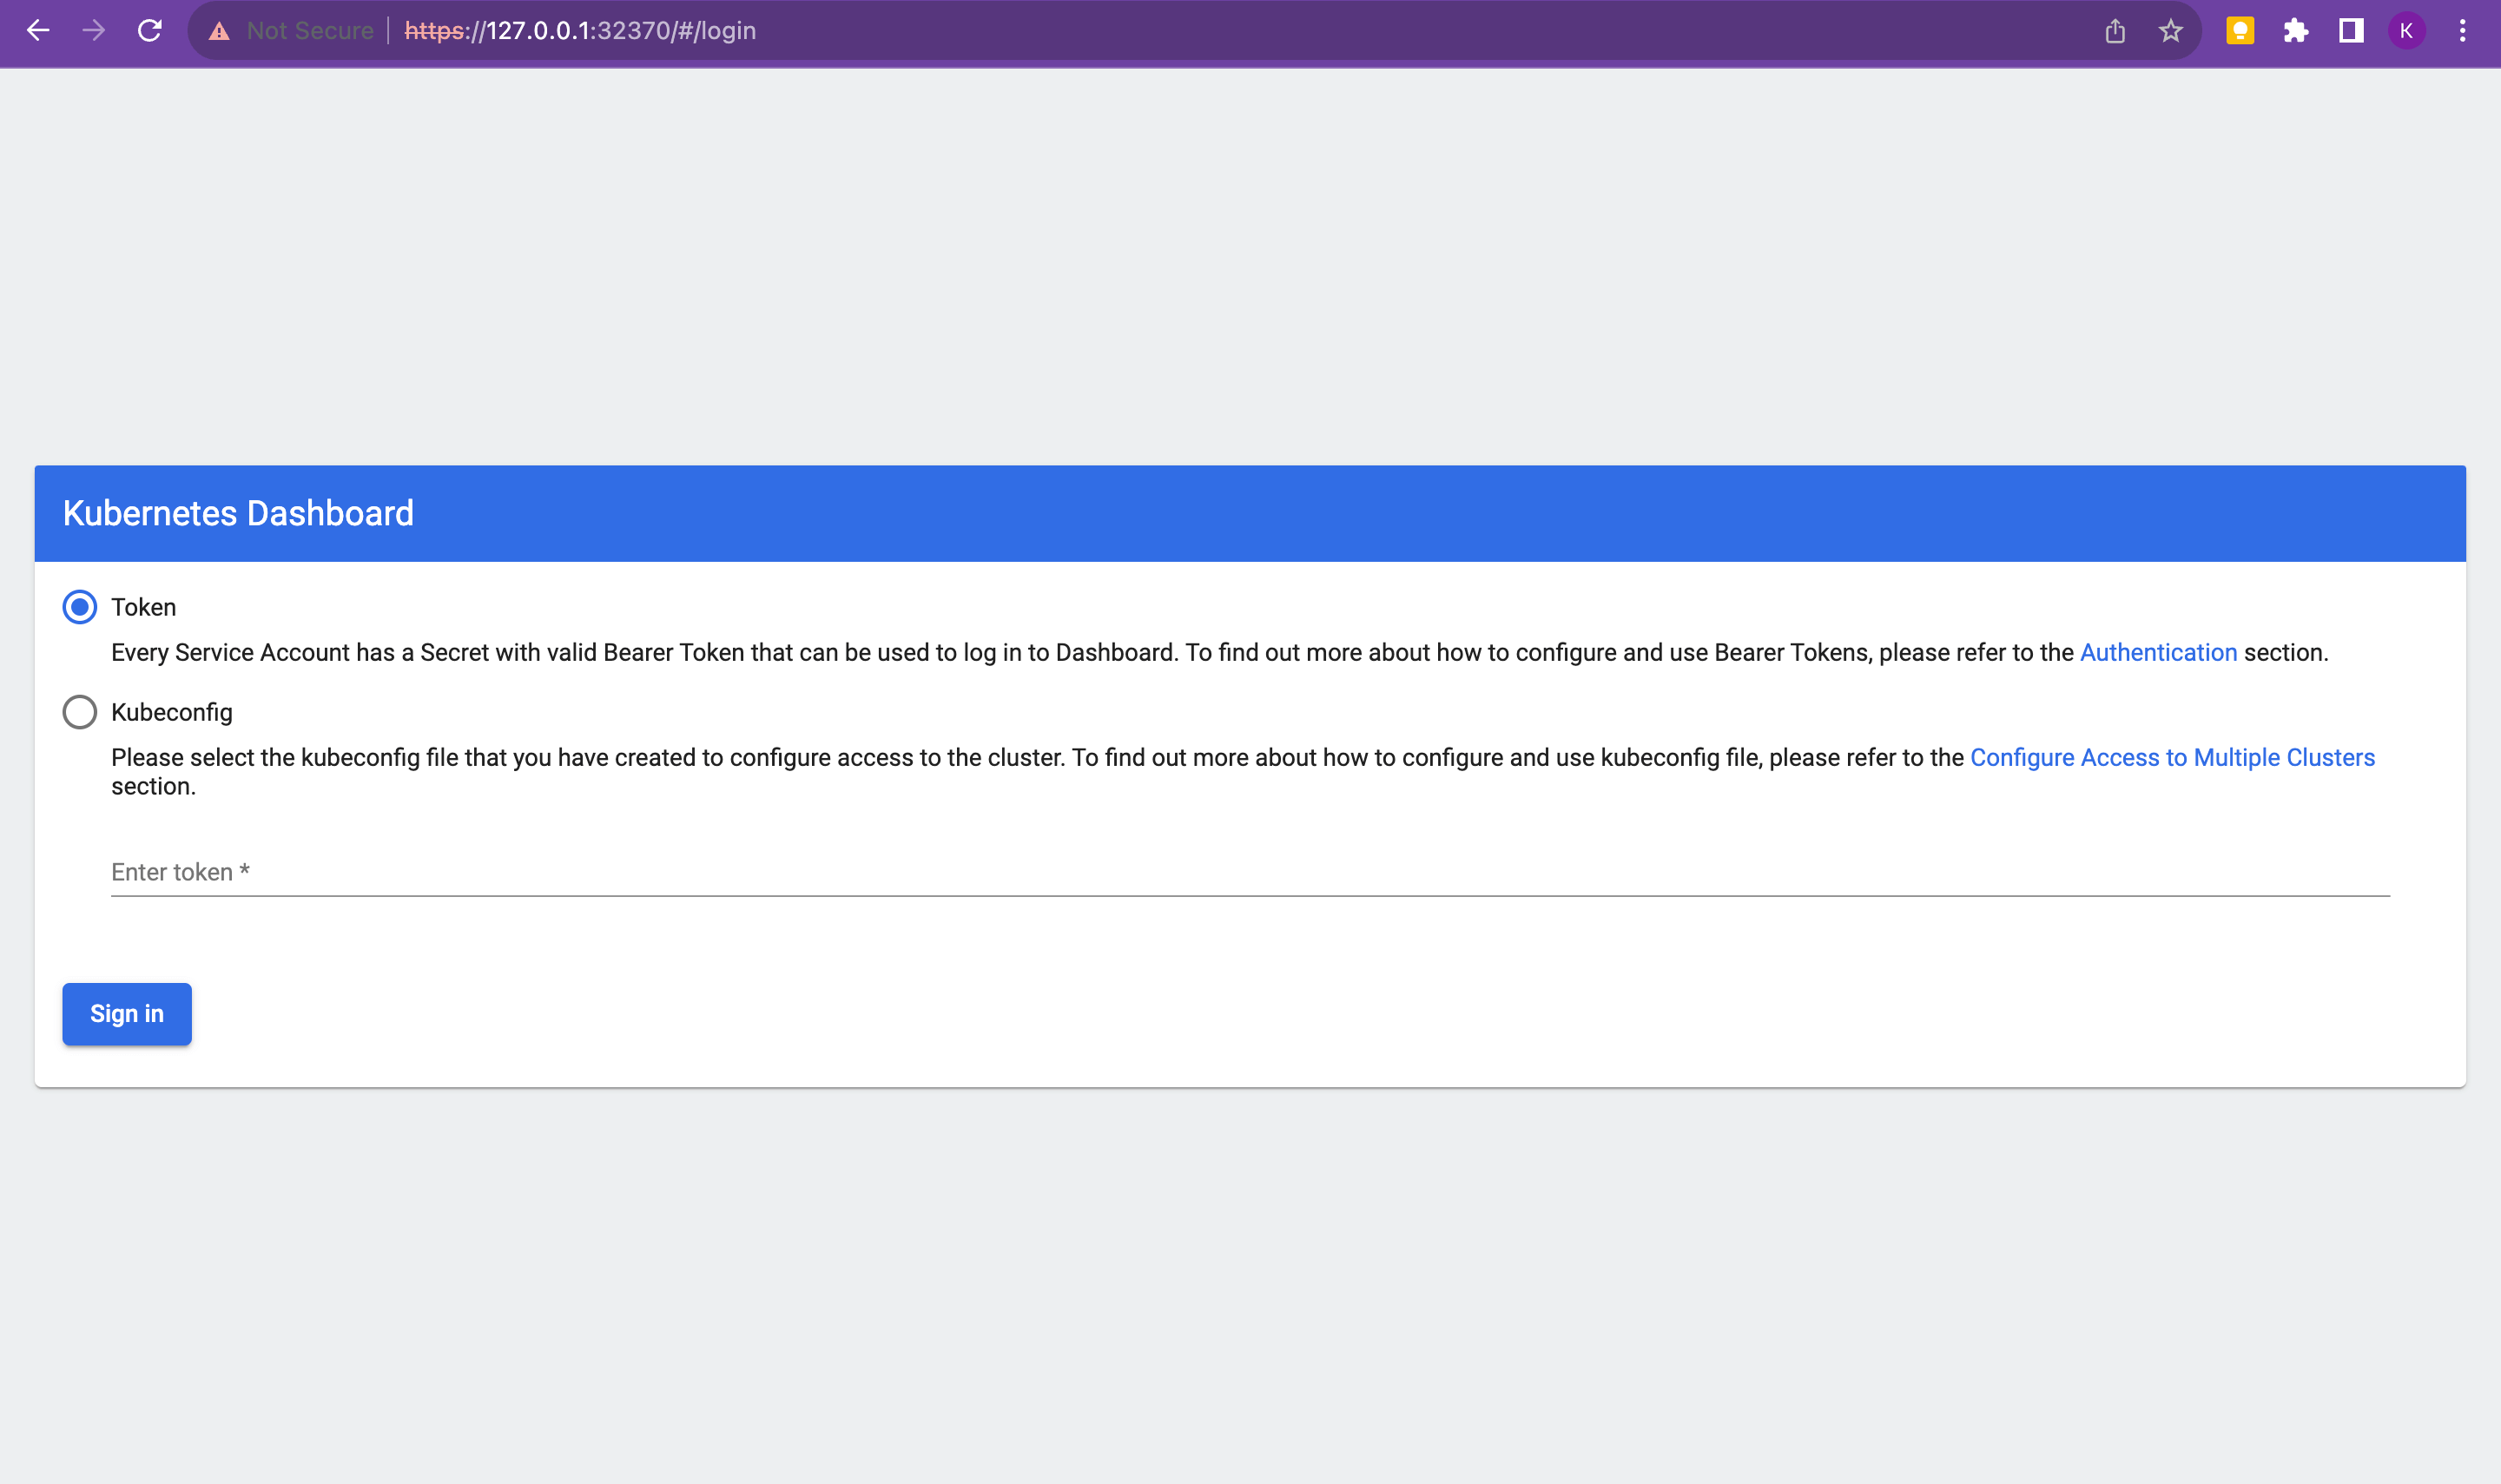
Now you can access the dashboard from your browser using https://127.0.0.1:32370. Note that by default, it will run on https:

By default, the token checkbox will be checked. Enter the token generated from the previous step and on login.

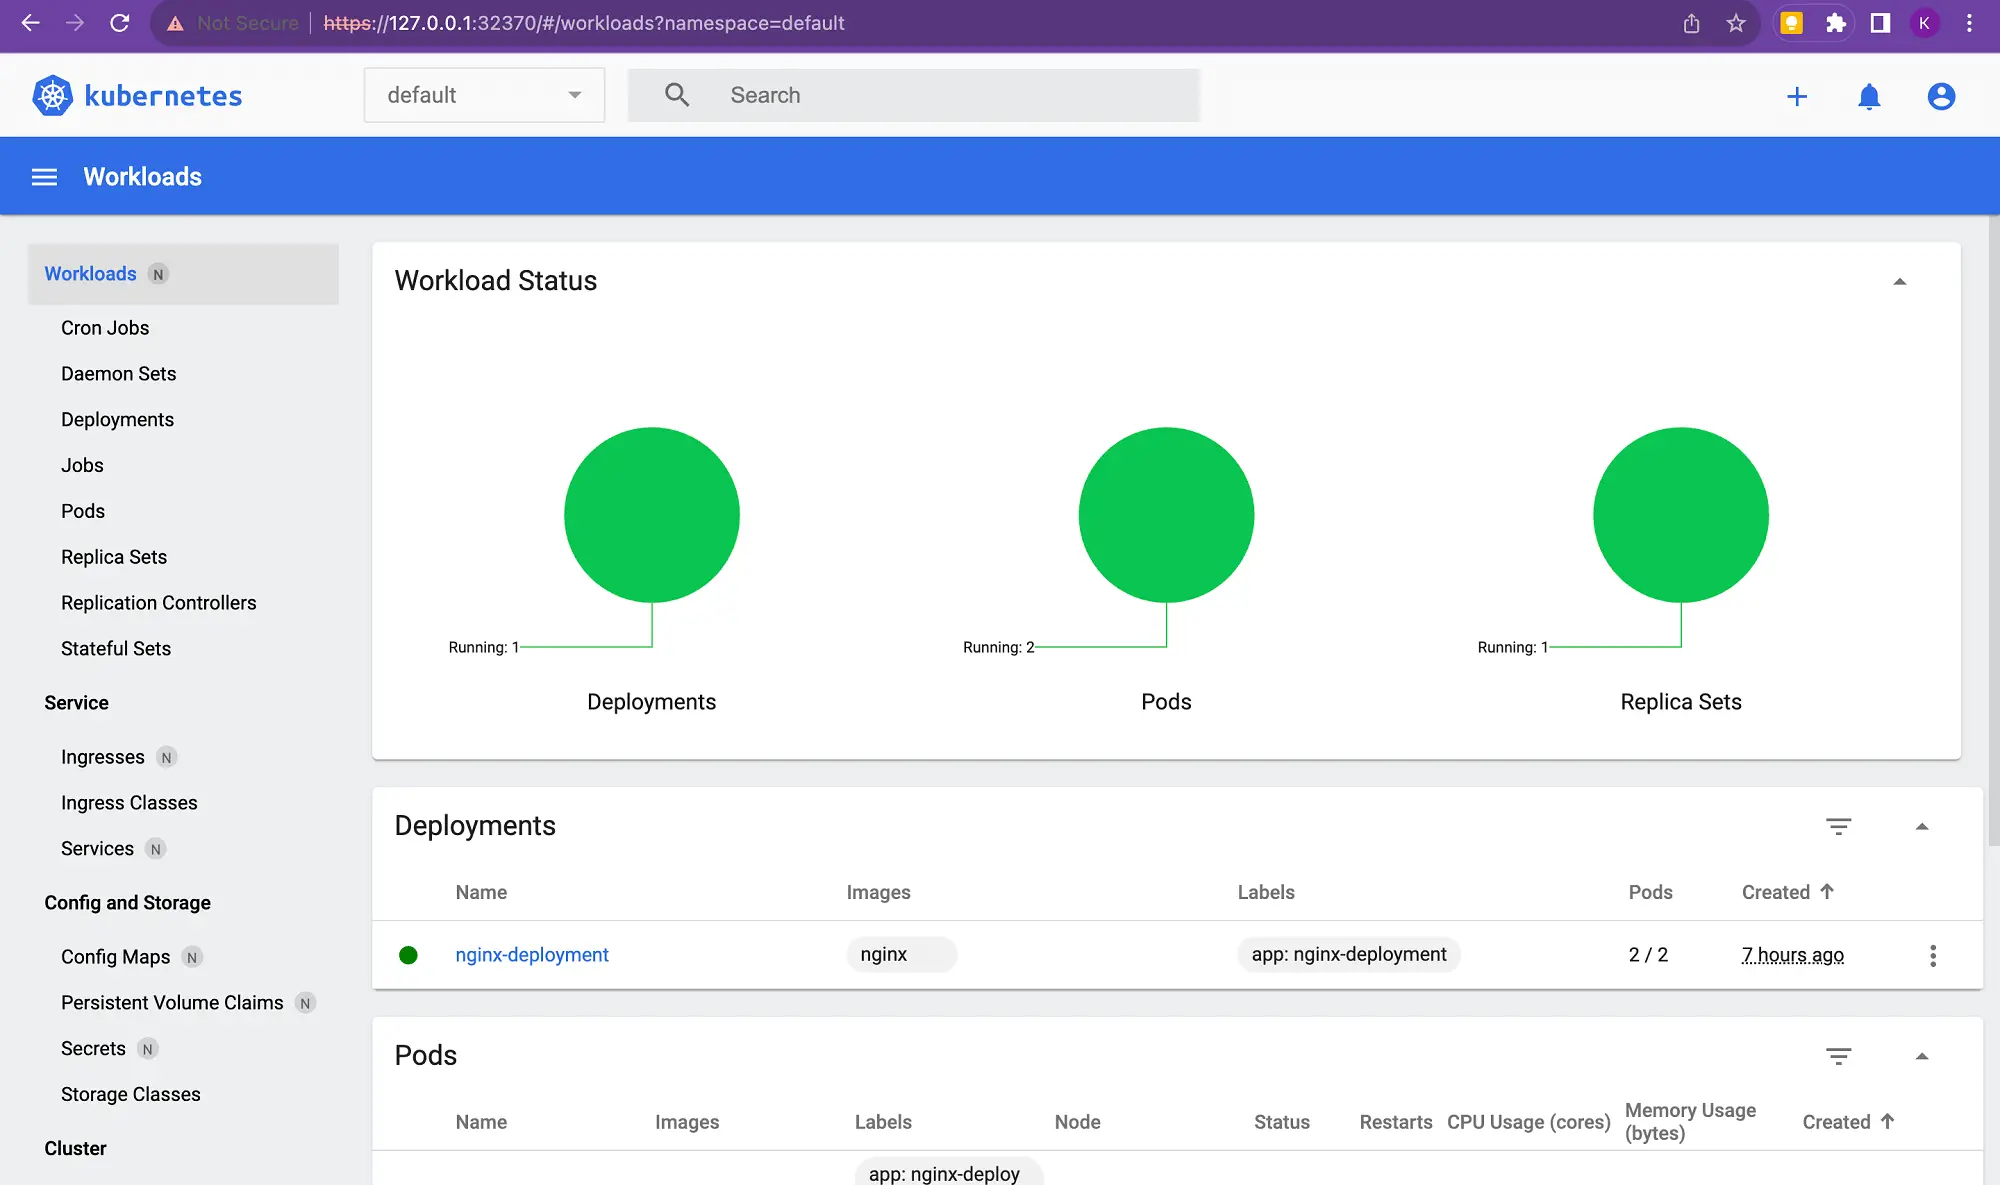
Under the deployments section, you can see the nginx-deployment service running, which was set earlier. You now dive deeper and access other metrics on your cluster.
Step 7: Uninstall k3s macOS Cluster (If Needed)
If you have completed your K3s development goals, you can uninstall it on your macOS. This will clean and remove the cluster and its components.
Use the following steps to ensure a clean K3s macOS cluster uninstallation.
- Execute the following command to stop and delete the K3s cluster:
Replace
myclusterwith the name of your K3s cluster. For example,k3d-mycluster-server-o. Usekubectl get nodesto confirm your cluster name.
k3d cluster delete mycluster
- Now you can use Homebrew to uninstall K3s and K3D:
brew uninstall k3s k3d
- Clean up residual K3s directories and configurations:
# Remove K3s-specific directories and configurations
# Remove the Kubernetes configuration file
rm ~/.kube/config
- Confirm k3s is no longer on Mac and has been successfully removed:
k3d version
You should most likely get an error indicating that k3d is not found on your macOS.
Conclusion
This guide showed the right process for running K3s on macOS. In summary, you learned the following:
- How to install K3s on macOS using K3D.
- Provisioning a single-node K3s cluster.
- Deploying applications onto the K3s macOS cluster using
kubectlcommands. - Provisioning and accessing the Kubernetes dashboard to manage your cluster and deployed applications.
- How to perform a clean K3s and K3D uninstallation.
Happy K3s cluster management on macOS!


