NestJS GraphQL API with TypeORM, Apollo Server and Postgres
Posted November 7, 2023
GraphQL is a query language. It perfectly integrates with NestJS TypeScript APIs when harnessing the power of Types check. On top of that, TypeORM is perfect for simplifying database operations pragmatically with PostgreSQL, MongoDB, MSSQL, etc. You need an Apollo server to create a federated supergraph and modernize your APIs.
In this tutorial, you will create a Nest.js GraphQL example API powered by Apollo Server, PostgreSQL, and TypeORM.
What you will Learn
As I walk you through the journey of getting Nest.js and GraphQL running with Apollo server and TypeORM, you will learn:
- How to model a GraphQL NestJS entity utilizing TypeORM.
- The perfect way to run Apollo Server to power NestJS GraphQL APIs.
- How to add database Relationships for GraphQL using TypeORM and PostgreSQL, featuring ManyToOne and OneToMany relations.
- How to build NestJS GraphQL Resolvers to handle API Queries and Mutations.
- The right way to use GraphQLModule and ApolloDriver to streamline the NestJS API graph.
- How to use GraphQL Code first approach.
Now, Dive in and modernize your NestJS GraphQL APIs with Apollo Server, TypeORM, and PostgreSQL to plug APIs with a scalable architecture that gives clients the power to exactly what they need.
Prerequisites
As you follow along, ensure you have the following:
- Basic knowledge working with Nest.js
- Have Node.js installed on your computer.
- For the database, make sure you have PostgreSQL ready.
What you will Create
You will create a simple Blog app on this NestJS GraphQL API with TypeORM and Apollo server tutorial. You will use two entities:
- Author with OneToMany Relationships and
- Post with ManyToOne Relationship
Each module will have its own Resolver while demonstrating how to add GraphQL TypeORM database relations.
Creating your First NestJS TypeORM Apollo-Inspired GraphQL API
In your project working directory, use the following command to create an out-of-the-box Nest.js App:
npm i -g @nestjs/cli
nest new nest-graphql
Head over to the new app you have created:
cd nest-nest-graphql
Install the following TypeORM and GraphQL packages:
npm install pg graphql @nestjs/graphql @nestjs/apollo apollo-server-express @nestjs/typeorm typeorm
Because we are creating Nest.js GraphQL Apollo server:
- You will need a module for your API. This will create the forFeature module as the starting point Nest uses to build your API graph.
- You need a controller to listen to requests that TypeORM will use and communicate with your database to perform CRUD operations.
- Entities are your application blueprint and type safety.
- Finally a provider to abstract complexity and logic of NestJS GraphQL operations within your databases.
Creating NestJS GraphQL App: A GraphQL Code First
Along this guide, you will use the GraphQL Code First approach to create your API. In the Code-First approach, you define your GraphQL types and schema directly within your code using TypeScript decorators with key decorators such as @ObjectType() and @Field().
So, why the Code First approach? The focus is on writing TypeScript code. In this case, the schema is derived from the code. This way, the GraphQL schema is generated dynamically at runtime based on your code’s decorators and TypeScript types.
The Advantages?
- Direct integration with TypeScript and type checking.
- Less boilerplate code.
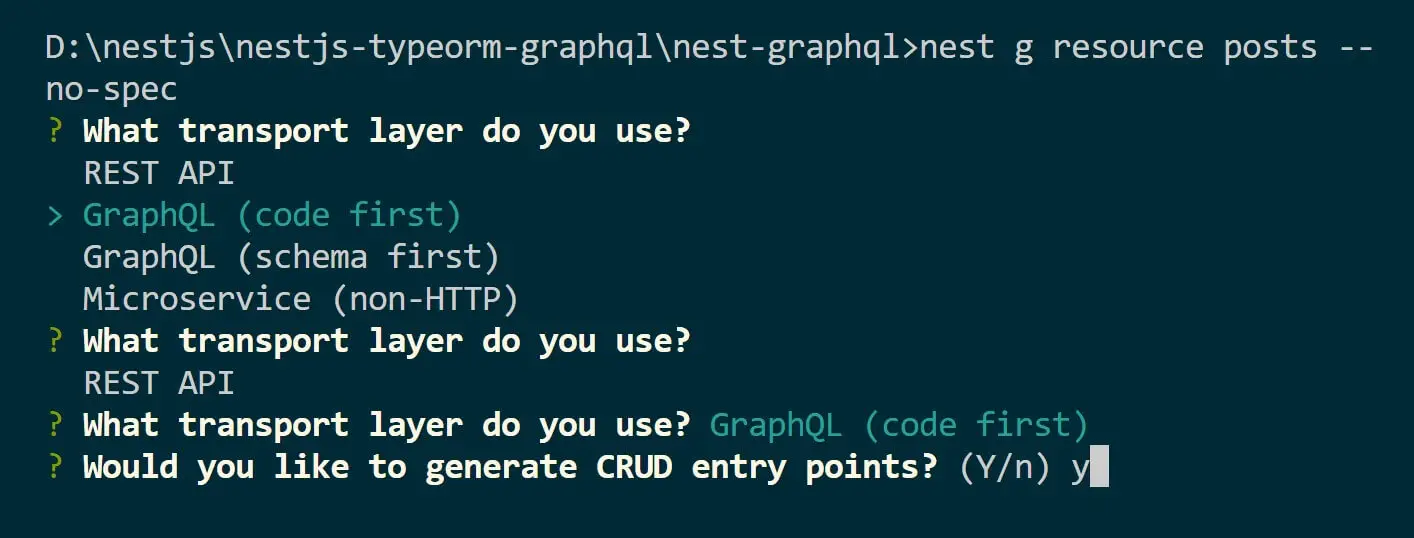
Go ahead and create the following two resources:
nest g resource posts --no-spec
Now, it’s here you must select the GraphQL approach you want in your NestJS as follows:
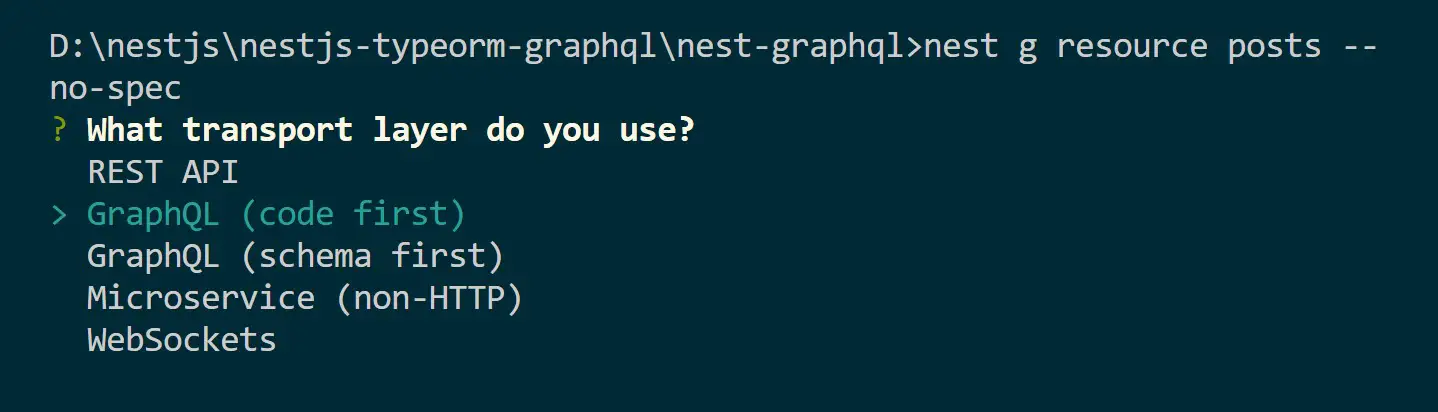
When prompted Would you like to generate CRUD entry points? chose yes with y:
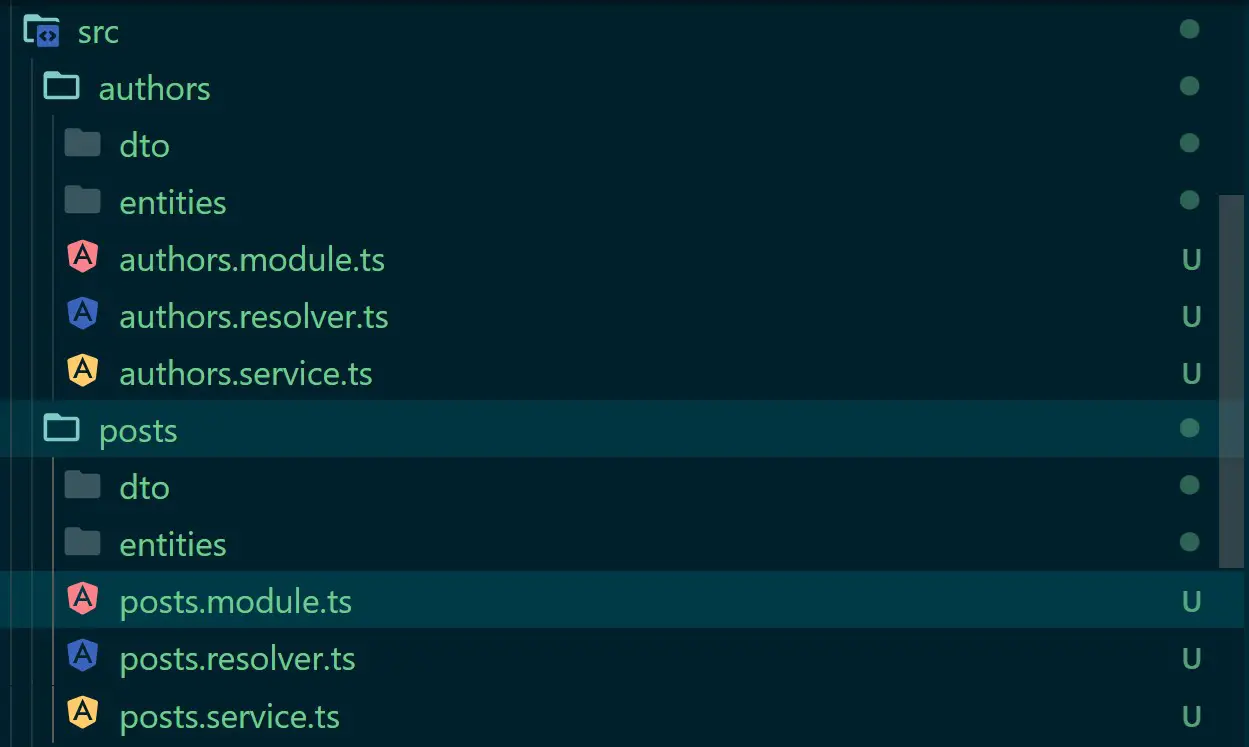
NestJS will create the boilerplate code you need to use. At the same time and using the same approach, create a resource for authors as follows:
nest g resource authors --no-spec
This is the easiest approach to creating full-fledged modules with its service, resolver, entities, and dto:
Creating NestJS GraphQL Schema and Entities with GraphQL and TypeORM
This step describes how you integrate GraphQL with Nestjs and TypeORM. It describes the decorators and TypeScript types your code will use to build GraphQL.
GraphQL uses ObjectTypes to represent a domain object in GraphQL API. It represents the structure of the data GraphQL will query or mutate. In this case, the author and post are the ObjectTypes. They define the query objects, mutations, and schema the GraphQL API needs.
On the other hand, entities represent your database structure. In it, you will use TypeORM to define how your database will look and the relationship you want to add.
You have the following files:
author.entity.tsinside thesrc/authors/entitiesfolder.post.entity.tsinside thesrc/posts/entitiesfolder.
In your author.entity.ts, you will represent Author ObjectType and its entity as follows:
import { Field, ID, ObjectType } from '@nestjs/graphql';
import { Post } from 'src/posts/entities/post.entity';
import { Column, Entity, OneToMany, PrimaryGeneratedColumn } from 'typeorm';

@Entity()
@ObjectType()
export class Author {
  @PrimaryGeneratedColumn('uuid')
  @Field(() => ID)
  id: string;

  @Column()
  @Field()
  name: string;

  @OneToMany(() => Post, (post) => post.author)
  @Field(() => [Post])
  posts: Post[];
}
- The decorator
ObjectTypefromnestjs/graphqlwill let NestJS and Apollo identify NestJS Author, an object class the GraphQL will use to generate Author schema. - The
@Field()decorator will add the specified class property to its parent schema type. It adds scalar types out of the box, such as Int, String, and ID. - To define the structure of your database table, TypeORM will add Columns and all the attributes your table needs. For example, TypeORM will allow Nest.js to create id (as Primary key) and name fields on your database.
- At the same time, TypeORM will generate the table for you within the database while still adding the OneToMany Relationship that the Author has with a Post.
Now, you can go ahead and create Post Object and its TypeORM Entity as follows (post.entity.ts):
import { Field, ID, ObjectType } from '@nestjs/graphql';
import { Author } from 'src/authors/entities/author.entity';
import {Column, Entity, JoinColumn, ManyToOne, PrimaryGeneratedColumn} from 'typeorm';

@Entity()
@ObjectType()
export class Post {
  @PrimaryGeneratedColumn('uuid')
  @Field(() => ID)
  id: string;

  @Column()
  @Field()
  title: string;

  @ManyToOne(() => Author)
  @JoinColumn()
  @Field(() => Author)
  author: Author;
}
Adding GraphQL Code First Schema using NestJS GraphQLModule and ApolloDriver
Because you are using the Code-First approach, you need to make sure you have NestJS GraphQLModule at the application entry point.
Adding NestJS GraphQLModule using Code First
What you need is to import the GraphQLModule in src/app.module.ts and tell NestJS we’re using code first and the ApolloDriver as follows:
import { Module } from '@nestjs/common';
import { AppController } from './app.controller';
import { AppService } from './app.service';
import { PostsModule } from './posts/posts.module';
import { AuthorsModule } from './authors/authors.module';
import { GraphQLModule } from '@nestjs/graphql';
import { ApolloDriverConfig, ApolloDriver } from '@nestjs/apollo';
import { join } from 'path';

@Module({
  imports: [
    PostsModule,
    AuthorsModule,
    GraphQLModule.forRoot<ApolloDriverConfig>({
      driver: ApolloDriver,
      autoSchemaFile: join(process.cwd(), 'src/schema.gql'),
    }),
  ],
  controllers: [AppController],
  providers: [AppService],
})
export class AppModule {}
Integrating GraphQL and Nestjs Modules and TypeOrmModule
Again, you want to have a database connection to execute database operations. Here, we are utilizing TypeORM to assist us in mapping the entities to the responsive table while creating the attributes and the relations.
To use TypeORM, you must tell NestJS to utilize TypeOrmModule at the entry point. This way, NestJS will ensure all your tables are in sync with your code and runtime.
But first, your Modules must also inherit TypeOrmModule as forFeature to allow NestJS and these modules to use the TypeORM Entities you created.
Go to src/authors/authors.module.ts and update this module as follows:
import { Module } from '@nestjs/common';
import { AuthorsService } from './authors.service';
import { AuthorsResolver } from './authors.resolver';
import { TypeOrmModule } from '@nestjs/typeorm';
import { Author } from './entities/author.entity';

@Module({
  imports: [TypeOrmModule.forFeature([Author])],
  providers: [AuthorsResolver, AuthorsService],
})
export class AuthorsModule {}
Apply the same changes to the src/posts/posts.module.ts file as follows:
import { Module } from '@nestjs/common';
import { PostsService } from './posts.service';
import { PostsResolver } from './posts.resolver';
import { TypeOrmModule } from '@nestjs/typeorm';
import { Post } from './entities/post.entity';

@Module({
  imports: [TypeOrmModule.forFeature([Post])],
  providers: [PostsResolver, PostsService],
})
export class PostsModule {}
Now you can go to the src/app.module.ts file and use TypeOrmModule as forRoot as follows:
//... Other imports
import { TypeOrmModule } from '@nestjs/typeorm';

@Module({
  imports: [
    PostsModule,
    AuthorsModule,
    TypeOrmModule.forRoot({
      type: 'postgres', // Use 'mysql' for MySQL
      host: 'localhost',
      port: 5432, // Default port
      username: 'postgres',
      password: 'pass',
      database: 'blog',
      entities: ['dist/**/*.entity.{ts,js}'],
      synchronize: true, // Set to false in production
    }),
    GraphQLModule.forRoot<ApolloDriverConfig>({
      driver: ApolloDriver,
      autoSchemaFile: join(process.cwd(), 'src/schema.gql'),
    }),
  ],
  controllers: [AppController],
  providers: [AppService],
})
export class AppModule {}
What you need to note:
- TypeORM will use the PostgreSQL database to sync your entities. Therefore, you have the right connection parameters for your PostgreSQL. Ensure you update them (database, password, and username)
- At the same time, TypeORM won’t create your database. It only creates a table. So, ensure you have a database named
blogwithin PostgreSQL.
Auto Generating Schema File and Database Tables
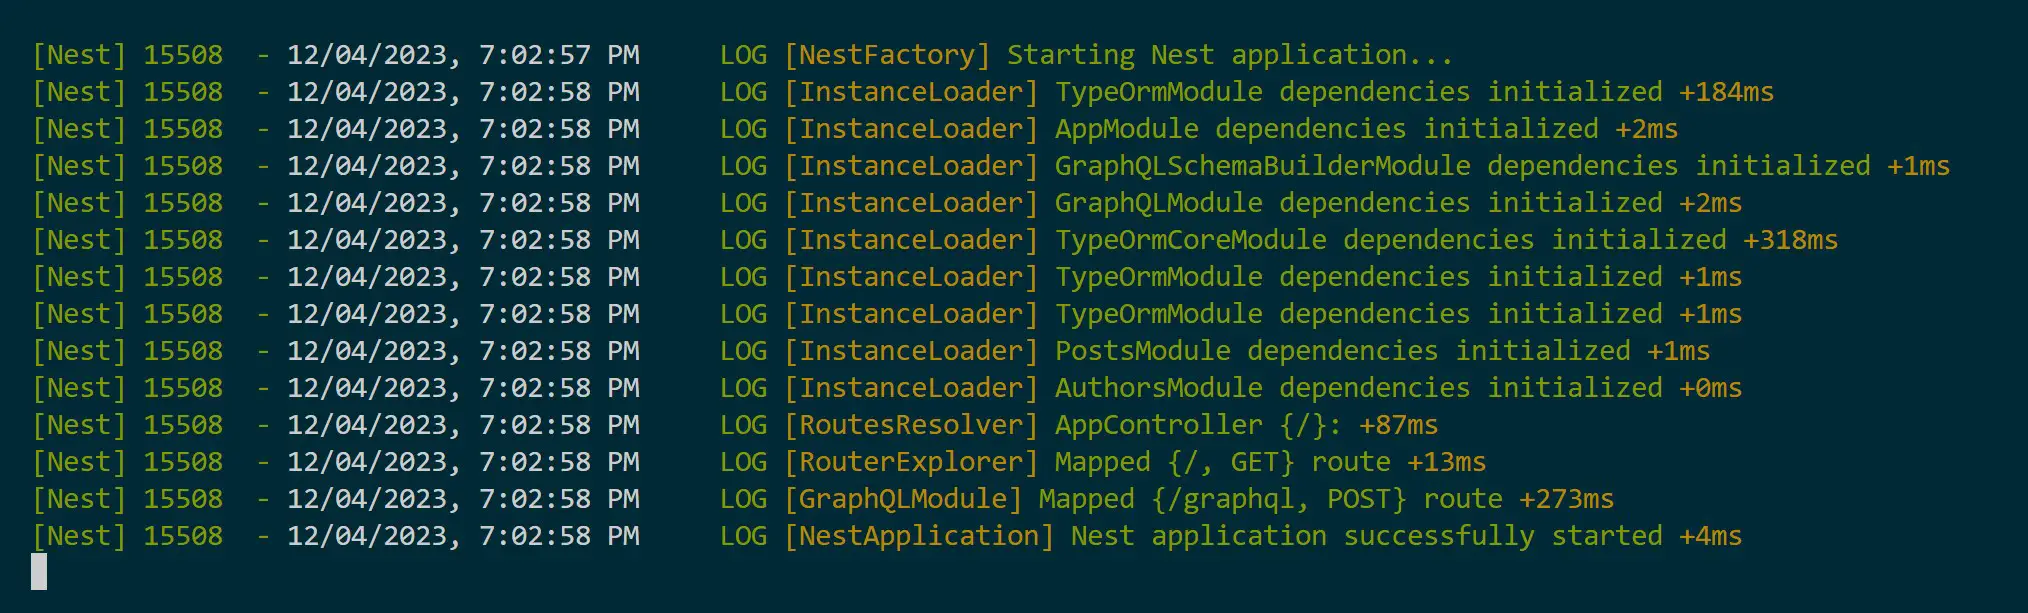
At this point, NestJS can use GraphQL and TypeORM to create your schema and Tables, respectively.
To test if this works, run npm run start:dev. If everything goes well, your app should be running tables created, and a schema file should be generated:
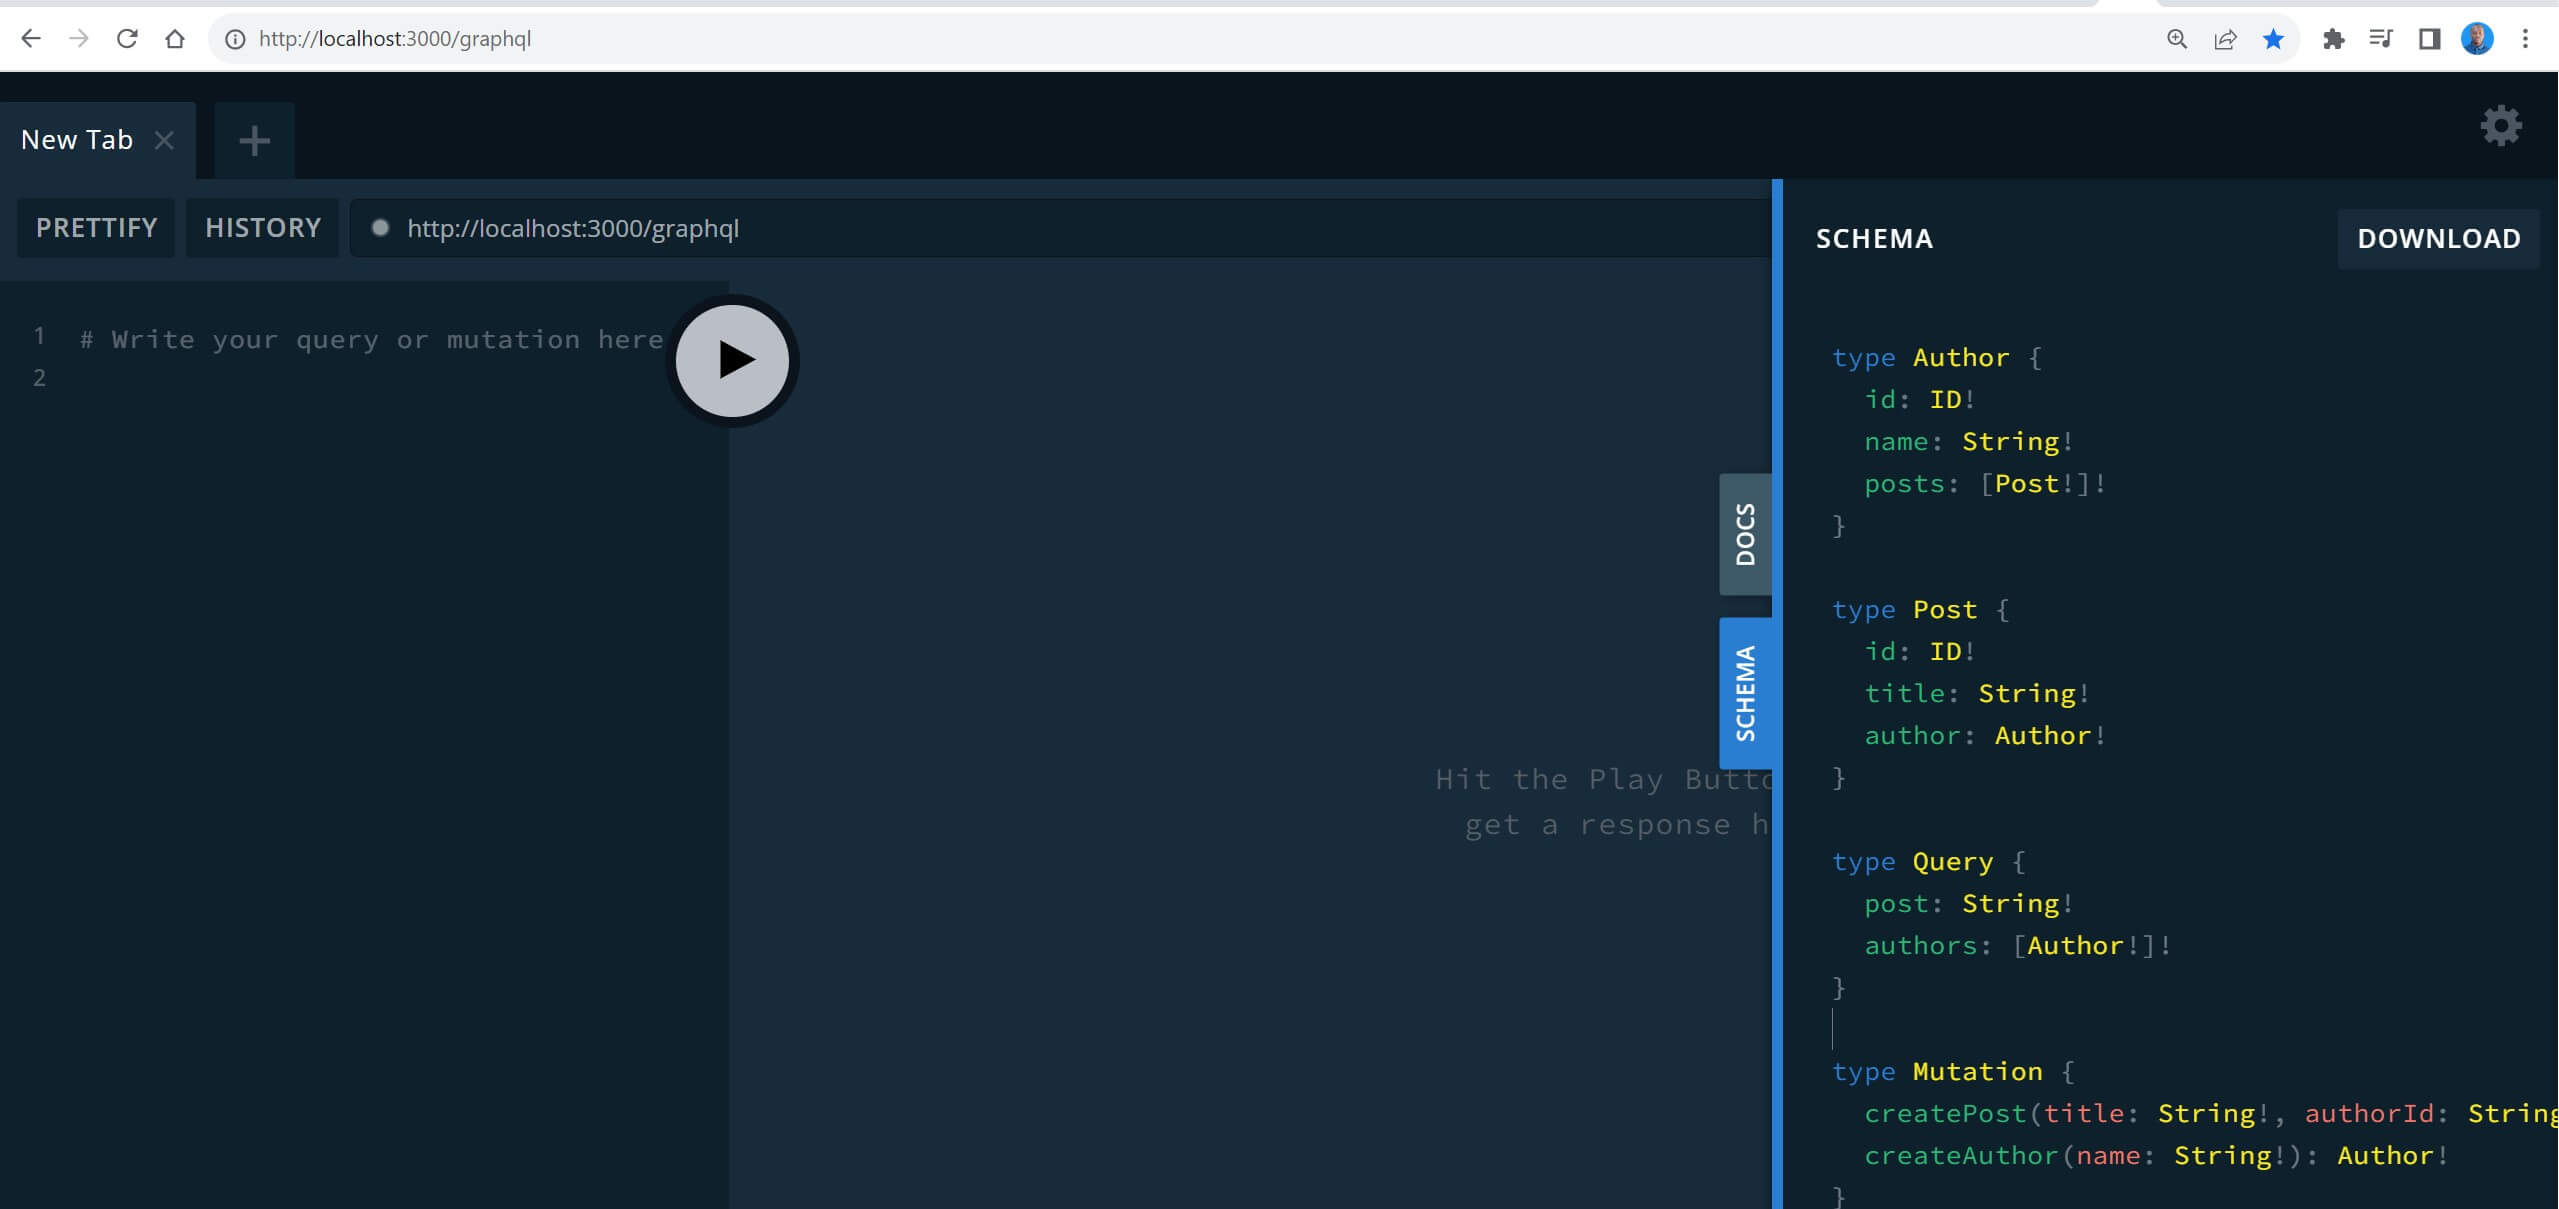
Go to the src/schema.gql file, and GraphQL will have a schema file generated in SDL as follows:
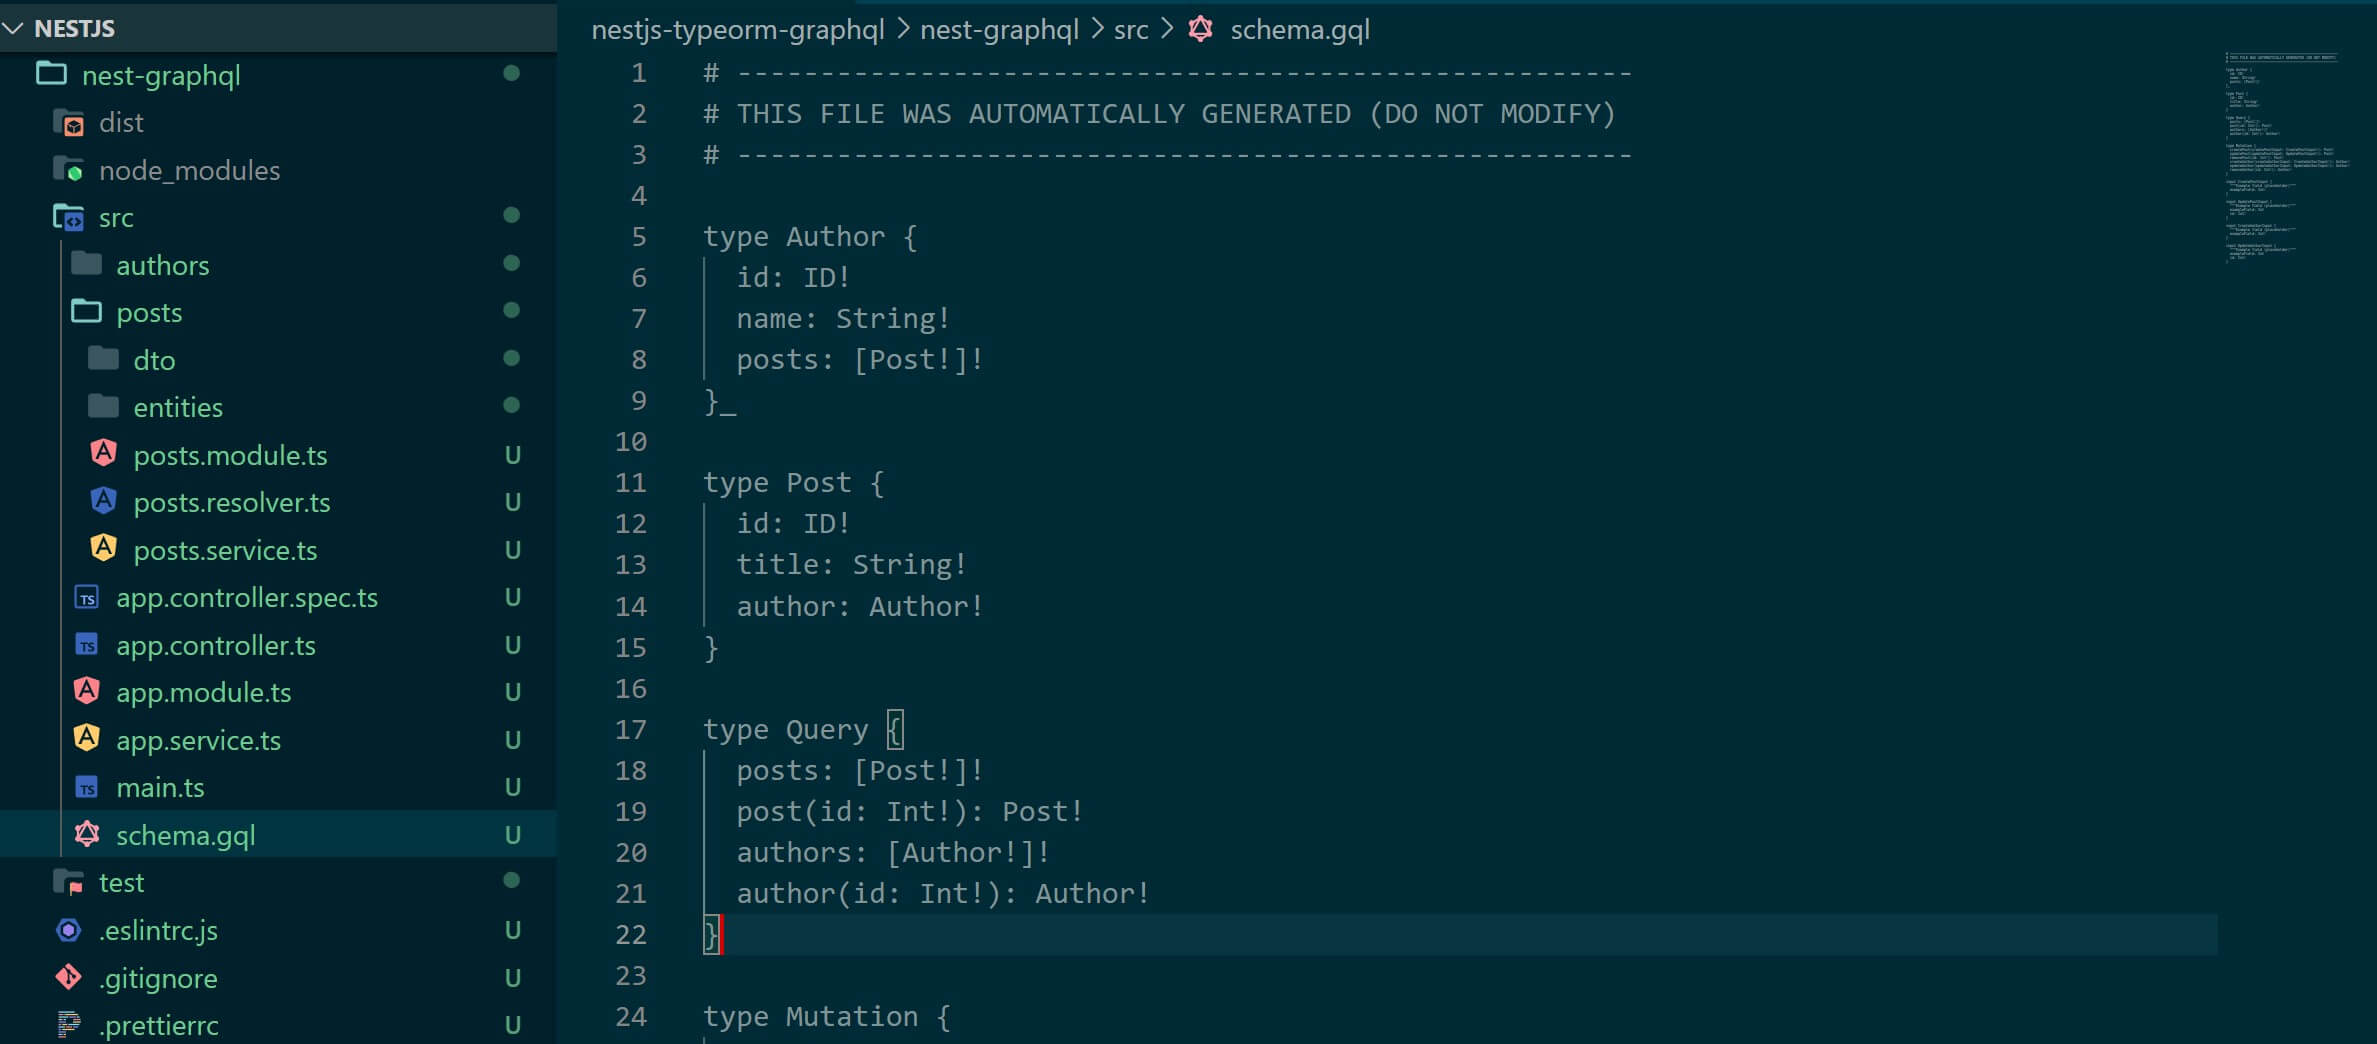
As you follow along and update resolvers, this file will be updated automatically.
Related: NestJS Resolvers FT GraphQL Code-First and Schema-First 🚀
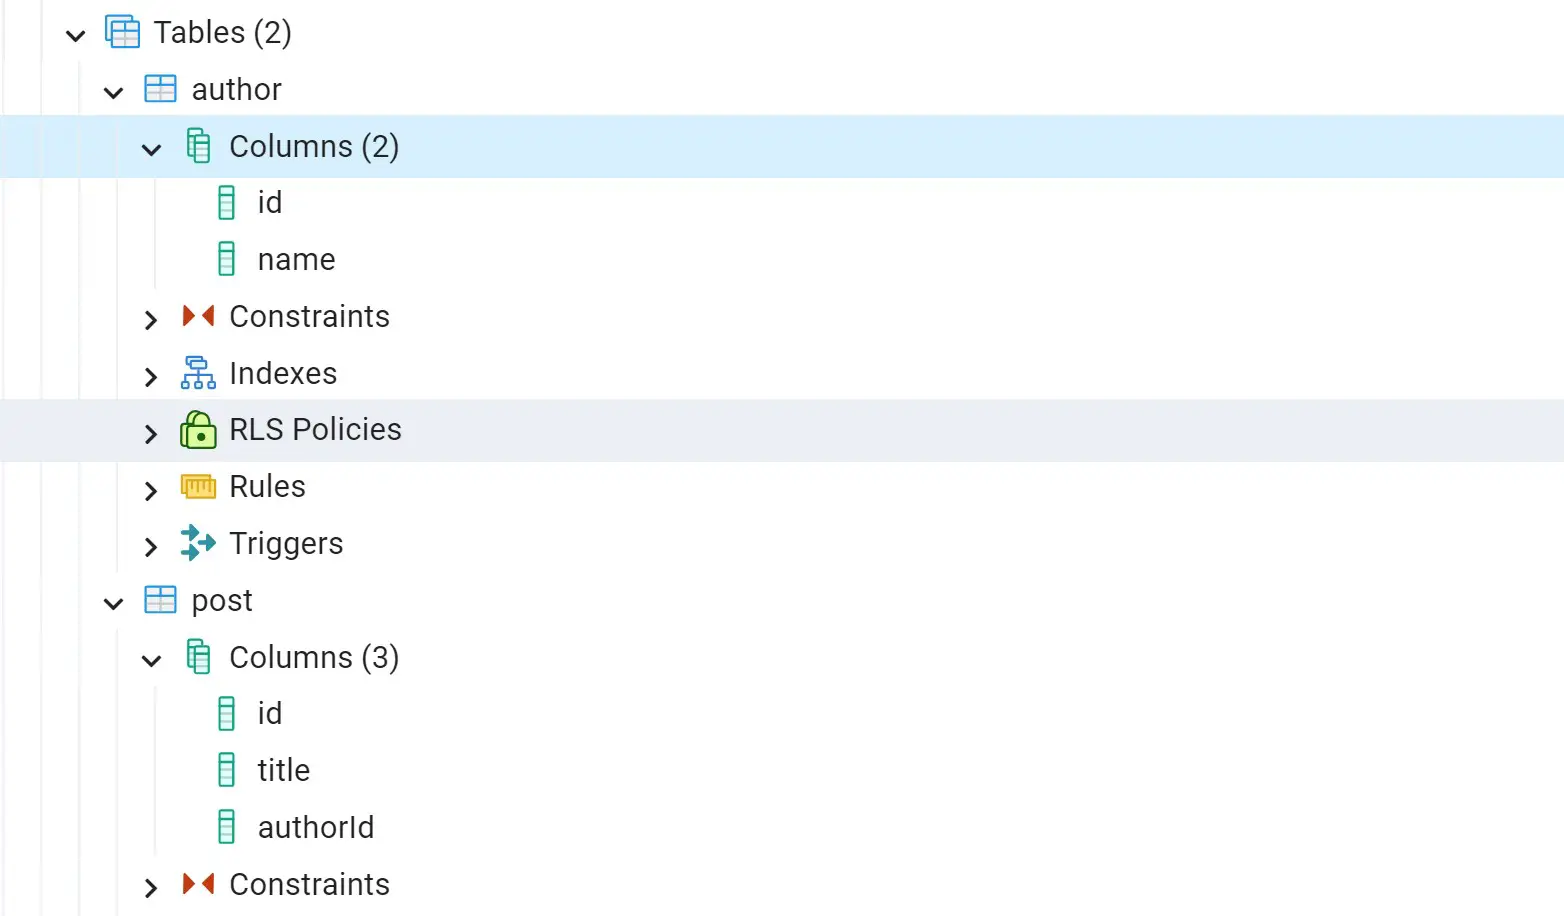
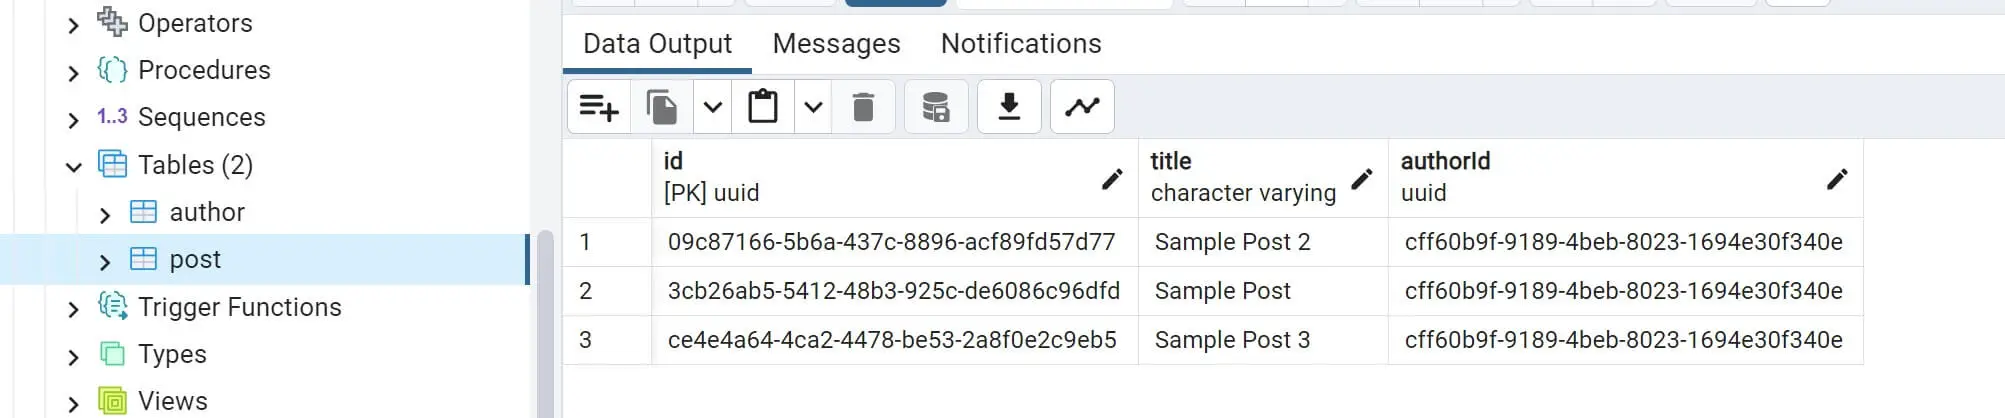
Also, go to PostgreSQL and confirm your tables:
Creating NestJS GraphQL Providers (Services)
A service abstract application logic (like fetching data from a database). Here, you use the @Injectable() decorator and create a repository layer to manage what you want GraphQL to do within NestJS.
In your PostsService, you will need the following:
- The
@nestjs/common decoratorsfor Injectable. - Use the
@nestjs/typeormdecorator for dependency injection of the Repository from TypeORM. - Inject the
Postentity’s repository into the service. - Constructor that takes injected
Repository<Post>as a parameter.
You finally need the Methods to handle GraphQL requests as follows:
createPost(title: string, authorId: string)creates a new post with the given title and author ID. It then saves the post using the posts repository.findAllByAuthor(authorId: string)finds all posts related to a specific author using a provided author ID.postAuthor(postId: string)finds the author of a specific post using the post ID.
Now update PostsService (src/posts/posts.service.ts) to add all these characteristics as follows:
import { Injectable } from '@nestjs/common';
import { InjectRepository } from '@nestjs/typeorm';
import { Repository } from 'typeorm';
import { Post } from './entities/post.entity';

@Injectable()
export class PostsService {
  constructor(
    @InjectRepository(Post)
    private readonly postsRepository: Repository<Post>,
  ) {}

  createPost(title: string, authorId: string) {
    const post = this.postsRepository.create({
      title,
      author: {
        id: authorId,
      },
    });

    return this.postsRepository.save(post);
  }

  findAllByAuthor(authorId: string): Promise<Post[]> {
    return this.postsRepository.find({
      where: {
        author: {
          id: authorId,
        },
      },
    });
  }

  async findAll(): Promise<Post[]> {
    return await this.postsRepository.find();
  }

  async postAuthor(postId: string) {
    const post = await this.postsRepository.findOne({
      where: {
        id: postId,
      },
      relations: {
        author: true,
      },
    });

    return post.author;
  }
}
Similarly, the AuthorsService should have these Methods:
create(name: string)to create a new author with the given name and an empty array of posts.findAll()fetches all authors in the database.authorPosts(authorId: string)for finding all posts related to a specific author using a specific author ID.
Your src/authors/authors.service.ts file will be updated as follows:
import { Injectable } from '@nestjs/common';
import { InjectRepository } from '@nestjs/typeorm';
import { Repository } from 'typeorm';
import { Author } from './entities/author.entity';

@Injectable()
export class AuthorsService {
  constructor(
    @InjectRepository(Author)
    private readonly authorsRepository: Repository<Author>,
  ) {}

  create(name: string) {
    const author = this.authorsRepository.create({ name, posts: [] });
    return this.authorsRepository.save(author);
  }

  findAll() {
    return this.authorsRepository.find();
  }

  async authorPosts(authorId: string) {
    const author = await this.authorsRepository.findOne({
      where: { id: authorId },
      relations: { posts: true },
    });

    return author.posts;
  }
}
Creating NestJS GraphQL Resolvers (Controllers)
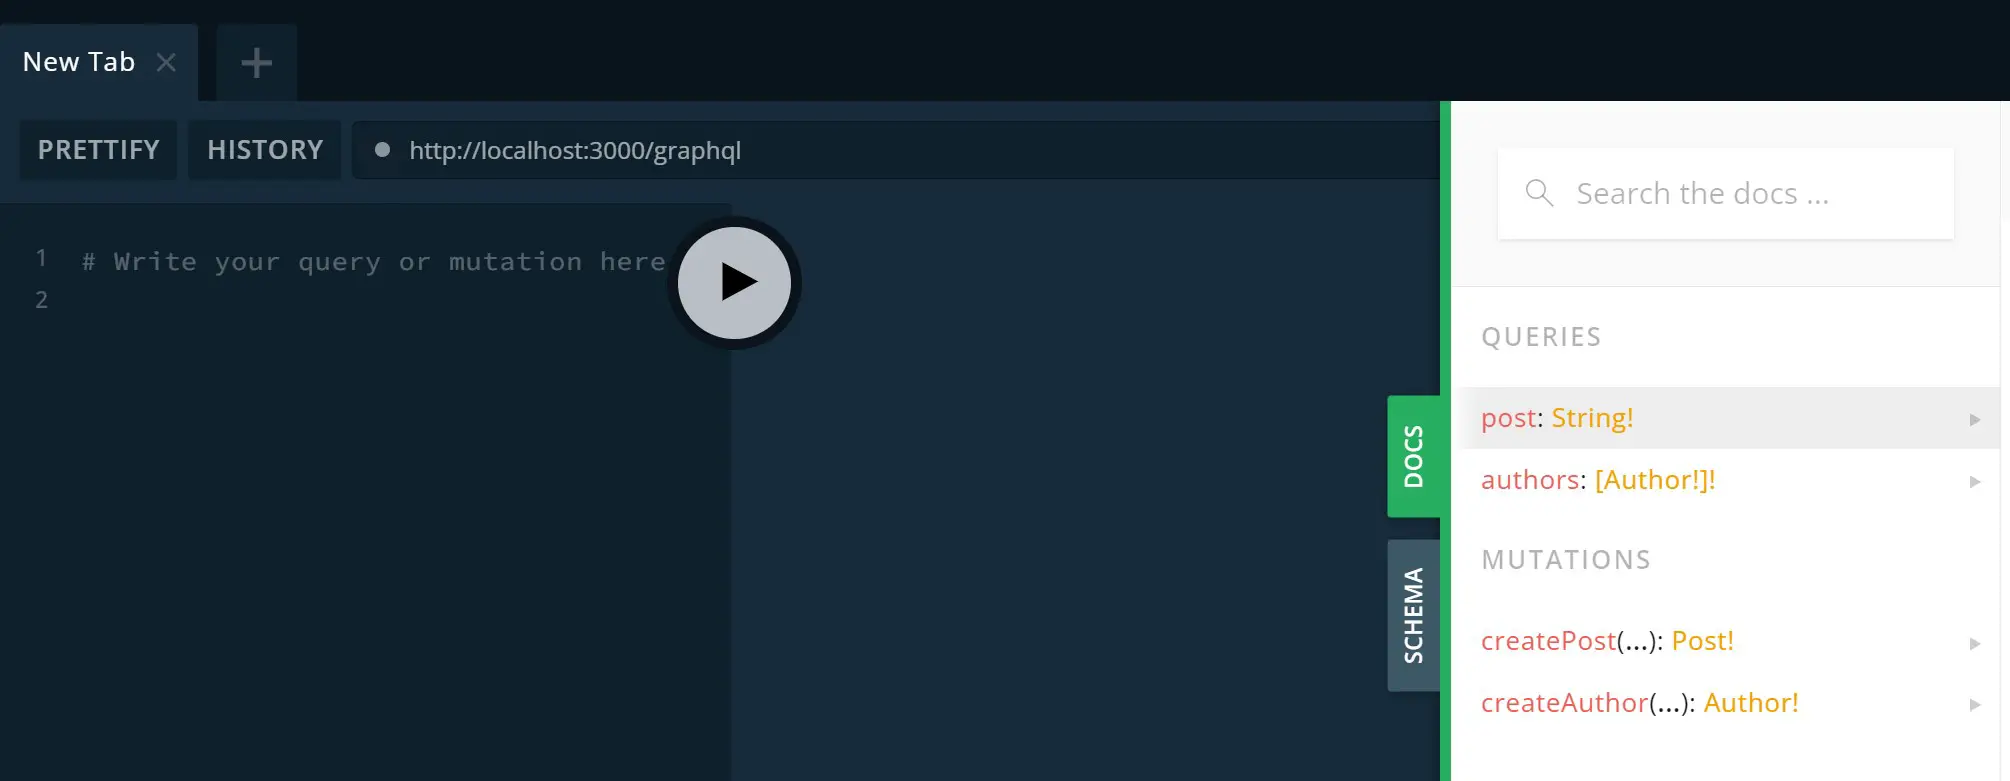
GraphQL interacts with your API with the http://localhost:3000/graphql endpoint with a lovely GraphQL IDE. Here, you need Resolvers to let IDE know what your Queries and Mutations look like.
This step is equivalent to Controllers in Rest APIs. But for GraphQL, the Query and mutation declarations are done using resolver files. They construct our GraphQL schema.
Related: NestJS Resolvers FT GraphQL Code-First and Schema-First 🚀
Resolvers will also handle the methods you created in your Providers (Services).
Go to PostsResolver (src/posts/posts.resolver.ts) and create:
- Queries methods
- Mutations for
createPostmutation to create a new post. - ResolveField for the author field resolver that resolves the author for a given Post.
import {Args,Mutation,Parent,Query,ResolveField, Resolver} from '@nestjs/graphql';
import { Author } from '../authors/entities/author.entity';
import { Post } from './entities/post.entity';
import { PostsService } from './posts.service';

@Resolver(() => Post)
export class PostsResolver {
  constructor(private readonly postsService: PostsService) {}

  @Query(() => Post)
  async post() {
    // let's fetch the first post available in the database
    const posts = await this.postsService.findAll();
    return posts.length > 0 ? posts[0] : null;
  }

  @Mutation(() => Post)
  createPost(@Args('title') title: string, @Args('authorId') authorId: string) {
    return this.postsService.createPost(title, authorId);
  }

  @ResolveField(() => [Author])
  author(@Parent() post: Post) {
    return this.postsService.postAuthor(post.id);
  }
}
Here you have:
- The
@Resolverdecorator defines a resolver class. - The decorators
@Query,@Mutation, and@ResolveFieldare to define GraphQL queries, mutations, and field resolvers, respectively. - The
@Argsdecorator will extract arguments from the GraphQL schema.
Likewise, the AuthorsResolver (src/authors/authors.resolver.ts) will have the Query Mutation and ResolveField methods as follows:
import {Args,Mutation,Parent,Query,ResolveField, Resolver} from '@nestjs/graphql';
import { Post } from '../posts/entities/post.entity';
import { Author } from './entities/author.entity';
import { AuthorsService } from './authors.service';

@Resolver(() => Author)
export class AuthorsResolver {
  constructor(private readonly authorsService: AuthorsService) {}

  @Query(() => [Author])
  authors() {
    return this.authorsService.findAll();
  }

  @Mutation(() => Author)
  createAuthor(@Args('name') name: string) {
    return this.authorsService.create(name);
  }

  @ResolveField(() => [Post])
  posts(@Parent() author: Author) {
    return this.authorsService.authorPosts(author.id);
  }
}
Starting NestJS GraphQL API
At this point, ensure your application is running:
npm run start:dev
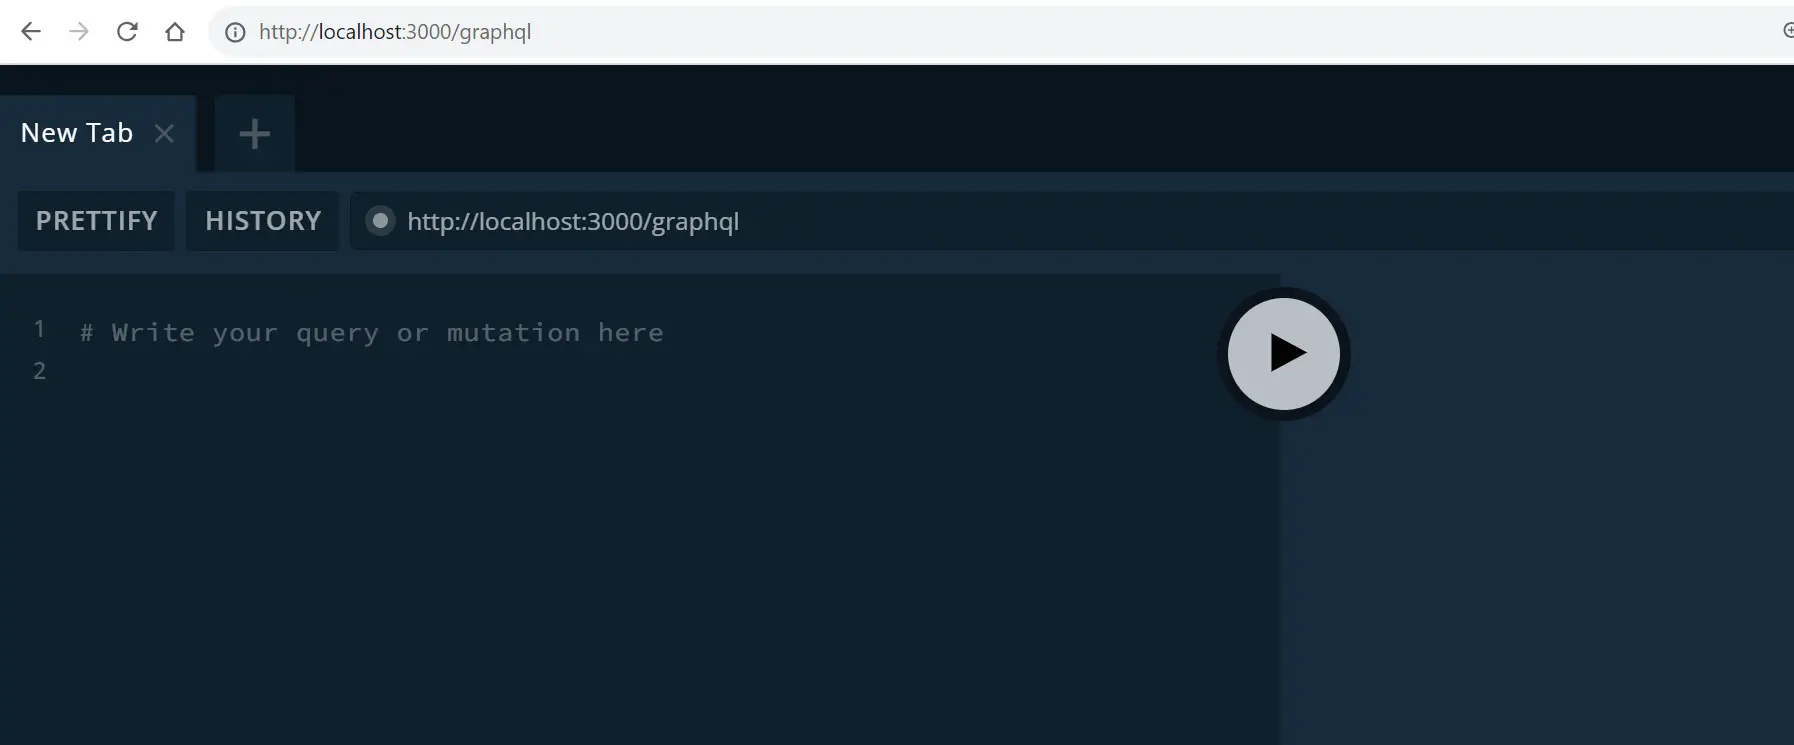
NestJS will expose GraphQL Playground on http://localhost:3000/graphql as follows:
Testing NestJS GraphQL API using the GraphQL Playground
Let’s start with mutations createPost and createAuthor to add data.
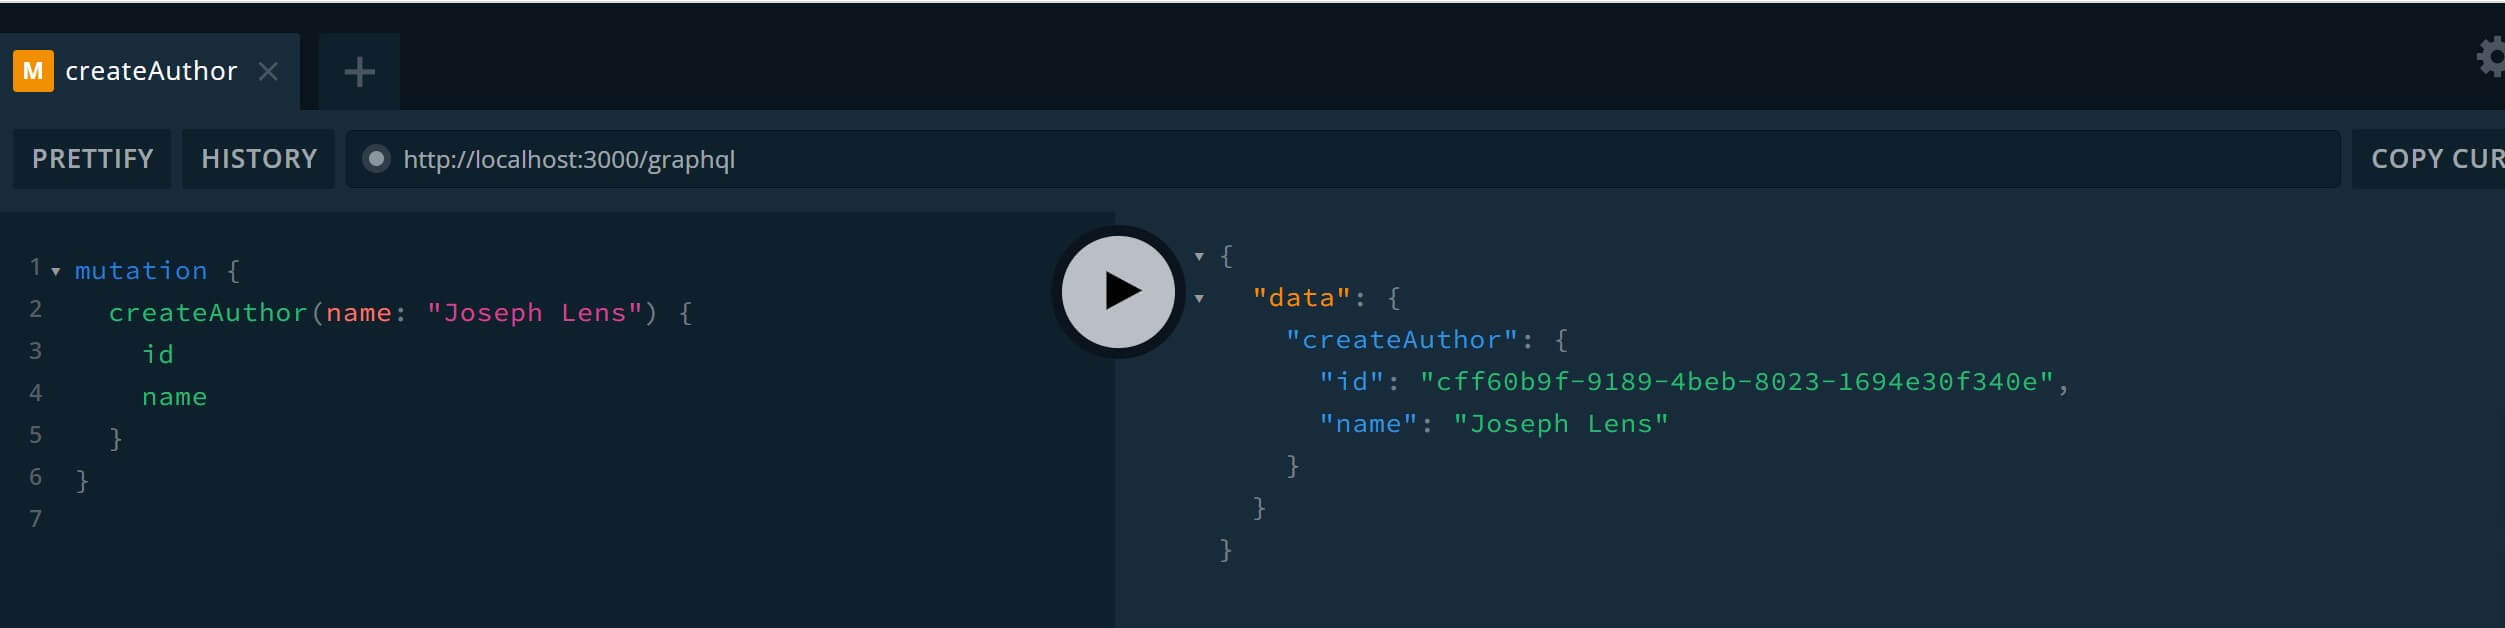
First, you need to create an Author using the following Mutation:
mutation {
  createAuthor(name: "John Doe") {
    id
    name
  }
}
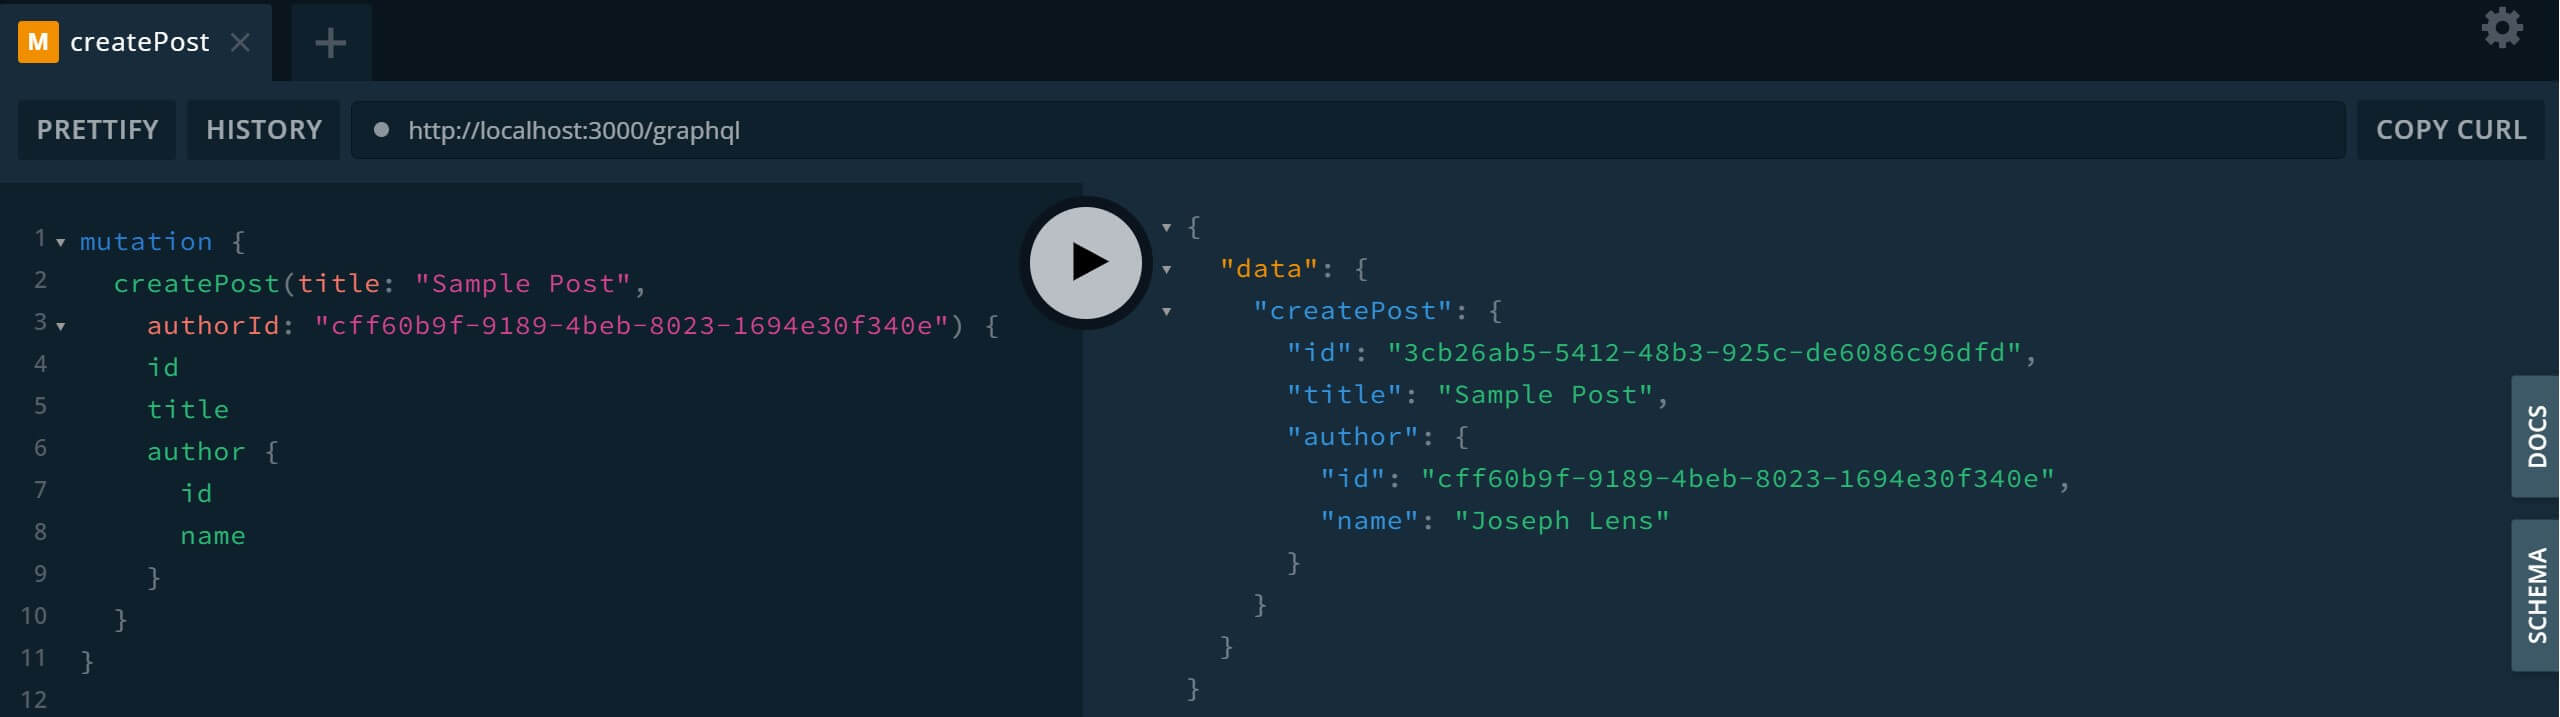
Now you can create a Post and assign it to this author:
mutation {
  createPost(title: "Sample Post",
    authorId: "cff60b9f-9189-4beb-8023-1694e30f340e") {
    id
    title
    author {
      id
      name
    }
  }
}
But note cff60b9f-9189-4beb-8023-1694e30f340e is the author ID associated with this Post:
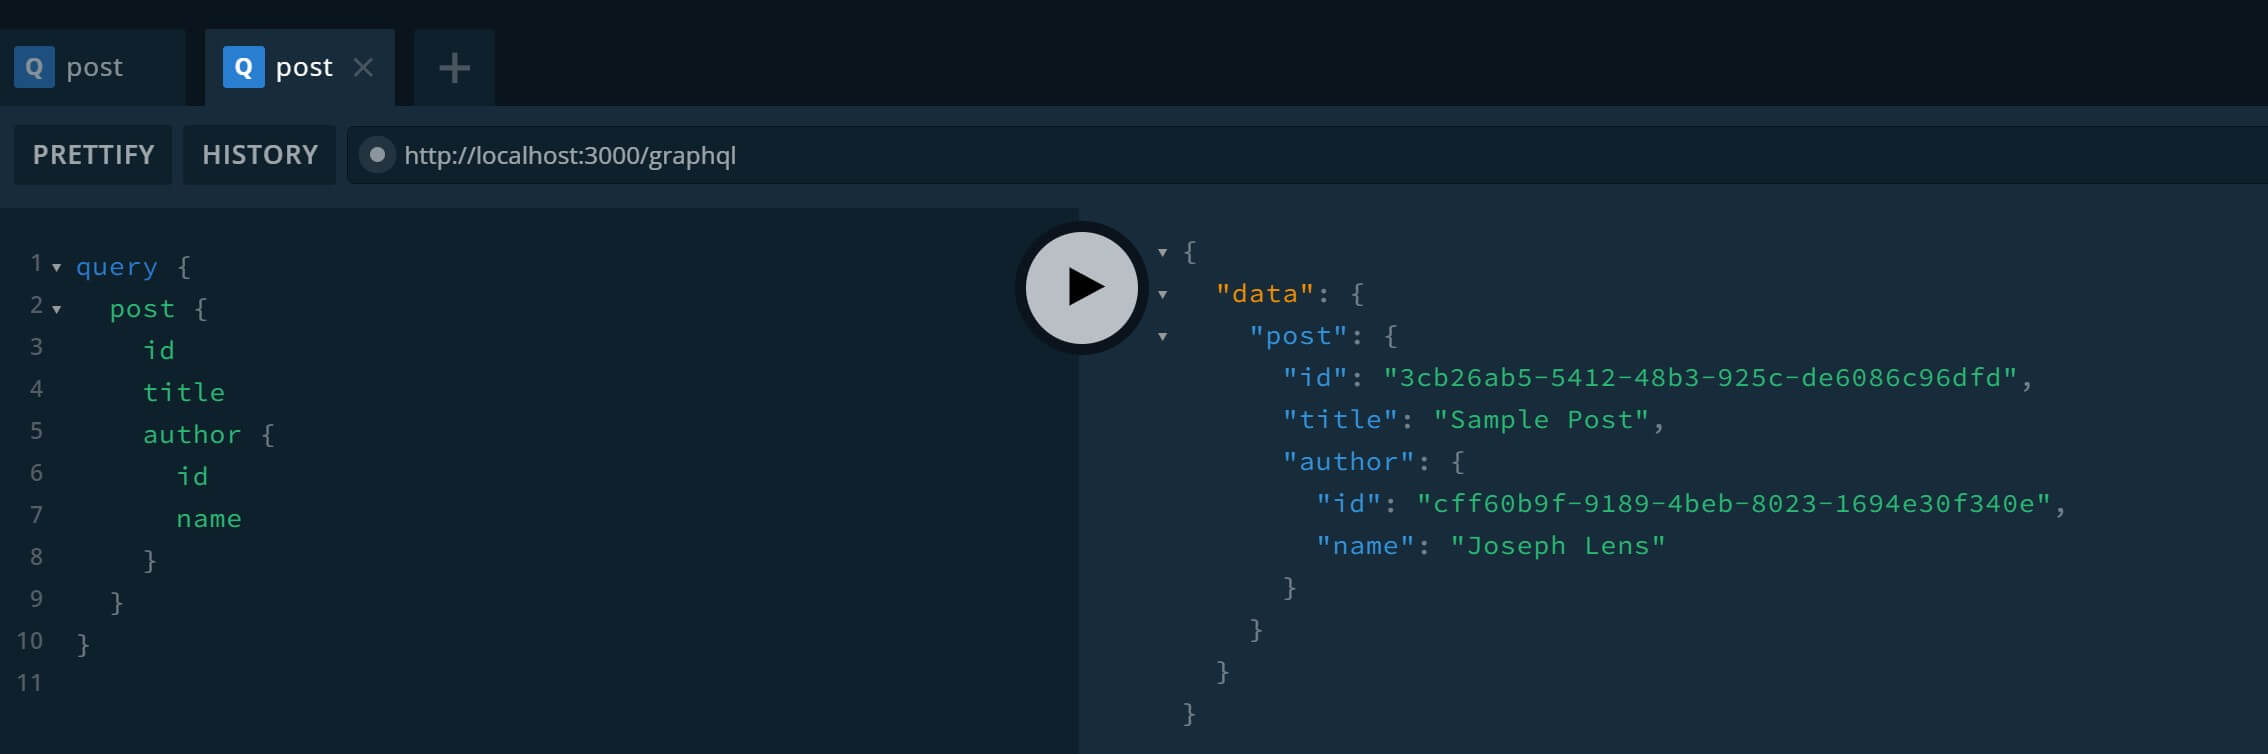
Because you have the data, use Queries to fetch it as follows:
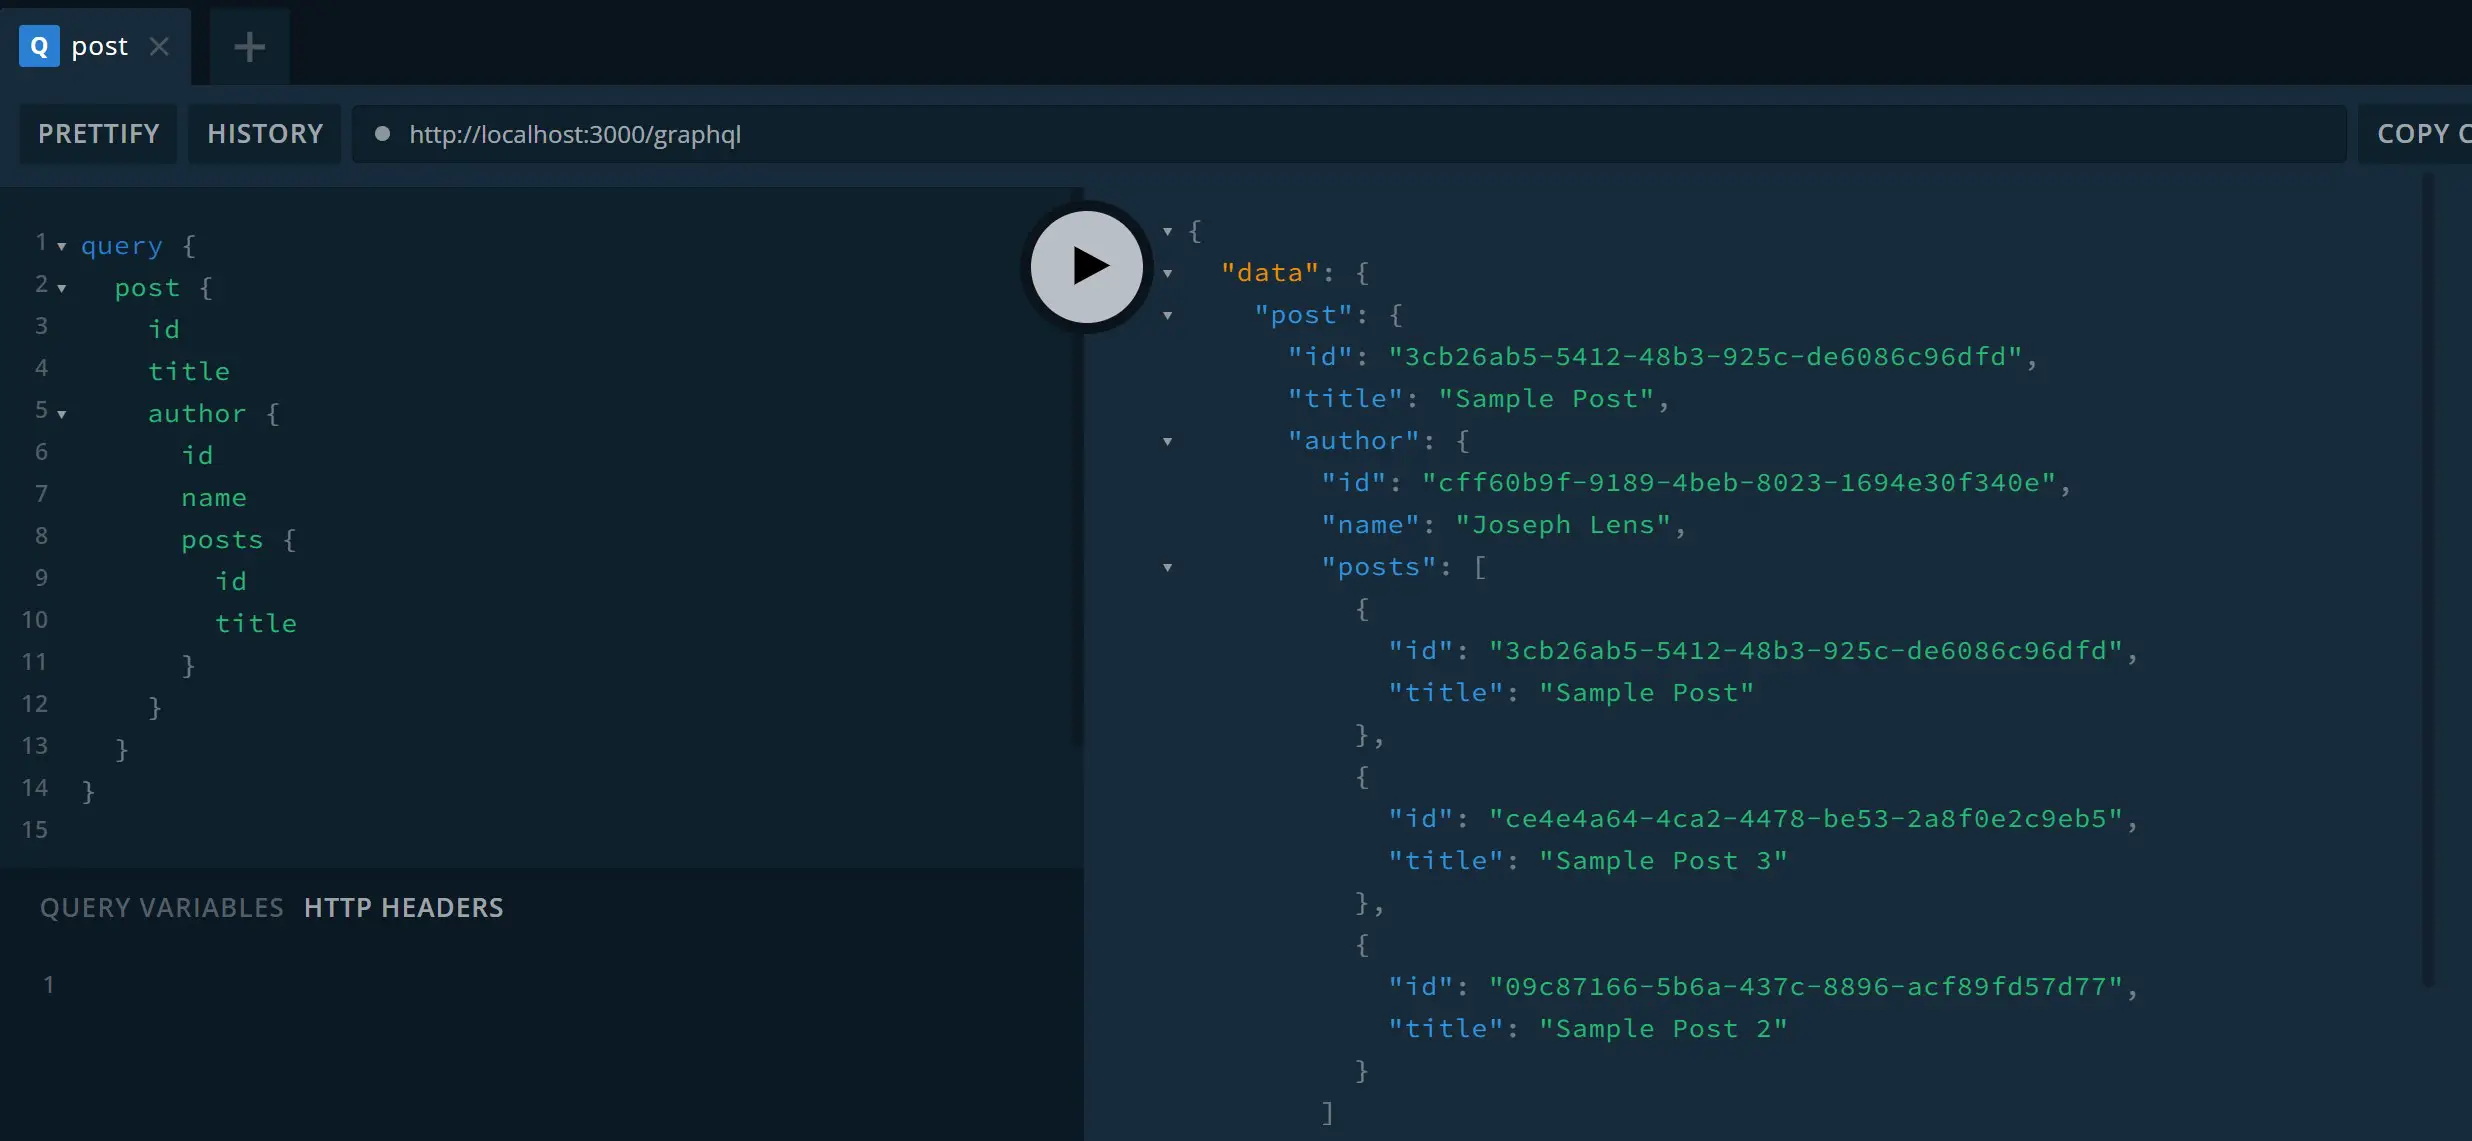
Fetch a post with the author’s details:
query {
  post {
    id
    title
    author {
      id
      name
    }
  }
}
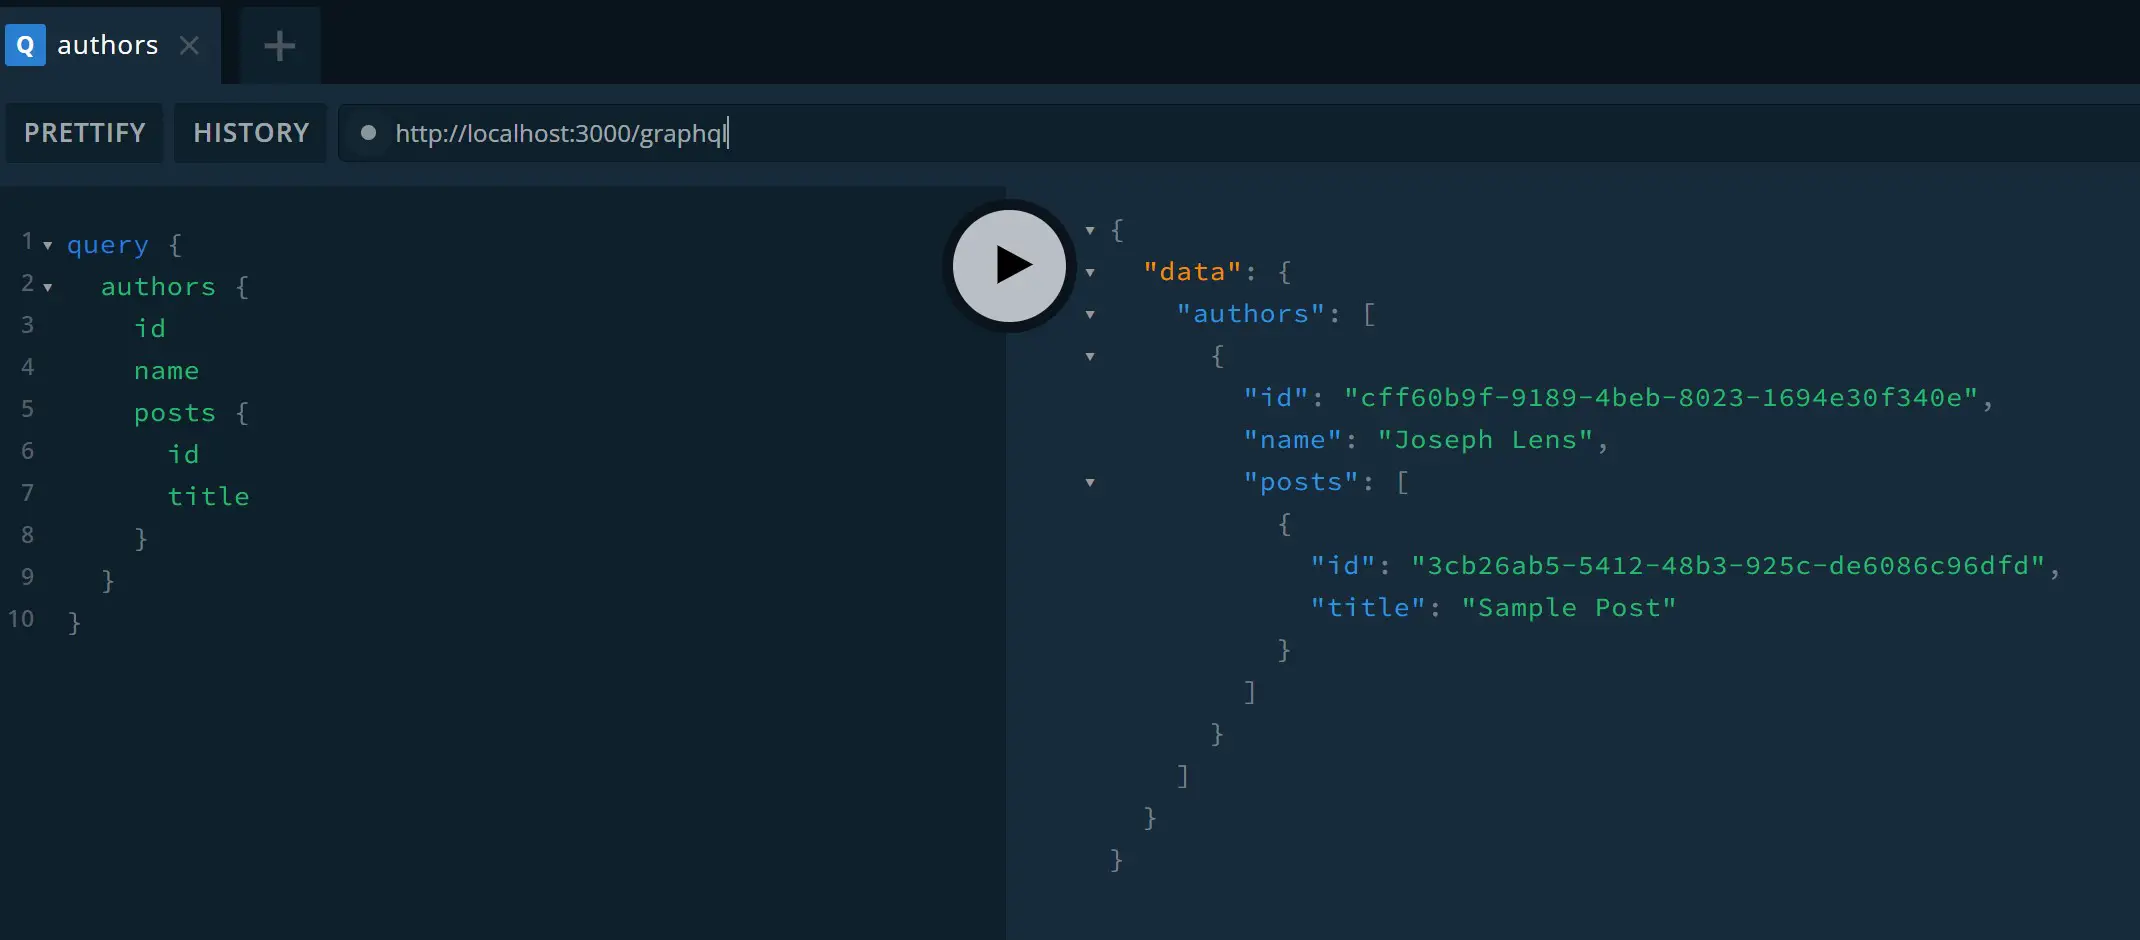
Fetch a list of authors with their post details
query {
  authors {
    id
    name
    posts {
      id
      title
    }
  }
}
Because you have the Field Resolvers:
query {
  post {
    id
    title
    author {
      id
      name
      posts {
        id
        title
      }
    }
  }
}
Note the changes you are making are in your database:
Conclusion
This was an easy yet more structured way of building your NestJS server-side apps with GraphQL Apollo server and TypeORM PostgreSQL relational database. I hope you found this tutorial helpful. Get the code ued on this guide on GitHub.
Written By: