Create, Generate, and Run TypeORM Migrations with Nest.js DataSource
Posted October 5, 2023

TypeORM migrations allow you to create Database entities that let TypeORM CLI create database tables within your code. You then use TypeORM to generate a migration from the entity. You’ll create TypeORM database migration entities. You’ll use Nest.js with TypeORM to create, run, and generate TypeORM migrations on PostgreSQL, SQLite, MongoDB, and MySQL DB.
Why not dive into this guide and take your TypeORM migrations to the next level? This Nest.js TypeORM migrations example guide has all you need for a perfect TypeORM migration setup. You’ll learn:
- How to create TypeORM migration in Nest.js with PostgreSQL, SQLite, MongoDB, and MySQL.
- How to create an entity that TypeORM uses to run database migrations.
- Steps to Creating TypeORM migrations.
- Use TypeORM and Nest.js to generate migrations from a datasource.
- Showing All Migrations.
- Applying migrations.
- Reverting and rolling back migrations.
- Running pending migrations.
- Understand TypeORM database works with migrations synchronization.
- How to manually generate, run, and apply TypeORM Nest.js Migrations.
- Undoing the last migration.
Prerequisites
To use TypeORM migrations with Nest.js, ensure you have the following:
- Node.js installed on your computer.
- PostgreSQL, or MySQL installed on your computer.
- If you are using MongoDB as your TypeORM migrations database, ensure you have Nest.js ready with MongoDB
Related: Easy TypeORM with Nest.js and MongoDB Example Tutorial
- Some basic Knowledge of working with Nest.js with TypeORM will be an added advantage
What is TypeORM Migrations
A migration (database context) manages and applies changes to the database schema. This way, your code creates a trail of migrations changes over time while preserving existing data. This means, that if your application evolves, and database structures need to adapt accordingly, Migrations will handle all operations without causing data loss and inconsistencies.
How TypeORM Migrations Works
TypeORM is an ORM. It gives you TypeScript classes and objects rather than raw SQL queries. Database migrations are a TypeORM feature. As you use TypeORM ORM, you get the advantage of advancing your existing data with Migrations.
TypeORM migrations work as follows:
- Create TypeORM entities and a connection to your database.
- Use TypeORM CLI with a typeorm migration:create command to generate migration files based on your entities.
- Apply the created migrations using TypeORM CLI typeorm migration:run command and update the database schema accordingly.
- If needed, TypeORM uses a typeorm migration:revert as the Migration command to roll back the database schema to its previous state.
Let’s now into the steps of practically using TypeORM migrations within a Nest.js app.
Configuring TypeORM migration entities with PostgreSQL
An entity uses classes and decorators that TypeORM needs to create database tables (collections if running a NOSQL DB). To simplify it, entities define your data’s schema and structure.
Your migration will use an entity and let TypeORM do its job on your PostgreSQL MongoDB, SQLite, and MySQL. For TypeORM to generate migration from an entity, create one as follows:
-
Ensure you have Nest.js CLI installed:
npm install -g @nestjs/cli -
Set up your Nest.js application:
nest new task_app_api -
Install the core TypeORM migration dependencies and pg for PostgreSQL packages. Use mysql2 for MySQL and sqlite3 if you are working with a different database.
npm install --save @nestjs/typeorm typeorm @nestjs/config pg -
Get your module ready
nest g module task
nest g service task --no-spec
nest g controller task --no-spec
To configure an entity, create a task.entity.ts file in the src/task directory. This file will host the configuration for the tasks table. Now use TypeORM entities representing your migration table as follows:
import { Entity, Column, PrimaryGeneratedColumn } from 'typeorm';

@Entity("tasks")
export class Task {
    @PrimaryGeneratedColumn()
    id: number;

    @Column()
    title: string;

    @Column()
    description: string;

    @Column({ default: false })
    isCompleted: boolean;
}
TypeORM will access this entity on your module. Head over to src/task/task.module.ts, import and configure TypeOrmModule as follows:
// Import modules and components
import { Module } from '@nestjs/common';
import { TaskService } from './task.service';
import { TaskController } from './task.controller';
// TypeOrmModule creates your database integration
import { TypeOrmModule } from '@nestjs/typeorm';
// Your Task entity class
import { Task } from './task.entity';

@Module({
  //Create an import module
  // add TypeOrmModule to Task entity
  imports: [TypeOrmModule.forFeature([Task])],
  providers: [TaskService],
  controllers: [TaskController]
})
export class TaskModule {}
Setting TypeORM DB synchronization for Migration
TypeORM dictates your tables. And there are two ways to do that:
- Allowing TypeORM to auto-populate your tables
- Generating and running migrations
You only use one parameter to control how Your TypeORM works, synchronize. If true, TypeORM auto-populates your tables; if false, TypeORM looks for migrations’ configurations.
Synchronization defines how the model will react if a new column is added to the table. It is discouraged in production to avoid losing data. To configure synchronization, head to your src/task folder and create a data.source.ts using datasource options as follows:
import { DataSource, DataSourceOptions } from 'typeorm';
export const dbdatasource: DataSourceOptions = {
  // TypeORM PostgreSQL DB Drivers
    type: 'postgres',
    host: 'localhost',
    port: 5432,
    username: 'postgres',
    password: 'pass',
    // Database name
    database: 'task',
    // Synchronize database schema with entities
    synchronize: false,
};

const dataSource = new DataSource(dbdatasource)
export default dataSource
Digesting How TypeORM Migrations Works
Keynote: you must check in the above code:
- This file (
data.source.ts) is created as a DataSource. TypeORM CLI uses a DataSource API instance as an Entity manager to create a connection to your database type. - Ensure your PostgreSQL db properties match the password, username, and database as such.
- Add your entity so TypeORM can add it to your database connection to populate your table.
synchronize: false,is the most key property here. Since you’ll be running migrations, set it to false.
You must have them ready and, most importantly, create your database at this step. TypeORM doesn’t create a database, and it only works on your tables.
Navigate to src/app.module.ts and use the DataSource and database connection as follows:
import { Module } from '@nestjs/common';
import { AppController } from './app.controller';
import { AppService } from './app.service';
import { TaskModule } from './task/task.module';
// Import the dataSource class
import { dbdatasource } from './task/data.source';
// TypeOrmModule database integration
import { TypeOrmModule } from '@nestjs/typeorm';
@Module({
  imports: [
    TypeOrmModule.forRoot(dbdatasource),
    TaskModule,
  ],
  controllers: [AppController],
  providers: [AppService],
})
export class AppModule {}
Setting up TypeORM Migration paths
TypeORM CLI will look to your dataSource to determine how to run your migrations. For TypeORM to run the migration, it has to check the entity and file path you want to save your migration files. Here we need to add the following parameters:
    // TypeORM Entity
    entities: ['build/task/task.entity.js'],
    // Your Migration path
    migrations: ['build/task/migrations/*.js'],
This means you have to update your data.source.ts file as follows:
import { DataSource, DataSourceOptions } from 'typeorm';
export const dbdatasource: DataSourceOptions = {
  // TypeORM PostgreSQL DB Drivers
    type: 'postgres',
    host: 'localhost',
    port: 5432,
    username: 'postgres',
    password: 'pass',
    // Database name
    database: 'task',
    // Synchronize database schema with entities
    synchronize: false,
    // TypeORM Entity
    entities: ['build/task/task.entity.js'],
    // Your Migration path
    migrations: ['build/task/migrations/*.js'],
    migrationsTableName: "task_migrations",

};

const dataSource = new DataSource(dbdatasource)
export default dataSource
entitiesreads the path to your entity file.migrationsis directory where your migrations file will be saved.- migrationsTableName will create another table (
task_migrations) within your database to save all migrations TypeORM will generate.
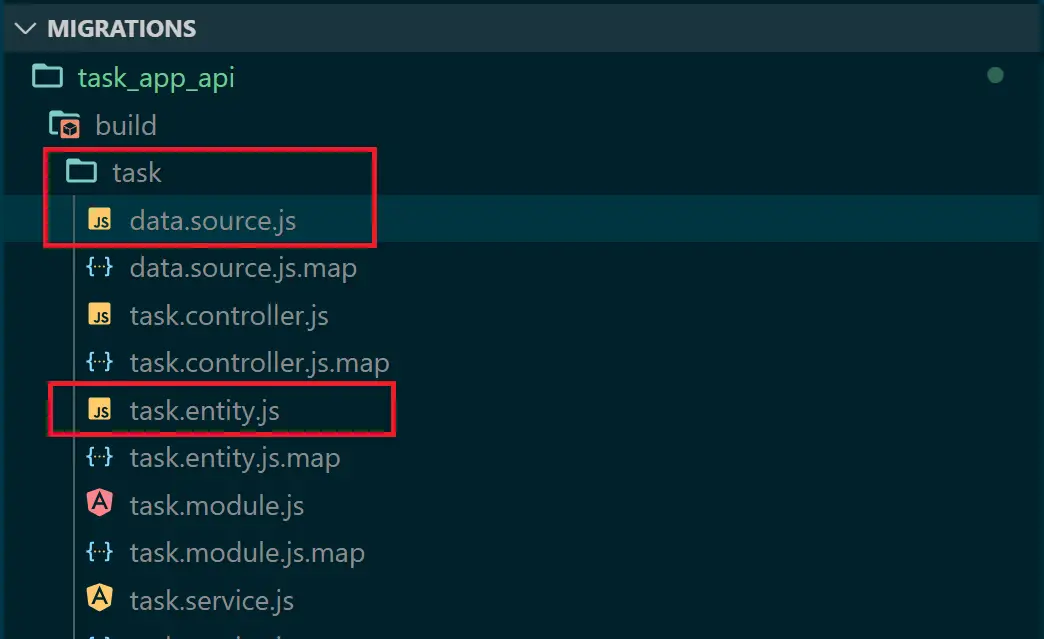
Note that TypeORM will read from your build files already transpiled to JavaScript in this sample.
So, ensure the above paths are correct. Otherwise, your migrations will fail. In my case, the transpiled files are saved in the
buildfolder. If you have a different transpiled configuration directory, such asdist, update your paths as such.
To be sure, a simple way is to execute npm run build. Then check your build paths:
Generating Your First TypeORM Migration Using TypeORM CLI
Let’s now allow TypeORM to generate migration from the entity with a few commands. Typically, you’ll use the following command format to generate a Nest.js TypeORM migration:
npx typeorm-ts-node migration:generate path-to-save-migrations/YourMigrationName -- -d path-to-datasource-configpath.ts
To create the above command sample, head over to your package.json file and add a script to generate migrations as follows:
    "typeorm": "npm run build && npx typeorm -d build/task/data.source.js",
    "migration:generate": "npm run typeorm -- migration:generate",
The first command represents npx typeorm. It builds your project npm run build and makes sure the typescript is first transpiled to JavaScript before running your migrations. Note that. The same command has the flag -d that executes your dataSource, and you have to provide its path as the parameter here as build/task/data.source.js, make sure you have your path correct.
TypeORM CLI will execute npm run typeorm -- migration:generate to generate migrations. In this case, you must provide the path to save your files. Run the following command:
npm run migration:generate -- src/task/migrations/task
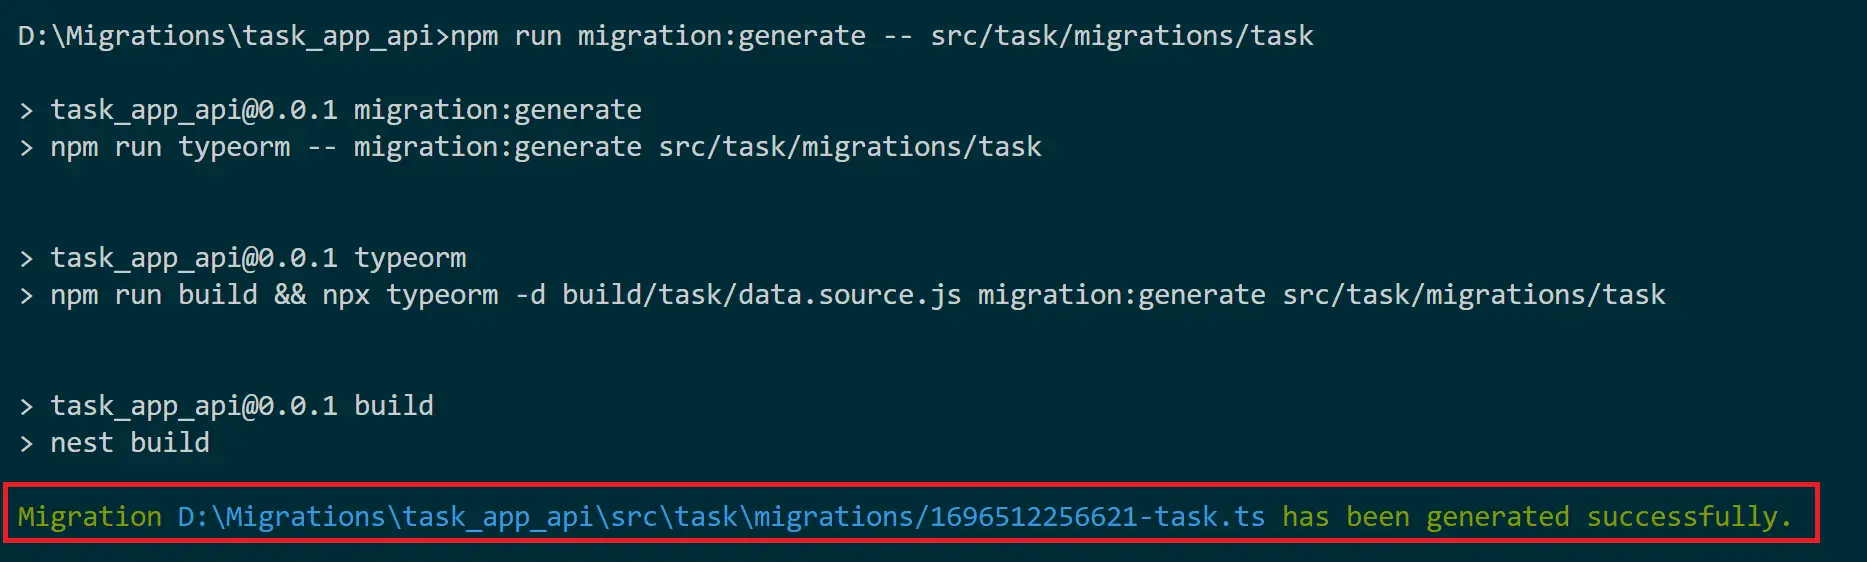
TypeORM will create a migrations folder inside the src/task directory in this case. The migration will be named a task.
This path should be the same as you added in migrations: ['build/task/migrations/*.js']. Where *.js will be the migration file.
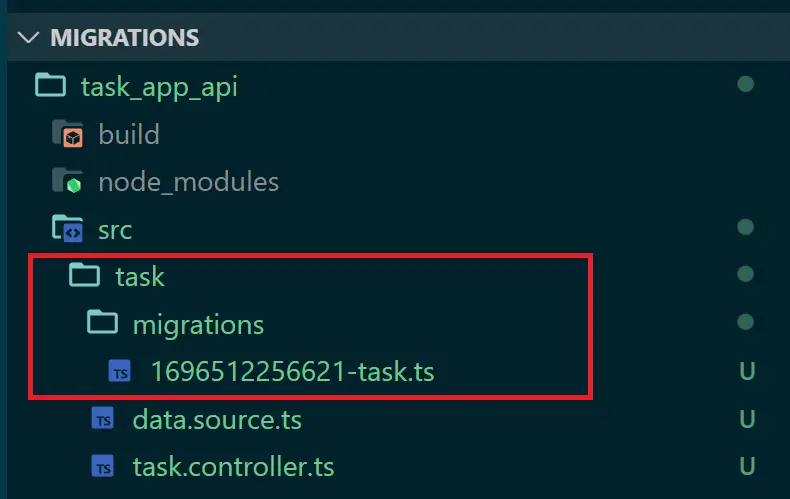
If you head over to the same path, your migrations will be created as follows:
import { MigrationInterface, QueryRunner } from "typeorm";

export class Task1696512256621 implements MigrationInterface {
    name = 'Task1696512256621'

    public async up(queryRunner: QueryRunner): Promise<void> {
        await queryRunner.query(`CREATE TABLE "tasks" ("id" SERIAL NOT NULL, "title" character varying NOT NULL, "description" character varying NOT NULL, "isCompleted" boolean NOT NULL DEFAULT false, CONSTRAINT "PK_8d12ff38fcc62aaba2cab748772" PRIMARY KEY ("id"))`);
    }

    public async down(queryRunner: QueryRunner): Promise<void> {
        await queryRunner.query(`DROP TABLE "tasks"`);
    }
}
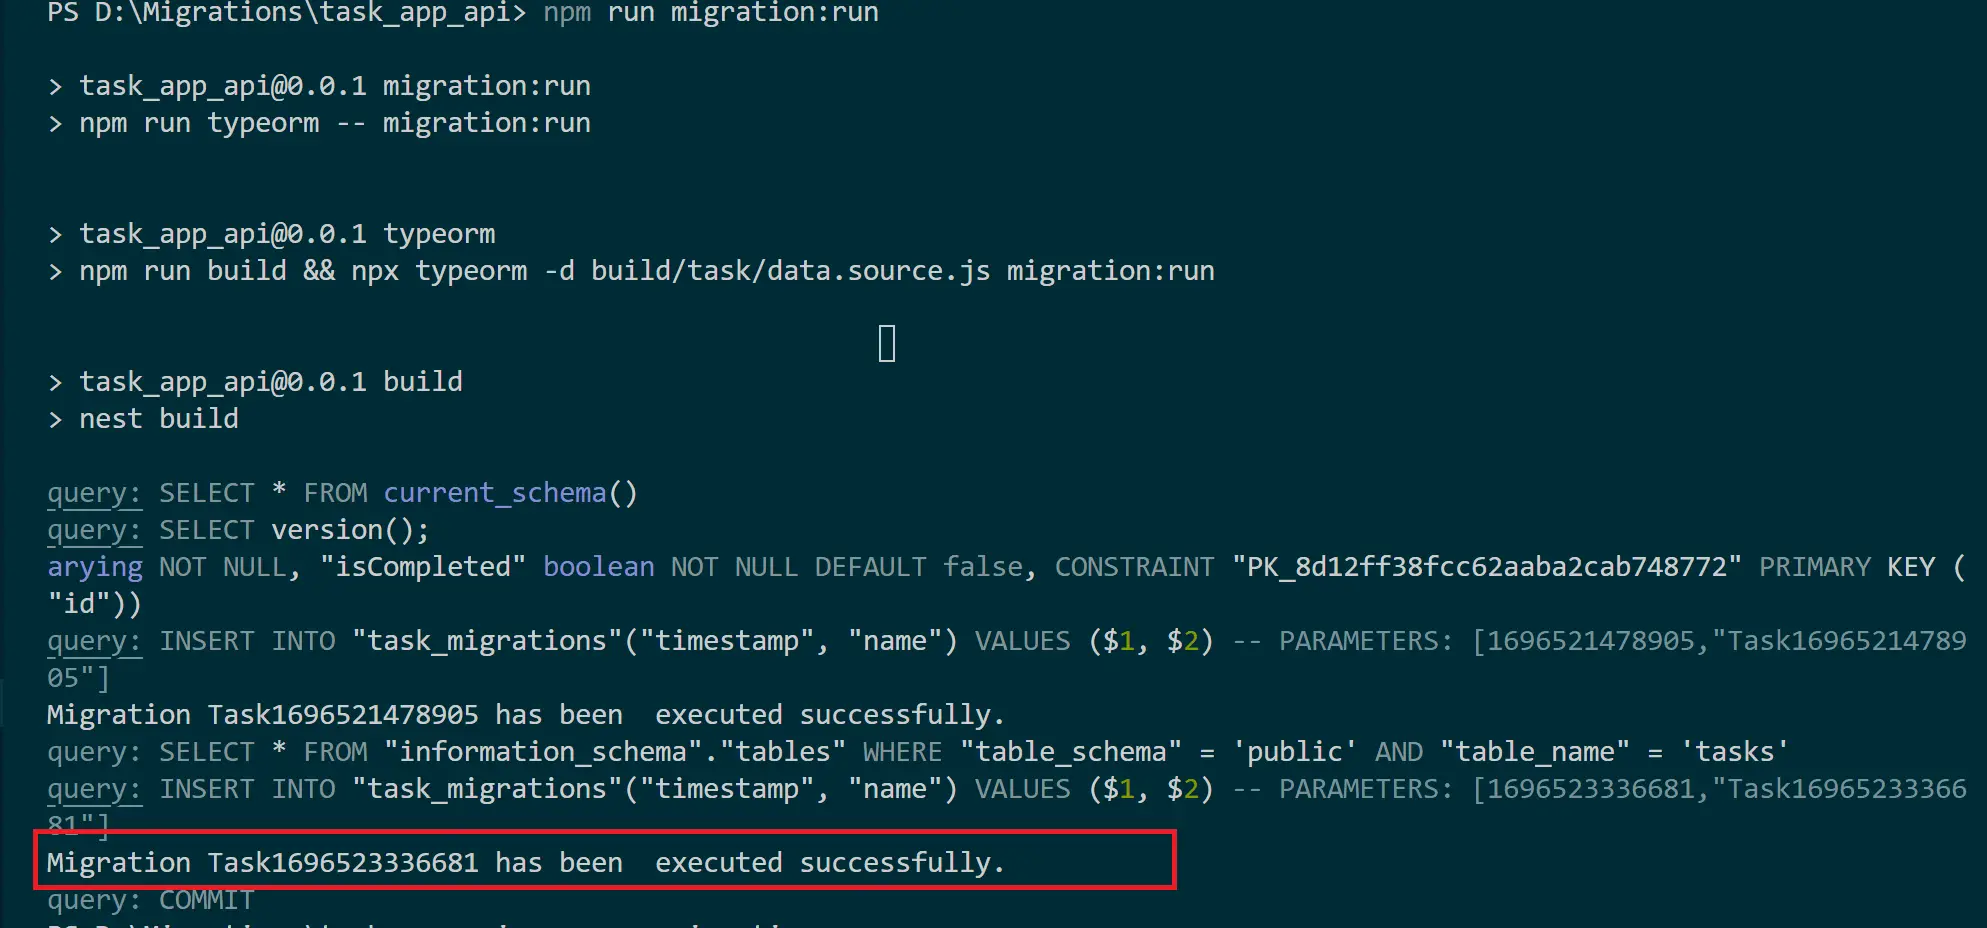
Running your Nest.js TypeORM Migration
To apply the above queries to your database, add the following command to your package.json scripts:
    "typeorm": "npm run build && npx typeorm -d build/task/data.source.js",
    "migration:generate": "npm run typeorm -- migration:generate",
    "migration:run": "npm run typeorm -- migration:run",
Now run the following command:
npm run migration:run
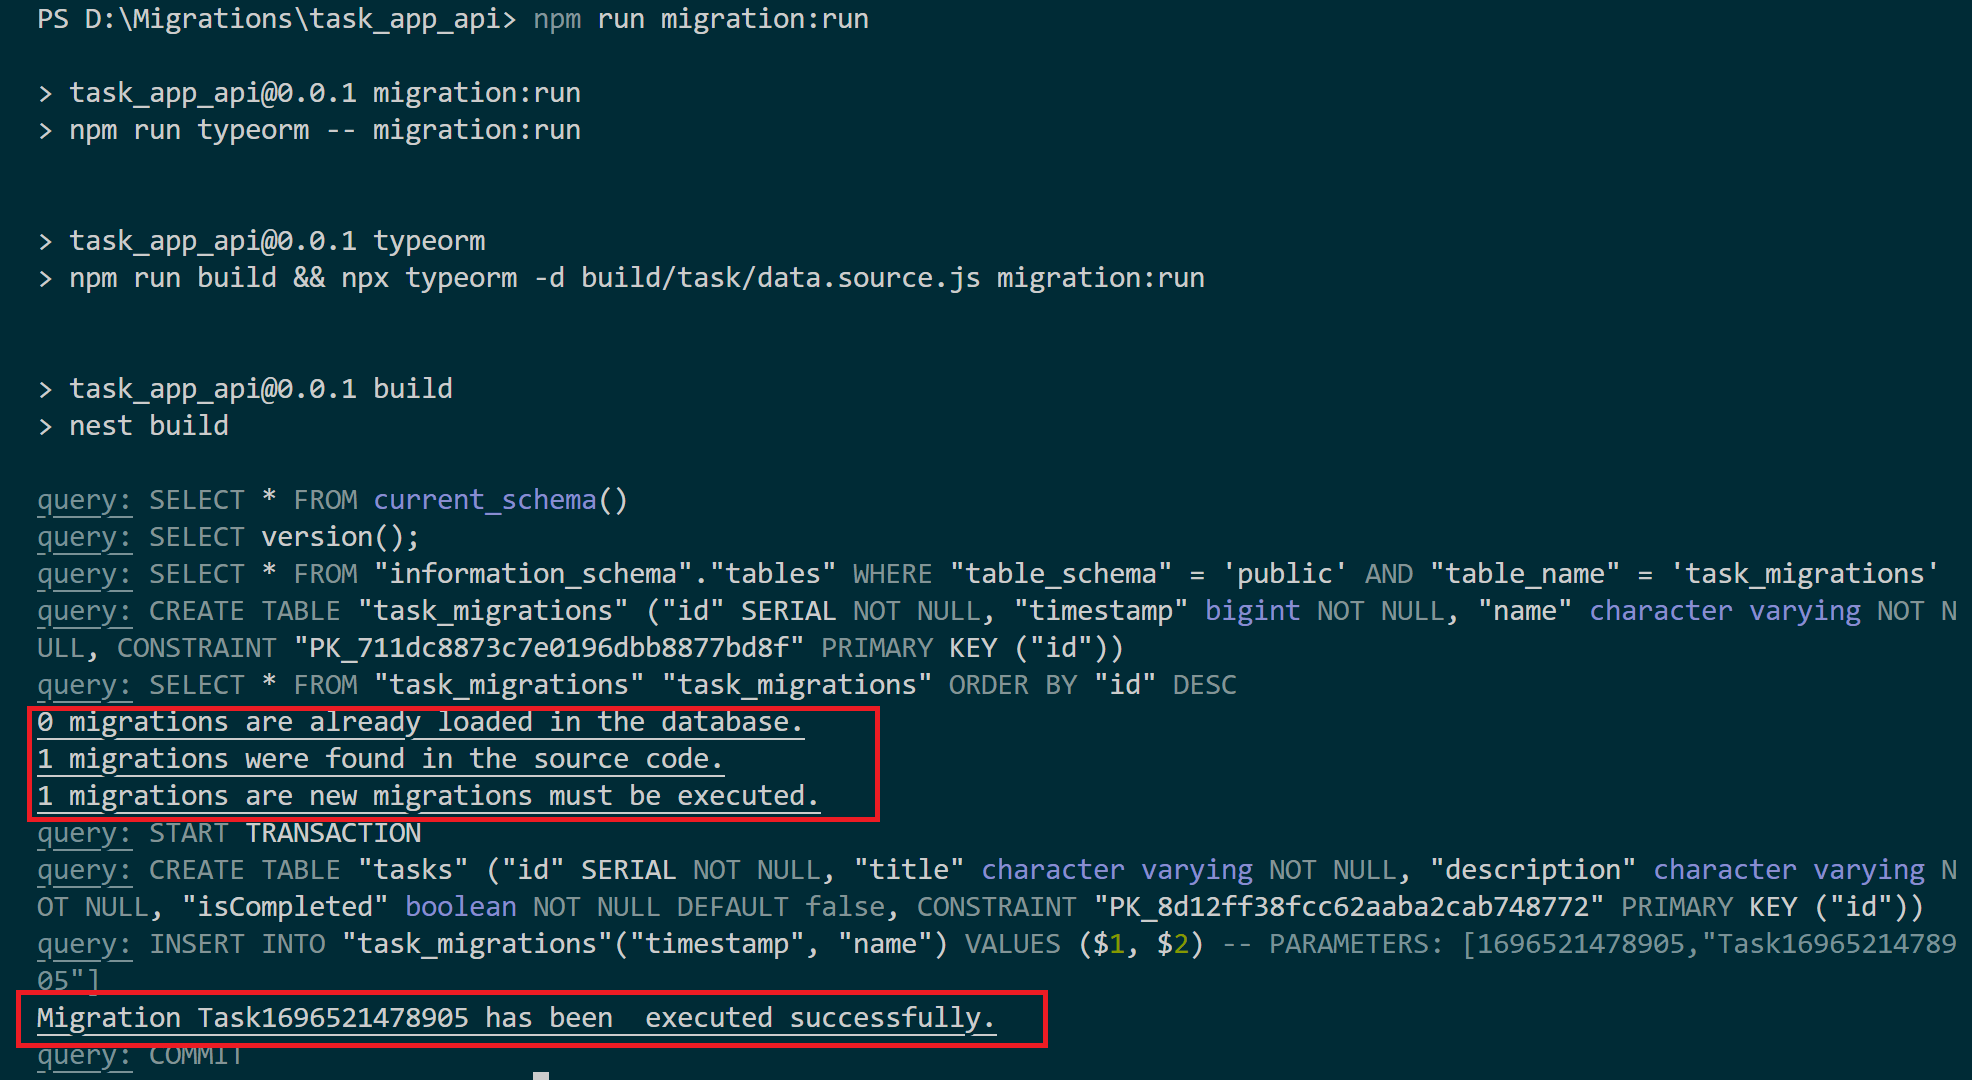
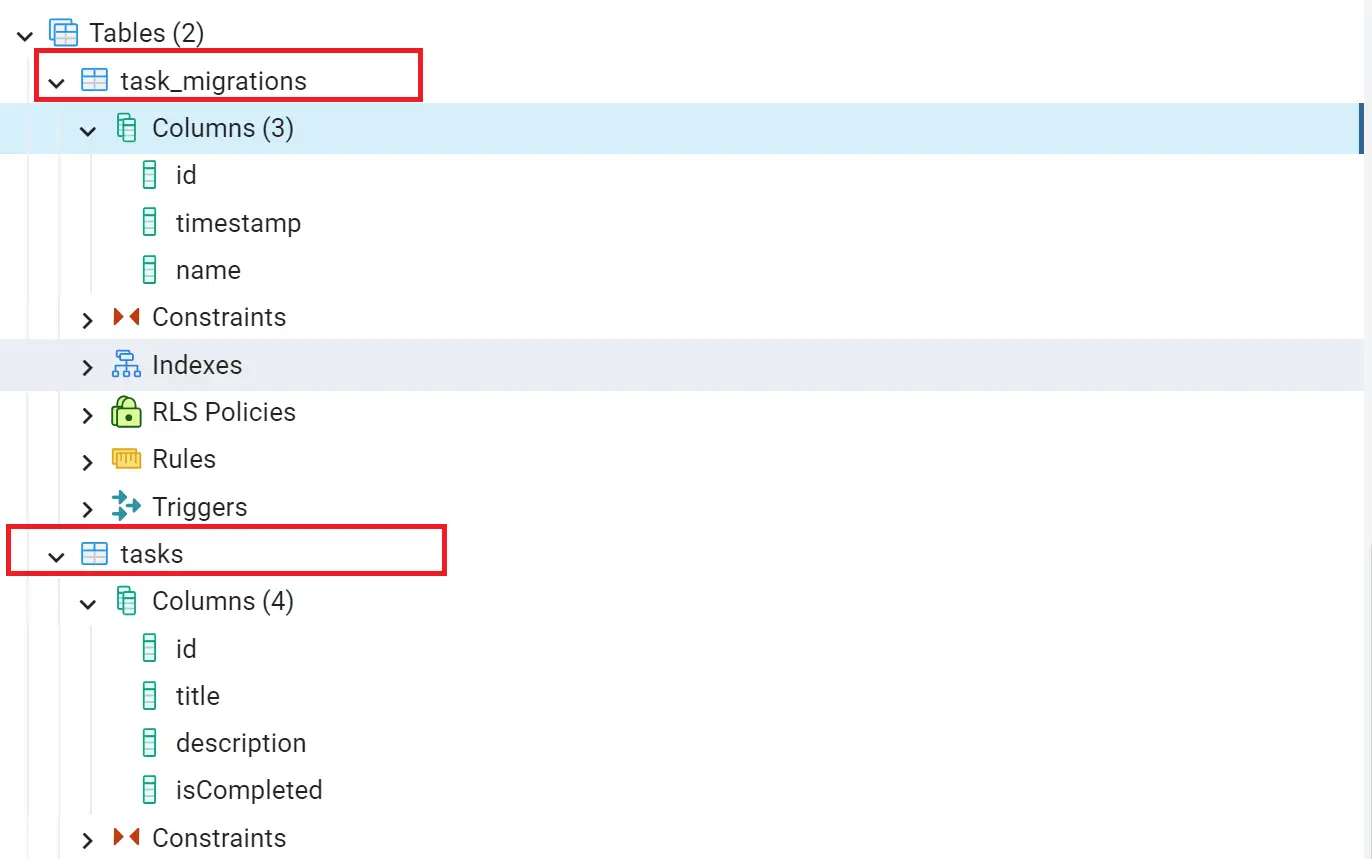
TypeORM will run your migration and tell you, Migration Task1696521113842 has been executed successfully. In this case, you’ll have two tables:
- Tasks executed from your entity
- Task_migrations created by TypeORM CLI to save your migrations as you specified in
migrationsTableName: "task_migrations"
Check these tables on your database as follows:
At this point, our migration is already deployed. If you try running the generate command:
npm run migration:generate -- src/task/migrations/task
TypeORM will give you a signal:

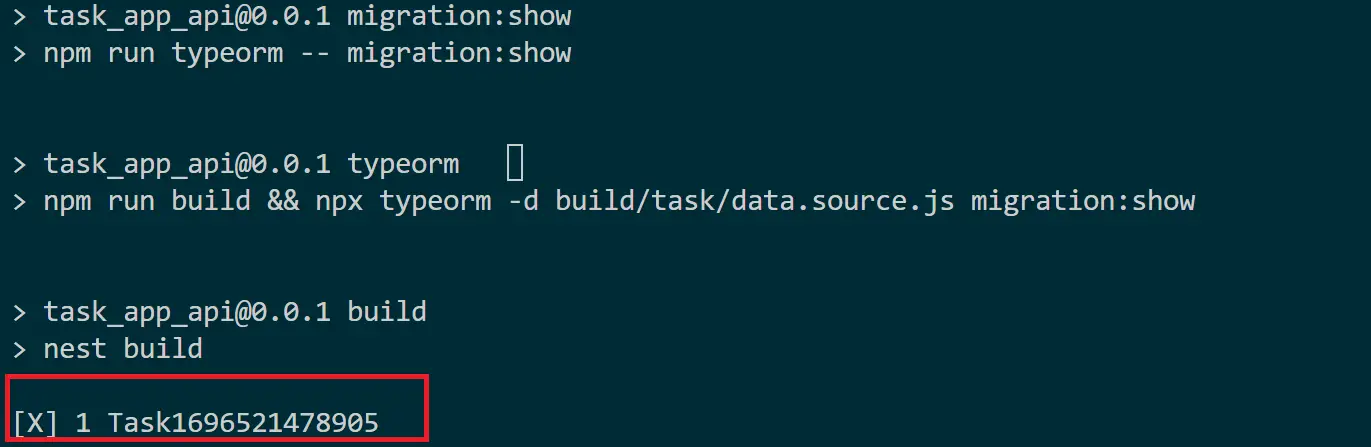
Showing All TypeORM Migrations
To check your available migrations, add the following script to the package.json file:
"migration:show": "npm run typeorm -- migration:show",
Then run the following command:
npm run migration:show
Running Any Pending TypeORM Migrations
Let’s say you have changed your Entities, like maybe adding a new field. In this case, regenerate the migrations:
npm run migration:generate -- src/task/migrations/task
Then apply them again:
npm run migration:show
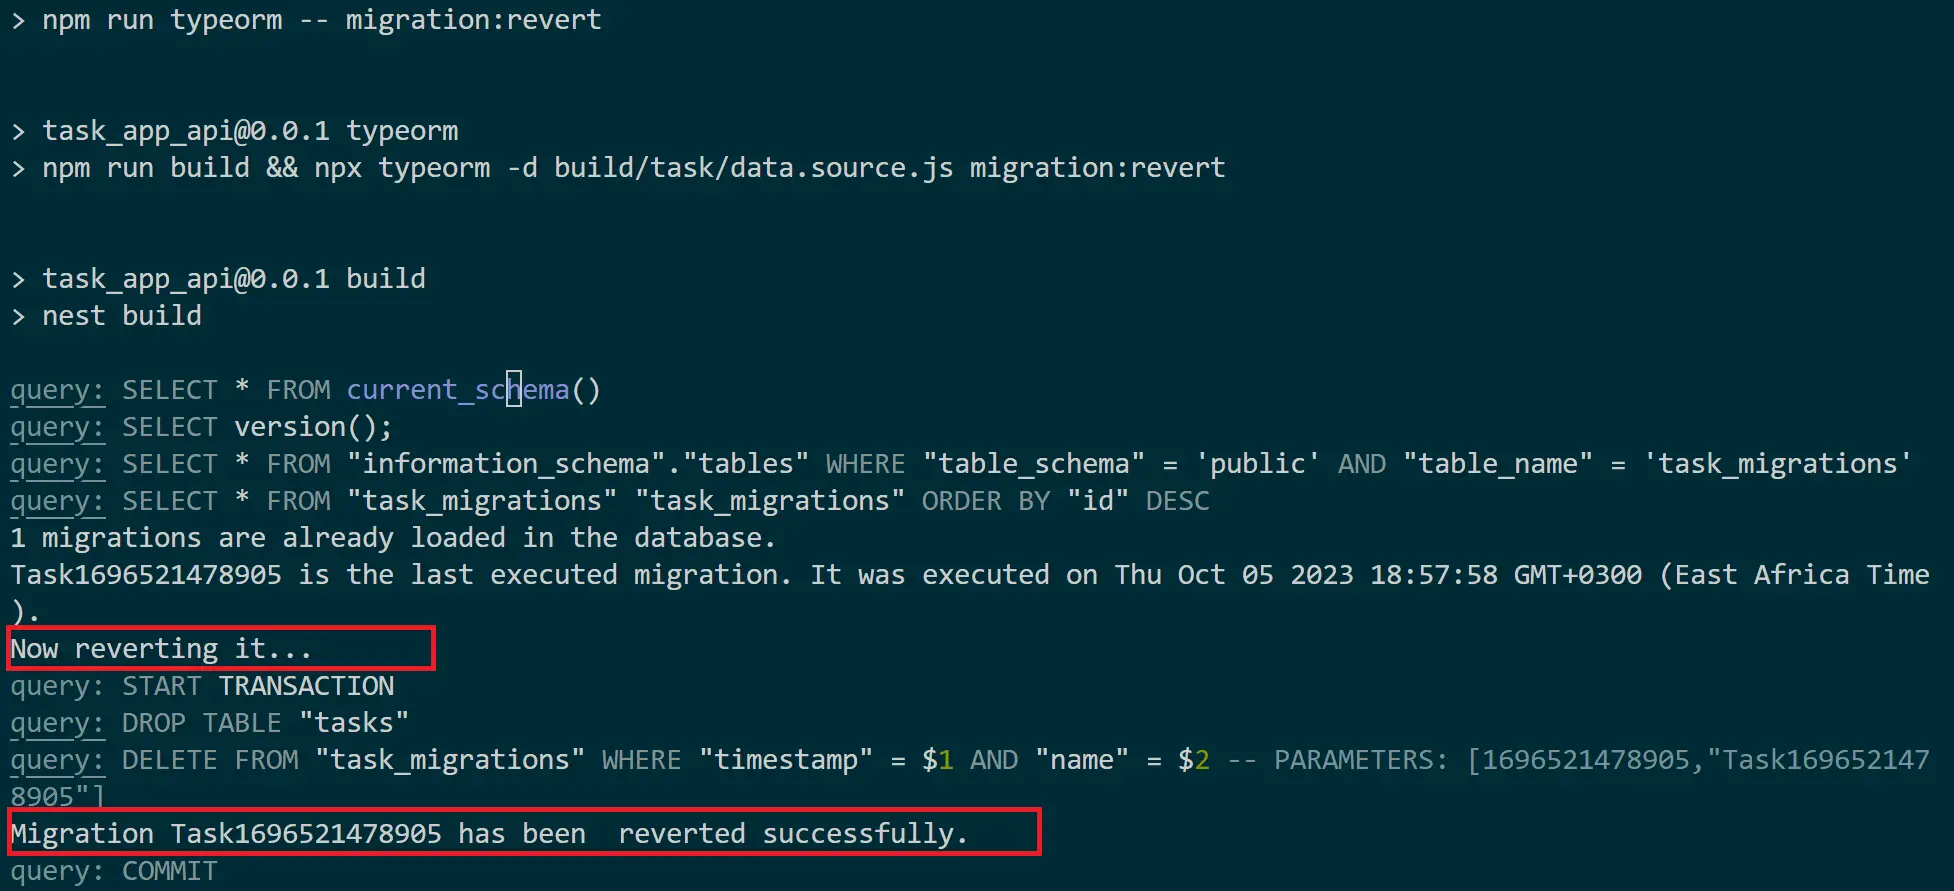
Rolling Back and Reverting TypeORM migrations
What if you want to go back to your previous migration? Your task_migrations table keeps records of the available migrations, and you can revert as follows:
"migration:revert": "npm run typeorm -- migration:revert",
Run your revert command as follows:
How to Manually Generate and Create TypeORM Nest.js Migrations
Up to this point, you have learned to use TypeORM CLI to create, generate, and run your migration automatically.
You can, however, choose to run your migrations manually, and in this section, you’ll learn how to do that.
This uses TypeORM migration API to write migrations as a manual approach to creating migration files manually.
Here, you must use MigrationBuilder to create SQL queries for both the up and down methods.
up - queries to perform migrations.
down - execute SQL queries to revert migrations.
To do so, you’ll first run the TypeORM migration command as follows:
npx typeorm migration:create src/task/migrations/task
The src/task/migrations/task remains the same.
This command should generate migration files with the up and down methods as follows:
import { MigrationInterface, QueryRunner } from "typeorm"

export class Task1696523336681 implements MigrationInterface {

    public async up(queryRunner: QueryRunner): Promise<void> {
    }

    public async down(queryRunner: QueryRunner): Promise<void> {
    }
}
The up method will be updated as follows:
- Update the imports so TypeORM can create a table
import { MigrationInterface, Table, QueryRunner } from "typeorm"
- Create a
queryRunnerWhere the name is your database table and columns are table fields as follows:
public async up(queryRunner: QueryRunner): Promise<void> {
        await queryRunner.createTable(new Table({
            name: "tasks",
            columns: [
                {
                    name: "id",
                    type: "serial",
                    isPrimary: true,
                    isNullable: false,
                },
                {
                    name: "title",
                    type: "varchar",
                    isNullable: false,
                },
                {
                    name: "description",
                    type: "varchar",
                    isNullable: false,
                },
                {
                    name: "isCompleted",
                    type: "boolean",
                    isNullable: false,
                    default: false,
                },
            ],
        }), true);
    }
This is a straightforward query to Understand. For example, the field title is a varchar that can’t be NULL.
TypeORM will use the down method to initiate a revert command. It will execute a dropTable query as follows:
    public async down(queryRunner: QueryRunner): Promise<void> {
        await queryRunner.dropTable("tasks");
    }
Now run the migration and apply the changes to your database using the migration run command:
npm run migration:run
And if you want to initiate a revert, run your revert command:
npm run migration:revert

Getting TypeORM Provider and Controller Ready
You have TypeORM generate migration from entity ready. And manual configuration as well. The next step is completing your API by adding providers and controllers.
To make this step easier, I have created a guide for the same. Check:
- Guide to TypeORM with Nest.js, Postgres, MySQL, Multer, Docker, and Docker Compose
- Guide To TypeORM MSSQL With Nest.js and Typescript
- Guide To TypeORM SQLite With Nest.js and Typescript
- TypeORM OneToMany and ManyToOne with Nest.js and PostgreSQL
Conclusion
In this Nest.js TypeORM migrations example guide, you have learned:
- How to create TypeORM migration in Nest.js with PostgreSQL, SQLite, MongoDB, and MySQL.
- How to create an entity that TypeORM uses to run database migrations.
- Steps to Creating a TypeORM migrations
- Use TypeORM to generate migrations
- Showing, Running, and Reverting migrations
- Understand TypeORM database synchronization
- How to manually generate, run, and apply TypeORM Nest.js Migrations.
Get the code used on this post in this GitHub repository.
I hope you found it helpful. Do you have any Nest.js topics that you need help understanding? Let us know, and we will create a simplified Guide for you.
Written By: