TypeORM OneToMany and ManyToOne with Nest.js and PostgreSQL
Posted October 1, 2023
In this tutorial, you’ll efficiently implement OneToMany and ManyToOne Relationships with TypeORM in Nest.js and PostgreSQL with orphanedRowAction, onDelete, and onUpdate CASCADE included.
TypeORM as an ORM allows you to manage many database tables within one application and still be able to implement Relations such as OneToMany and ManyToOne, to name a few.
Dive and learn how to get your TypeORM OneToMany and ManyToOne Relations running on your Nest.js apps.
Related: Master TypeORM ManyToMany Relation with NestJS and Postgres
Prerequisites
This migrations guide assumes you have prior knowledge of Nest.js TypeORM and PostgreSQL database. The following samples provide you with what you need for now.
Related: Guide to TypeORM with NestJS, Postgres, MySQL, Multer, Docker, and Docker Compose.
Understanding TypeORM OneToMany and ManyToOne
One-to-Many relationship has one record in one table is associated with multiple records in another table. A many-to-one relationship is the opposite. Multiple records in one table are associated with a single record in another table.
TypeORM these database interactions with foreign key constraints. This way, TypeORM entities are created differently with One-to-Many and Many-to-One relationships in your TypeScript code
Hypothetical TypeORM OneToMany and ManyToOne
To Understand this TypeORM One-to-Many and Many-to-One model, let’s take a Hypothetical example. In this case you have two entities, Department and Employee. For TypeORM to represent One-to-Many and Many-to-One relationships you will have:
- Department Table with Fields department_id, name, location.
- Employee Table with Fields employee_id, name, position, department_id (foreign key)
The foreign key constraints will let TypeORM create your tables to work with One-to-Many and Many-to-One relationships. Here is how TypeORM will break these relationships:
- Each department will have multiple employees to represent a One-to-Many relationship from Department to Employee.
+-------------+--------------+----------------------------+
| Departments |
+-------------+--------------+----------------------------+
| id          | int(11)      | PRIMARY KEY AUTO_INCREMENT |
| name        | varchar(255) |                            |
| location    | varchar(255) |                            |
+-------------+--------------+----------------------------+
- Each employee belongs to only one department, representing a Many-to-One relationship from Employee to Department.
+-------------+--------------+----------------------------+
| Employees   |
+-------------+--------------+----------------------------+
| id          | int(11)      | PRIMARY KEY AUTO_INCREMENT |
| name        | varchar(255) |                            |
| position    | varchar(255) |                            |
| departmentId| int(11)      | FOREIGN KEY                |
+-------------+--------------+----------------------------+
Let’s now dive into practical implementation.
Two Best Ways of Implementing OneToMany and ManyToOne and TypeORM
In this example, you’ll create two models with three entities. You’ll learn to update or delete from the OneToMany and ManyToOne relations. You’ll use orphanedRowAction delete, onDelete CASCADE, and onUpdate CASCADE to manage related db tables.
Example one: A product API with product, images, and product characteristics Entities representing OneToMany and ManyToOne are as follows:
- OneToMany -
ProductEntitywith OneToMany relationship withProductImageEntityusing the @OneToMany decorator. One product can have multiple images associated with it. - OneToMany -
ProductEntitywith OneToMany relationship withProductCharacteristicEntity. This way, one product will have multiple characteristics associated with it. - ManyToOne -
ProductImageEntitywith ManyToOne relationship withProductEntity. You use this relation when each product image belongs to a single product. - ManyToOne -
ProductCharacteristicEntitywith a ManyToOne relationship withProductEntity. This will be a perfect way to create each product characteristic belonging to a single product.
This example will allow you to use only one service and controller to implement the API and the three entities.
In the following example, each entity will have its provider, controller, and services. That’s why I chose to use a user’s post use case.
Example Two: A posts API with users, posts, and comments tables. In this case, you will have the following relation.
- User entity will have a OneToMany relation with the Post entity. This relationship means one user can have multiple posts.
- Post has a ManyToOne relationship with the user as each post belongs to a single user.
- A single post will have a OneToMany relationship with a comment. This means each post will have multiple comments.
- Comment has a ManyToOne relationship with a post. Each comment can only belong to a single post.
Setting up a TypeORM OneToMany and ManyToOne App with Nest.js
Let’s dive in and create TypeORM OneToMany and ManyToOne Relations in your Nest.js with PostgreSQL.
You’ll use entities and decorators to establish the TypeORM relationships. Let’s first create a Nest.js app as follows:
- Ensure you have Nest.js CLI ready:
npm i -g @nestjs/cli
- Create your app using the following command:
nest new typeorm-nestjs
- Change the terminal directory and point to the newly created
typeorm-nestjsfolder:
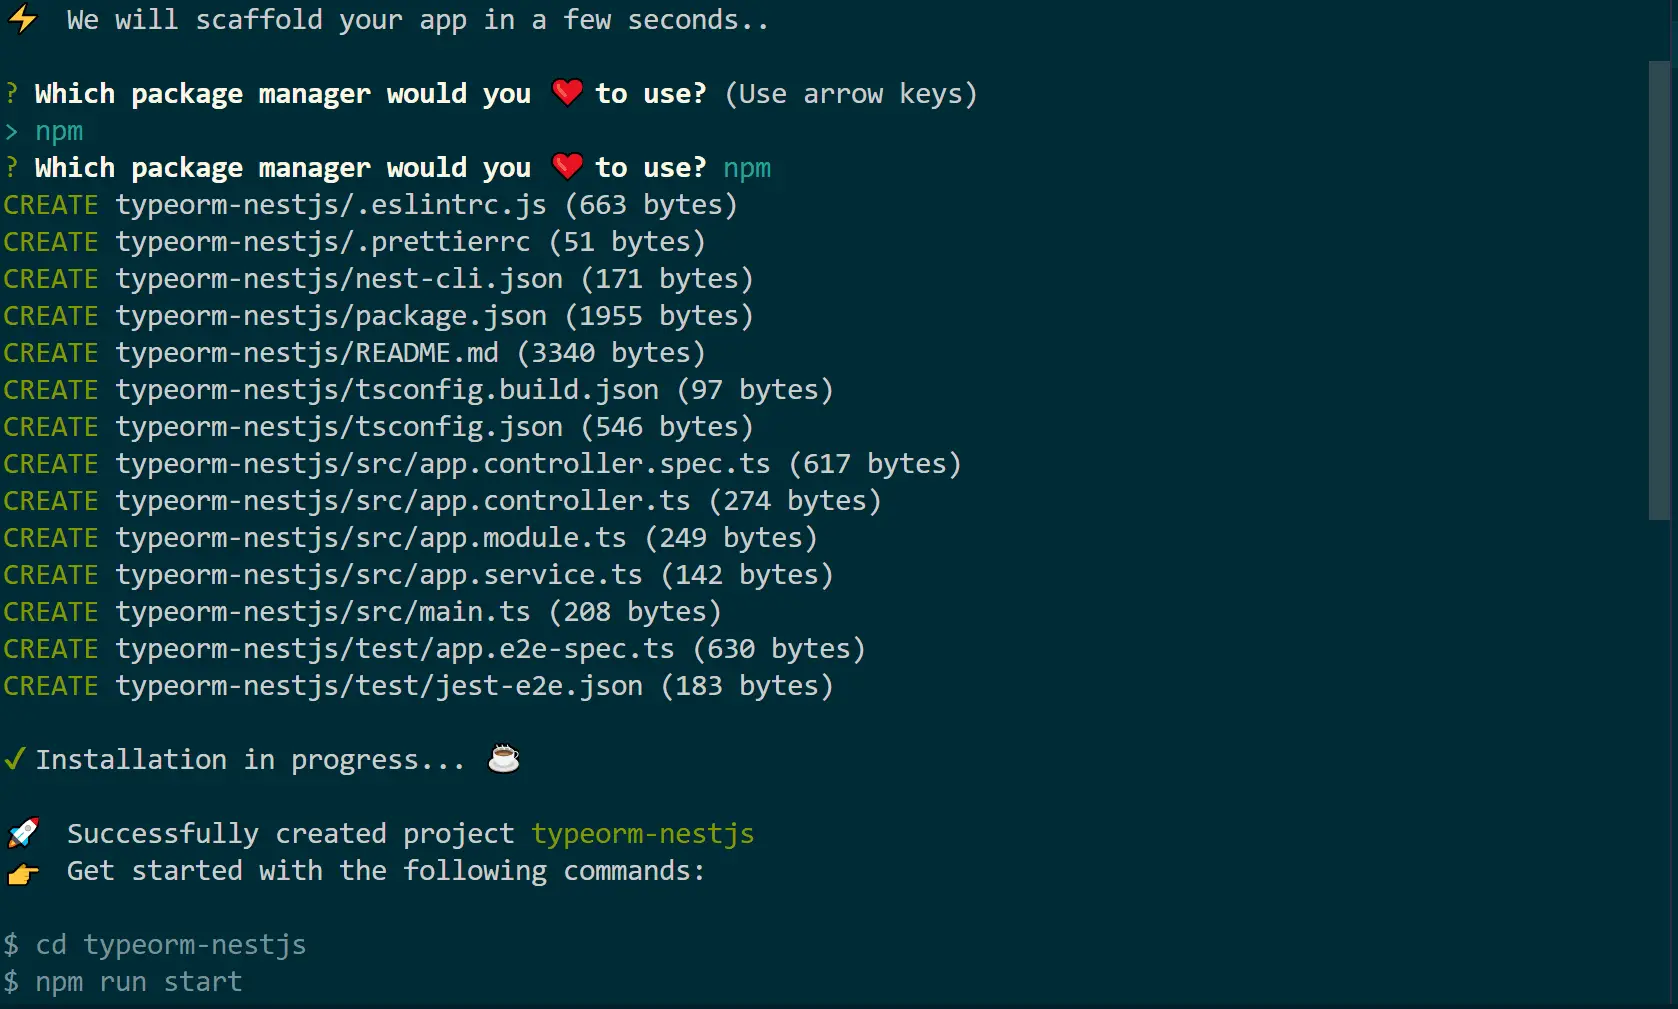
cd new typeorm-nestjs
You will then install the following packages:
npm i typeorm @nestjs/typeorm pg
Example One: Creating TypeORM OneToMany and ManyToOne Entities
Let’s start with the product example and create its entities. First, generate the product module, service, and controller running the following commands, each at a time:
nest g module product
nest g service product --no-spec
nest g controller product --no-spec
Inside your created src/product folder, create an entities directory and start creating your Relation as follows:
First, create a src/product/product.entity.ts file. This entity will represent a product columns id, name, price, quantityAvailable, description, category, createdAt, updatedAt, and deletedAt. as f0llows:
import { Column, CreateDateColumn, DeleteDateColumn, Entity, OneToMany, PrimaryGeneratedColumn UpdateDateColumn} from 'typeorm';
import ProductCharacteristicEntity from './product-characteristic.entity';
import ProductImageEntity from './product-image.entity';

@Entity({ name: 'products' })
export default class ProductEntity {
   @PrimaryGeneratedColumn('uuid')
   id: string;

   @Column({ name: 'name', length: 100, nullable: false })
   name: string;

   @Column({ name: 'price', type: 'decimal', nullable: false })
   price: number;

   @Column({ name: 'quantity_available', nullable: false })
   quantityAvailable: number;

   @Column({ name: 'description', length: 255, nullable: false })
   description: string;

   @Column({ name: 'category', length: 100, nullable: false })
   category: string;

   @OneToMany(() => ProductImageEntity, (productImage) => productImage.product, {
     cascade: true,
     eager: true,
   })
   images: ProductImageEntity[];

   @OneToMany(
     () => ProductCharacteristicEntity,
     (productCharacteristic) => productCharacteristic.product,
     { cascade: true, eager: true },
   )
   characteristics: ProductCharacteristicEntity[];

   @CreateDateColumn({ name: 'created_at' })
   createdAt: string;

   @UpdateDateColumn({ name: 'updated_at' })
   updatedAt: string;

   @DeleteDateColumn({ name: 'deleted_at' })
   deletedAt: string;
}
However, note that we have imported and added:
- OneToMany relation
ProductCharacteristicEntity - OneToMany to ProductImageEntity
It shows you how we discussed that a single product can have many images and associated characteristics.
Let’s now implement these two entities. Create a src/product/product-image.entity.ts file and create your ManyToOne relation as follows:
import { Column, Entity, ManyToOne, PrimaryGeneratedColumn } from 'typeorm';
import ProductEntity from './product.entity';

@Entity({ name: 'product_images' })
export default class ProductImageEntity {
   @PrimaryGeneratedColumn('uuid')
   id: string;

   @Column({ name: 'url', nullable: false })
   url: string;

   @Column({ name: 'description', length: 255, nullable: false })
   description: string;

   @ManyToOne(() => ProductEntity, (product) => product.images, {
     orphanedRowAction: 'delete',
     onDelete: 'CASCADE',
     onUpdate: 'CASCADE',
   })
   product: ProductEntity;
}
ManyToOne here points to the ProductEntity. This will instruct TypeORM that the database table created from this entity can contain many images that belong to one product.
Also, take note of the following code block:
orphanedRowAction: 'delete',
onDelete: 'CASCADE',
onUpdate: 'CASCADE',
These properties are key when managing how to delete and update relations:
orphanedRowAction: 'delete'tells TypeORM that yourProductImageEntityis an orphan toProductEntity. If you delete its associated product, it will be deleted as wellonDelete: 'CASCADE'andonUpdate: 'CASCADE'have CASCADE set. This way, if the product is deleted or updated, the associated images have the same changes.
import { Column, Entity, ManyToOne, PrimaryGeneratedColumn } from 'typeorm';
import ProductEntity from './product.entity';

@Entity({ name: 'product_characteristics' })
export default class ProductCharacteristicEntity {
   @PrimaryGeneratedColumn('uuid')
   id: string;

   @Column({ name: 'name', length: 100, nullable: false })
   name: string;

   @Column({ name: 'description', length: 255, nullable: false })
   description: string;

   @ManyToOne(() => ProductEntity, (product) => product.characteristics, {
     orphanedRowAction: 'delete',
     onDelete: 'CASCADE',
     onUpdate: 'CASCADE',
   })
   product: ProductEntity;
}
Let’s get the last entity ready. Create a src/product/product-characteristic.entity.ts file as follows:
import { Column, Entity, ManyToOne, PrimaryGeneratedColumn } from 'typeorm';
import ProductEntity from './product.entity';

@Entity({ name: 'product_characteristics' })
export default class ProductCharacteristicEntity {
   @PrimaryGeneratedColumn('uuid')
   id: string;

   @Column({ name: 'name', length: 100, nullable: false })
   name: string;

   @Column({ name: 'description', length: 255, nullable: false })
   description: string;

   @ManyToOne(() => ProductEntity, (product) => product.characteristics, {
     orphanedRowAction: 'delete',
     onDelete: 'CASCADE',
     onUpdate: 'CASCADE',
   })
   product: ProductEntity;
}
As indicated above, ManyToOne shows how different ProductCharacteristicEntity can belong to one ProductEntity.
Likewise, orphanedRowAction and CASCADE will let you delete or update ProductCharacteristicEntity if its related product gets deleted or updated.
Adding Your TypeORM OneToMany and ManyToOne to TypeORM Service
With your entities ready, let’s create a service to implement the application logic. In this case, we need to create the DTOs to manage how to create and update these entities.
Creating TypeORM OneToMany and ManyToOne DTOs
First, create a dto folder in your src/product directory to create the entity types for creating and updating. You will create the following:
characteristic.dto.ts - Your charactaeristicDto will be as follows:
import { IsNotEmpty } from 'class-validator';
import ProductEntity from '../entities/product.entity';

export default class CharacteristicDTO {
   id: string;
   product: ProductEntity;

   @IsNotEmpty({ message: 'The field name cannot be empty' })
   name: string;

   @IsNotEmpty({ message: 'The field description cannot be empty' })
   description: string;
}
image.dto.ts - Requests sent to change image details should have the following properties:
import { IsNotEmpty } from 'class-validator';
import ProductEntity from '../entities/product.entity';

export default class ImageDTO {
   id: string;
   product: ProductEntity;

   @IsNotEmpty({ message: 'The field name cannot be empty' })
   url: string;

   @IsNotEmpty({ message: 'The field description cannot be empty' })
   description: string;
}
createProduct.dto.ts- to add the fields needed when sending a request to create a product:
import { Type } from 'class-transformer';
import { IsArray, IsInt, IsNotEmpty, IsNumber, IsUUID, ValidateNested} from 'class-validator';
import ImageDTO from './image.dto';
import CharacteristicDTO from './characteristic.dto';

export default class CreateProductDTO {
   @IsNotEmpty({ message: 'The field name cannot be empty' })
   name: string;

   @IsNotEmpty({ message: 'The field price cannot be empty' })
   @IsNumber(undefined, { message: 'The field price must be of type number' })
   price: number;

   @IsNotEmpty({ message: 'The field quantityAvailable cannot be empty' })
   @IsInt({ message: 'The field quantityAvailable must be of type number' })
   quantityAvailable: number;

   @IsNotEmpty({ message: 'The field description cannot be empty' })
   description: string;

   @ValidateNested()
   @IsArray()
   @Type(() => ImageDTO)
   images: ImageDTO[];

   @IsNotEmpty({ message: 'The field category cannot be empty' })
   category: string;

   @ValidateNested()
   @IsArray()
   @Type(() => CharacteristicDTO)
   characteristics: CharacteristicDTO[];
}
updateProduct.dto.ts- Likewise, when creating a product, add the record that must be checked to send PUT requests:
import { Type } from 'class-transformer';
import { IsArray, IsInt, IsNumber, IsOptional, ValidateNested} from 'class-validator';
import ImageDTO from './image.dto';
import CharacteristicDTO from './characteristic.dto';

export default class UpdateProductDTO {
   @IsOptional()
   name: string;

   @IsNumber(undefined, { message: 'The field price must be of type number' })
   @IsOptional()
   price: number;

   @IsInt({ message: 'The field quantityAvailable must be of type number' })
   @IsOptional()
   quantityAvailable: number;

   @IsOptional()
   description: string;

   @ValidateNested()
   @IsArray()
   @Type(() => ImageDTO)
   @IsOptional()
   images: ImageDTO[];

   @IsOptional()
   category: string;

   @ValidateNested()
   @IsArray()
   @Type(() => CharacteristicDTO)
   @IsOptional()
   characteristics: CharacteristicDTO[];
}
Implementing TypeORM for Handling OneToMany and ManyToOne Relations
Navigate to the src/profile/product.service.ts file and implement the CRUD logic as follows:
Add the import you need. This must include the ProductEntity that will, in turn, point to its related entities:
import { Injectable } from '@nestjs/common';
import { InjectRepository } from '@nestjs/typeorm';
import ProductEntity from './entities/product.entity';
import { Repository } from 'typeorm';
You service Repository should be update as follows:
@Injectable()
export class ProductService {
   constructor(
     @InjectRepository(ProductEntity)
     private readonly productRepository: Repository<ProductEntity>,
   )
   // all CRUD properties must be added here
}
Now go ahead and add all CRUD methods inside the above ProductService:
- List all products:
   // List all products
   async list() {
     const result = await this.productRepository.find();
     return result;
   }
- Create a new product:
   // Create a new product
   async create(product: ProductEntity) {
     await this.productRepository.save(product);
   }
- Find a single product by ID:
   // Find a product by ID
   async findById(id: string) {
     return this.productRepository.findOneBy({
       id,
     });
   }
- Update a product:
   // Update a product
   async update(id: string, product: ProductEntity) {
     const hasProduct = await this.findById(id);
     if (!hasProduct) throw new Error('Product does not exist');
     await this.productRepository.update(id, product);
   }
- Delete a product:
   // Delete a product
   async delete(id: string) {
     const hasProduct = await this.findById(id);
     if (!hasProduct) throw new Error('Product does not exist');
     await this.productRepository.delete(id);
   }
Adding the Application Controller
For your service methods to work, you need to add them to a controller. This will let you execute the actual HTTP methods (GET, POST, PUT, DELETE) while creating the routes to manage the API.
Navigate to src/profile/product.controller.ts and add them as follows:
import { Body, Controller, Delete, Get, Param, Post, Put,} from '@nestjs/common';
import CreateProductDTO from './dto/createProduct.dto';
import { ProductService } from './product.service';
import ProductEntity from './entities/product.entity';
import UpdateProductDTO from './dto/updateProduct.dto';

@Controller('/product')
export default class ProductController {
   constructor(private productService: ProductService) {}

   // Create a new product
   @Post()
   async createProduct(@Body() data: CreateProductDTO) {
     const product = new ProductEntity();
     Object.assign(product, data);
     await this.productService.create(product);
     return { message: 'Product successfully registered', id: product.id };
   }

   // List all products
   @Get()
   async listProducts() {
     return this.productService.list();
   }

   // Update a product by ID
   @Put('/:id')
   async updateProduct(@Param('id') id: string, @Body() data: UpdateProductDTO) {
     const product = new ProductEntity();
     Object.assign(product, data);
     await this.productService.update(id, product);
     return { message: 'Product successfully updated', id };
   }

   // Delete a product by ID
   @Delete('/:id')
   async deleteProduct(@Param('id') id: string) {
     await this.productService.delete(id);
     return { message: 'Product successfully deleted', id };
   }
}
Getting the Application to Run your OneToMany and ManyToOne Relations
For this to work, we now need a database ready. We are using PostgreSQL here. In your src directory, create a config folder and add a postgres.config.ts with the following database configurations:
import { Injectable } from '@nestjs/common';
import { ConfigService } from '@nestjs/config';
import { TypeOrmModuleOptions, TypeOrmOptionsFactory } from '@nestjs/typeorm';

@Injectable()
export class PostgresConfig implements TypeOrmOptionsFactory {
   constructor(private configService: ConfigService) {}

   createTypeOrmOptions(): TypeOrmModuleOptions {
     return {
       // Add postgres as type
       type: 'postgres',
       // Database host
       host: this.configService.get<string>('DB_HOST', 'localhost'),
       // Database port
       port: this.configService.get<number>('DB_PORT', 5432),
       // Database username
       username: this.configService.get<string>('DB_USERNAME', 'postgres'),
       // Database password
       password: this.configService.get<string>('DB_PASSWORD', 'password'),
       // Database name
       database: this.configService.get<string>('DB_DATABASE', 'product'),
       // Entity files path
       entities: [__dirname + '/../**/*.entity{.js,.ts}'],
       // Auto-generate database schema (only for development)
       synchronize: true,
     };
   }
}
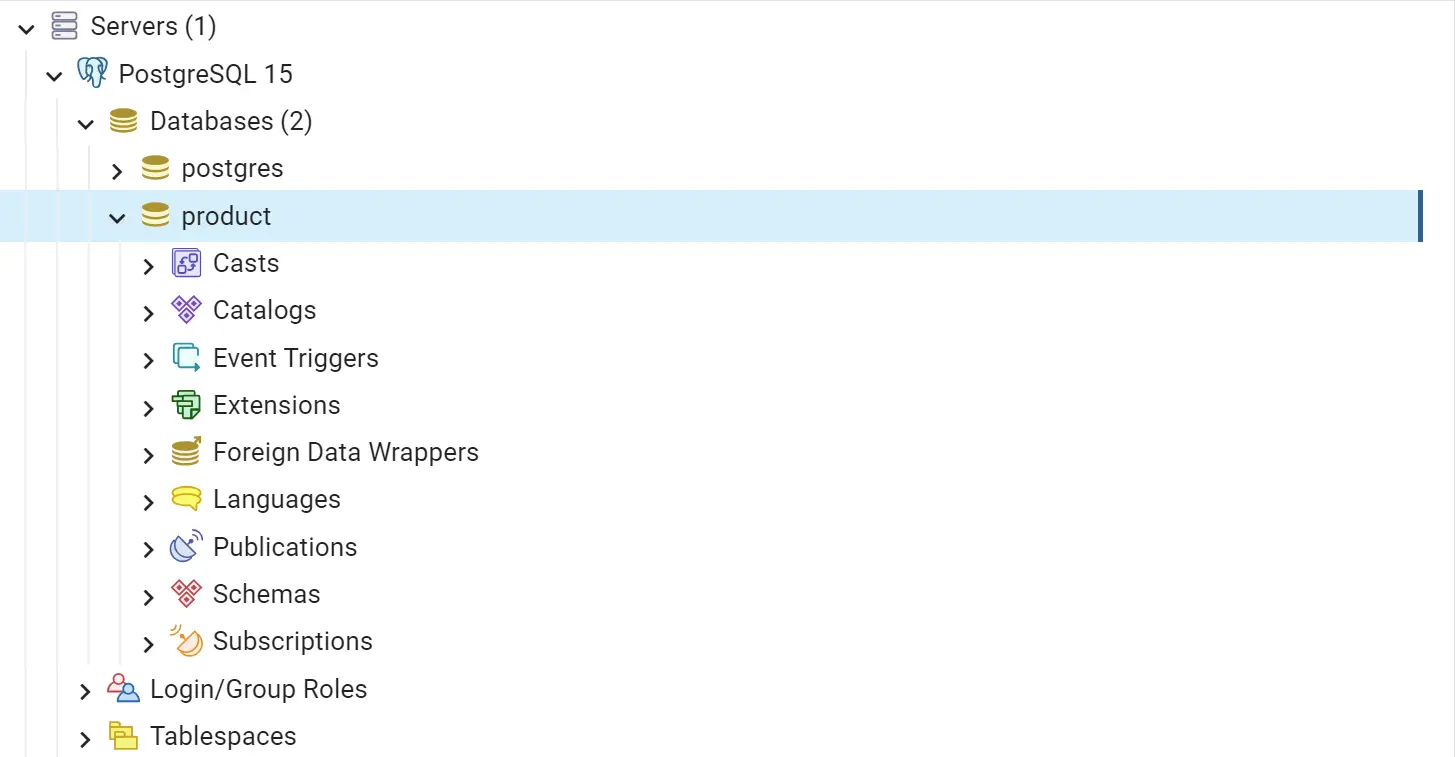
Now ensure you have created a product database:
Now head over to your src/app.module.ts and update it as follows:
import { Module } from '@nestjs/common';
import { TypeOrmModule } from '@nestjs/typeorm';
import { ConfigModule } from '@nestjs/config';
import { PostgresConfig } from './config/postgres.config';
import { ProductModule } from './product/product.module';

@Module({
   imports: [

     ProductModule,
     ConfigModule.forRoot({
       isGlobal: true,
     }),
     TypeOrmModule.forRootAsync({
       useClass: PostgresConfig,
       inject: [PostgresConfig],
     }),
   ],
})
export class AppModule {}
It’s time to test your app. Run the following command:
npm run start

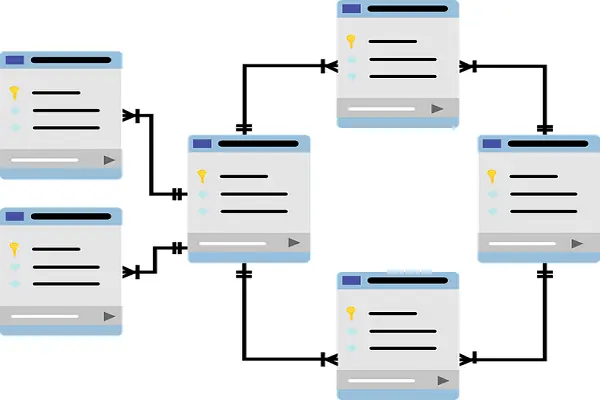
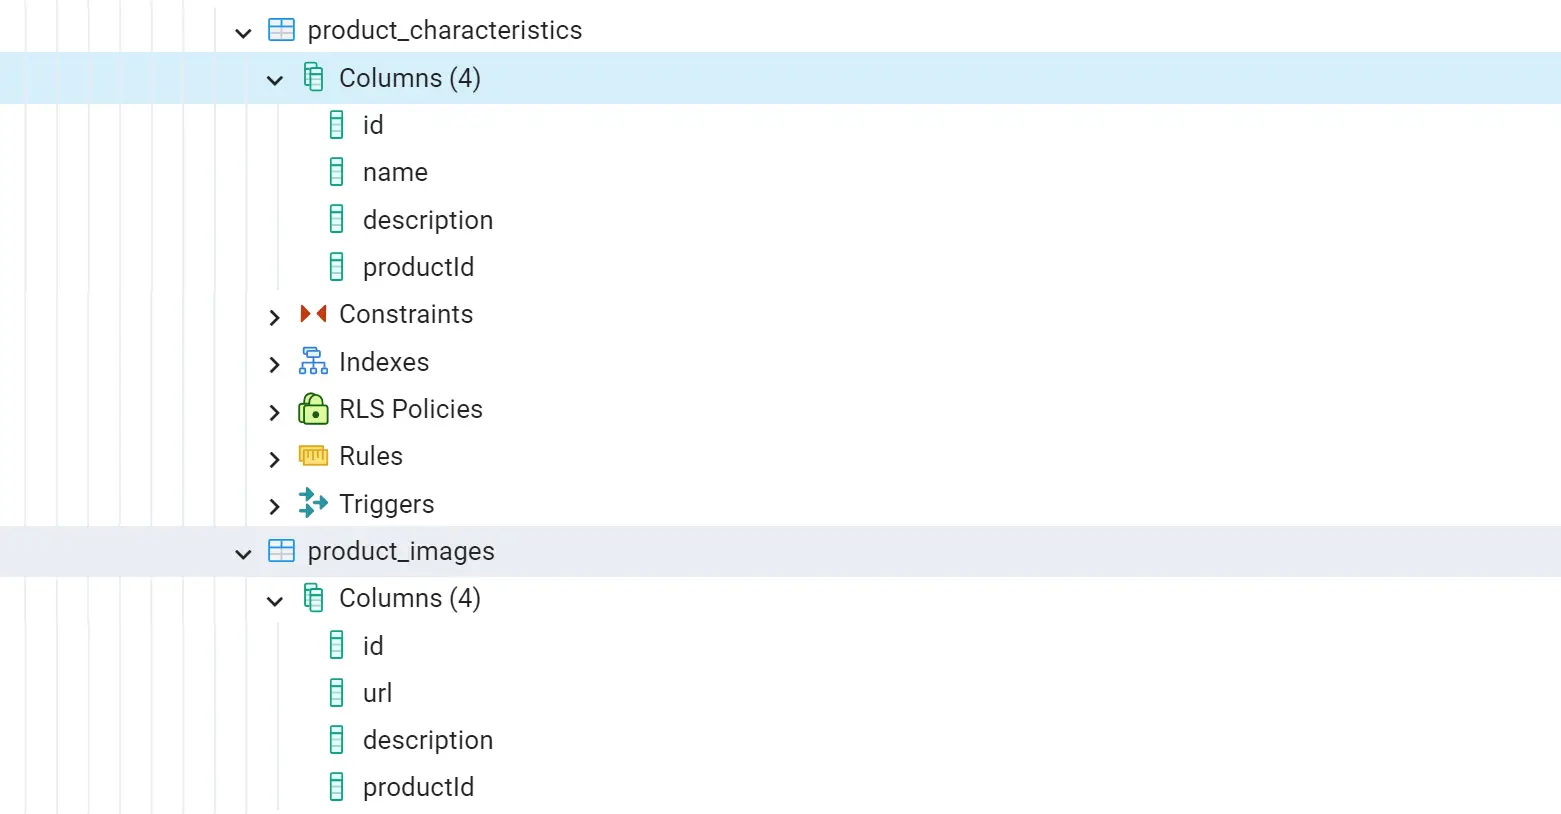
TypeORM should create your tables as follows:

Now, every entity should create a table and its associated properties:

Testing if TypeORM OneToMany and ManyToOne is Working with Nest.js
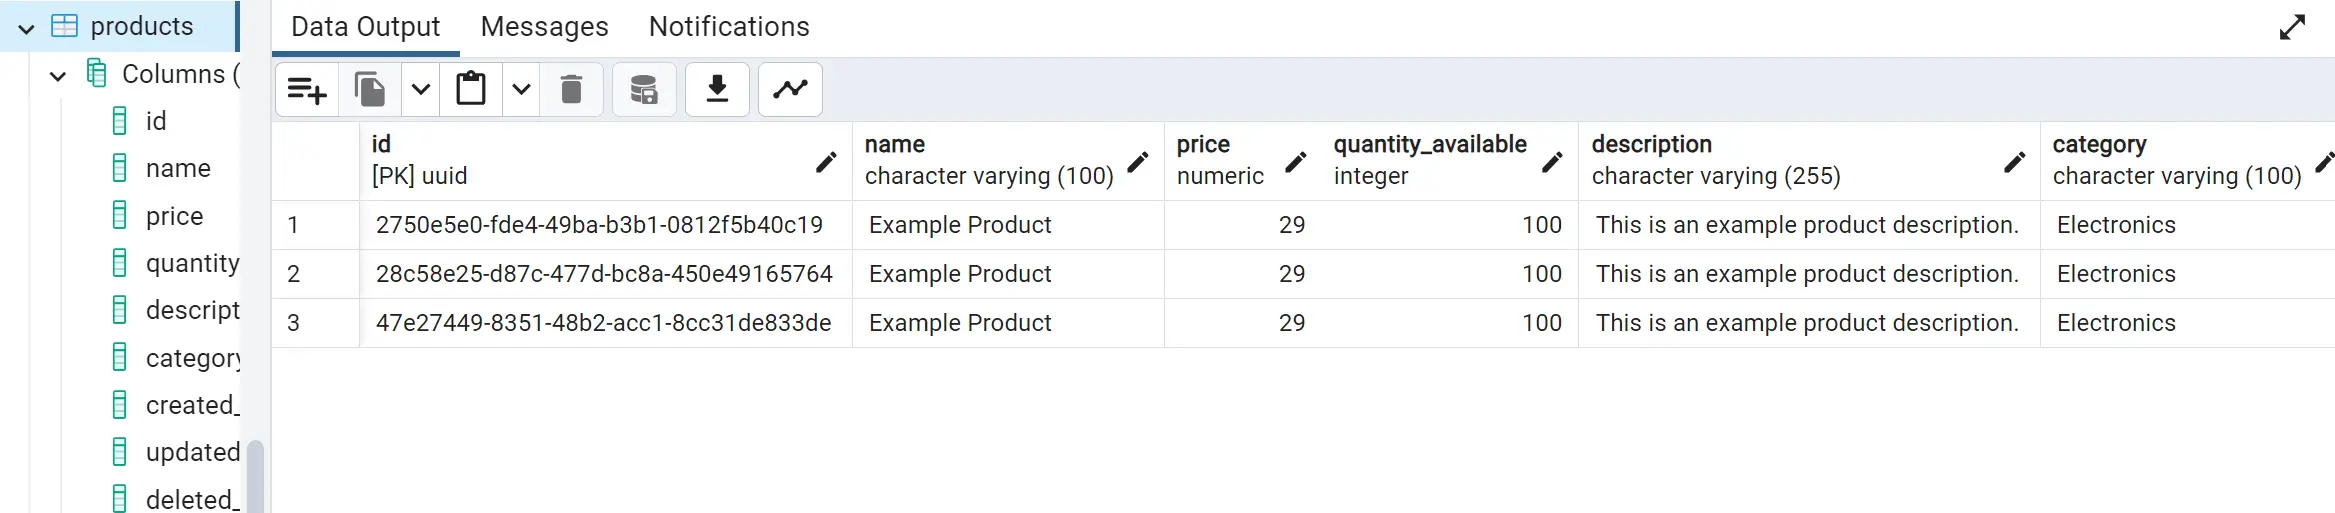
Head over to Postman and send a POST request to http://localhost:3000/product/ as follows:

Before sending you data, ensure it has the following JSON format:
{
  "name": "Example Product",
  "price": 29,
  "quantityAvailable": 100,
  "description": "This is an example product description.",
  "images": [
   {
    "url": "https://example.com/image1.jpg",
    "description": "Image 1 description"
   },
   {
    "url": "https://example.com/image2.jpg",
    "description": "Image 2 description"
   }
  ],
  "category": "Electronics",
  "characteristics": [
   {
    "name": "Size",
    "description": "Large"
   },
   {
    "name": "Color",
    "description": "Red"
   }
  ]
}
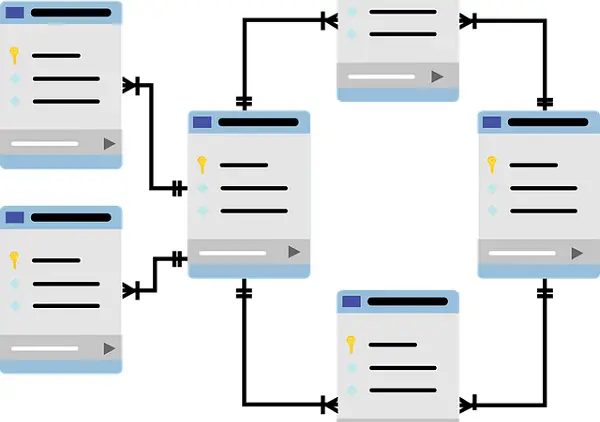
Go and refresh your database tables and check if TypeORM added OneToMany and ManyToOne relationships as we described:


You can go further and test if other methods are working. You can check the code on this GitHub Repository.
Example Two: Creating TypeORM OneToMany and ManyToOne Entities
Let’s dive into the second example to learn how to implement TypeORM OneToMany and ManyToOne relationships differently.
I have hosted the code on this GitHub Repository for this example. Go ahead and try using it.
If interested, comment, and I will create a comprehensive tutorial covering this example.
Conclusion
I hope you gained some insights setting up TypeORM OneToMany and ManyToOne Relationships with Nest.js. Leave a comment if you encounter errors or problems. We try to dress them ASAP. And if you want to explore related topics, don’t hesitate to reach out.
Written By: