Easy Node.js Express Typescript API w/ TypeORM and Postgres
Posted May 3, 2024

This guide teaches you how to easily set up a Node.js app with Typescript and Express. You will use TypeORM to create a CRUD API while using Express to communicate with Postgres as your database.
The right option for creating Node.js Typescript API is using Express. Now, TypeORM uses entities as TypeScript classes to represent database Postgres tables. Once you run the Node.js API, Express will run TypeORM and correspond to table columns, and relationships in your entities.
TypeORM adds a TypeScript flavor to Node.js. You get an easy code base to manage your API. Along this guide, you will learn:
- How to set up TypeORM with a TypeScript Node.js Express app.
- Connection to Postgres using Express and TypeORM
- Creating Postgres tables and columns, and relationships with TypeORM.
- How to use TypeORM and Node.js with Express to create TypeORM migrations.
- Adding relationships to Postgres using TypeORM, TypeScript, and Express.
Ready? Let’s dive in and set up Node.js Express Typescript API with TypeORM and Postgres like Pros.
Prerequisites
Before Getting TypeORM and Node.js up and running, ensure:
- Node.js is installed on your computer
- Have the Postgres database ready. If not I will show you how to use Docker to get Postgres working.
Related: Guide to Run PostgreSQL dpage pgAdmin4 with Docker Compose
- Have prior knowledge working with TypeScript, Node.js, Express, and TypeORM.
Creating Node.js Express Typescript App with TypeORM
Creating your Node.js Express API with TypeScript, TypeORM, and PostgreSQL step-by-step guide. You will need to first set up your app App. Since you’re using TypeScript, you’ll GET TypeScript installed globally:
npm install -g typescript
In your working directory, initialize a Node.js app:
npm init -y
To make this project a success, you will use the following packages:
- Express and @types/express for building a Node.js Express API with TypeScript types.
- TypeORM to give you access to TypeORM classes.
- pg to add PostgreSQL database drivers
- ts-node and typescript for compiling your Node.js TypeScript API.
- nodemon to run your app.
Use this command to get these packages ready:
npm install express @types/express typeorm pg ts-node typescript nodemon
Setting Up TypeScript With Express and TypeORM
Once ready, TypeScript must be working for this specific project. In your working directory. TypeScript will check a tsconfig.json file in the root directory to determine how to run a Node.js app. To make it easier, initialize the TypeScript configuration file with the following command:
npx tsc --init
I want this project to have a specific structure. Therefore, your tsconfig.json file should look as follows:
{
  "compilerOptions": {
    "experimentalDecorators": true,
    "emitDecoratorMetadata": true,
    "module": "NodeNext",
    "moduleResolution": "NodeNext",
    "target": "ES2020",
    "sourceMap": true,
    "outDir": "dist",
  },
  "include": ["src/**/*", "src/index.ts"],
}
Lastly, to run TypeScript, you will nodemon and ts-node. Go to package.json and create a script to run Node.js as follows:
  "scripts": {
    "dev": "nodemon --watch src --ext ts,json --exec node -r ts-node/register src/index.ts"
  },
Don’t worry about src/index.ts and others. You will create them as you process them. I want your Working directory to have all the following files and folders. You will use this structure along the way:
typeorm-backend/
│
│   package-lock.json
│   package.json
│   tsconfig.json
│
└───src
    │   index.ts
    │
    ├───controllers
    │       clientController.ts
    │       transactionController.ts
    │
    ├───entities
    │       Client.ts
    │       Transaction.ts
    │
    ├───routes
    │       clientRouter.ts
    │       transactionRouter.ts
    │
    └───db
            PostgresDataSource.ts
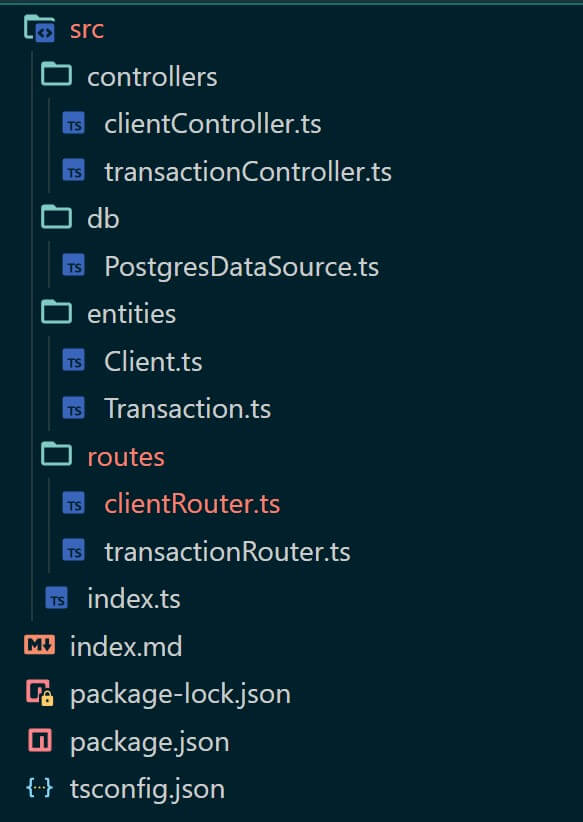
Once you have these main files and folders, your app is ready to go. Let’s now add TypeORM and Express to run the Node.js TypeScript app.
Creating TypeScript Entities with TypeORM
Entities are TypeScript classes. In TypeORM, an entity in the blueprint of the application you will create. TypeORM entities represent your database tables.
This means entities dictate the structure of your API with metadata about your API requests.
These classes are decorated with TypeScript decorators provided by TypeORM. Once the entities are, you use TypeORM’s repository pattern to perform database operations from your entities.
This guide will use a bank scenario. You will save the client details and the transaction history.
Now, navigate to your src\entities\Client.ts file and add an entity with bank client properties as follows:
import {Entity, Column,  BaseEntity, PrimaryGeneratedColumn, CreateDateColumn, UpdateDateColumn} from "typeorm"

// inside entity, name the table
@Entity('clients')
//Extending BaseEntity allows for the CRUD operations
export class Client extends BaseEntity {
  @PrimaryGeneratedColumn()
  id: number;

  @Column()
  first_name: string;

  @Column()
  last_name: string;

  @Column({
    unique: true
  })
  email: string;

  @Column({
    type: "numeric",
  })
  balance: number;

  @Column({
    default: true,
    name: "active",
  })
  is_active: boolean;

  @CreateDateColumn()
  created_at: Date;

  @UpdateDateColumn()
  updated_at: Date;
}
The key points to note here are:
- TypeORM has all the decorators you need to get your entity ready.
@Entity('clients')decorates the classClientas an entity, to represent a database tableclients.@PrimaryGeneratedColumn()creates and marks the id property as the primary key and autogenerated within your database.- TypeORM will then use
@Column()to map each property as a column to theclientstable. - Note that each
@Column()gets created based on its characteristics. For example,first_nameis a string.is_activeis a boolean and created by default as true. Email is decorated withunique: trueand two records can’t have a similar email.
Connecting Node.js to Postgres using TypeORM
Once the entity is ready, you will use it to create the table. However, you won’t create the table manually. At the same time, TypeORM will need a connection to your database. In this case, you will access Postgres and create a database bank:
You must create a database named
bankbefore proceeding,
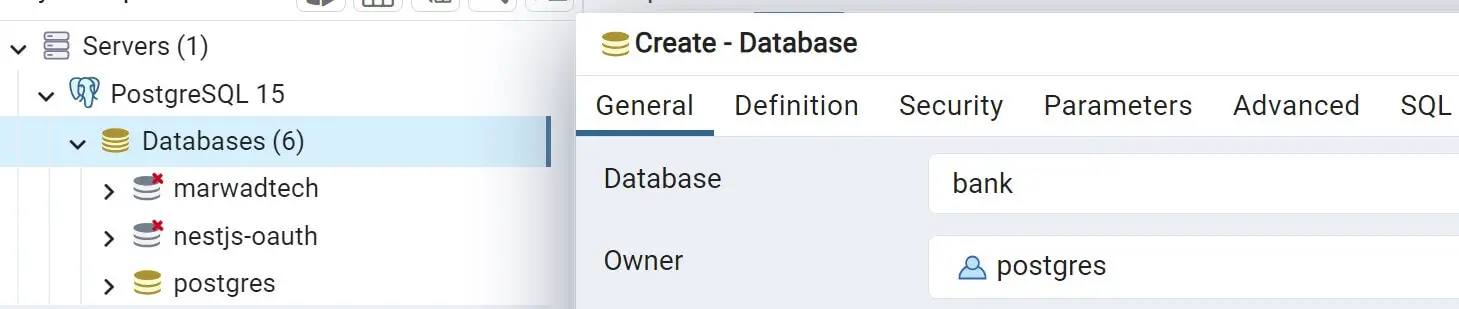
Now, go to the src\db\PostgresDataSource.ts file and create a connection to the bank database as follows:
Remember to replace it with your Postgres details.
import { DataSource } from 'typeorm'
import { Client } from '../entities/Client';

export const PostgresDataSource = new DataSource({
  type: "postgres",
  host: "localhost",
  port: 5432,
  username: "postgres",
  password: "pass",
  database: "bank",
  entities: [Client],
  synchronize: true,
})
Here you have:
- Database type (postgres), host, port, username, password, database name
- Array of entities to be used (in this case, just the Client entity)
- The synchronize option is set to true to automatically synchronize database schema with entities.
Create TypeORM Controllers with Node.js
controllers are the logic of your application. In this example, controllers create the logic of your HTTP methods. It’s here that TypeORM will let Express process your data and send the respective requests based on your HTTP methods.
Let’s take an example of fetching and adding a new client to the bank. You will need to process the data with TypeORM through Postgres using TypeScript as such. This will add an abstraction layer over database operations.
Go to your src\controllers\clientController.ts file and use the DataSource connection to Postgres to process your data as follows:
// clientController.js

import { Client } from '../entities/Client';
import { PostgresDataSource } from '../db/PostgresDataSource';

export const getAllClients = async (req, res) => {
  try {
    const allClients = await Client.find();
    return res.json(allClients);
  } catch (error) {
    return res.status(500).json({ error: error.message });
  }
};

export const getClientById = async (req, res) => {
  try {
    const { client_id } = req.params;
    const oneClient = await PostgresDataSource
      .createQueryBuilder()
      .select('client')
      .from(Client, 'client')
      .where('client.id = :id', { id: client_id })
      .getOne();
    return res.json(oneClient);
  } catch (error) {
    return res.status(500).json({ error: error.message });
  }
};

export const createClient = async (req, res) => {
  try {
    const {
      first_name,
      last_name,
      email,

      balance,
    } = req.body;

    const newClient = Client.create({
      first_name,
      last_name,
      email,
      balance,
    });
    await newClient.save();
    return res.json(newClient);
  } catch (error) {
    return res.status(500).json({ error: error.message });
  }
};

export const deleteClient = async (req, res) => {
  try {
    const { client_id } = req.params;
    const response = await Client.delete(parseInt(client_id, 10));
    return res.json(response);
  } catch (error) {
    return res.status(500).json({ error: error.message });
  }
};
Using TypeORM repository with Node.js and Express Instead of Controllers
TypeORM gives you access to the repository. The above example is the typical way to create a Node.js logic to process data.
TypeORM repositories will still work as an abstraction layer over database operations in a more object-oriented way. You will use repositories to perform CRUD (Create, Read, Update, Delete) operations on your entities. Still, the log is the same as that of Node.js controllers.
If you want to use the TypeORM repository you will replace your src\controllers\clientController.ts code as follows:
import { Client } from '../entities/Client';
import { PostgresDataSource } from '../db/PostgresDataSource';

export class clientController {

  private clientRepository = PostgresDataSource.getRepository(Client)

  async getAllClients(req, res) {
    const allClients = await this.clientRepository.find();
    return res.json(allClients)
  }

  async getClientById(req, res) {

    try {
      const { client_id } = req.params;
      const oneClient = await this.clientRepository
        .createQueryBuilder()
        .select('client')
        .from(Client, 'client')
        .where('client.id = :id', { id: client_id })
        .getOne();
      return res.json(oneClient);
    } catch (error) {
      return res.status(500).json({ error: error.message });
    }
  }

  async createClient(req, res) {
    try {
      const {
        first_name,
        last_name,
        email,
        balance,
      } = req.body;

      const newClient = this.clientRepository.create({
        first_name,
        last_name,
        email,
        balance,
      });
      await this.clientRepository.save(newClient);
      return res.status(201).json(newClient);
    } catch (error) {
      return res.status(500).json({ error: error.message });
    }
  }

  async deleteClient(req, res) {
    try {
      const { client_id } = req.params;
      const deleteResult = await this.clientRepository.delete(parseInt(client_id, 10));
      if (deleteResult.affected === 0) {
        return res.status(404).json({ error: 'Client not found' });
      }
      return res.json({ message: 'Client deleted successfully' });
    } catch (error) {
      return res.status(500).json({ error: error.message });
    }
  }
}
Adding Express Routes with TypeScript and TypeORM
The next step is to get the routes/endpoints ready. You already have the functions needed to process the logic of this API. Endpoints will map the above functions to their respective HTTP Methods. Go to your src\routes\clientRouter.ts file and create routes.
Here you will use Express to process the HTTP methods as follows:
// clientRoutes.js

import express from 'express';
import * as clientController from '../controllers/clientController';

const clientRouter = express.Router();

clientRouter.get(`/clients`, clientController.getAllClients);
clientRouter.get(`/clients/:client_id`, clientController.getClientById);
clientRouter.post('/clients/create', clientController.createClient);
clientRouter.delete('/clients/:client_id', clientController.deleteClient);

export default clientRouter;
With this setup, you will have:
- GET request to /clients invokes
getAllClients. - GET request to /clients/:client_id runs
getClientByIdin the clientController. - POST request to
/clients/createwill invokecreateClient. - DELETE request to
/clients/:client_idfor thedeleteClientmethod.
Running The API with Express Module and TypeScript
The final step is to wrap the whole API together. You will need:
- Initializes the Postgres Data Source and logs a message upon successful initialization
- Add Express middleware to parse JSON and URL-encoded bodies for incoming requests.
- Run the client routes as mounted using clientRouter.
- Get the server started and listen on a port.
These changes will be added to your src\index.ts file as follows:
import express from 'express';
import { PostgresDataSource } from './db/PostgresDataSource';
import clientRouter from './routes/clientRouter';

const main = async () => {
  // Initialize Postgres Data Source
  PostgresDataSource.initialize()
    .then(() => {
      console.log(`Postgres Data Source has been initialized`);
    })
    .catch((err) => {
      console.error('Error during Postgres Data Source initialization ====>', err);
      throw new Error("Error during Postgres Data Source initialization");
    });

  const app = express();

  // Middleware to parse JSON and URL-encoded bodies
  app.use(express.json());
  app.use(express.urlencoded({ extended: true }));

  // Mount client routes
  app.use(clientRouter);

  // Start the server
  const port = process.env.PORT || 4000;
  app.listen(port, () => console.log(`The server is listening on port ${port}`));
}

main();
Testing The Node.js Express TypeORM and Postgres API
Your App is ready. Use the following command to run it:
npm run dev
This should call inside the index.ts file to run it with nodemon:
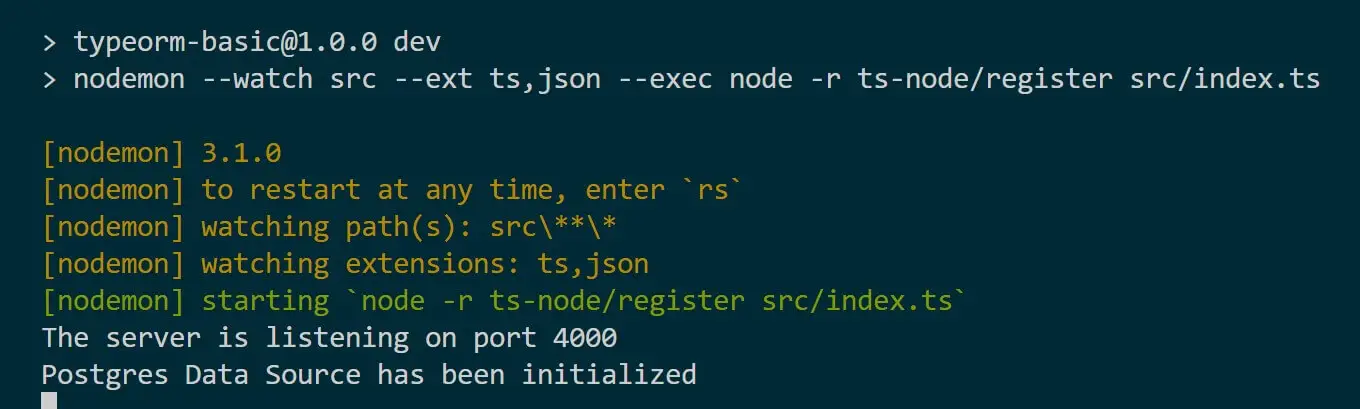
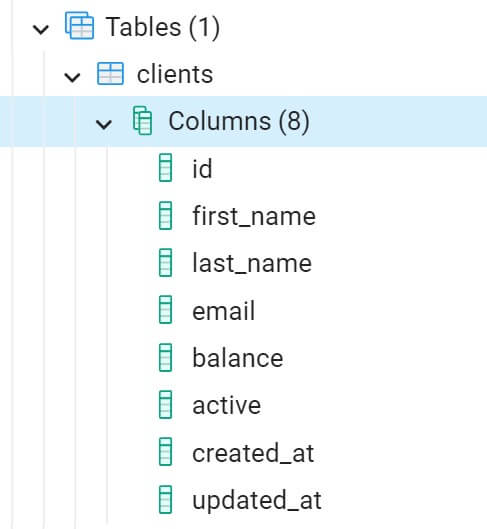
If you have a Postgres Data Source has been initialized message, your API is good. TypeORM should map your entity to the bank database as follows:
Adding Relationships with Express, Typescript, TypeORM, and Postgres
TypeORM supports relationships between entities. A table can related to another table. When using TypeORM, you don’t need to set it up manually. You only need your entities with one entity associated with another.
Let’s take an example of this bank API. A client will have transactions. In this case, a client will have OneToMany relationship with Transaction.
In a one-to-many relationship, each client record in one entity is associated with multiple records in the transactions entity. Each record in the transaction entity is associated with only one record in the client entity.
How do we represent this scenario using this Node.js Express Typescript API with TypeORM and Postgres?
First, you will navigate to the src\entities\Transaction.ts file and create your Transaction entity as follows:
import { Entity, PrimaryGeneratedColumn, Column, BaseEntity, CreateDateColumn, UpdateDateColumn, ManyToOne, JoinColumn
} from "typeorm"
import { Client } from "./Client";

export enum TransactionTypes {
  DEPOSIT = 'deposit',
  WITHDRAW = 'withdraw'
}

@Entity('transactions') // inside entity -- we name the table
export class Transaction extends BaseEntity {  // extending BaseEntity allows for the CRUD operations
    @PrimaryGeneratedColumn()
    id: number;

    @Column({
      type: "enum",
      enum: TransactionTypes,
    })
    type: string;

    @Column({
      type: "numeric",
    })
    amount: number;

    @ManyToOne(() => Client, (client) => client.transactions, {onDelete: "CASCADE"})
    @JoinColumn({ name: 'client_id' })
    client: Client;

    @CreateDateColumn()
    created_at: Date;

    @UpdateDateColumn()
    updated_at: Date;
}
A transaction will represent a ManyToOne relationship with the Client. In a many-to-one relationship, multiple records in the transaction entity are associated with a single record in the client entity.
To make this relationship work, you create a JoinColumn decorator. @JoinColumn specifies the column in the database client table that holds the foreign key for a relationship. JoinColumn is used in conjunction with @ManyToOne to define the owning side of the relationship.
Based on this example, specify the column in the database table (Transaction table) that holds the foreign key for the relationship. { name: 'client_id' } is the join column. It will work as the foreign key column in the Transaction table should be named client_id.
Adding Relationship to Both Entities
This step is key. The transaction has a ManyToOne relationship with the client. The Client has a OneToMany Relationship with Transaction. Therefore, you must edit the src\entities\Client.ts file to many the Relationship as follows:
import { Transaction } from "./Transaction";

import { Entity, Column, BaseEntity, OneToMany, PrimaryGeneratedColumn, CreateDateColumn, UpdateDateColumn } from "typeorm"

// inside entity, name the table
@Entity('clients')
//Extending BaseEntity allows for the CRUD operations
export class Client extends BaseEntity {
  @PrimaryGeneratedColumn()
  id: number;

  @Column()
  first_name: string;

  @Column()
  last_name: string;

  @Column({
    unique: true
  })
  email: string;

  @Column({
    type: "numeric",
  })
  balance: number;

  @Column({
    default: true,
    name: "active",
  })
  is_active: boolean;

  @CreateDateColumn()
  created_at: Date;

  @UpdateDateColumn()
  updated_at: Date;

  @OneToMany(() => Transaction, (transaction) => transaction.client)
  transactions: Transaction[];
}
This will ensure the relationship works both ways
Running the TypeORM Relationship with Express and Postgres
To let Node.js run this new Transaction entity, you will navigate to the src\db\PostgresDataSource.ts file and add your new entity and TypeORM Postgres connection as follows:
import { DataSource } from 'typeorm'
import { Client } from '../entities/Client';
import { Transaction } from '../entities/Transaction';

export const PostgresDataSource = new DataSource({
  type: "postgres",
  host: "localhost",
  port: 5432,
  username: "postgres",
  password: "pass",
  database: "bank",
  entities: [Client, Transaction],
  synchronize: true,
})
If you rerun your App at this point, your Transaction table should be ready as such:
npm run dev
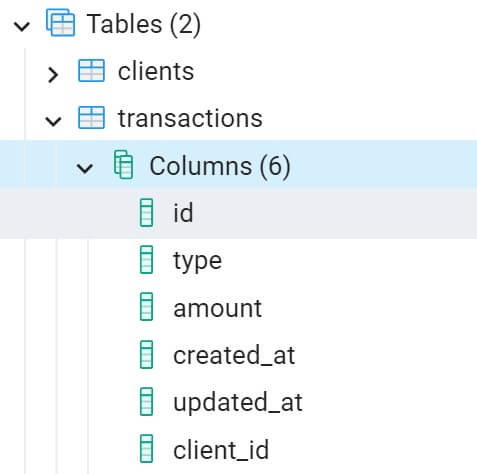
The client_id is ready as the foreign key. Let’s add some requests to this new setup.
Sending Requests to TypeORM Relations with Express and Postgres
Now, that your API structure has changed, you need to add HTTP methods to handle the relationship. Here, You only need to post a relationship with an existing client.
Therefore, you add a POST method to the transactions table. Go to your src\controllers\transactionController.ts file and record a new Transaction with existing clients as follows:
import { Request, Response } from 'express';
import { Transaction, TransactionTypes } from '../entities/Transaction';
import { Client } from '../entities/Client';

export const createTransaction = async (req: Request, res: Response): Promise<Response> => {
  try {
    const { client_id } = req.params;
    const { amount, type } = req.body;
    const client = await Client.findOneBy({ id: parseInt(client_id, 10) });

    if (!client) return res.json({ message: "Client not found" });

    const newTransaction = Transaction.create({
      amount: parseInt(amount, 10),
      type,
      client,
    });
    await newTransaction.save();

    if (type === TransactionTypes.DEPOSIT) {
      client.balance += newTransaction.amount;
    } else if (type === TransactionTypes.WITHDRAW) {
      client.balance -= newTransaction.amount;
    }
    await client.save();

    return res.json({ message: "Transaction Created." });
  } catch (error) {
    return res.status(500).json({ error: error.message });
  }
};
In every transaction you will have:
- WITHDRAW that deducts from the original amount.
- DEPOSIT that adds to the existing transaction amount.
Each transaction is added based on an existing client. That’s why your Endpoints must have the client_id parameter to record which client made this transaction.
At the same time, the client must have a way to select its transaction. In this case, you only need to use a leftJoinAndSelect with TypeORM and access the Transaction table.
In your src\controllers\transactionController.ts file add this join Query in your getClientById method as follows:
export const getClientById = async (req, res) => {
  try {
    const { client_id } = req.params;
    const oneClient = await PostgresDataSource
      .createQueryBuilder()
      .select('client')
      .from(Client, 'client')
      .leftJoinAndSelect('client.transactions', 'transaction')
      .where('client.id = :id', { id: client_id })
      .getOne();
    return res.json(oneClient);
  } catch (error) {
    return res.status(500).json({ error: error.message });
  }
};
Once ready, you will create a new route in your src\routes\transactionRouter.ts file as follows:
import express, { Router } from 'express';
import { createTransaction } from '../controllers/transactionController';

const transactionRouter: Router = express.Router();

transactionRouter.post("/transactions/:client_id", createTransaction);

export default transactionRouter;
Now Run this router in your src\index.ts file:
// Add transactionRouter import
import transactionRouter from './routes/transactionRouter';

// check clientRouter and add transactionRouter
  app.use(clientRouter);
  app.use(transactionRouter);
Testing the Node.js Express Typescript API with TypeORM and Postgres
The API is now ready. Run your command to make sure the app is Running:
npm run dev
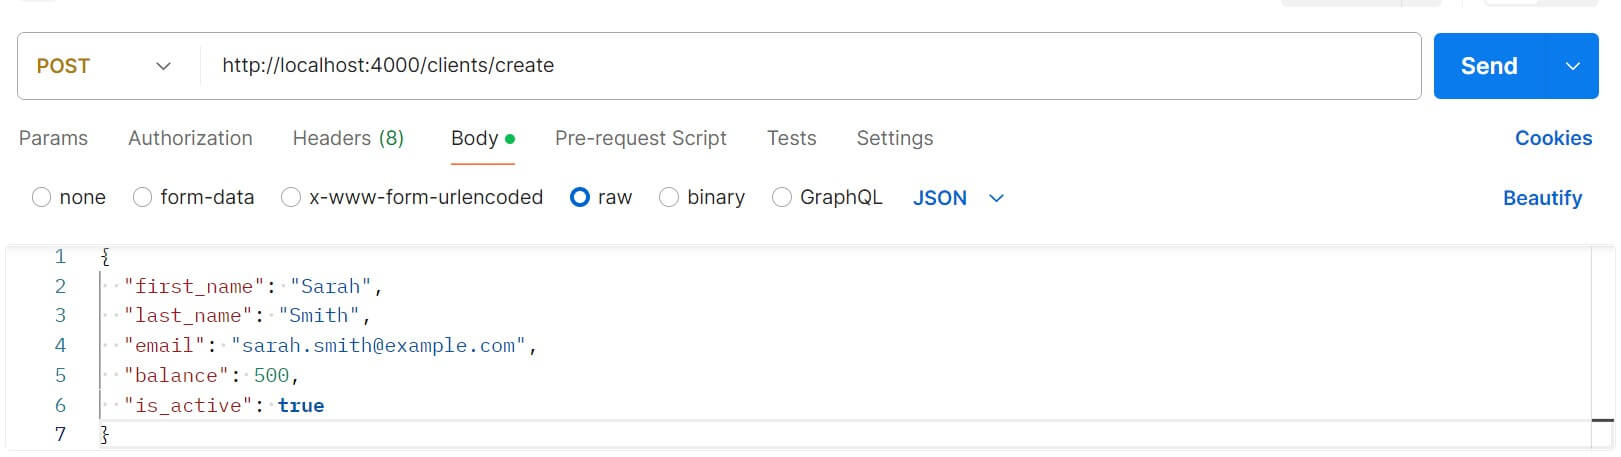
The API is ruuning on Port 4000. I will use Postman. First, add a new client using the following JSON example:
{
  "first_name": "Sarah",
  "last_name": "Smith",
  "email": "[email protected]",
  "balance": 500,
  "is_active": true
}
In your Postman, add a Post request to http://localhost:4000/clients/create with the above JSON payload and SEND:
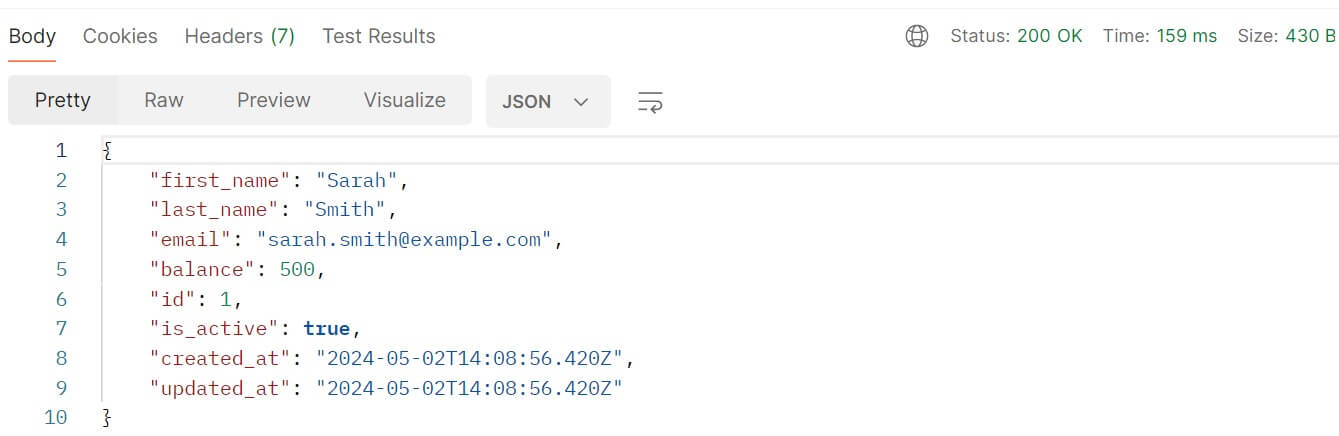
After sending the request, check the response from your server. You should receive a response indicating that the client was created as follows:
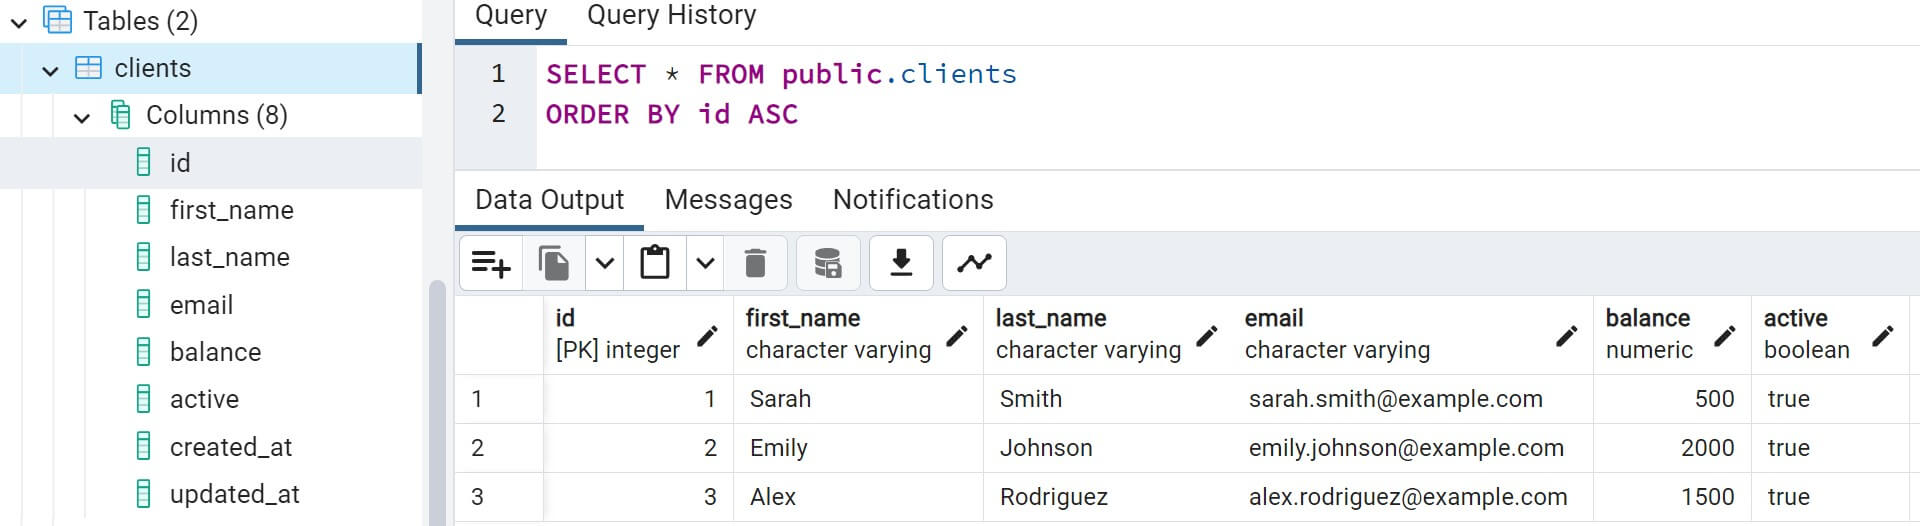
Add more clients. A GET request to http://localhost:4000/client should show you all added clients. The changes should be reflected in your Postgres clients table as well:
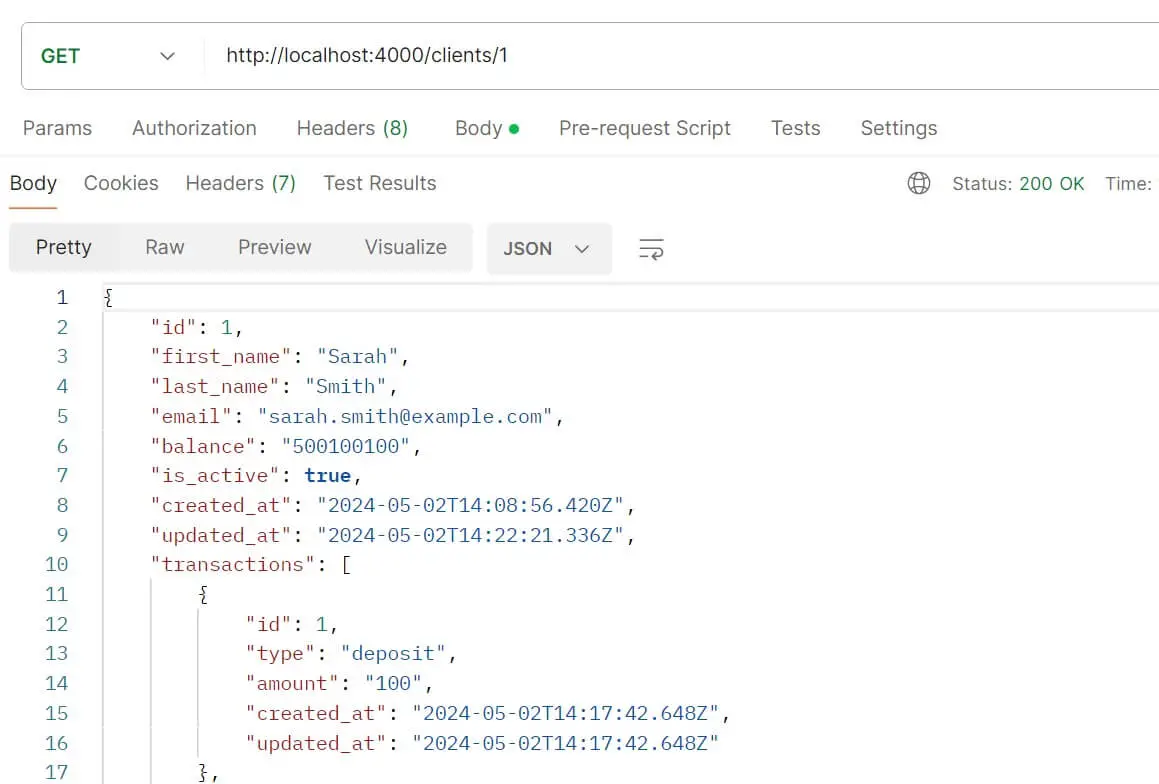
Now, it is time to Post a new Transaction to the added client using the client ID. Let’s say you want to deposit a new transaction to the client with ID 1, you will use http://localhost:4000/transactions/1 as your Endpoint.
Then you send a POST request as follows:
{
    "client_id": "1",
    "amount": "100",
    "type": "deposit"
}
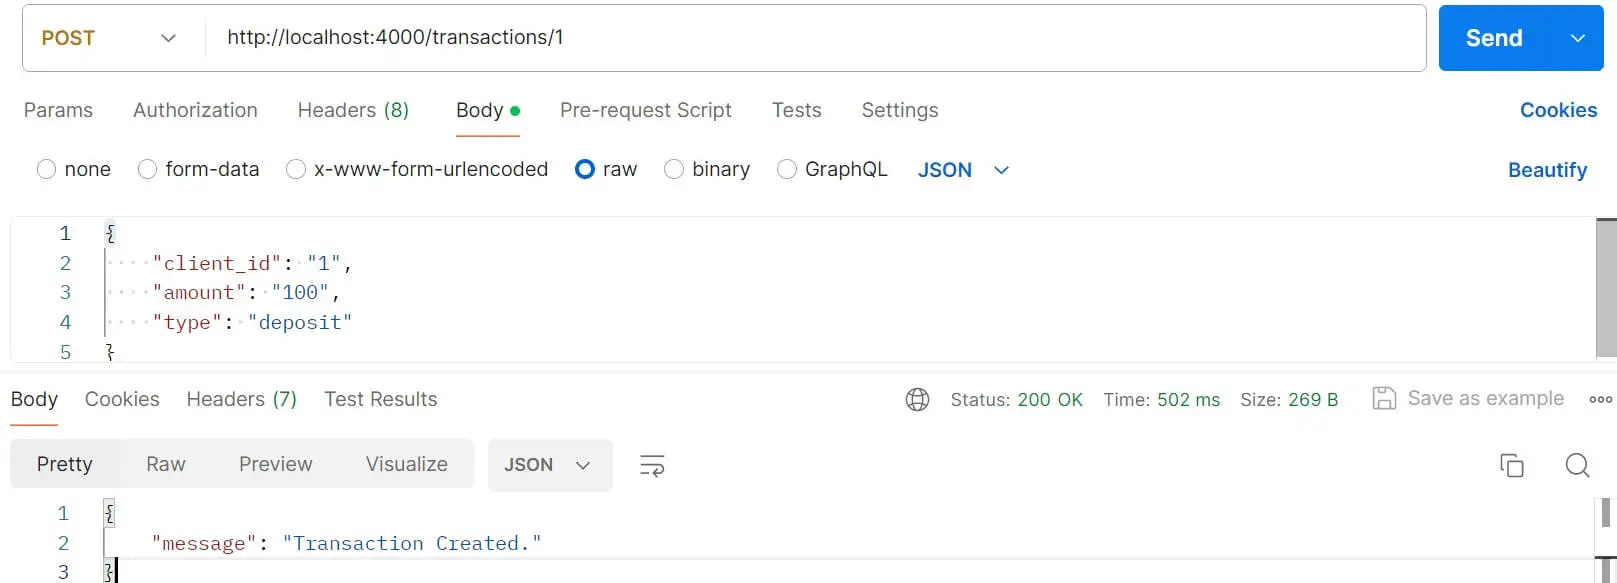
The client with ID one initially has a balance of 500. With a transaction deposit of 100, the new balance. Confirm so by sending a GET request to http://localhost:4000/client/1
Go ahead and try out more examples. Also, get the whole code on this GitHub Repo
Adding TypeORM Migrations with Express and Postgres
TypeORM has a Migrations feature that you should add to your Node.js Express APIs. Migrations manage changes to the database schema over time in a structured and automated way.
A database Migration creates a version control of your database schema changes. You manage database schema changes as your project evolves. Let’s say you want to add a new column to your table. You will need to manually add it.
But with Migrations TypeORM will handle every step for you. The best thing is, this feature is version-controlled. This means you can always go back to a previous database state without manual interventions.
How do you add TypeORM Migrations to a TypeScript Node.js API with Express and Postgres? Let’s find Out.
For this section, check out Create, Generate, and Run TypeORM Migrations for more details.
Conclusion
This was an Easy guide to creating Node.js Express Typescript API with TypeORM and Postgres. I hope you’ve learned:
- How to set up TypeORM with a TypeScript Node.js Express app.
- Connection to Postgres using Express and TypeORM.
- Creating Postgres tables and columns, and relationships with TypeORM.
- How to use TypeORM and Node.js with Express to create TypeORM migrations.
- Adding relationships to Postgres using TypeORM, TypeScript, and Express.
Written By: