Nest.js Logging with Winston, LoggerService, and Best Practices
Posted September 28, 2023

Do you want to create a custom Logger Service for your Nest.js apps? Learn Nest.js logging with Winston and Best Practices. You’ll create a Nest.js logger with transports such as Console, Slack, file, and database.
Why Nest.js Logging with Winston?
Logging is part of the large application ecosystem needed to run the Nest.js application on production. It gives you insights into what’s happening within your application.
A Nest.js logger tracks errors, how the system is behaving, and activities processed by your API. This means you need a LoggerService. Winston is the best candidate to do so.
Nest.js Logging with Winston is simple and easy to get up and running. It gives you different transports for your Logging channels for your log output destination. Here, you will learn to use Console, Slack, file, and MongoDB log channels.
At the same time, Winston creates the LoggerService with your designed Log formats and Logging levels that any Nest.js custom logger would use to craft aggregated logs.
Let’s dive into this Nest.js Logging with Winston guide, create a LoggerService, and learn the Best Practices for creating Nest.js loggers.
Prerequisites
To Craft your Nest.js logger, ensure you:
- Have Node.js installed on your computer.
- MongoDB ready and up and running.
- Have Slack installed and a channel and webhook URL ready.
Related: Guide to TypeORM with NestJS, Postgres, MySQL, Multer, Docker, and Docker Compose
Creating a Nest.js app with Winston
To get started, ensure you have the Nest.js app ready. If not, install the Nest.js CLI:
npm i -g @nestjs/cli
Run the following command to create your project:
nest new logging-app
Change the directory to the created application.
cd logging-app
To create your Logger, you will use the following libraries:
- Mongoose, @nestjs/mongoose, and mongodb for database management
- Winston and winston-transport for creating Winston logging service
- Winston-daily-rotate-file to save Winston logs to a log file
- Winston-slack-webhook-transport to add logs to a slack channel
- Winston-MongoDB to log Winston to a MongoDB database.
- Class-validator
To install all the above packages, run the following command.
npm install winston winston-transport winston-slack-webhook-transport winston-daily-rotate-file winston-mongodb class-validator mongoose @nestjs/mongoose mongodb
Configuring a Winston Logger
To set up a logger, you will create a winston.config.ts and add your Winston logger multiple transports. First, create a Nest.js module as follows:
nest g module logger
Inside the created src/logger folder, create your winston.config.ts and start configuring your Winston logger as follows:
- First, import all the packages you need Winston to access and create logging transports:
// src/logger/winston.config.ts

import * as winston from 'winston';
import 'winston-daily-rotate-file';
import * as SlackHook from 'winston-slack-webhook-transport';
import * as winstonMongoDB from 'winston-mongodb';
- Create and export your logger so you can access it within the project:
// Create transports instance
const transports = [];

// Create and export the logger instance
export const logger = winston.createLogger({
  level: 'info',
  format: winston.format.json(),
  transports,
});
Configuring Winston transports
As explained earlier, we will add Console, Slack, file, and MongoDB log channels. These channels are created as transports. This Winston will access them and save your logs.
Let’s create them as follows:
Creating a Console Winston transport
Logging to the console means the log recorded will be visible on the terminal running your Nest.js logger.
Ensure all the coming Winston transports are added inside the
const transports = []you added in thewinston.config.tsfile.
Winston will log your log based on how you have instructed it. By default, logs are recorded in JSON format.
{"context":"NotFoundExceptionFilter","level":"error","message":"404 Error: Cannot GET /itemst"}
Console log transport is as simple as follows:
new winston.transports.Console(),
This transport will tell Winston to log into the console with the default format. However, you can dive deeper and change the format as follows:
  new winston.transports.Console({
    format: winston.format.combine(
      // Add a timestamp to the console logs
      winston.format.timestamp(),
      // Add colors to you logs
      winston.format.colorize(),
      // What the details you need as logs
      winston.format.printf(({ timestamp, level, message, context, trace }) => {
        return `${timestamp} [${context}] ${level}: ${message}${trace ? `\n${trace}` : ''}`;
      }),
    ),
  }),
The output of the above transport will be close to the following log:
2023-09-27T17:40:14.578Z [NotFoundExceptionFilter] error: 404 Error: Cannot GET /itemst
Creating a File Winston transport
If you want to record logs to a file, then tell Winston to do so as follows:
  new winston.transports.DailyRotateFile({
    filename: 'logs/application-%DATE%.log',
    datePattern: 'YYYY-MM-DD',
    zippedArchive: true,
    maxSize: '20m',
    maxFiles: '14d',
    format: winston.format.combine(
      winston.format.timestamp(),
      winston.format.json(),
    ),
  }),
Winston will use DailyRotateFile to create a log file logs/application-%DATE%.log. In this example, the file will be created based on the date of the log, i.e., application-2023-09-27.log.
This way, you will have different log files generated each day.
Creating a Slack Winston transport
Slack acts as a notification channel. When running your application on the server, you want timely notification when certain logs are recorded on your Nest.js API.
Using slackWinston, create a Slack logger as follows:
  new SlackHook({
    webhookUrl: 'YOUR_SLACK_WEBHOOK_URL',
    channel: '#logs',
    username: 'LoggerBot',
    level: 'error',
    format: winston.format.combine(
      winston.format.timestamp(), // Add a timestamp to Slack logs
      winston.format.printf(({ timestamp, level, message, context, trace }) => {
        return `${timestamp} [${context}] ${level}: ${message}${trace ? `\n${trace}` : ''}`;
      }),
    ),
  }),
A few things to note here are:
- You must add a
webhookUrlpointing to your Slack channel. Here is how to create one. - Your
#logschannel must be related to your Slack. - Slack will only receive error-based logs as notifications based on this logger.
Creating a MongoDB Winston transport
MongoDB is a NoSQL-based database. It is ideal for log management as you can save your logs in JSON.
Using winstonMongoDB, create your MongoDB logger as follows:
  new winstonMongoDB.MongoDB({
    level: 'info',
    db: 'mongodb://localhost:27017/your-database-name',
    options: {
      useUnifiedTopology: true,
    },
    collection: 'logs',
    format: winston.format.combine(
      winston.format.timestamp(), // Add a timestamp to MongoDB logs
      winston.format.json(), // Use JSON format for MongoDB logs
    ),
  }),
MongoDB db only accepts JSON-based data. So, in this example, you must use winston.format.json() as you designed the logging format.
Implementing Nest.js LoggerService
Let’s get some logs into action. So, create a LoggerService using the following command:
nest g service logger --no-spec
Navigate to the created src/logger/logger.service.ts file and add your LoggerService as follows:
// src/logger/logger.service.ts

import { Injectable } from '@nestjs/common';
import { logger } from './winston.config';

@Injectable()
export class LoggerService {
  log(message: string, context?: string) {
    logger.info(message, { context });
  }

  error(message: string, trace: string, context?: string) {
    logger.error(message, { context, trace });
  }

  warn(message: string, context?: string) {
    logger.warn(message, { context });
  }

  debug(message: string, context?: string) {
    logger.debug(message, { context });
  }
}
This creates a custom Nest.js Logger service. It has the messages and levels you want to add to your Logger. You can edit them to match your preference.
To confirm if your logging transport and logging services are working, navigate to src/logger/logger.controller.ts.
Inject the custom logger service as follows:
nest g controller logger --no-spec
// src/logger/logger.controller.ts
import { Controller, Get } from '@nestjs/common';
import { LoggerService } from './logger.service';

@Controller('logger')
export class LoggerController {
  constructor(private readonly logger: LoggerService) {}

  @Get('info')
  getInfoLog() {
    this.logger.log(
      'This is an INFO log message from the LoggerController.',
      'LoggerController',
    );
    return 'Logged an INFO message.';
  }

  @Get('error')
  getErrorLog() {
    this.logger.error(
      'This is an ERROR log message from the LoggerController.',
      null,
      'LoggerController',
    );
    return 'Logged an ERROR message.';
  }
}
Now Ensure your src/app.module.ts file is as follows:
import { Module } from '@nestjs/common';
import { LoggerModule } from './logger/logger.module';
import { MongooseModule } from '@nestjs/mongoose';

@Module({
  imports: [MongooseModule.forRoot('mongodb://localhost:27017'), LoggerModule],
})
export class AppModule {}
Its time to start the server, so run:
npm run start
Your Nest.js logger should be ready:
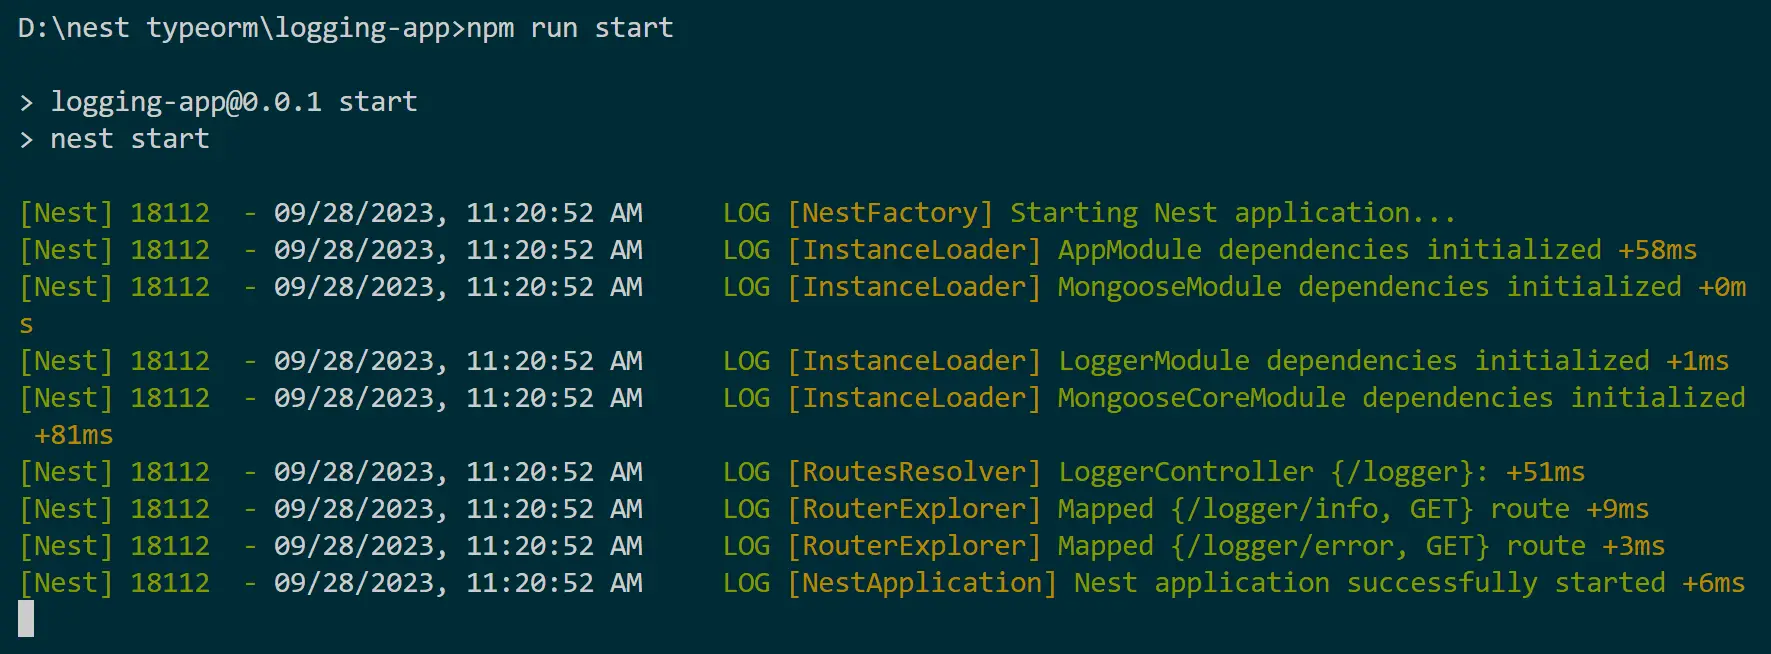
To test to logs, run a GET request to http://localhost:3000/logger/info.
First, the console will record the log as follows:

Winston will create a file system to save the recorded logs:

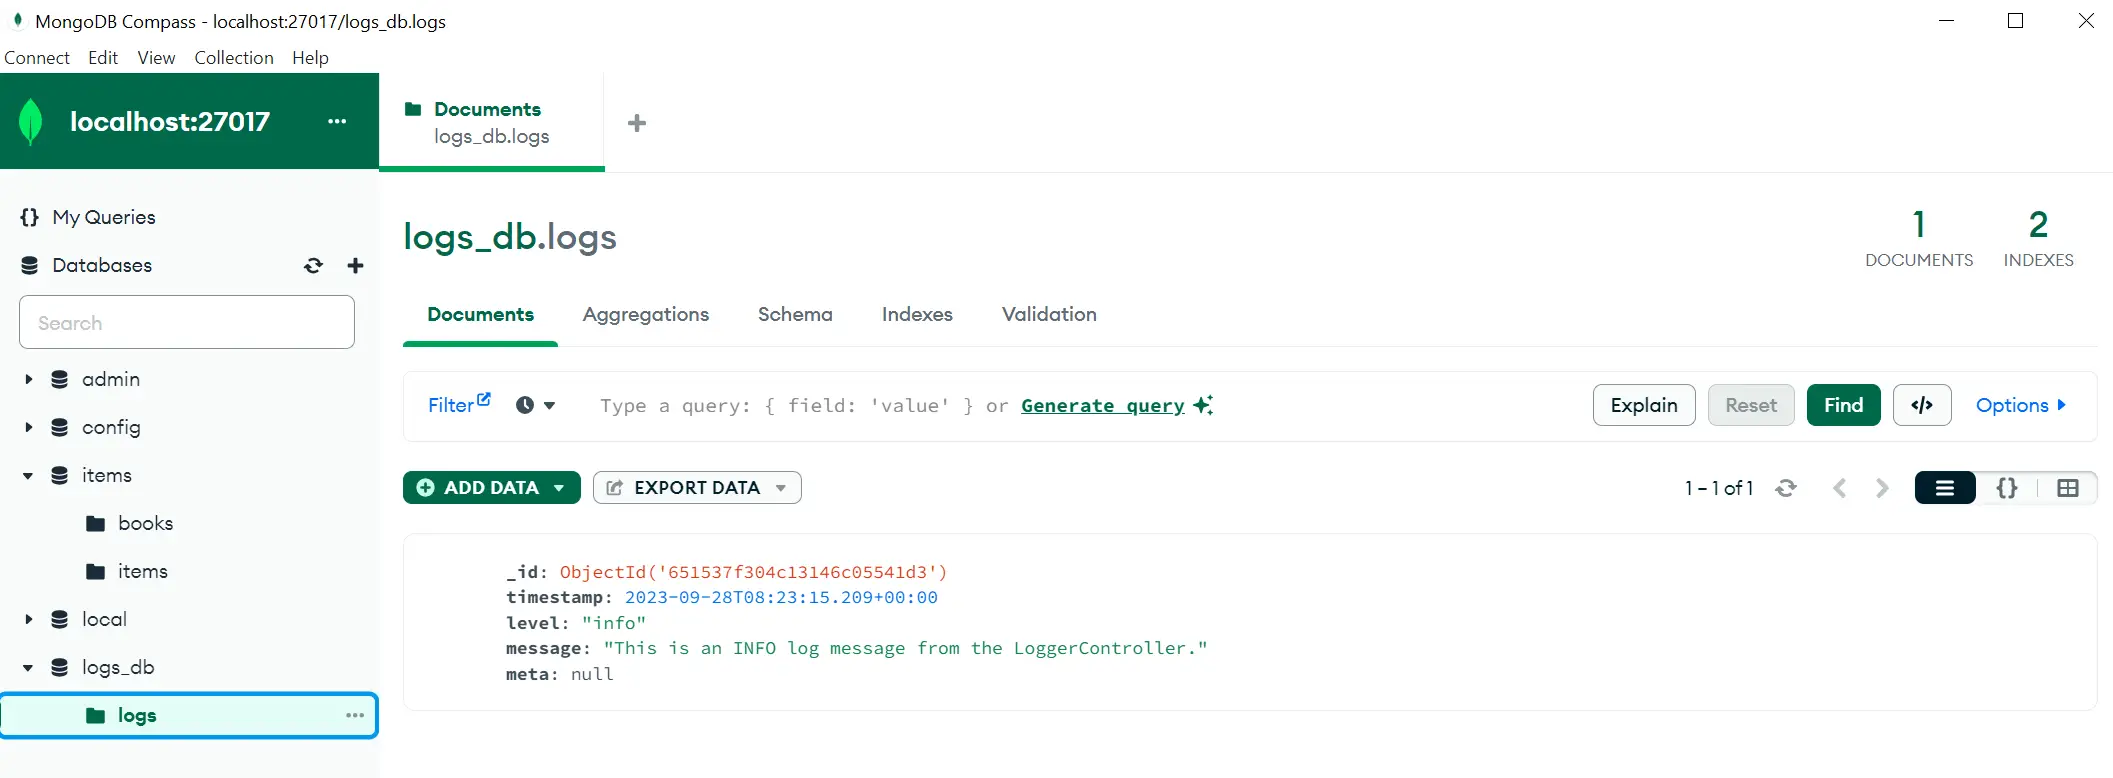
And if you refresh your MongoDB dB, the same result will be recorded as follows:
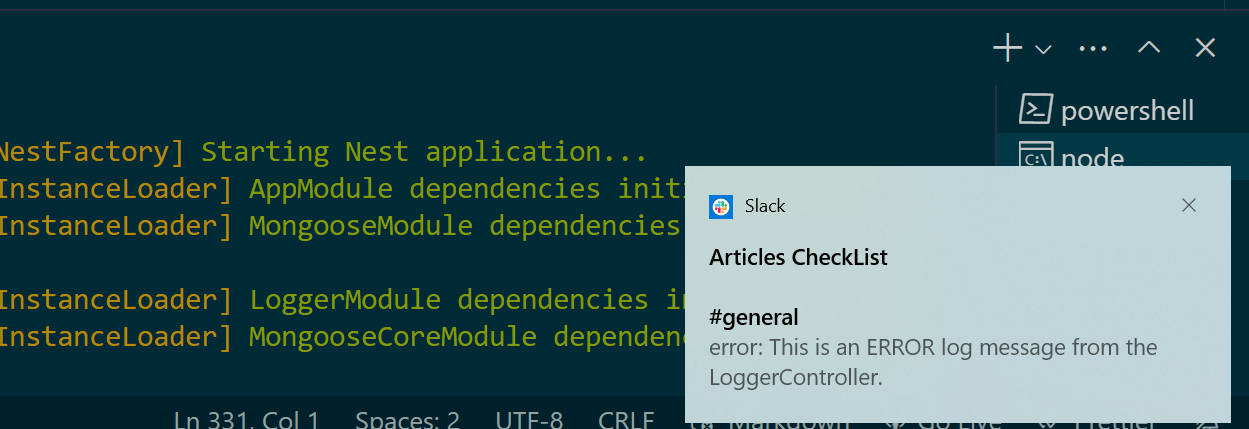
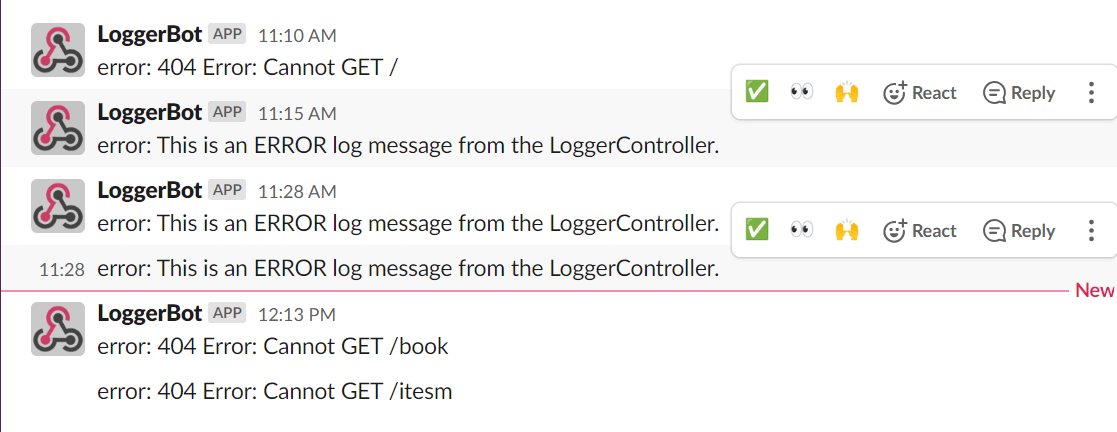
Let’s first send a GET request to http://localhost:3000/logger/error. Note that this will invoke an error message. This should be captured and sent as a notification to Slack. Once you set the Get request, you will have your Slack notification as follows:
If you didn’t get the notification, check your Slack channels as such:

How to add Winston Nest.js Logging to a Nest.js API.
Now that you have learned how to capture simple logs, why not dive deeper and learn how to get logs from a Nest.js API?
I will assume you have prior knowledge of creating a Nest.js CRUD API with MongoDB here. You can also follow this Guide to TypeORM with NestJS, Postgres, and MySQL.
The main goal is to get logs off the API. I will create a simple book API as follows:
Creating a Winston Nest.js Driven Logging API
Create the API module.
nest g module book
Create the service for the API
nest g service book --no-spec
Create its controller
nest g controller book --no-spec
Inside the book folder, create a schemas directory and add the book.schema.ts file as follows:
import { Schema, Prop, SchemaFactory } from '@nestjs/mongoose';
import mongoose from 'mongoose';

export enum Category {
  ADVENTURE = 'Adventure',
  CLASSICS = 'Classics',
  CRIME = 'Crime',
  FANTASY = 'Fantasy',
}

@Schema({
  timestamps: true,
})
export class Book {
  @Prop()
  title: string;

  @Prop()
  description: string;

  @Prop()
  author: string;

  @Prop()
  price: number;

  @Prop()
  category: Category;
}

export const BookSchema = SchemaFactory.createForClass(Book);
inside the book folder create a dto directory and add CreateBookDto.dto.ts and UpdateBookDto.dto.ts files as follows:
CreateBookDto.dto.ts file
import {IsNotEmpty, IsString, IsNumber,IsEnum, IsEmpty }from 'class-validator';
import { Category } from '../schemas/book.schema';

export class CreateBookDto {
  @IsNotEmpty()
  @IsString()
  title: string;

  @IsNotEmpty()
  @IsString()
  description: string;

  @IsNotEmpty()
  @IsString()
  author: string;

  @IsNotEmpty()
  @IsNumber()
  price: number;

  @IsNotEmpty()
  @IsEnum(Category, { message: 'Please enter correct category.' })
  category: Category;
}
UpdateBookDto.dto.ts file
import {
  IsOptional,
  IsString,
  IsNumber,
  IsEnum,
  IsEmpty,
} from 'class-validator';
import { Category } from '../schemas/book.schema';

export class UpdateBookDto {
  @IsOptional()
  @IsString()
  title: string;

  @IsOptional()
  @IsString()
  description: string;

  @IsOptional()
  @IsString()
  author: string;

  @IsOptional()
  @IsNumber()
  price: number;

  @IsOptional()
  @IsEnum(Category, { message: 'Please enter correct category.' })
  category: Category;
}
Create a 404.ts file inside the books to capture 404 errors as follows:
// src/books/404.ts

import { Catch, NotFoundException, ArgumentsHost } from '@nestjs/common';
import { BaseExceptionFilter } from '@nestjs/core';
import { LoggerService } from '../logger/logger.service';

@Catch(NotFoundException)
export class NotFoundExceptionFilter extends BaseExceptionFilter {
  constructor(private readonly logger: LoggerService) {
    super();
  }

  catch(exception: NotFoundException, host: ArgumentsHost) {
    const ctx = host.switchToHttp();
    const response = ctx.getResponse();
    const request = ctx.getRequest();

    const message = `404 Error: ${exception.message}`;

    // Log the 404 error message
    this.logger.error(message, undefined, 'NotFoundExceptionFilter');

    response.status(404).json({
      statusCode: 404,
      timestamp: new Date().toISOString(),
      path: request.url,
      message: 'Resource not found,
    });
  }
}
Now your src/book/book.service.ts file
import { Injectable, HttpException, HttpStatus } from '@nestjs/common';
import { InjectModel } from '@nestjs/mongoose';
import * as mongoose from 'mongoose';
import { Book } from './schemas/book.schema';

import { Query } from 'express-serve-static-core';

@Injectable()
export class BookService {
  constructor(
    @InjectModel(Book.name)
    private bookModel: mongoose.Model<Book>,
  ) {}

  async findAll(query: Query): Promise<Book[]> {
    const resPerPage = 2;
    const currentPage = Number(query.page) || 1;
    const skip = resPerPage * (currentPage - 1);

    const keyword = query.keyword
      ? {
          title: {
            $regex: query.keyword,
            $options: 'i',
          },
        }
      : {};

    const book = await this.bookModel
      .find({ ...keyword })
      .limit(resPerPage)
      .skip(skip);
    return book;
  }

  async createBook(book: Book): Promise<Book> {
    const data = Object.assign(book);

    const res = await this.bookModel.create(data);
    return res;
  }

  async getBookById(id: string): Promise<Book> {
    const isValidId = mongoose.isValidObjectId(id);
    if (!isValidId) {
      throw new HttpException(
        'Please enter correct id.',
        HttpStatus.BAD_REQUEST,
      );
    }

    const book = await this.bookModel.findById(id);
    if (!book) {
      throw new HttpException('Book not found', HttpStatus.NOT_FOUND);
    }

    return book;
  }

  async updateBookById(id: string, book: Book): Promise<Book> {
    return await this.bookModel.findByIdAndUpdate(id, book, {
      new: true,
      runValidators: true,
    });
  }

  async deleteBookById(id: string): Promise<Book> {
    return await this.bookModel.findByIdAndDelete(id);
  }
}
You will need to update the src/book/book.module.ts file as follows:
import { Module } from '@nestjs/common';
import { BookController } from './book.controller';
import { BookService } from './book.service';
import { BookSchema } from './schemas/book.schema';
import { MongooseModule } from '@nestjs/mongoose';
import { LoggerModule } from '../logger/logger.module'; // Import the LoggerModule

@Module({
  imports: [

    MongooseModule.forFeature([{ name: 'Book', schema: BookSchema }]),
    LoggerModule, // Include the LoggerModule here
  ],
  controllers: [BookController],
  providers: [BookService],
})
export class BookModule {}
Finally, here is how you’ll add logging to your API. This will be added to your book controllers, so your src/book/book.controller.ts file should reflect as follows:
import { Controller, Body,Param, Get, Post, Put, Delete, Query,Req, NotFoundException, } from '@nestjs/common';
import { CreateBookDto } from './dto/CreateBookDto.dto';
import { UpdateBookDto } from './dto/UpdateBookDto.dto';
import { LoggerService } from '../logger/logger.service';

import { Book } from './schemas/book.schema';
import { BookService } from './book.service';

import { Query as ExpressQuery } from 'express-serve-static-core';

@Controller('books')
export class BookController {
  constructor(
    private bookService: BookService,
    private readonly logger: LoggerService,
  ) {}

  @Get()
  async getBooks(@Query() query: ExpressQuery): Promise<Book[]> {
    this.logger.log('Fetching all books', 'BookController');
    return await this.bookService.findAll(query);
  }

  @Post('new')
  async createBook(
    @Body()
    createBook: CreateBookDto,
    @Req() req,
  ): Promise<Book> {
    this.logger.log('Creating a new book', 'BookController');
    return await this.bookService.createBook(createBook);
  }

  @Get(':id')
  async getBook(@Param('id') id: string): Promise<Book> {
    this.logger.log(`Fetching book with ID ${id}`, 'BookController');

    const  book = await this.bookService.getBookById(id);
    if (!book) {
      throw new NotFoundException(`Book with ID ${id} not found`);
    }
    return book;


  }

  @Put(':id')
  async updateBook(
    @Param('id')
    id: string,
    @Body()
    updateBook: UpdateBookDto,
  ): Promise<Book> {
    this.logger.log(`Updating Book with ID ${id}`, 'BookController');
    const updatedBook = await this.bookService.updateBookById(id, updateBook);
    if (!updatedBook) {
      throw new NotFoundException(`Book with ID ${id} not found`);
    }
    return updatedBook;
  }

  @Delete(':id')
  async deleteBook(@Param('id') id: string): Promise<Book> {
    this.logger.log(`Deleting Book with ID ${id}`, 'BookController');
    const deleteBook = await this.bookService.deleteBookById(id);
    if (!deleteBook) {
      throw new NotFoundException(`Book with ID ${id} not found`);
    }
    return deleteBook;

  }
}
Set up Modules and Providers
Up to this point, the src/app.module.ts file should reflect as follows:
import { Module } from '@nestjs/common';
import { LoggerModule } from './logger/logger.module';
import { MongooseModule } from '@nestjs/mongoose';
import { APP_FILTER } from '@nestjs/core';
import { NotFoundExceptionFilter } from './book/404'; // Import the custom filter
import { BookModule } from './book/book.module';


@Module({
  imports: [

    MongooseModule.forRoot('mongodb://localhost:27017'),

    LoggerModule,
    BookModule,
  ],

  providers: [

    {
      provide: APP_FILTER,
      useClass: NotFoundExceptionFilter, // Register the custom filter for 404 errors
    },
  ],
})
export class AppModule {}
Testing Nest.js Winston Integrated Endpoint
Before running the API, your app should have the following folder structure.
nest-crud-logger/
├── src/
│ ├── app.controller.ts
│ ├── app.module.ts
│ ├── app.service.ts
│ ├── book/
│ │ ├── dto/
│ │ │ ├── CreateBookDto.dto.ts
│ │ │ ├── UpdateBookDto.dto.ts
│ │ ├── models/
│ │ │ ├── book.model.ts
│ │ ├── schemas/
│ │ │ ├── book.schema.ts
│ │ ├── book.controller.ts
│ │ ├── 404.ts
│ │ ├── book.module.ts
│ │ ├── book.service.ts
│ ├── logger/
│ │ ├── winston.config.ts
│ │ ├── logger.module.ts
│ │ ├── logger.service.ts
│ ├── main.ts
├── node_modules/
├── package.json
├── tsconfig.json
├── nest-cli.json
├── ...
If you go lost, make sure to use the Code used in this Guide on this GitHub Repository
Now run the application:
npm run start
The app will run on http://localhost:3000. Use the following URL to perform your CRUD requests:
- Get a list of all books:
http://localhost:3000/books - Get a single book by its unique ID:
http://localhost:3000/books/:id - Create a new book:
http://localhost:3000/books/new - Update an Existing book by ID:
http://localhost:3000/books/:id - Delete a book by ID:
http://localhost:3000/books/:id
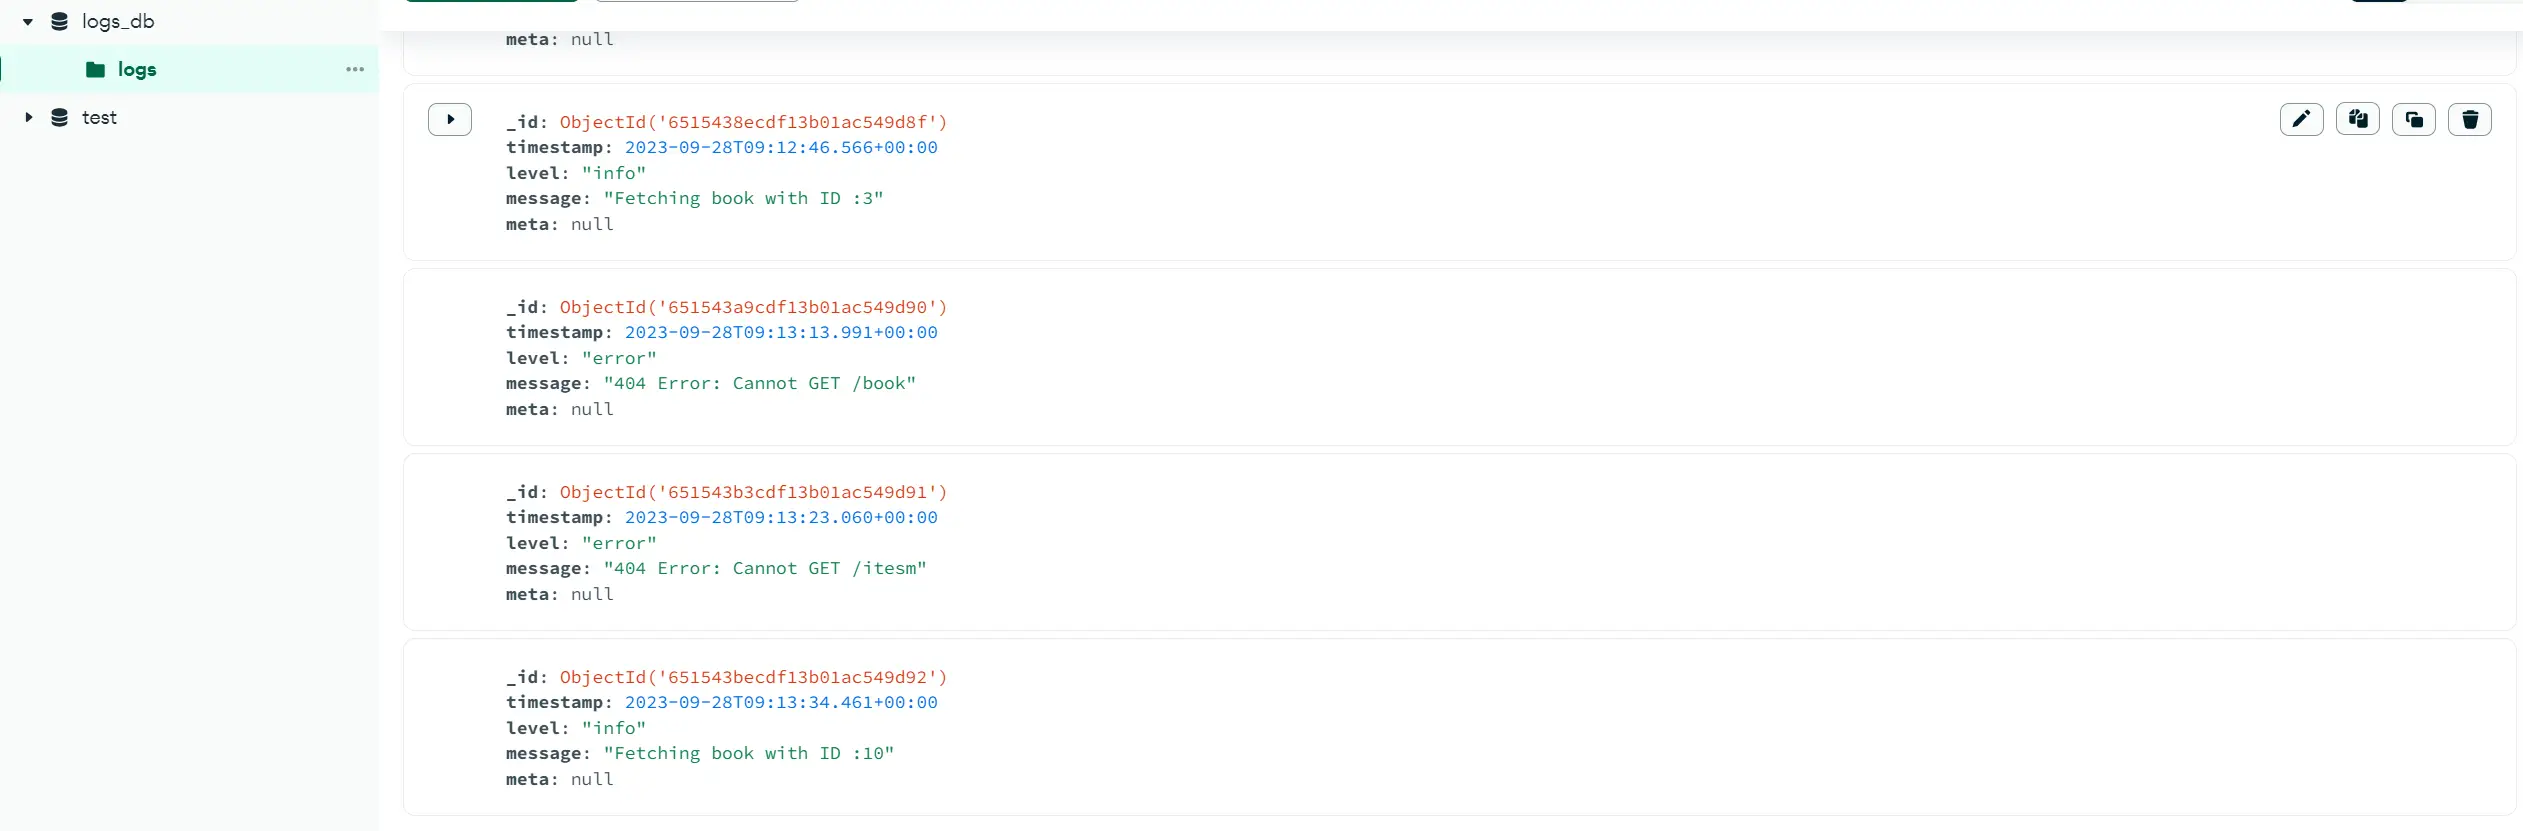
Now check the Log channels and see how logs were recorded:
- Console:

- File transport

- MongoDB
- Slack notifications
Nest.js Logging Best Practices
Logging makes monitoring and debugging apps a lot easier. For Nest.js apps:
- Use different log levels and categorize the logs that need immediate attention. Using Slack notifications was a great idea.
- Log format matters. Ensure each log has a timestamp, log levels, context, and the log message.
- The log formats should be structured with standard formats such as JSON
- Log only what you need.
- Global exception filters are great. We used 404 logs as an example.
- Alerting is key on log events. Again, Slack is helpful. Tools like Prometheus and Grafana make a good cut on the same
- Logs should be centralized. The classic example was using different transporters such as MongoDB and file-based systems.
Conclusion
How did you enjoy this Nest.js Logging with Winston? If you found it helpful, leave a comment. And if you encounter any errors, leave a comment, and we will address it right away.
Do you have any Nest.js topics that you need help understanding? Let us know, and we will create a simplified Guide for you.
Written By: