Easy Nest.js Mongoose Example Tutorial with MongoDB Schema
Posted January 30, 2024

Mongoose is an object modeling library for MongoDB. It is designed to work with Node.js and Nest.js with a simple, schema-based model to interact with MongoDB documents. In this easy example Tutorial, you will learn how to use Mongoose with Nest.js and create your schemas to model the MongoDB database.
You will learn how to install Nest.js with Mongoose and MongoDB, define Mongoose schemas and models, query the database, and create Nest.js Mongoose CRUD API. In summary, you will learn:
- How to create Nest.js API and set up Mongoose to access MongoDB.
- The right way to create a Mongoose schema/model.
- How to use Nest.js and Mongoose to create a MongoDB connection Example.
- Using MongoDB, Nest.js, and Mongoose to create a CRUD.
- How to create MongoDB database relations with Nest.js and Mongoose.
- You will create a Posts and Authors Nest.js API while demonstrating how to implement Mongoose One to Many relations.
Ready? Dive into this Easy Nest.js Mongoose Example Tutorial with MongoDB Schema and create CRUD like a PRO.
Related: Easy TypeORM with Nest.js and MongoDB Example Tutorial
What you need to use Nest.js with Mongoose
Before setting up your app, ensure:
- You have MongoDB installed and running on your computer.
- Node.js runtime installed on your machine.
Introducing Mongoose, Schema and Nest.js
Mongoose defines data schemas. This way, you specify the structure of the data and the types of each field your Nest.js API will inherit. You get Mongoose features like validation, middleware, and query building to simplify the interaction with MongoDB.
Working with Mongoose makes the Nest.js app straight to the point. Mongoose will create an abstraction layer on top of MongoDB’s native driver as you organize your Nest.js code.
Let’s now get into a step-by-step setup and make sure Nest.js can utilize the Mongoose advantages.
Creating Nest.js App with Mongoose and MongoDB
In this guide, you will create a blog app. Here, you will have two modules, posts and author. This will be critical in helping us create the Mongoose schema while adding relations between an author and posts.
Therefore, you need a working Nest.js app. Use the following command to get one ready:
# Install Nest.js CLI with NPM
npm i -g @nestjs/cli
# Create a Nest app in your working dir
nest new nest-mongoose
Change the directory and point to the Created nest-mongoose folder.
cd nest-mongoose
Nest.js is now ready. To make Mongoose available in this Nest.js app, you need a few libraries:
- Mongoose and @nestjs/mongoose: - Mongoose as a MongoDB object modeling tool and @nestjs/mongoose as the Nest.js package with decorators and utilities to integrate Mongoose.
- Class-validator and class-transformer are libraries for input validation and data transformation.
To install these dependencies, use the following command:
npm i mongoose @nestjs/mongoose class-validator class-transformer
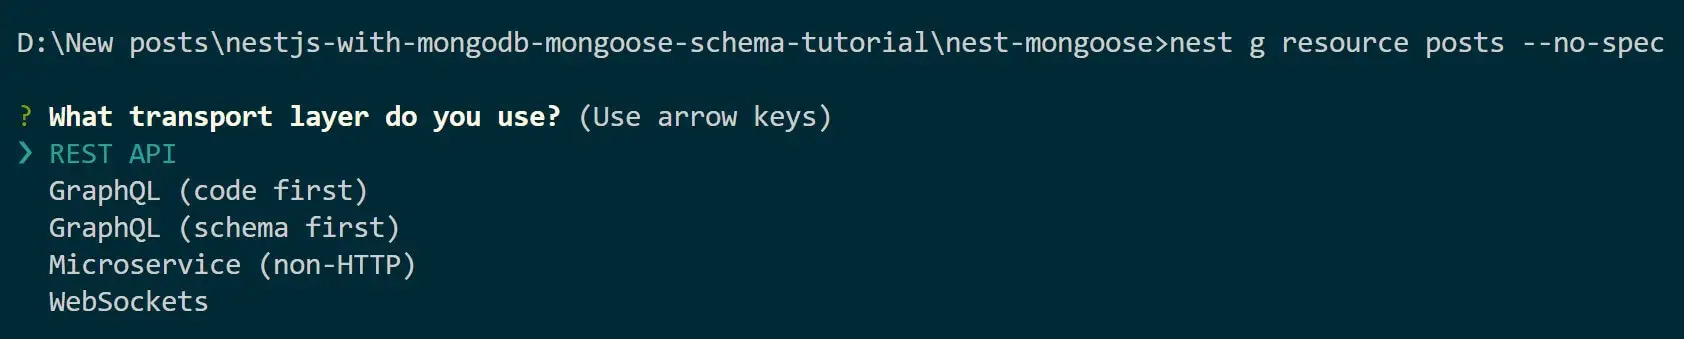
Now, create a module to start using this Mongoose Nest.js setup. We will start creating a posts module. We will create the Authors module later in this guide when implementing Mongoose One to Many relations. Use the following command to create a post resource and ensure you create it as a REST API:
nest g resource posts --no-spec
Creating Schema/Models Example using Mongoose and Nest.js
Mongoose uses a schema to define the structure of documents within a collection in MongoDB. This means a schema in the blueprint of your MongoDB database. It has the structure for your data. Here, you are using Nest.js. This gives you Typescript advantages to include the types of each field, default values, and validation rules.
Once you have the schema ready, Nest.js will allow you to create a Mongoose model based on that schema. A model in this will be a Typescript constructor compiled from schemas. Nest.js uses the Schema model to create and query documents in the associated MongoDB collection.
Navigate to the src\posts\entities\post.entity.ts file and create your schema and Mongoose model as follows:
import { Prop, Schema, SchemaFactory } from '@nestjs/mongoose';
import { Document, Types } from 'mongoose';

export type PostDocument = Post & Document<Types.ObjectId>;

@Schema({ collection: 'posts' })
export class Post {
  @Prop({ required: true, type: String })
  title: string;

  @Prop({ required: true, type: String })
  body: string;

  @Prop({ required: true, type: String })
  creationDate: string;
}

export const PostSchema = SchemaFactory.createForClass(Post);
Here:
- You will use @nestjs/mongoose and Mongoose as your modeling tool.
- You will create a TypeScript type of
PostDocumentextending toPost. The post will represent a document in the MongoDB collection. - When the Post class is executed, @Schema Decorator will create the collection
postsin your DB. DBThe fields of thepostscollection will use Mongoose @Prop Decorators. At the same time, you can add class properties defining each schema field. For example, @Prop will create a body field. This field is required when creating a new post and must be of type string.
Creating Mongoose Database Connection with Nest.js and MongoDB
For this schema to work, Mongoose will first need to establish a connection to MongoDB. You need the MongoDB connection string and let Mongoose handle how the documents and collection will be created based on the schema you have created above.
First, go to your PostsModule and integrate with Mongoose to manage the Post entity using MongooseModule.forFeature. MongooseModule.forFeature will specify the entities that should be registered with the current module’s Mongoose connection.
Go to the src\posts\posts.module.ts file and add the following changes:
//src\posts\posts.module.ts
import { Module } from '@nestjs/common';
import { PostsService } from './posts.service';
import { PostsController } from './posts.controller';
import { MongooseModule } from '@nestjs/mongoose';
import { PostSchema } from './entities/post.entity';

@Module({
  imports: [MongooseModule.forFeature([
    { name: 'Post', schema: PostSchema },
  ]),
],
  controllers: [PostsController],
  providers: [PostsService],
})
export class PostsModule {}
This PostsModule will be used in your NestJS application. You must import it into the main application module. This means the src\app.module.ts will have some changes:
AppModule is the root module of NestJS. The configuration for the Mongoose database connection will be executed here. You need MongooseModule.forRoot to configure the Mongoose connection to the MongoDB database as follows:
//src\app.module.ts
import { Module } from '@nestjs/common';
import { AppController } from './app.controller';
import { AppService } from './app.service';
import { PostsModule } from './posts/posts.module';
import { MongooseModule } from '@nestjs/mongoose';

@Module({
  imports: [
    MongooseModule.forRoot('mongodb://127.0.0.1:27017/blog_app', {

  }),
  PostsModule],
  controllers: [AppController],
  providers: [AppService],
})
export class AppModule {}
The main argument here is the MongoDB connection URI, mongodb://127.0.0.1:27017/blog_app. Mongoose will point to this connection URI and create a blog_app document. It will proceed and run PostsModule to run the Post schema and create its associated posts collection.
If you are using MongoDB Atlas, check this How to Connect Mongoose with MongoDB Atlas Cluster Login guide and learn how to obtain your connection string.
Creating Posts Using Mongoose and Nest.js
If you have the MongoDB connection ready, you need to start creating and adding data to your collection. Nest.js will use the PostsService class to handle any operations related to posts.
However, when creating a new post, you need a DTO (Data Transfer Object) to validate incoming data. You use class-validator; corresponding fields are not empty before Mongoose adds the new field to MongoDB. Go to the src\posts\dto\create-post.dto.ts file and create one as follows:
// src\posts\dto\create-post.dto.ts
import { IsNotEmpty } from 'class-validator';

export default class CreatePostDto {
  @IsNotEmpty({ message: 'Field $property cannot be empty.' })
  title: string;

  @IsNotEmpty({ message: 'Field $property is not a valid date.' })
  body: string;
}
At the same time, Nest.js needs the data structure expected in the response when retrieving or creating a post. This way, you control what data is exposed in the API response to have a clean and predictable interface for your API clients. In the src\posts\dto\ folder, create a post.response.dto.ts file and destruct the API response as follows:
//src\posts\dto\post.response.dto.ts
// Import the type representing a document of the Post entity
import { PostDocument } from '../entities/post.entity';

// Define the PostResponseDTO class representing the response structure for posts
export default class PostResponseDTO {
  // Constructor initializes properties based on provided arguments
  constructor(
    // ID of the post
    public id: string,
    // Title of the post
    public title: string,
    // Body/content of the post
    public body: string,
    // Date when the post was created
    public creationDate: string,
  ) {}

  // Static method to convert a PostDocument to a PostResponseDTO instance
  static from = ({
    // MongoDB ObjectId representing the post's ID
    _id,
    // Title of the post
    title,
    // Body/content of the post
    body,
    // Date when the post was created
    creationDate,
  }: PostDocument): PostResponseDTO =>
    new PostResponseDTO(
      // Convert MongoDB ObjectId to its hexadecimal representation
      _id.toHexString(),
      title,
      body,
      creationDate,
    );
}
It’s time to create the post. Go to src\posts\posts.service.ts file:
- add import statements
- Create an @Injectable() decorator for a Nest.js service to get injected as a dependency.
- Ensure you have a Constructor to inject the Mongoose model for the Post entity.
- Proceed and create CRUD operations for fetching, creating, deleting, and retrieving single posts, while handling errors using HTTP exceptions.
The src\posts\posts.service.ts looks as follows:
//src\posts\posts.service.ts
import { HttpException, HttpStatus, Injectable, Logger } from '@nestjs/common';
import { PostDocument } from './entities/post.entity';
import PostResponseDTO from './dto/post.response.dto';
import CreatePostDto from './dto/create-post.dto';
import { InjectModel } from '@nestjs/mongoose';
import { Model, Types } from 'mongoose';

@Injectable()
export class PostsService {
  private readonly logger = new Logger(PostsService.name);

  constructor(
    @InjectModel('Post') private postModel: Model<PostDocument>,
  ) {}

  async AddNew(createPostDto: CreatePostDto): Promise<PostResponseDTO> {
    try {
      const { title, body } = createPostDto;
      const newPost = await this.postModel.create({
        title,
        body,
        // creationDate is a string representing the date
        creationDate: new Date().toISOString(),
      });
      return PostResponseDTO.from(newPost);
    } catch (error) {
      throw new HttpException(
        'Error while creating a post',
        HttpStatus.BAD_REQUEST,
      );
    }
  }
}
Mongoose will refer to your DTO classes and use the Schema model to define how a post should be created. It will then use create() to add the new document to MongoDB.
Fetch Posts with Mongoose from MongoDB
At the same time, you want Mongoose to use Nest.js and fetch existing data in MongoDB. It’s here you will get to define the instructions for using GET request.
Mongoose gives you two major methods:
findById()to get one document based on its id.find()as a query to get a list of documents that match a given filter.
Create them in your src\posts\posts.service.ts file as follows:
//src\posts\posts.service.ts
  async findAll(): Promise<Array<PostResponseDTO>> {
    try {
      const posts = await this.postModel.find().sort('-creationDate').exec();
      return posts.map(PostResponseDTO.from);
    } catch (error) {
      throw new HttpException(
        'Error while fetching posts',
        HttpStatus.BAD_REQUEST,
      );
    }
  }

  async findOne(id: string): Promise<PostResponseDTO> {
    const _id = new Types.ObjectId(id);
    const post = await this.postModel.findById(_id).exec();
    return PostResponseDTO.from(post);
  }
Note that find() has an optional filter sort() to arrange the fetched items based on the creationDate.
At the same time, use findByIdAndDelete and detele a post from the database:
//src\posts\posts.service.ts

  async delete(id: string) {
    try {
      const _id = new Types.ObjectId(id);
      return await this.postModel.findByIdAndDelete(_id).exec();
    } catch (error) {
      throw new HttpException(
        'Error deleting the post',
        HttpStatus.BAD_REQUEST,
      );
    }
  }
Adding Controllers Using Nest.js
The final puzzle is to let Nest.js match the above functions to the respective HTTP methods. Controllers handle routes. This is the only way Nest.js can use Mongoose, establish the MongoDB connections, and now expose your operations.
Open the src\posts\posts.controller.ts file and add the following controllers as they match the associated methods:
//src\posts\posts.controller.ts
import { Controller, Get, Post, Param, Body, Delete, Query } from '@nestjs/common';
import { PostsService } from './posts.service';
import PostResponseDTO from './dto/post.response.dto';
import CreatePostDto from './dto/create-post.dto';

@Controller('posts')
export class PostsController {
  constructor(private readonly postsService: PostsService) {}

  // Ecreating a new post
  @Post()
  async createPost(@Body() createPostDto: CreatePostDto): Promise<PostResponseDTO> {
    // Call the AddNew to handle post creation
    return this.postsService.AddNew(createPostDto);
  }

  // retrieving a post by ID
  @Get('/:id')
  async getPost(@Param('id') id: string): Promise<any> {
    // Use to findOne retrieve a post by ID
    return this.postsService.findOne(id);
  }

  // retrieving all posts
  @Get()
  async getAllPosts(): Promise<Array<PostResponseDTO>> {
    // Use findAll service to get all posts
    return this.postsService.findAll();
  }

  // deleting a post by ID
  @Delete('/:id')
  async deletePost(@Param('id') id: string): Promise<any> {
    return this.postsService.delete(id);
  }
}
Testing Mongoose Connection with Nest.js and MongoDB
Your Mongoose Nest.js app is ready. To run it, use the following command:
# Use dev for watch mode
npm run start:dev
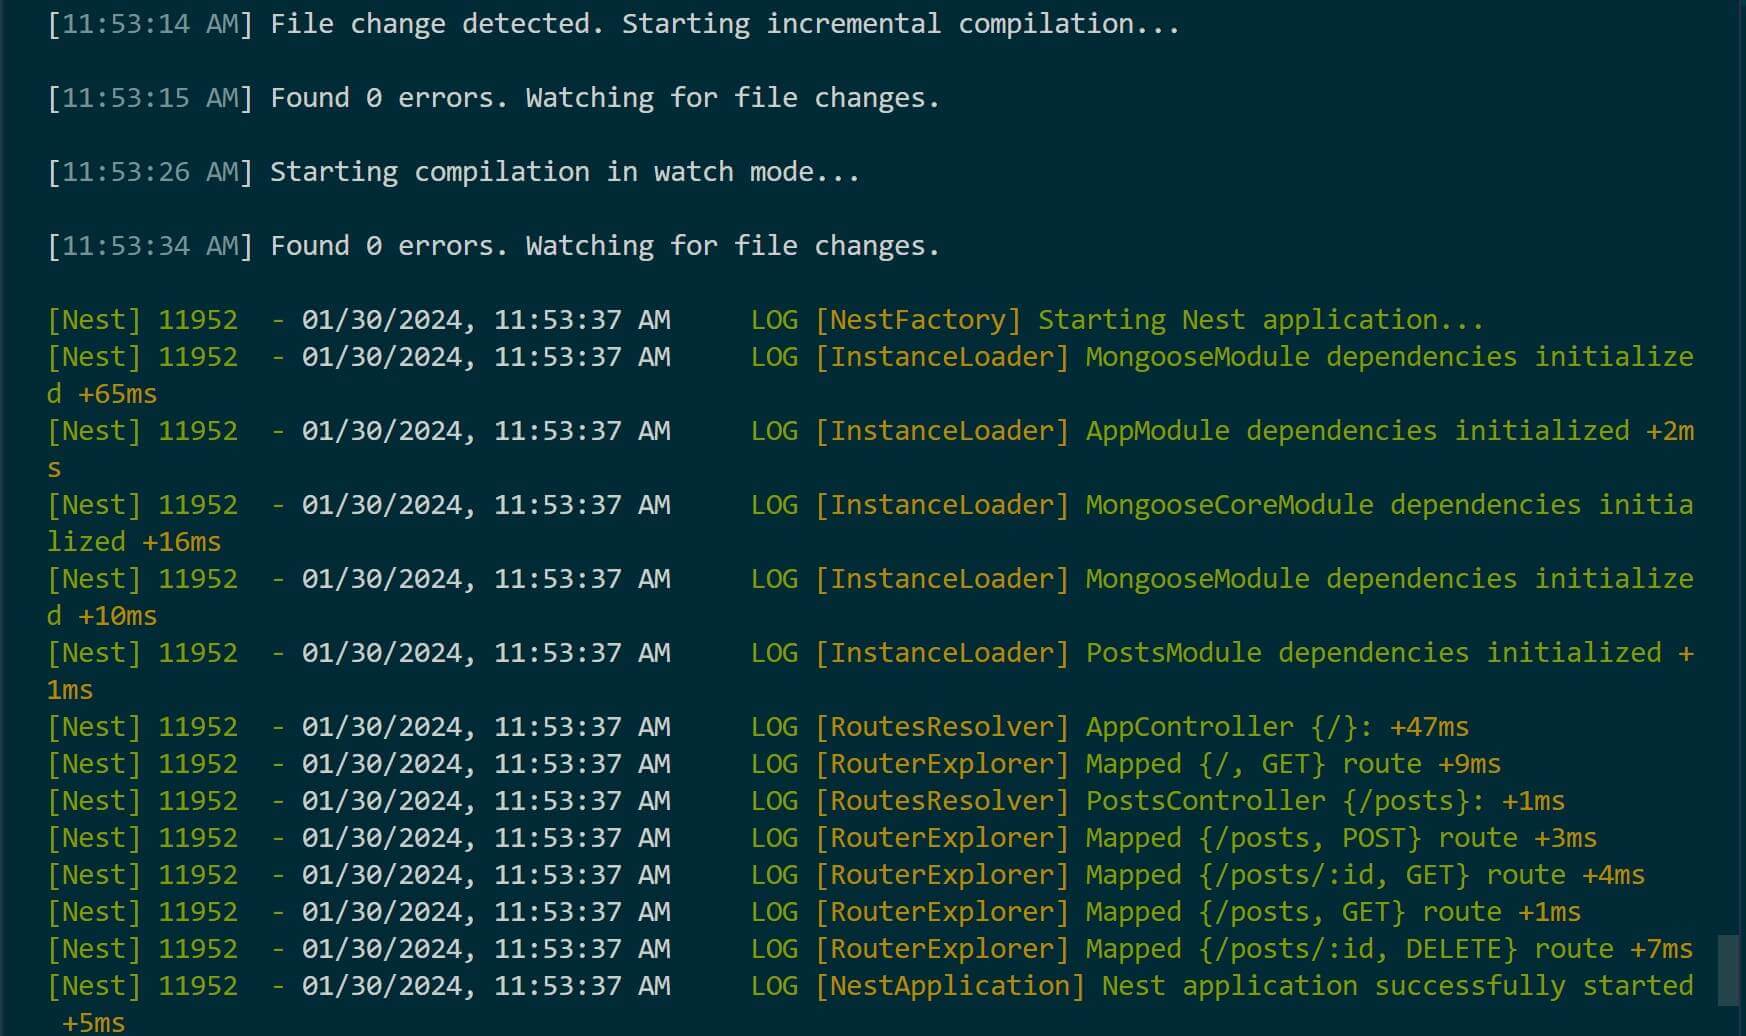
The server is running on port 3000. This means you will access it on http://localhost:3000/posts.
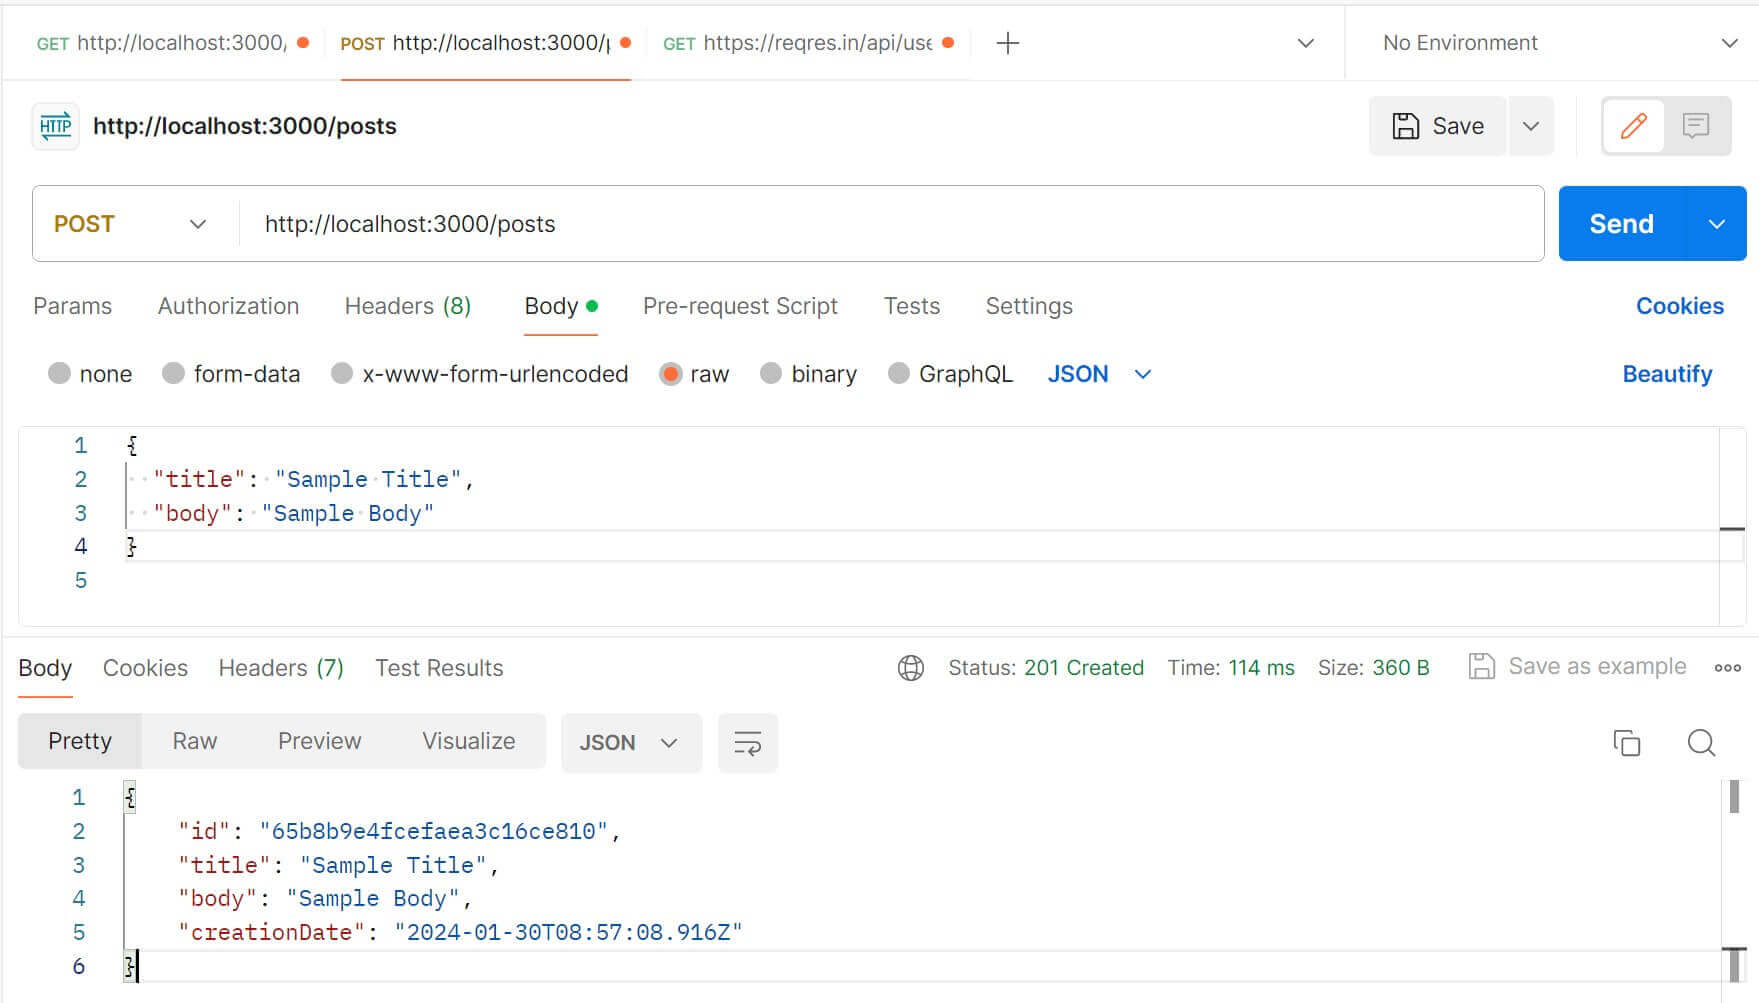
To add a post, you will the following payload Example:
{
  "title": "Sample Title",
  "body": "Sample Body"
}
Then use Postman to send a POST request as follows:
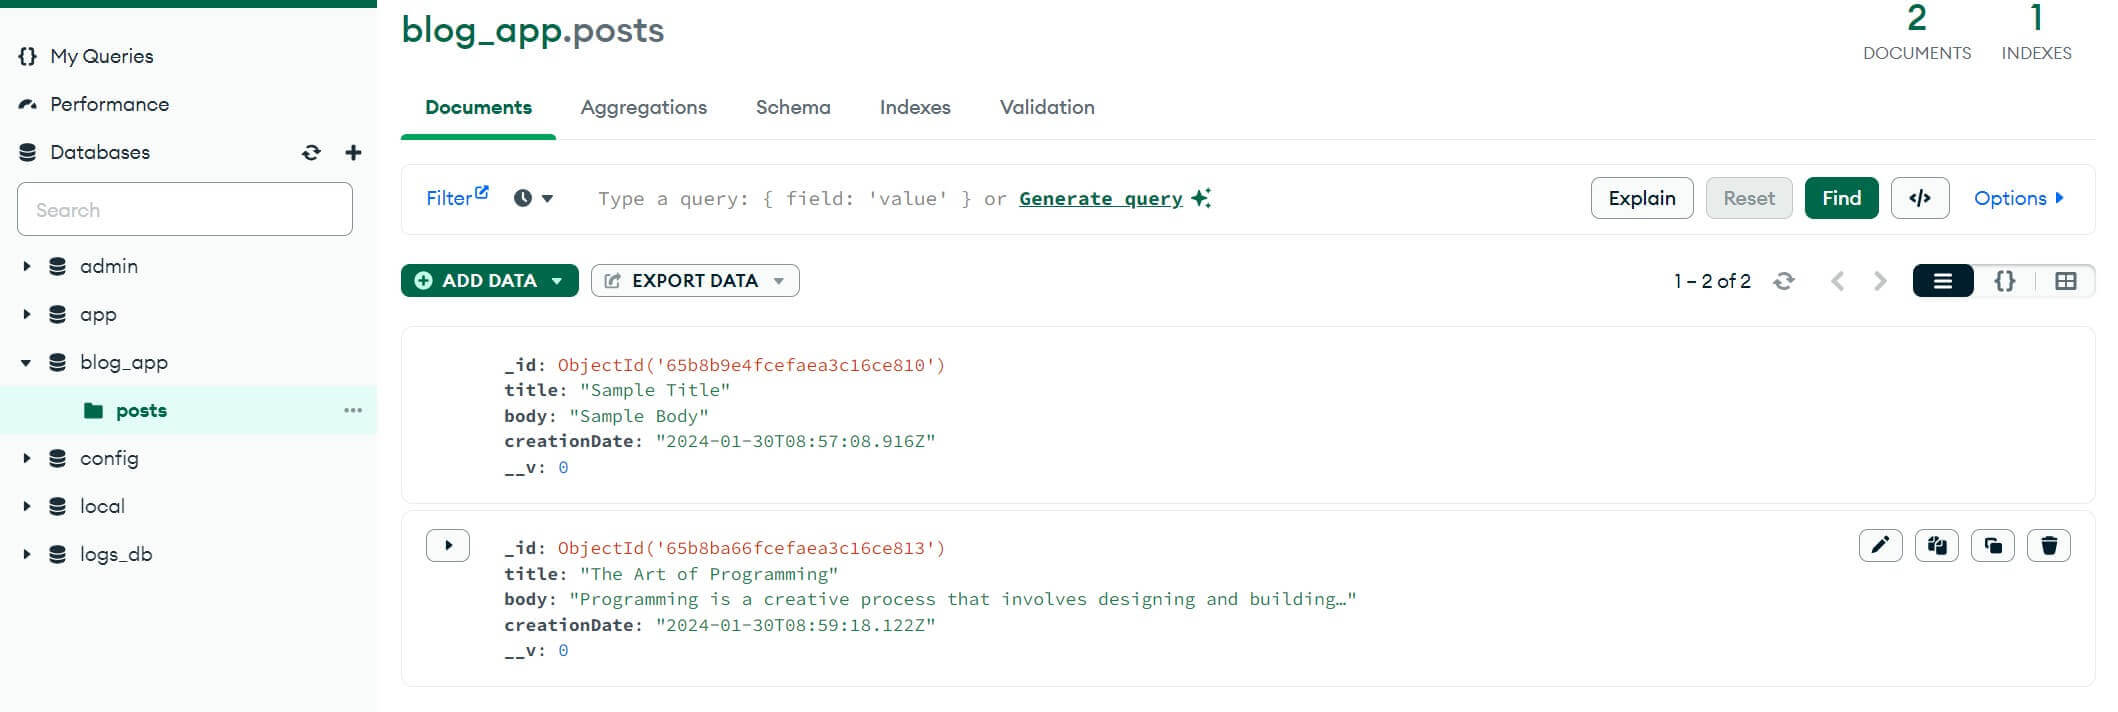
At the same time, you should have the added items in your MongoDB:
Use Postman with GET to confirm so:
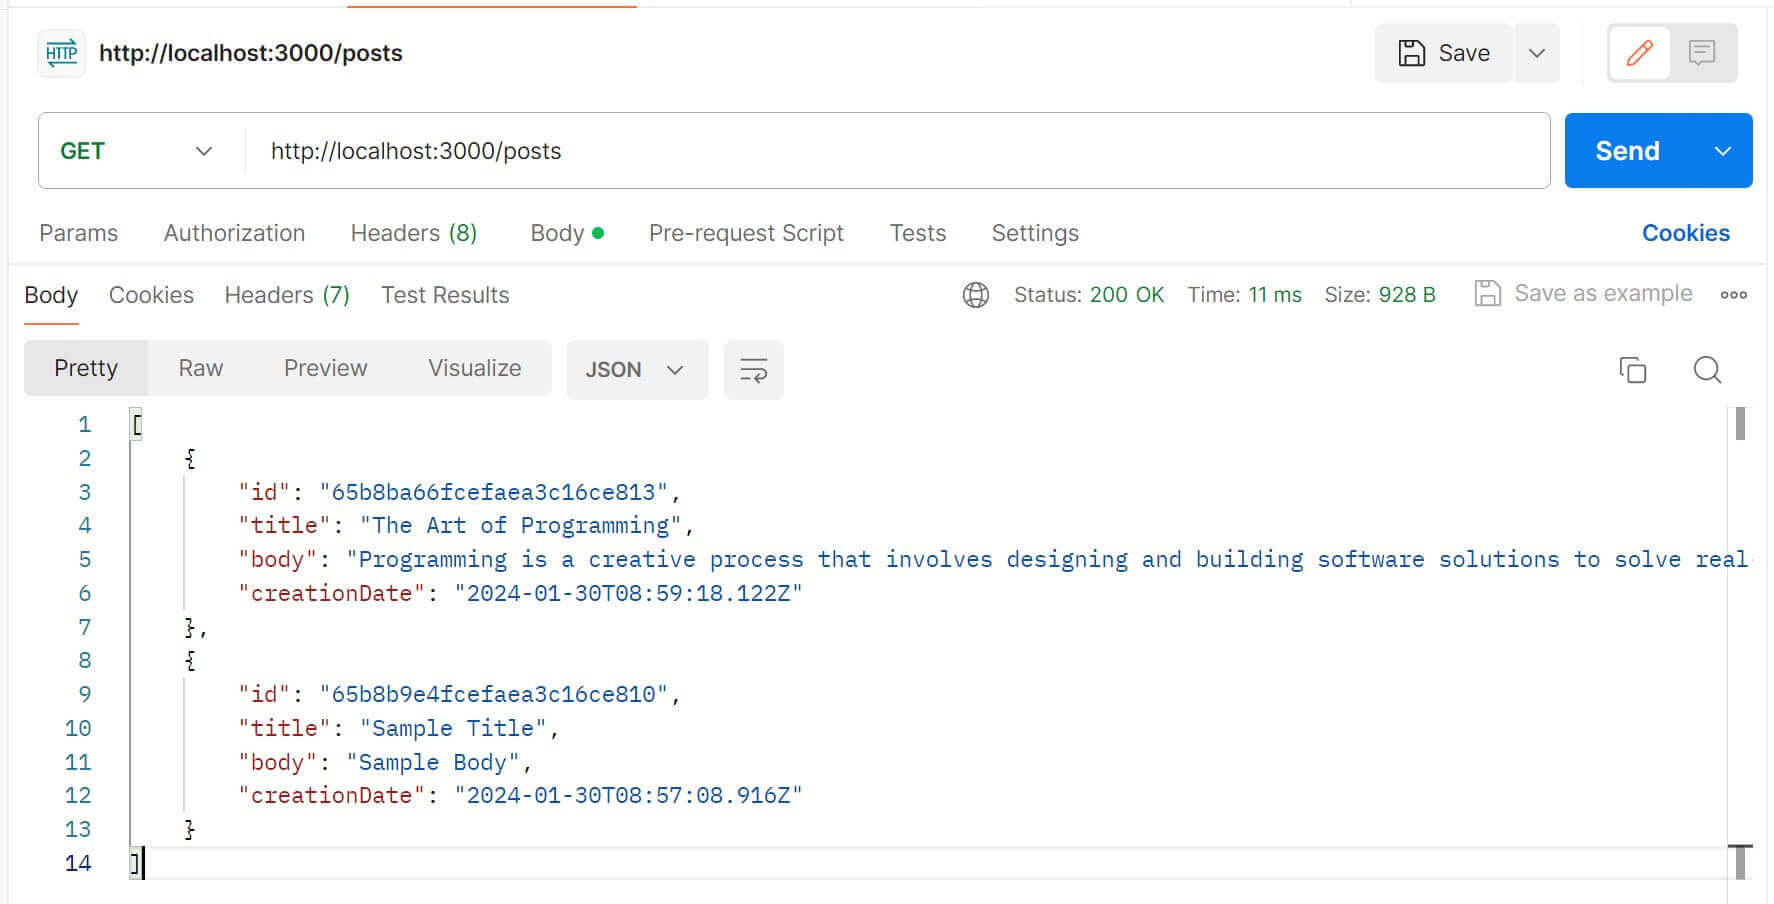
If you want to get or delete a single post, the route should be http://localhost:3000/posts/post_id. However, you must substitute post_id with the respective id of an existing post.
If you want the complete code up to this point. Check this GitHub repo. Otherwise, let’s dive even deeper and create a Posts and Authors Nest.js API while demonstrating how to implement Mongoose One to Many relations.
Adding Mongoose One to Many Relations with NestJS
A Relation exists if you have two MongoDB documents that rely on each other to create a complete dependency. So far, we have created the Post module. Now, you will create an Authors module while ensuring you have the two able to use Mongoose to add One to Many.
At this point, stop your NestJS server and implement the following steps.
Creating Authors Module with Nest.js
Each Nest.js Module is independent. This means you will create another feature module for the Authors and add it:
- Mongoose schema.
- The Mongoose CRUD services
- Controllers to access the authors
Use the following command to create an author’s resource and ensure you create it as a REST API:
nest g resource authors --no-spec

Creating the author’s Schema using Mongoose and Nest.js
We already know what schema is and why Mongoose needs it. In this context, you are creating a one-to-many relationship. This means one author can have many posts. An author will create many posts. But a single post will only have one author.
Now, this logic must reflect your Mongoose schema. Let’s start by creating the schema for the author. You will navigate to the src\authors\entities\author.entity.ts file and use Mongoose to create it as follows:
//src\authors\entities\author.entity.ts
import { Prop, Schema, SchemaFactory } from '@nestjs/mongoose';
import { Document, Types } from 'mongoose';
import { PostDocument } from 'src/posts/entities/post.entity';

export type AuthorDocument = Author & Document<Types.ObjectId>;

@Schema({ collection: 'authors' })
export class Author {
  @Prop({ required: true, type: String })
  realname: string;

  @Prop({ required: true, type: String })
  nickname: string;

  @Prop({ required: true, type: String })
  birthDate: string;

  @Prop({ type: [{ type: Types.ObjectId, ref: 'Post' }] })
  posts: Array<PostDocument>;
}

export const AuthorSchema = SchemaFactory.createForClass(Author);
Here:
- You have applied to Mongoose class properties to have the schema fields.
- The
AuthorDocumenttype will represent a document in theauthorscollection with an associated MongoDB connection. - Note (
[{ type: Types.ObjectId, ref: 'Post' }]) the posts property formPostDocumenttypes add a reference to the Post entity. This way, the Mongoose schema will establish relationships between authors and posts.
This setup means the author property as a reference to the Author entity needs to create a link to each post to its author. What this means is the Post will need some changes.
Go to the src\posts\entities\post.entity.ts file, and ensure you add the Author reference to the Post as follows:
//src\posts\entities\post.entity.ts
import { Prop, Schema, SchemaFactory } from '@nestjs/mongoose';
import { Document, Types } from 'mongoose';
import { AuthorDocument } from 'src/authors/entities/author.entity';

export type PostDocument = Post & Document<Types.ObjectId>;

@Schema({ collection: 'posts' })
export class Post {
  @Prop({ required: true, type: String })
  title: string;

  @Prop({ required: true, type: String })
  body: string;

  @Prop({ required: true, type: String })
  creationDate: string;

  @Prop({ required: true, type: Types.ObjectId, ref: 'Author' })
  author: AuthorDocument;
}

export const PostSchema = SchemaFactory.createForClass(Post);
The ref: 'Author' will reference the author field in the Post schema and the Author model. It tells Mongoose that the values stored in the author field should correspond to documents in the authors collection (Author is the model’s name associated with the authors collection).
Adding Mongoose MongoDB Connection to Nest.js AuthorsModule
Like PostsModule, the AuthorsModule must be set up to work with Mongoose. This is where we use MongooseModule.forFeature to add entities and their schemas as they are registered with the current module’s Mongoose connection.
You will note that the Author and Post must be added.
- The
{ name: 'Author', schema: AuthorSchema }object to add the Mongoose modelAuthorand its schemaAuthorSchema. - The
{ name: 'Post', schema: PostSchema }object does the same for thePostentity.
Navigate to the src\authors\authors.module.ts file and add Mongoose models for the Author and Post entities along with their respective schemas as follows:
//src\authors\authors.module.ts
import { Module } from '@nestjs/common';
import { MongooseModule } from '@nestjs/mongoose';
import { AuthorsController } from './authors.controller';
import { AuthorsService } from './authors.service';
import { AuthorSchema } from './entities/author.entity';
import { PostSchema } from 'src/posts/entities/post.entity';

@Module({
  imports: [
    MongooseModule.forFeature([
      { name: 'Author', schema: AuthorSchema },
      { name: 'Post', schema: PostSchema },
    ]),
  ],
  providers: [AuthorsService],
  controllers: [AuthorsController],
  exports: [],
})
export class AuthorsModule {}
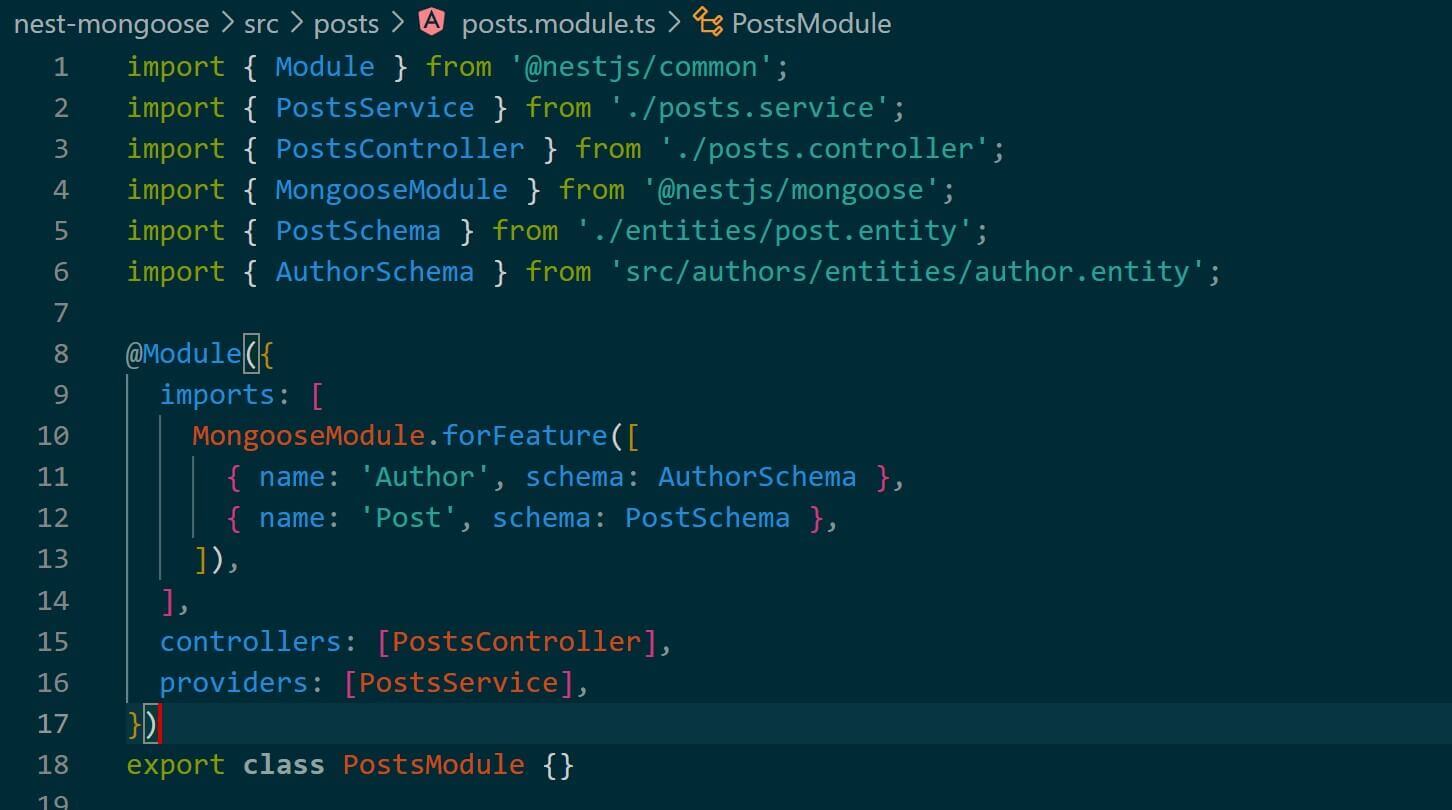
Because we have a Mongoose one to many relationships, PostsModule will need to have a reference to the Author. Therefore, update with:
//src\posts\posts.module.ts
import { AuthorSchema } from 'src/authors/entities/author.entity';

  imports: [
    MongooseModule.forFeature([
      { name: 'Author', schema: AuthorSchema },
      { name: 'Post', schema: PostSchema },
    ]),
  ],
Creating Author Mongoose Nest.js DTOs
When creating a new author or post, DTO (Data Transfer Object) validates incoming data. You use class-validator corresponding fields are not empty before Mongoose adds the new field to MongoDB.
For data validation, you will use IsNotEmpty and IsDateString from the class-validator and Validation decorators. This way, each Mongoose author property is decorated with validation decorators to add the correctness of the provided (data being added) data.
Go to the src\authors\dto\create-author.dto.ts file and create one as follows:
//src\authors\dto\create-author.dto.ts
import { IsNotEmpty, IsDateString } from 'class-validator';

export default class CreateAuthorDto {

    @IsNotEmpty({ message: 'Field $property is not a valid name.' })
    name: string;

    @IsNotEmpty({ message: 'Field $property is not a valid nickname.' })
    nickname: string;

    @IsNotEmpty({ message: 'Field $property is not a valid date.' })
    @IsDateString({}, { message: 'Field $property is not a valid date.' })
    birthDate: string;
}
At the same time, you need to shape the data sent as a response when getting authors or creating new authors. You create a DTO to control what data Mongoose and Nest.js will expose in the API response.
Go to \src\authors\dto\ and create a author-response.dto.ts file with response DTO as follows:
//src\authors\dto\author-response.dto.ts
import { AuthorDocument } from "../entities/author.entity";


export default class AuthorResponseDTO {
  constructor(
    public id: string,
    public name: string,
    public nickname: string,
    public birthDate: string,
    public posts?: Array<any>,
  ) { }

  static from = ({
    _id,
    realname,
    nickname,
    birthDate,
    posts,
  }: AuthorDocument): AuthorResponseDTO =>
    new AuthorResponseDTO(_id.toHexString(), realname, nickname, birthDate, posts);
}
The AuthorResponseDTO will:
- represent the structure of the author’s response.
- Ensure to include properties (id, name, nickname, birthDate,). Note that
?tests Nest.js; you have an optional posts array. - Nest.js will add a constructor that initializes these properties.
- The
toHexStringmethod is MongoDB ObjectId instances to convert theObjectIdto its hexadecimal MongoDB representation.
How to Add an Author with Mongoose and NestJS with Related Posts
Now, let’s add some POST methods to this API. We will have a few changes here. To post an author, you must create a post. This post will then get associated with the Author to cement the ONE-TO-MANY relation.
This means you will have:
addPostmethod to add a new post to a specified authoraddAuthoras a method to create a new author.
Navigate to the src\authors\authors.service.ts file and add these two as follows:
- Import any utilities that will be used to craft the Author service:
// src\authors\authors.service.ts
import { HttpException, HttpStatus, Injectable, Logger } from '@nestjs/common';
import { InjectModel } from '@nestjs/mongoose';
import { validateOrReject } from 'class-validator';
import { Model, Types } from 'mongoose';

import AuthorResponseDTO from './dto/author-response.dto';
import PostResponseDTO from 'src/posts/dto/post.response.dto';
import { PostDocument, Post } from 'src/posts/entities/post.entity';
import { AuthorDocument } from './entities/author.entity';
import CreatePostDto from 'src/posts/dto/create-post.dto';
import CreateAuthorDto from './dto/create-author.dto';
- Add AuthorsService class marked with the
@Injectabledecorator. Here you will inject Mongoose models for authors (AuthorDocument) and posts (PostDocument).
// src\authors\authors.service.ts
@Injectable()
export class AuthorsService {
  private readonly logger = new Logger(AuthorsService.name);

  constructor(
    @InjectModel('Author') private authorModel: Model<AuthorDocument>,
    @InjectModel('Post') private postModel: Model<PostDocument>,
  ) {}
Inside this AuthorsService class, add your methods for a new Author and author associated with the post as follows:
// src\authors\authors.service.ts
  async addAuthor(requestDto: CreateAuthorDto): Promise<AuthorResponseDTO> {
    await validateOrReject(requestDto);
    try {
      const newAuthor = new this.authorModel();
      newAuthor.realname = requestDto.name;
      newAuthor.nickname = requestDto.nickname;
      newAuthor.birthDate = requestDto.birthDate;
      const author = await newAuthor.save();
      return AuthorResponseDTO.from(author);
    } catch (error) {
      throw new HttpException(
        'Error saving the author',
        HttpStatus.BAD_REQUEST,
      );
    }
  }

  async addPost(
    id: string,
    requestDto: CreatePostDto,
  ): Promise<PostResponseDTO> {
    await validateOrReject(requestDto);
    try {
      const newPost = new this.postModel(requestDto as Post);
      const _id = new Types.ObjectId(id);
      const author = await this.authorModel.findById(_id).exec();
      newPost.author = author;
      newPost.creationDate = new Date().toISOString().slice(0, 10);
      const post = await newPost.save();
      return PostResponseDTO.from(post);
    } catch (error) {
      throw new HttpException('Error saving the post', HttpStatus.BAD_REQUEST);
    }
  }
At the same time, let’s add a count Method that retrieves the count of authors added:
// src\authors\authors.service.ts
  async count(): Promise<number> {
    try {
      return await this.authorModel.countDocuments().exec();
    } catch (error) {
      throw new HttpException('Error counting authors', HttpStatus.BAD_REQUEST);
    }
  }
How to Fetch Authors and Related Posts with Mongoose and Nest.js
This step will not along fetch author but the author with the related posts. You will set up a method using GET to display authors available on your MongoDB. Mongoose will use find() and findById() as follows:
// src\authors\authors.service.ts
  async findAll(): Promise<Array<AuthorResponseDTO>> {
    try {
      const authors = await this.authorModel.find().exec();
      return authors.map(AuthorResponseDTO.from);
    } catch (error) {
      throw new HttpException('Error fetching authors', HttpStatus.BAD_REQUEST);
    }
  }

  async findOne(id: string): Promise<AuthorResponseDTO> {
    const _id = new Types.ObjectId(id);
    const author = await this.authorModel.findById(_id).exec();
    return AuthorResponseDTO.from(author);
  }
If interested in deleting an author, use findByIdAndDelete() from Mongoose and add a Nest.js method as follows:
// src\authors\authors.service.ts
async delete(id: string) {
  try {
    const _id = new Types.ObjectId(id);
    return await this.authorModel.findByIdAndDelete(_id).exec();
  } catch (error) {
    throw new HttpException(
      'Error deleting the author',
      HttpStatus.BAD_REQUEST,
    );
  }
}
You now have Mongoose models to interact with the MongoDB database. Let’s add Controllers.
Adding Author Controller with NestJS to Mongoose
To have access to the above method, we will use routes. These routes go into src\authors\authors.controller.ts file as follows:
//src\authors\authors.controller.ts
import { Body, Controller, Delete, Get, Param, Post } from '@nestjs/common';
import AuthorResponseDTO from './dto/author-response.dto';
import PostResponseDTO from 'src/posts/dto/post.response.dto';
import { AuthorsService } from './authors.service';
import CreateAuthorDto from './dto/create-author.dto';
import CreatePostDto from 'src/posts/dto/create-post.dto';

@Controller('authors')
export class AuthorsController {
  constructor(private authorsService: AuthorsService) {}

  // Endpoint to get the count of authors
  @Get('count')
  count(): Promise<number> {
    return this.authorsService.count();
  }

  // Endpoint to get all authors
  @Get()
  findAll(): Promise<Array<AuthorResponseDTO>> {
    return this.authorsService.findAll();
  }

  // Endpoint to add a new author
  @Post()
  add(@Body() requestDto: CreateAuthorDto): Promise<AuthorResponseDTO> {
    return this.authorsService.addAuthor(requestDto);
  }

  // Endpoint to add a new post to a specific author
  @Post(':id/posts')
  addPost(
    @Param('id') id: string,
    @Body() requestDto: CreatePostDto,
  ): Promise<PostResponseDTO> {
    return this.authorsService.addPost(id, requestDto);
  }

  // Endpoint to delete an author by ID
  @Delete(':id')
  delete(@Param('id') id: string) {
    return this.authorsService.delete(id);
  }
}
Modifying Post service and Controller
You now have a relationship with the Author. Therefore, Mongoose needs to use Nest.js and allows you to fetch posts based on the author. You will get a response to all posts (or a single post) and be able to display the associated Author.
In your src\posts\posts.service.ts file, update the PostsService constructor with the author Model as follows:
// src\posts\posts.service.ts
  constructor(
    @InjectModel('Author') private authorModel: Model<AuthorDocument>,
    @InjectModel('Post') private postModel: Model<PostDocument>,
  ) {}
Now, create findPostsAndAuthor to allow Mongoose to fetch Posts and the related Author:
// src\posts\posts.service.ts
  async findPostsAndAuthor(authorName: string): Promise<Array<PostResponseDTO>> {
    try {
      let query = this.postModel.find();
      if (authorName) {
        const authors = await this.authorModel
          .find()
          .where('realname')
          .regex(new RegExp(authorName, 'i'))
          .select('id')
          .exec();
        query = query.where('author').in(authors.map((author) => author._id));
      }
      const posts = await query.populate('author').sort('-creationDate').exec();
      return posts.map(PostResponseDTO.from);
    } catch (error) {
      throw new HttpException(
        'Error fetching posts and author',
        HttpStatus.BAD_REQUEST,
      );
    }
  }
Go to src\posts\posts.controller.ts and create a controller to run the findPostsAndAuthor method:
//src\posts\posts.controller.ts
  @Get()
  findAll(
    @Query('authorName') authorName: string,
  ): Promise<Array<PostResponseDTO>> {
    return this.postsService.findPostsAndAuthor(authorName);
  }
Testing Mongoose One to Many with Nest.js and Postman
The API is now completed. The Mongoose one to many relationships should be ready. To test it, use the following command:
npm run start:dev
You will Note that Nest.js will have added Endpoints:
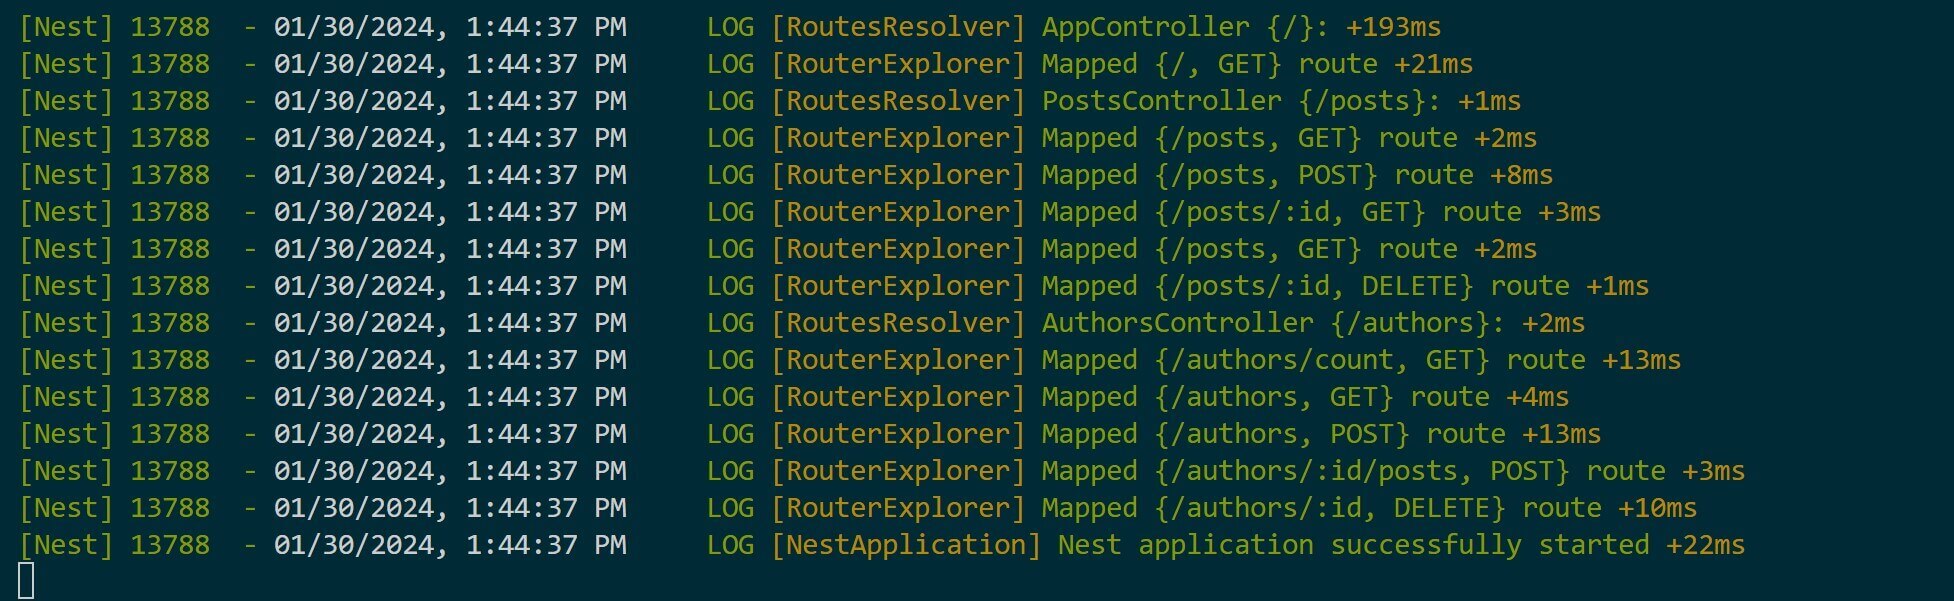
At the same time, check your database. Now you have the posts and author collections as follows:
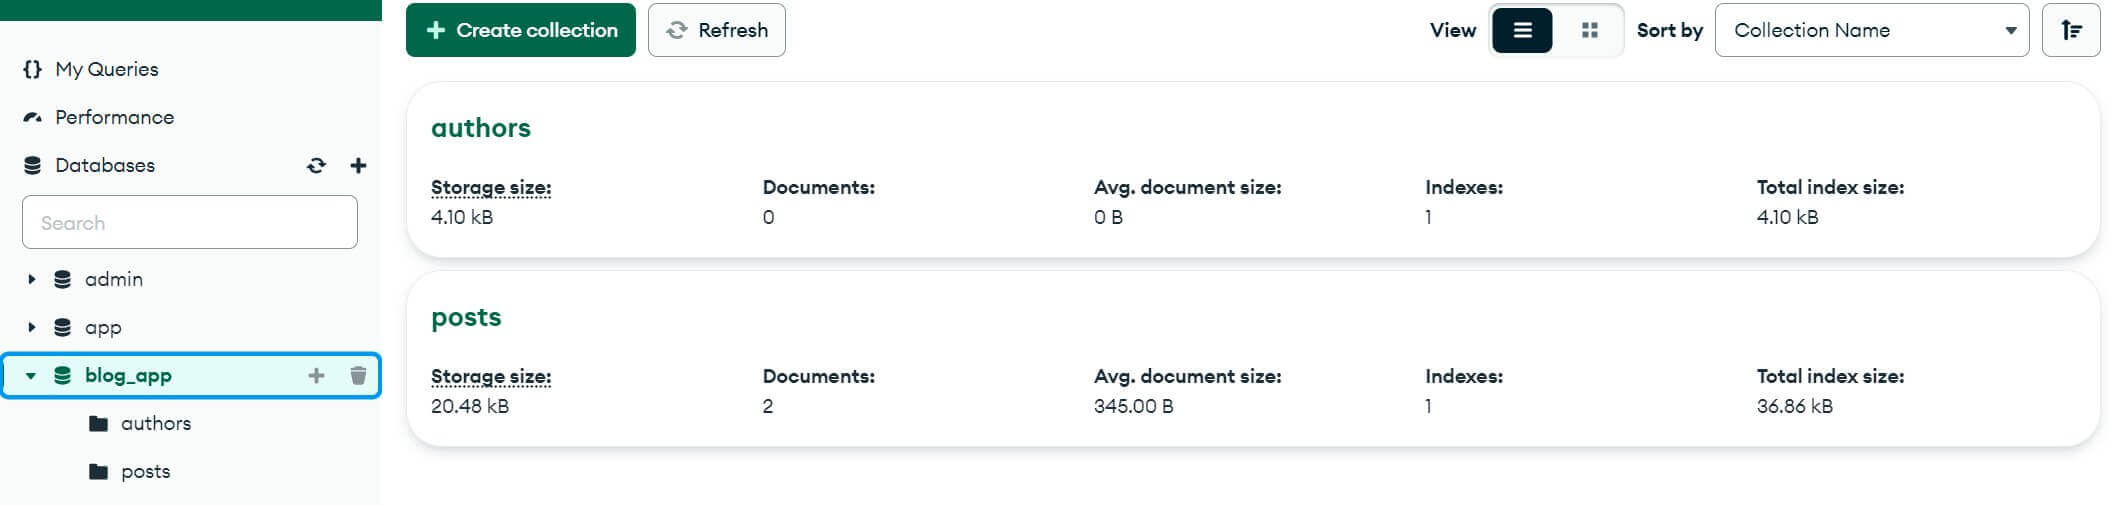
We have one to many relations between the author and the post, which means you must have an existing author before creating a post and assigning it to the author. Use the http://localhost:3000/authors endpoint and send a POST request to add a new author as follows:
{
  "name": "Emily Johnson",
  "nickname": "emilyj",
  "birthDate": "1995-02-15"
}
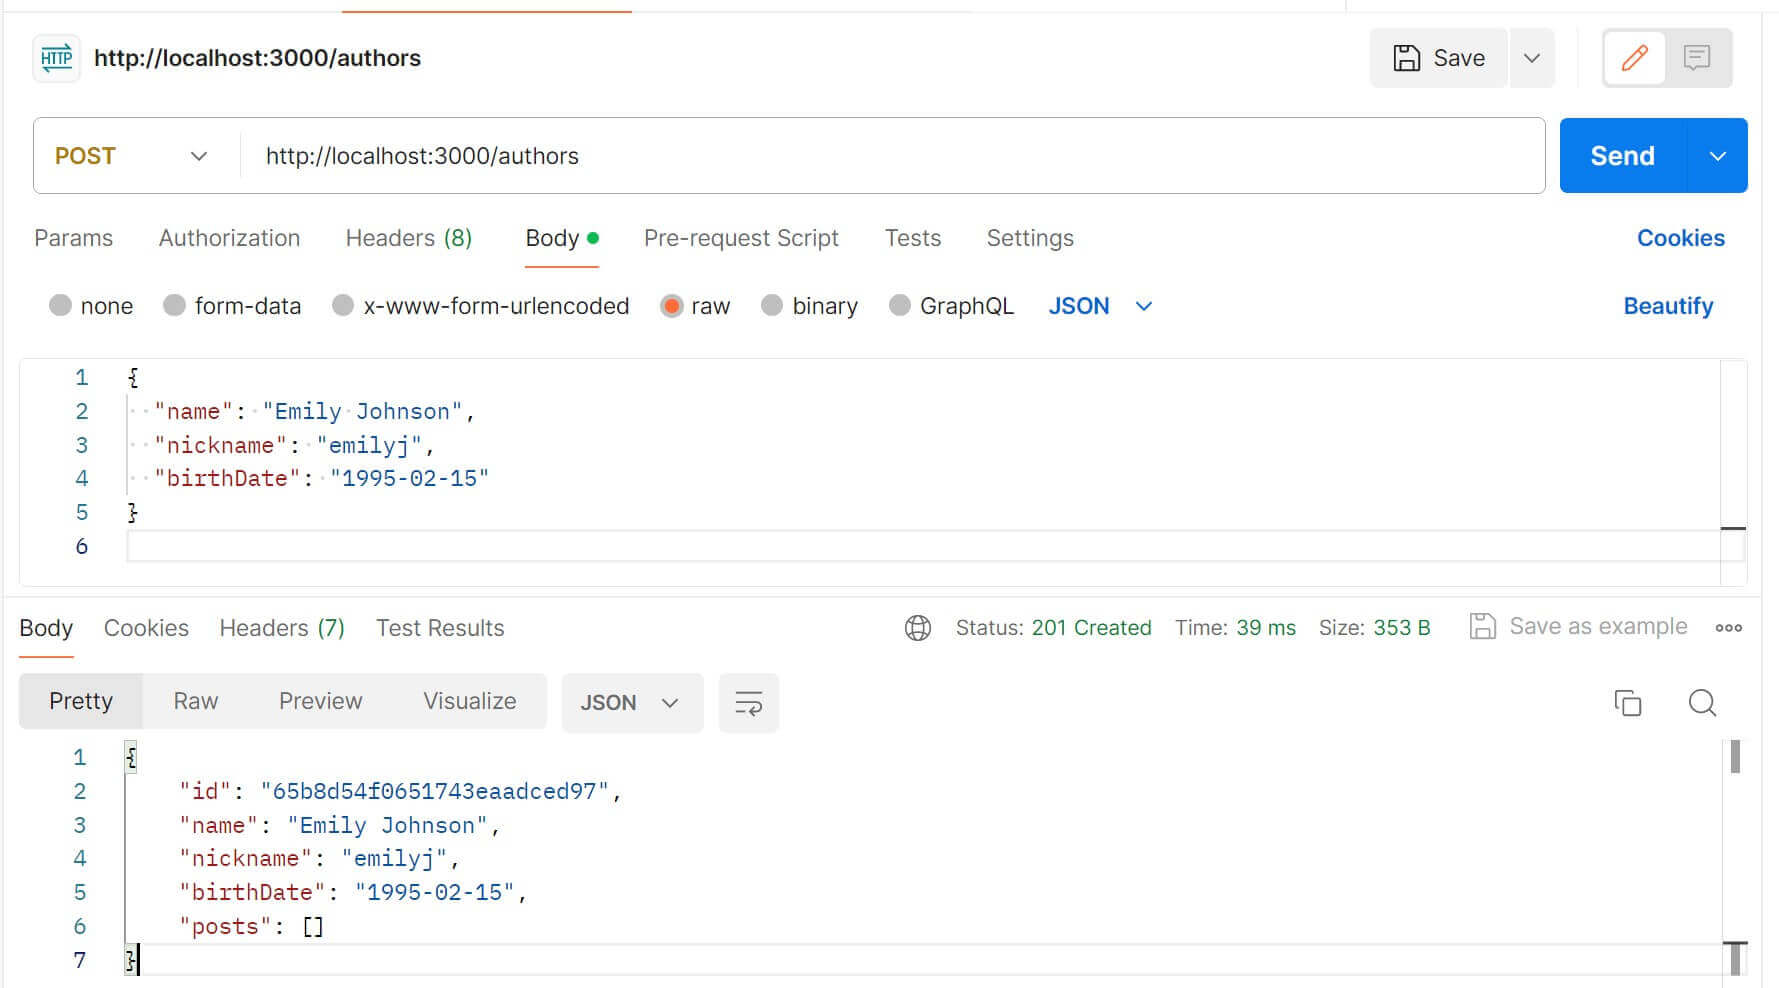
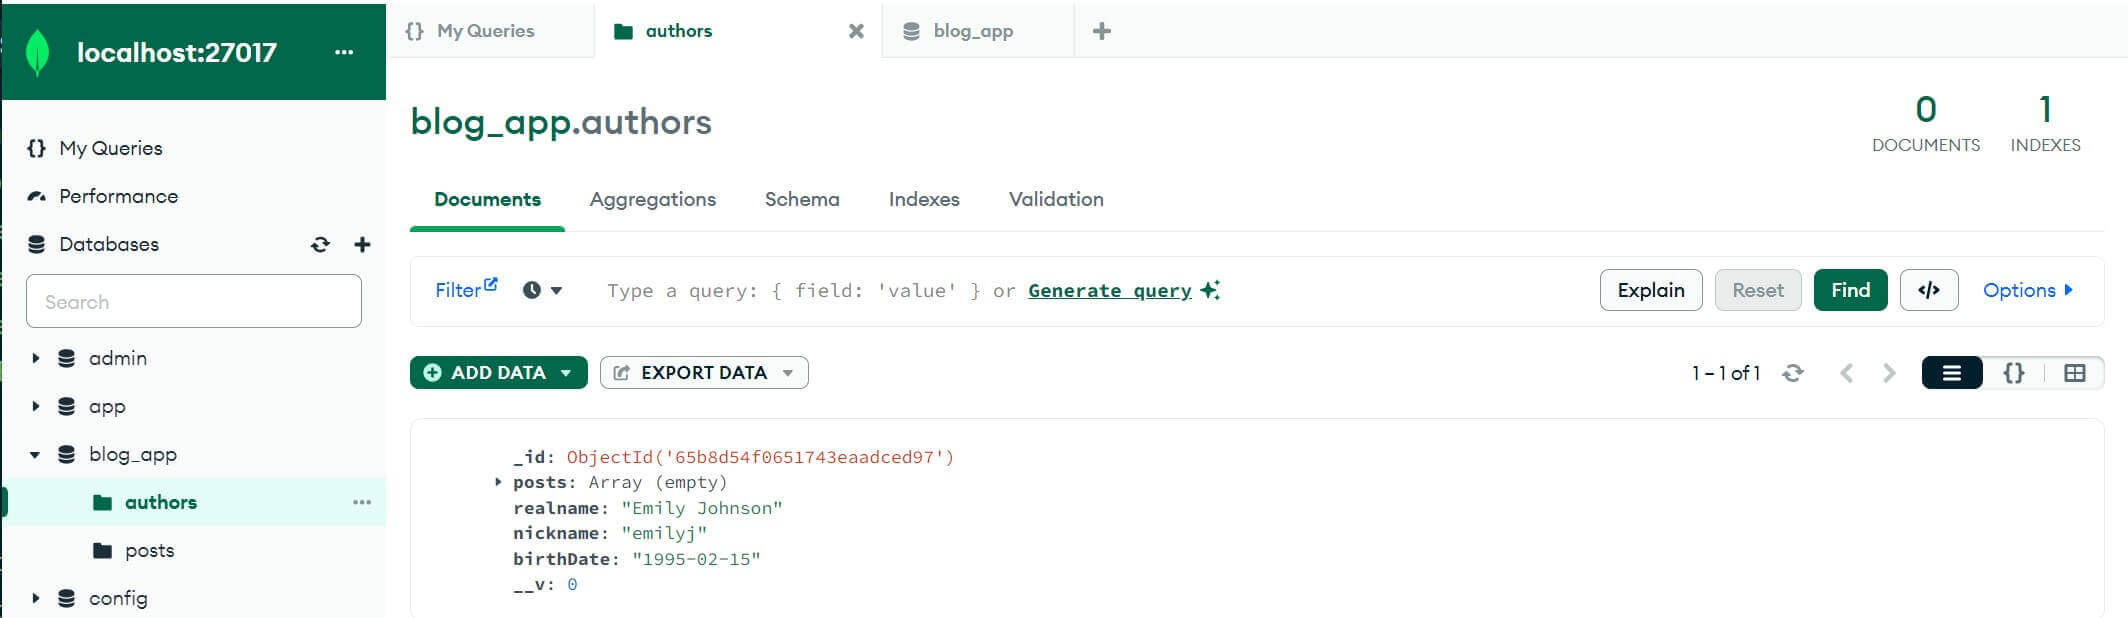
You have created the author. Check the database if the author was added.
Now, this author will be assigned posts post to complete the one to may relation. Here, you will get the author id and use the endpoint http://localhost:3000/authors/{authorId}/posts. {authorId} will be substituted with the author id, for example http://localhost:3000/authors/65b8d54f0651743eaadced97/posts. To do so based on your specific Author id.
Grab the endpoint and head over to Postman. Send a POST request with a new post item as follows:
{
  "title": "Discovering Hidden Gems in the City",
  "body": "Exploring the vibrant streets and hidden corners of the city. From quaint coffee shops to colorful street art, every turn brought a discovery. Can't wait to share more snapshots and stories from this urban adventure!"
}
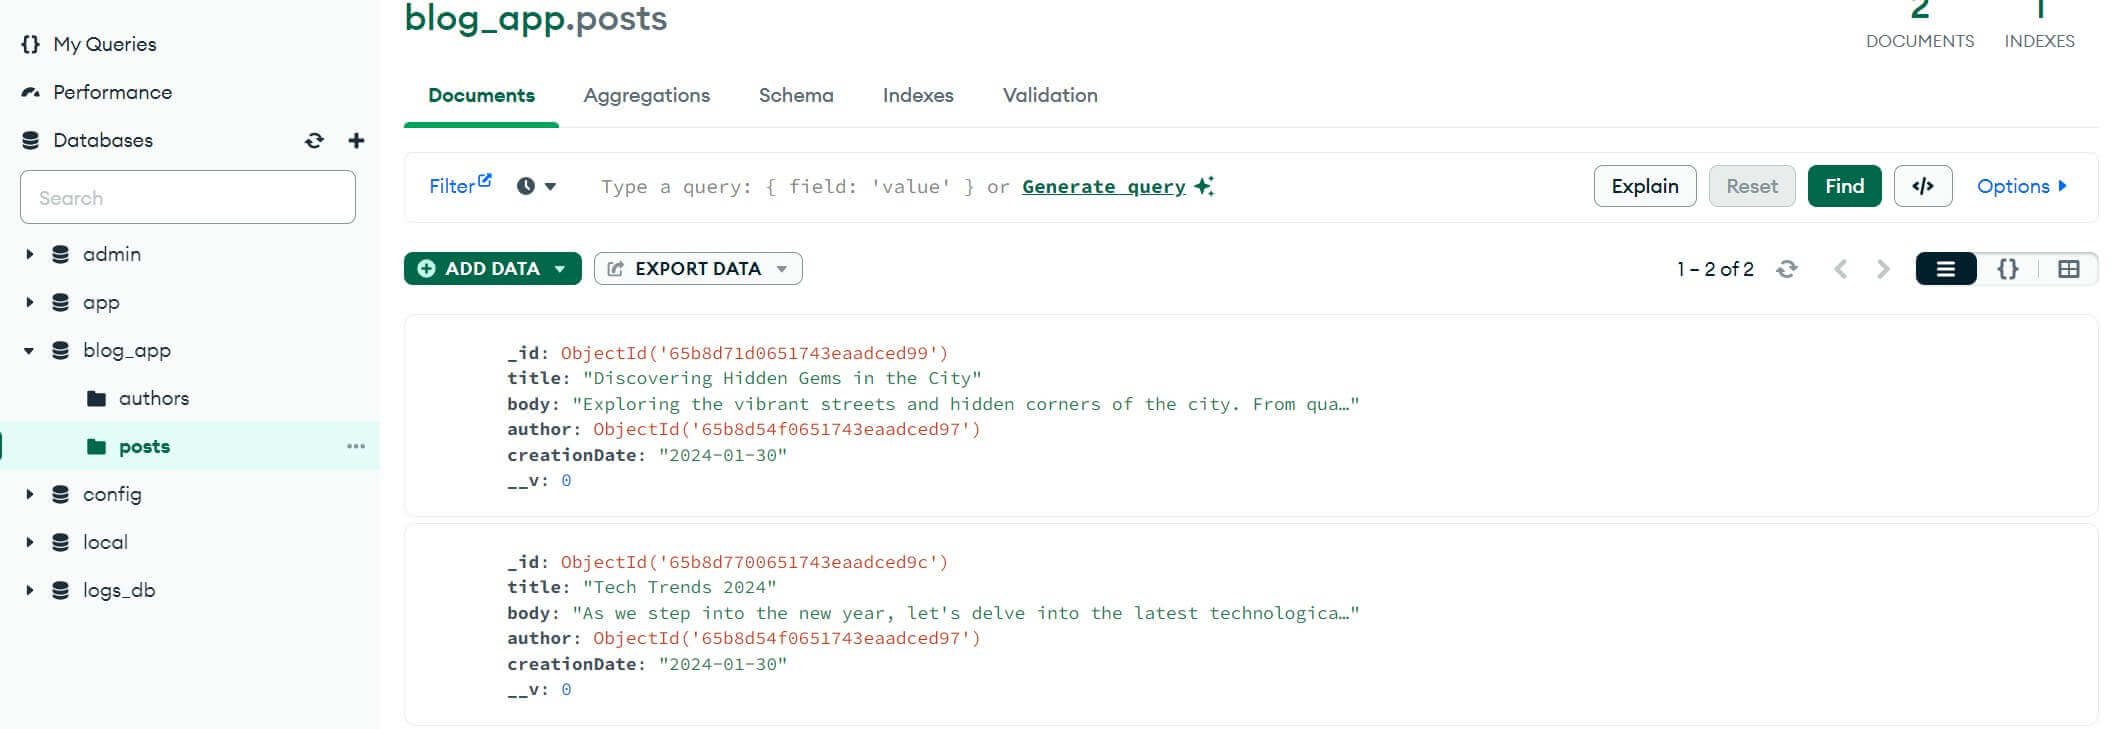
Check the posts document. You will have the posts and authorID as follows:
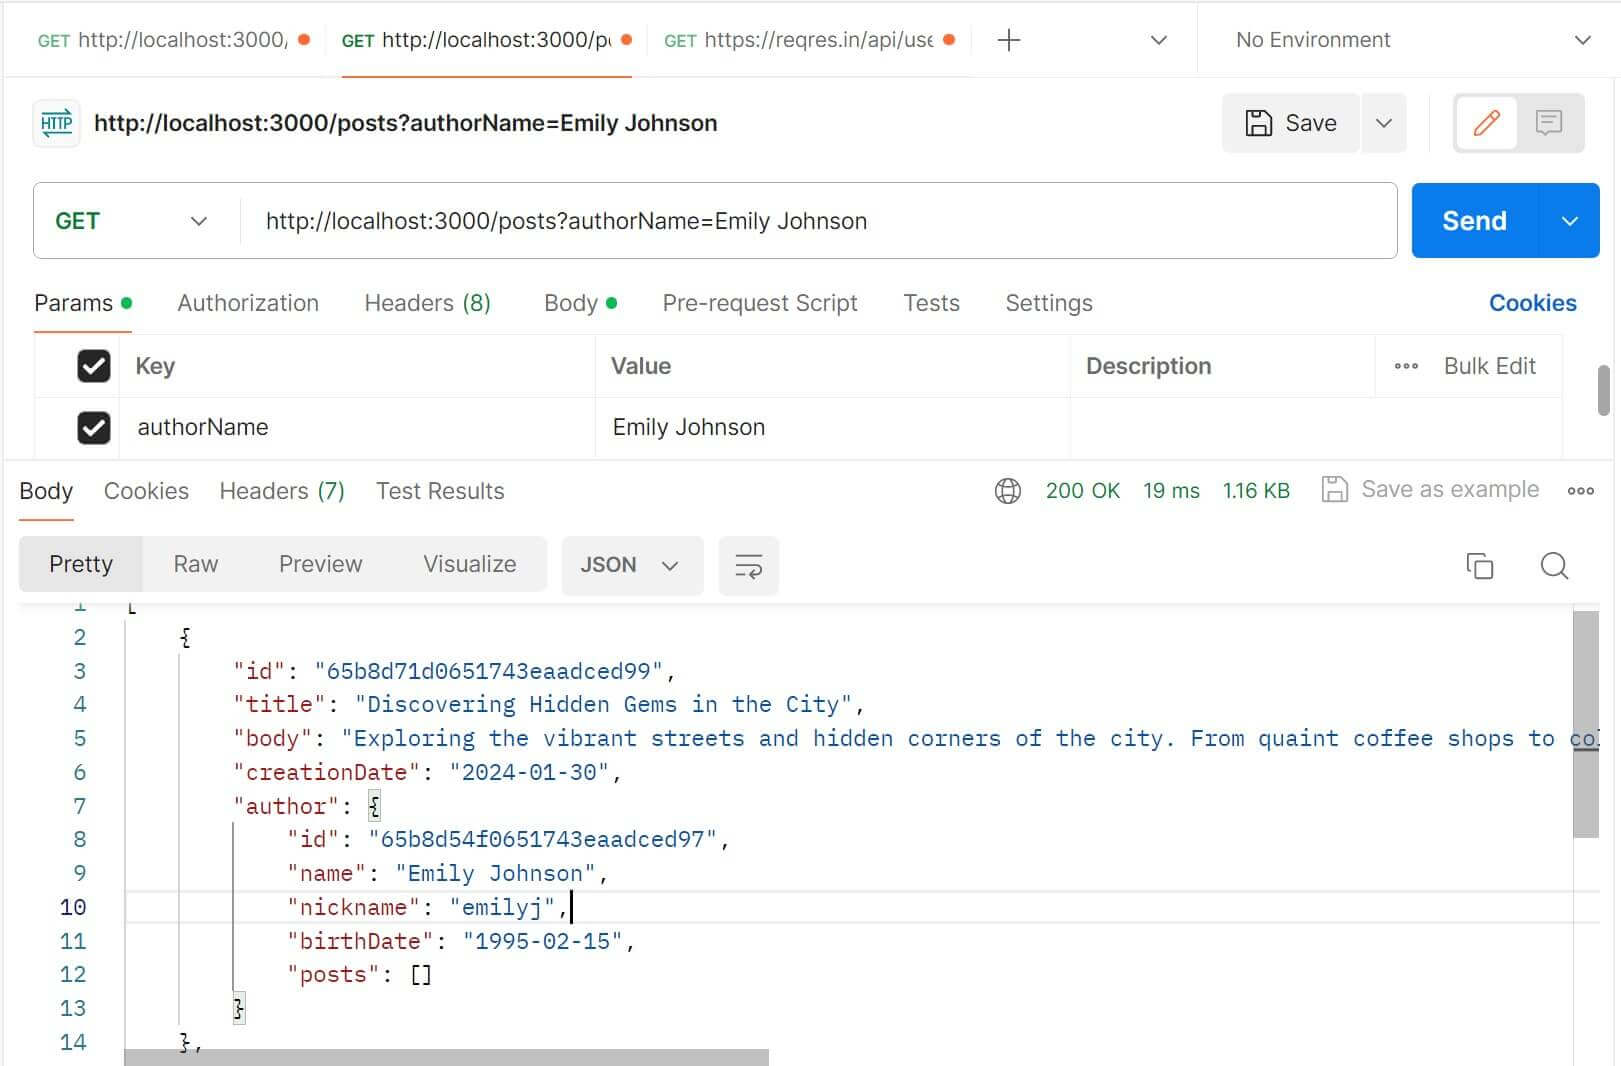
Now, to get a response to the post and author:
- Add GET request to
http://localhost:3000/posts - Use Postman to add Query Parameters: Add a parameter with key authorName and a value (e.g., “Emily Johnson”).
You should get a response to posts and the associated author as follows:
Conclusion
This application code is available on GitHub. If interested, go further and check the whole API and its client (frontend) on this GitHub repo. I hope you have learned:
- How to create Nest.js API and set up Mongoose to access MongoDB.
- The right way to create a Mongoose schema/model.
- How to use Nest.js and Mongoose to create a MongoDB connection Example.
- Using MongoDB, Nest.js, and Mongoose to create a CRUD.
- How to create MongoDB database relations with Nest.js and Mongoose.
- Creating a Posts and Authors Nest.js API while demonstrating how to implement Mongoose One to Many relations.
Written By: