Guide to TypeORM with NestJS, Postgres, MySQL, Multer, Docker and Docker Compose
Posted September 28, 2023

Use TypeScript TypeORM with Nest.js, MySQL, PostgreSQL, and Docker Compose in this exmaple tutorial. You’ll create an API using TypeORM with Nest.js and Multer to upload images.
In summary, you will learn to:
- Create a handy Nest.js Tapeworm MySQL tutorial.
- Craft a Nest.js TypeORM PostgreSQL example db connection.
- Use Multer to Upload Images with Express FileInterceptor.
- Create a TypeScript Nest.js CRUD API.
- How to get started using TypeORM with NestJS.
- Use Docker Compose to run CRUD TypeORM and NestJS API with Docker.
What is TypeORM and Why a Nest.js TypeORM MySQL/PostgreSQL Tutorial
TypeORM acts as a special notebook to manage your databases. You only write a few lines of code, and TypeORM takes care of all your databases and tables. This means you only work with object-oriented programming techniques to create entities that represent database operations.
When creating Nest.js APIs with Postgres and TypeORM, you can use the same connection and extend to other databases. TypeORM uses a type value that specifies which database modeling you want to use. Therefore, you only need to change the database connection and reuse the same API code base.
How TypeORM Works with Nestjs and TypeScript
TypeORM is excellent when combined with a scalable TypeScript Nest.js backend and robust databases such as MySQL and PostgreSQL:
- You write the Nest.js entity as a blueprint telling TypeORM what info to store in your DB.
- TypeScript gives you types to write strongly typed TypeORM entities.
- Saving Data to your database is out of the box. Not even a single data process is done manually. You only tell TypeORM, “Hey, TypeORM, save this for me!”. TypeORM through Nest.js will write it in the right place in your db. The same applies to getting, updating, or deleting data, a perfect CRUD combo.
- TypeORM uses magic mapping to handle all the tricky database stuff behind the scenes.
Let’s dive in and get your TypeORM with Nest.js API up and running.
Prerequisites
Before diving into this step-by-step guide with TypeScript, Nest.js, TypeORM, Multer, MySQL/PostgreSQL example, ensure you have the following handy tools:
- Node.js (version >= 16) installed on your computer.
- A MySQL or PostgreSQL database installed and running.
- Basic knowledge working with Nest.js and SQL is an additional tip.
Related: Nest.js Logging with Winston, LoggerService, and Best Practices
- Docker Desktop installed and running on your computer.
Setting up a TypeORM with TypeScript and Nest.js
To Create a Nest.js API, you need CLI to scaffold a default application. Install the CLI using the following command:
npm i -g @nestjs/cli
Now, create your Nest.js project with default options using the following command:
nest new typeorm-with-nestjs
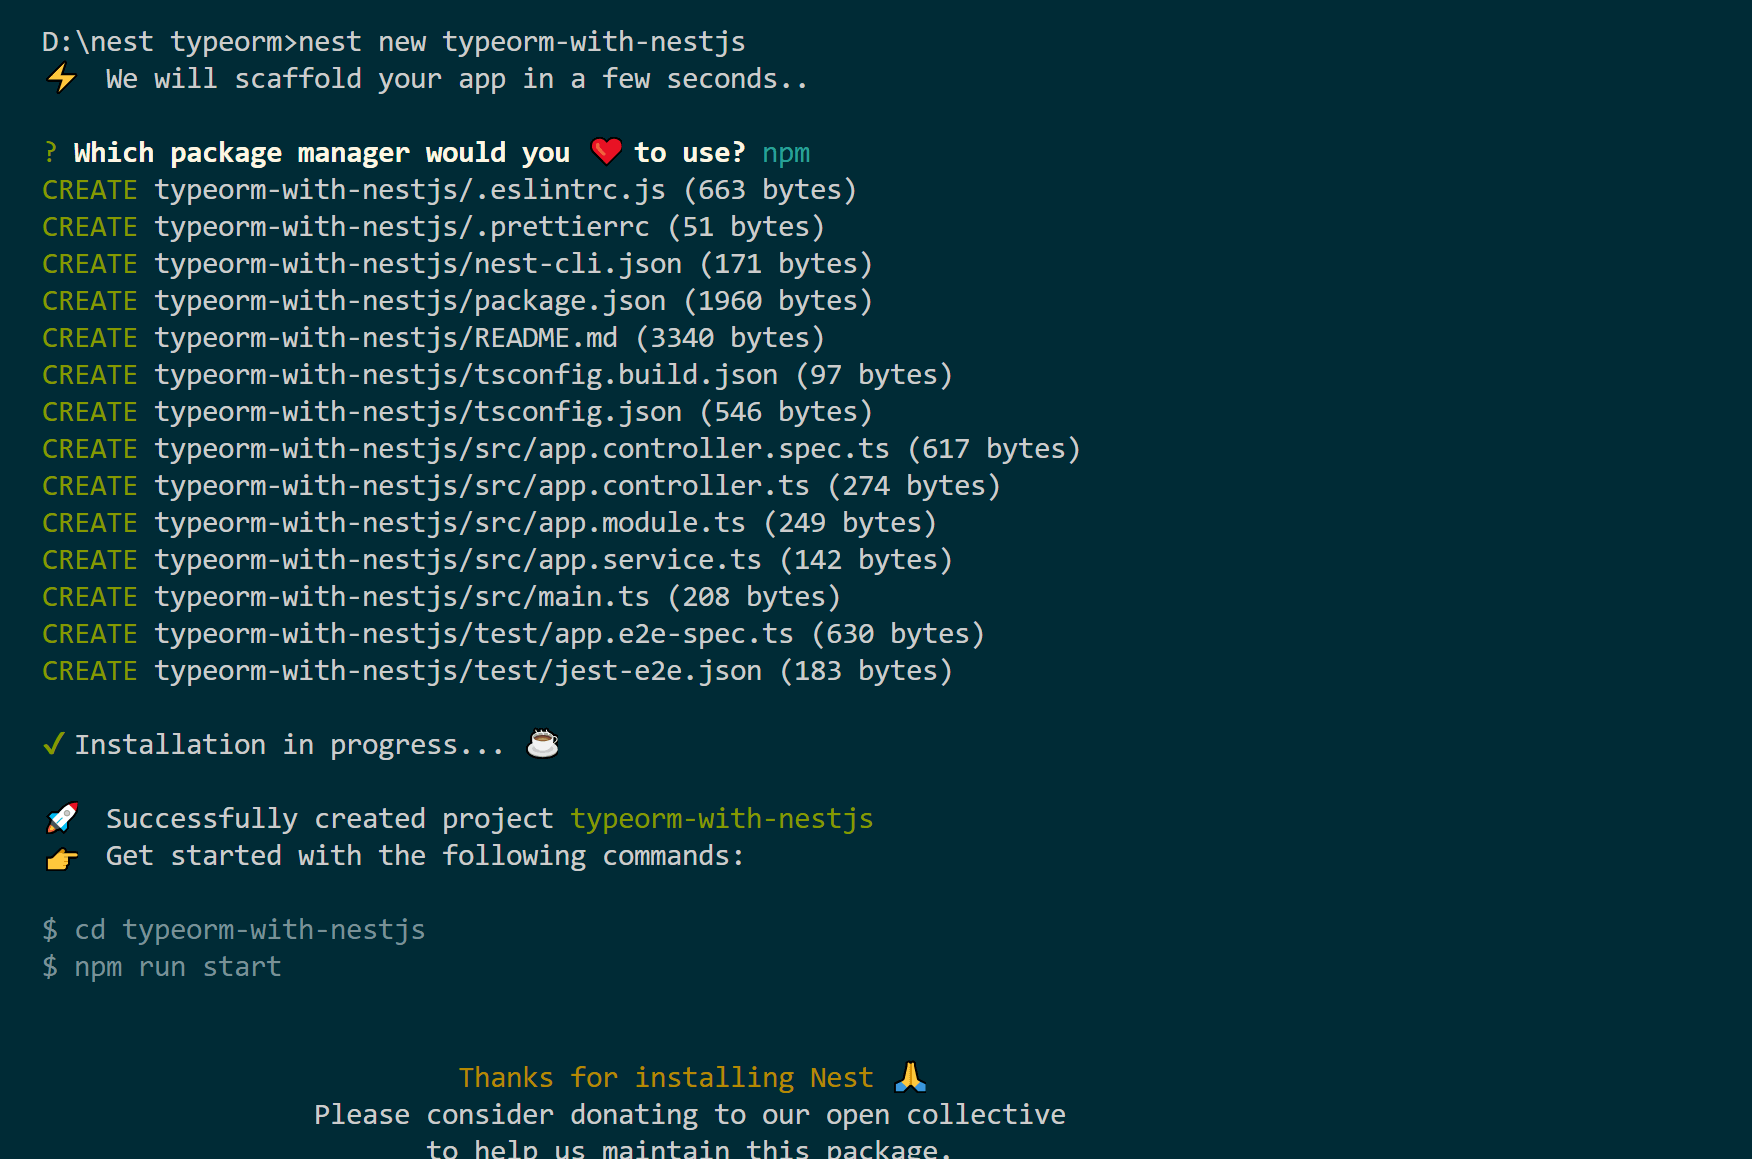
Change the directory and point to the newly created typeorm-with-nestjs:
cd typeorm-with-nestjs
The available application should serve you with the Hello World Version of Nest.js, so run the following command to check that:
npm run start
We need some NPM packages to make this project a success. They include:
- typeorm: Your ORM for Nest.js TypeScript App
- pg: Drivers for connection to a PostgreSQL
- multer: A middleware for adding file objects to API requests
- mysql2: Drivers for connection to a MySQL
- @nestjs/mapped-types: For creating DTO variants to define input and output interfaces.
- @nestjs/typeorm: TypeORM Module for Nest.js
- @types/multer: TypeScript checks for Multer
To Install them all, run the following single command:
npm i typeorm pg multer mysql2 @nestjs/mapped-types @nestjs/typeorm @nestjs/typeorm @types/multer
Adding TypeORM Entities to Nest.js
Entities are the blueprint of your database. They define how TypeORM will interact with the database to create tables and the different entities..
To create your Entities, first generate a new module, a controller, or a service for your API. In this case, I will create a profile entity. Therefore, you need the module, controller, and service for profile. To generate them, run the following commands one at a time:
# For creating the module
nest g module profile
# Generate its service
nest g service profile --no-spec
# Generate its controller
nest g controller profile --no-spec
This will create an src/profile folder with profile.module.ts, profile.service.ts, and profile.controller.ts.
Create an entities folder inside the src/profile folder and add a profile.entity.ts file. You will import TypeORM and create the following database schema representation:
import {
  Column,
  CreateDateColumn,
  Entity,
  PrimaryGeneratedColumn,
  UpdateDateColumn,
} from "typeorm";

@Entity()
export class Profile {
  @PrimaryGeneratedColumn()
  id: number;

  @Column()
  userName: string;

  @Column("int")
  userAge: number;

  @Column()
  profileImage: string;

  @CreateDateColumn()
  createdAt: Date;

  @UpdateDateColumn()
  updatedAt: Date;
}
Note that we are using @Entity() to instruct TypeORM. This will be a database table blueprint, and its @Column with:
- id as primary key as decorator
PrimaryGeneratedColumnsays - A string userName Column
- A string for recoding the
profileImage, which will represent the image URL/path - A number representing a userAge Column
- To track when a record was created, the
@CreateDateColumn()decorator gets dates to represent thecreatedAtandupdatedAtas such.
Crafting the Nest.js Service with TypeScript and Multer
It’s time to dive into the logic of the application API. You will need the Data Transfer Object (DTO) in that case. This will help you build the entity types for creating and updating variations.
DTO creates the field/entity you want your GET and POST requests to use. Head over to the src/profile directory and create a dto folder. Here, you will add two files:
create-profile.dto.tsfor creating/POST fields:
export class CreateProfileDto {
  userName: string;
  userAge: number;
  profileImage: string;
}
update-profile.dto.tsfor PUT request fields:
import { PartialType } from "@nestjs/mapped-types";
import { CreateProfileDto } from "./create-profile.dto";

export class UpdateProfileDto extends PartialType(CreateProfileDto) {
  userName: string;
  userAge: number;
  profileImage: string;
}
Good progress. You should note that, up to this point, you have the following folder structure for your application:
typeorm-with-nestjs/
├── src/
│ ├── app.controller.ts
│ ├── app.module.ts
│ ├── app.service.ts
│ ├── profile/
│ │ ├── dto/
│ │ │ ├── create-profile.dto.ts
│ │ │ ├── update-profile.dto.ts
│ │ ├── entities/
│ │ │ ├── profile.entities.ts
│ │ ├── profile.controller.ts
│ │ ├── profile.module.ts
│ │ ├── profile.service.ts
│ ├── main.ts
├── node_modules/
├── package.json
├── tsconfig.json
├── nest-cli.json
├── ...
Adding Multer to Nest.js using Express
For Multer to work and update images, here is how you will craft your profile service. Navigate to the src/profile/profile.service.ts file and add the following imports:
import { Injectable } from '@nestjs/common';
import { CreateProfileDto } from './dto/create-profile.dto';
import { UpdateProfileDto } from './dto/update-profile.dto';
import { InjectRepository } from '@nestjs/typeorm';
import { Profile } from './entities/profile.entity';
import { Repository } from 'typeorm';
import { Response } from 'express';
import * as fs from "fs/promises";
import * as path from 'path';
Note that you have path and fs modules for instructing TypeORM and Nest.js where and how to save images.
Now update the service Repository as follows:
@Injectable()
export class ProfileService {
  constructor(
   @InjectRepository(Profile)
   private profileRepository: Repository<Profile>
  ) {}

  // all methods related to profile will be added here
}
You can dive in and add Multer as follows:
Note that all the coming methods go inside
ProfileService, see comment// all related to profile will be added here:
// Create a new user profile with uploaded image and user data
create(file: Express.Multer.File, createProfileDto: CreateProfileDto) {
  // Extract userName and userAge from the DTO
  const { userName, userAge } = createProfileDto;

  // Create a new profile object with user data and, if provided, the uploaded file's filename
  const profile = this.profileRepository.create({
   userName: userName,
   userAge: userAge,
   // Assign the uploaded file's filename or undefined if not provided
   profileImage: file?.filename,
  });

  // Save the newly created profile to the database and return the saved profile
  return this.profileRepository.save(profile);
}
The main parameters you need to understand here are:
file: representing a file uploaded through an API request using Multer.createProfileDto: containing your database propertiesuserNameanduserAge, passed as input data from the API request.- The
this.profileRepository.save(profile)object that returns the saved profile
With the Multer ready, let’s add the method for handling all the CRUD operations that we need Nest.js and TypeORM to execute to either MySQL or PostgreSQL:
- Creating a new Profile
  create(file: Express.Multer.File, createProfileDto: CreateProfileDto) {
   const { userName, userAge } = createProfileDto;
   const profile = this.profileRepository.create({
     userName: userName,
     userAge: userAge,
    profileImage: file?.filename,
   });
   return this.profileRepository.save(profile);
  }
- Getting all records
  async findAll(res: Response) {
   const profile = await this.profileRepository.find();
   if (profile.length !== 0) {
    return res.status(200).json(profile);
   }
   return res.status(404).json({ msg: "profile not found." });
  }
- Getting a based on the field id (PrimaryKey)
  async findOne(id: number, res: Response) {
   const profile = await this.profileRepository.findOneBy({ id });
   if (profile) {
    return res.status(200).json(profile);
   }
   return res.status(404).json({ msg: "profile not found." });
  }
- Updating and existing profile
  async update(file: Express.Multer.File, id: number, updateProfileDto: UpdateProfileDto, res: Response) {
   const { userName, userAge } = updateProfileDto;
   const profile = await this.profileRepository.findOneBy({ id });
   if (profile) {
    if (file) {
     await fs.unlink(path.join(process.cwd(), `./images/${profile.profileImage}`));
     await this.profileRepository.update(
      {
       id: id
      },
      {
       userName: userName,
       userAge: userAge,
       profileImage: file?.filename,
      }
     );
     return res.status(200).json({ msg: "profile updated successfully." });
    }

    await this.profileRepository.update(
     {
      id: id
     },
     {
      userName: userName,
      userAge: userAge,
     }
    );
    return res.status(200).json({ msg: "profile updated successfully." });
   }
   return res.status(404).json({ msg: "profile not found." });
  }
- Deleting and existing profile
  async delete(id: number, res: Response) {
   const profile = await this.profileRepository.findOneBy({ id });
   if (profile) {
    await fs.unlink(path.join(process.cwd(), `./images/${profile.profileImage}`));
    await this.profileRepository.delete(id);
    return res.status(200).json({ msg: "profile deleted successfully." });
   }
   return res.status(404).json({ msg: "profile not found." });
  }
Getting Multer, Nest.js, and TypeORM to the Application Controller
Good job, mate. So, let’s get this method to execute the actual HTTP methods (GET, POST, PUT, DELETE)
I will bundle this as one code block that goes inside src/profile/profile.controller.ts as follows:
import {
  Controller,
  Get,
  Post,
  Body,
  Patch,
  Param,
  Delete,
  UseInterceptors,
  UploadedFile,
  Res,
} from "@nestjs/common";
import { ProfileService } from "./profile.service";
import { CreateProfileDto } from "./dto/create-profile.dto";
import { UpdateProfileDto } from "./dto/update-profile.dto";
import { FileInterceptor } from "@nestjs/platform-express";
import { diskStorage } from "multer";
import { Response } from "express";

const storage = diskStorage({
  destination: (req, file, cb) => {
   cb(null, "./images");
  },
  filename: (req, file, cb) => {
   const fileExt = file?.mimetype?.split("/")[1];
   const fileGen = `${Date.now()}.${fileExt}`;
   cb(null, fileGen);
  },
});

@Controller("profile")
export class ProfileController {
  constructor(private readonly profileService: ProfileService) {}

  @Post()
  @UseInterceptors(
   FileInterceptor("Image", {
    storage: storage,
   })
  )
  create(
   @UploadedFile() file: Express.Multer.File,
   @Body() createProfileDto: CreateProfileDto
  ) {
   return this.profileService.create(file, createProfileDto);
  }

  @Get()
  findAll(@Res() res: Response) {
   return this.profileService.findAll(res);
  }

  @Get(":id")
  findOne(@Param("id") id: string, @Res() res: Response) {
   return this.profileService.findOne(+id, res);
  }

  @Patch(":id")
  @UseInterceptors(
   FileInterceptor("image", {
    storage: storage,
   })
  )
  update(
   @UploadedFile() file: Express.Multer.File,
   @Param("id") id: string,
   @Body() updateProfileDto: UpdateProfileDto,
   @Res() res: Response
  ) {
   return this.profileService.update(file, +id, updateProfileDto, res);
  }

  @Delete(":id")
  remove(@Param("id") id: string, @Res() res: Response) {
   return this.profileService.delete(+id, res);
  }
}
Populating Profile Service, Entities, and Controller to the Profile module
For the Service, Entities, and Controller, we have created. The src/profile/profile.module.ts Module must be able to access them as follows:
import { Module } from "@nestjs/common";
import { ProfileService } from "./profile.service";
import { TypeOrmModule } from "@nestjs/typeorm";
import { ProfileController } from "./profile.controller";
import { Profile } from "./entities/profile.entity";

@Module({
  // Import the TypeOrmModule and specify the entities
  imports: [TypeOrmModule.forFeature([Profile])],

  // Declare the providers (services)
  providers: [ProfileService],

  // Add the controllers
  controllers: [ProfileController],
})
export class ProfileModule {}
This will basically:
- Get
TypeOrmModuleas defined in the Profile entity and use it With Nest.js and TypeORM. - Declare
ProfileServiceandProfileControllerassociated with handling HTTP requests and responses related to profiles.
Adding Nest.js TypeORM to the PostgreSQL database
When creating Nest.js APIs with Postgres and TypeORM, you can use the same connection and extend to other databases. TypeORM uses a type value that specifies which database modeling you want to use. Therefore, you only need to change the database connection and reuse the same API code base.
If you use PostgreSQL, you should have the following TypeOrmModule.forRoot with type: 'postgres'. So go ahead and update the src/app.module.ts file as follows:
import { Module } from '@nestjs/common';
import { AppController } from './app.controller';
import { AppService } from './app.service';
import { ProfileModule } from './profile/profile.module';
import { TypeOrmModule } from '@nestjs/typeorm';
import { Profile } from './profile/entities/profile.entity';

@Module({
  imports: [
   TypeOrmModule.forRoot({
    type: 'postgres', // Use 'postgres' for PostgreSQL
    host: 'localhost',
    port: 5432, // Default PostgreSQL port
    username: 'postgres',
    password: 'postgres_password',
    database: 'profile',
    entities: [Profile],
    synchronize: true, // Set to false in production
   }),
   ProfileModule,
  ],
  controllers: [AppController],
  providers: [AppService],
})
export class AppModule {}
Adding Nest.js TypeORM to MySQL
MySQL and PostgreSQL are both SQL databases. So, if you want to run your Nest.js TypeORM with MySQL, your src/app.module.ts file should look as follows:
import { Module } from '@nestjs/common';
import { AppController } from './app.controller';
import { AppService } from './app.service';
import { ProfileModule } from './profile/profile.module';
import { TypeOrmModule } from '@nestjs/typeorm';
import { Profile } from './profile/entities/profile.entity';

@Module({
  imports: [
   TypeOrmModule.forRoot({
    type: 'mysql', // Use 'mysql' for MySQL
    host: 'localhost',
    port: 3306, // Default MySQL port
    username: 'root',
    password: 'mysql_password',
    database: 'profile',
    entities: [Profile],
    synchronize: true, // Set to false in production
   }),
   ProfileModule,
  ],
  controllers: [AppController],
  providers: [AppService],
})
export class AppModule {}
This is just as simple as you can imagine. All you need is to:
- Change
typeso it can use MySQL - Change the database port, username, and password.
- The host remains
localhostunless you want to run on production
Is Your TypeORM with NestJS, Multer, MySQL, and PostgreSQL Setup Working?
Let’s check the truth meter and see if what you have created can bear fruit.
Before testing this, ensure you create a profile database (whether you are using MySQL or PostgreSQL).
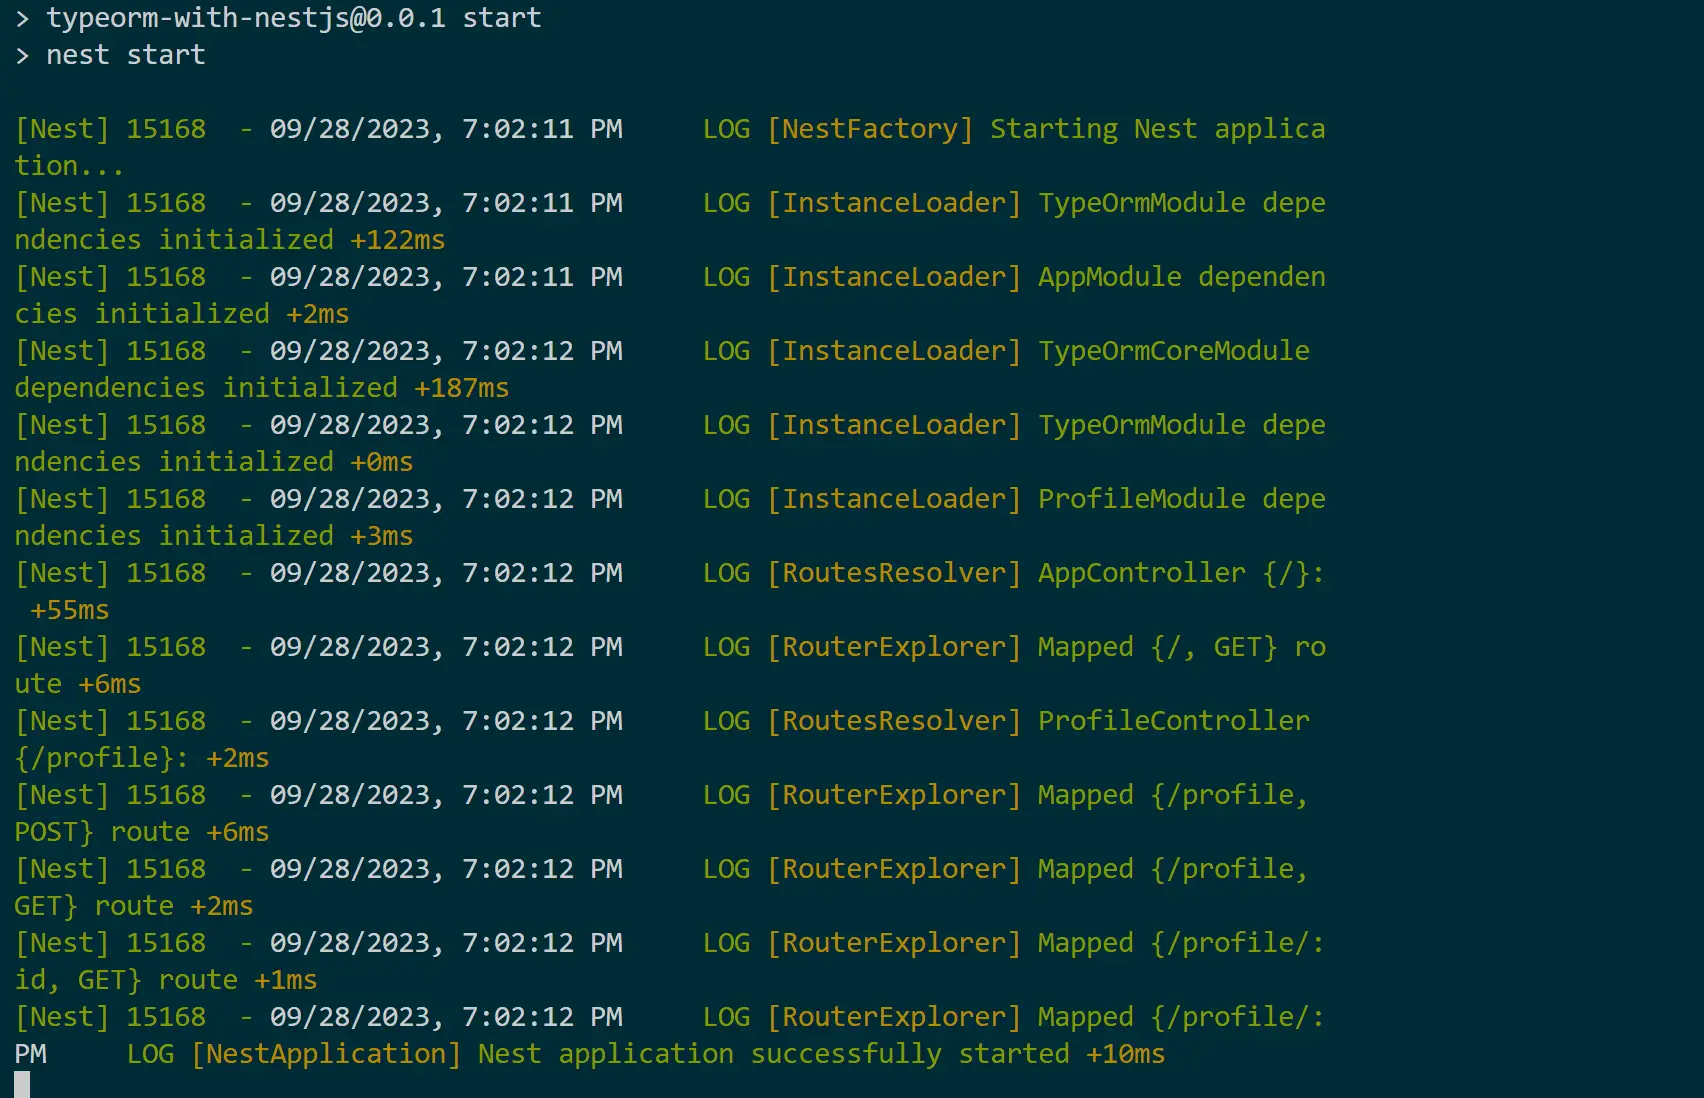
Then run the following command to start the server:
npm run dev
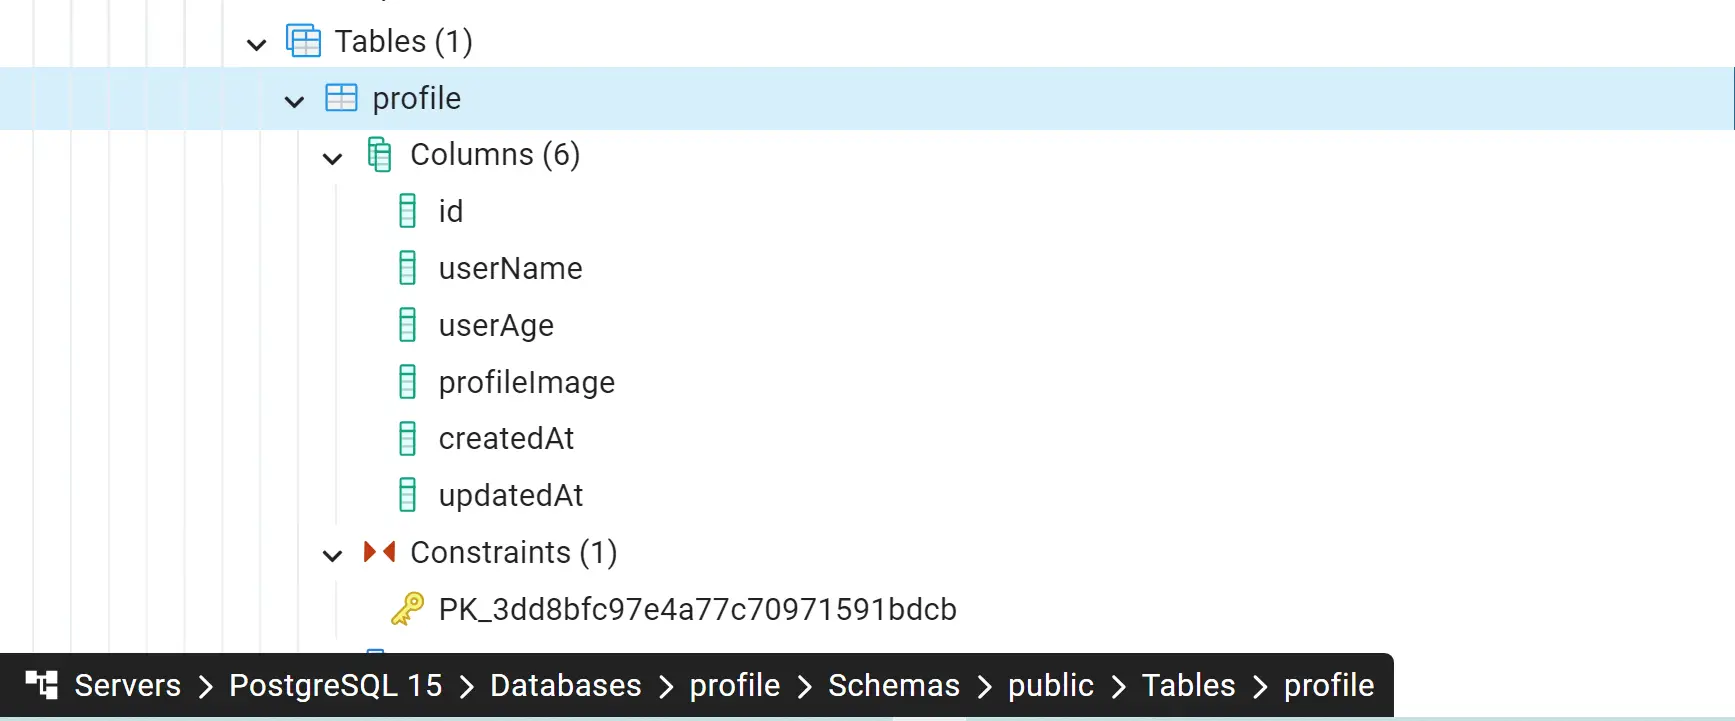
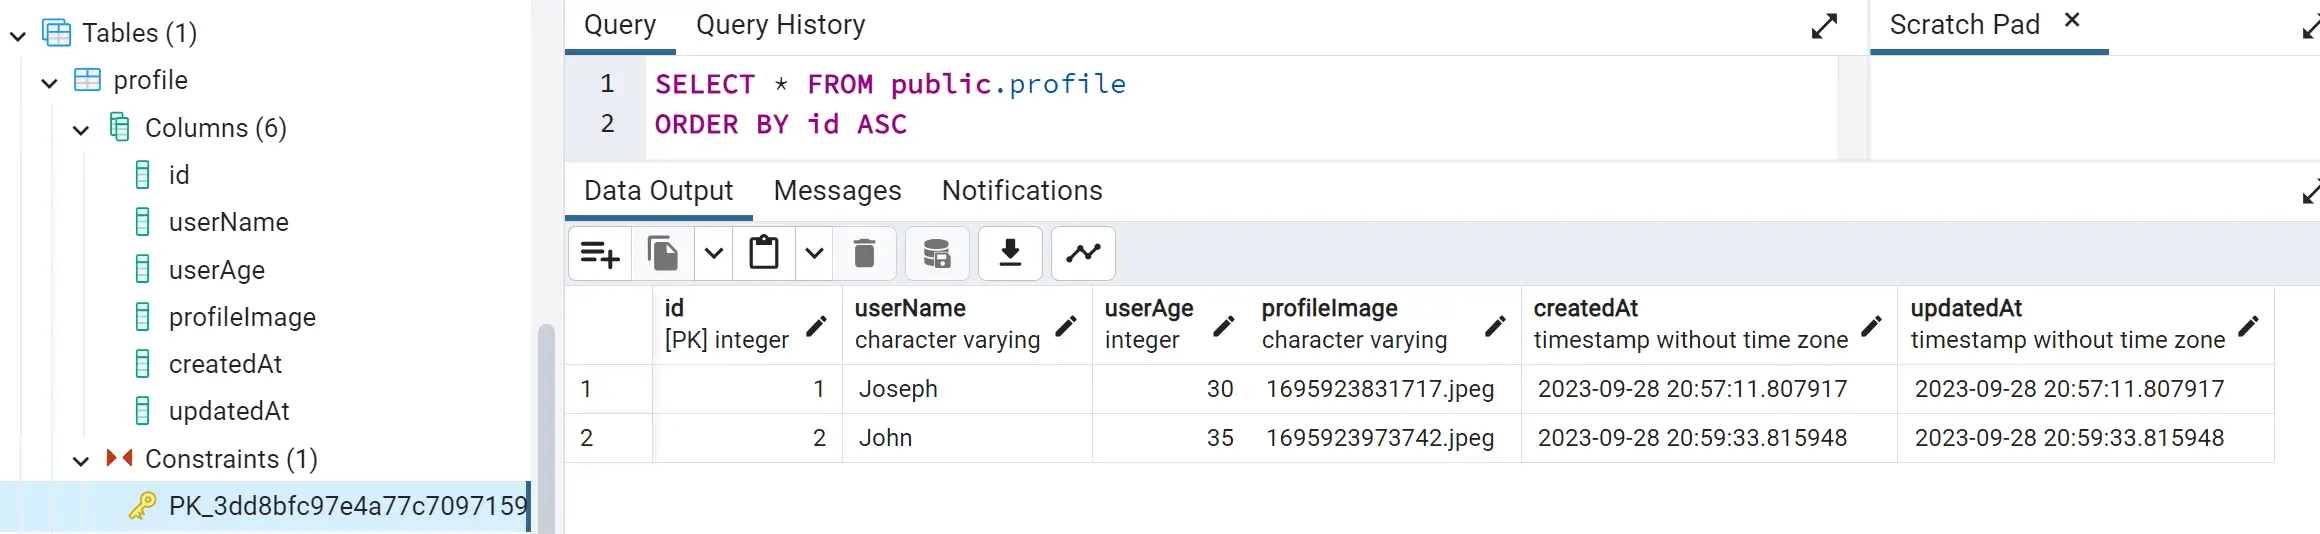
Head over and check the table and see if entities were created as you instructed TypeORM to do. Here is a sample of how my PostgreSQL database table looks like:
I hope you are happy (Up to this point).
Testing the Multer, TypeORM NestJS, MySQL/PostgreSQL API
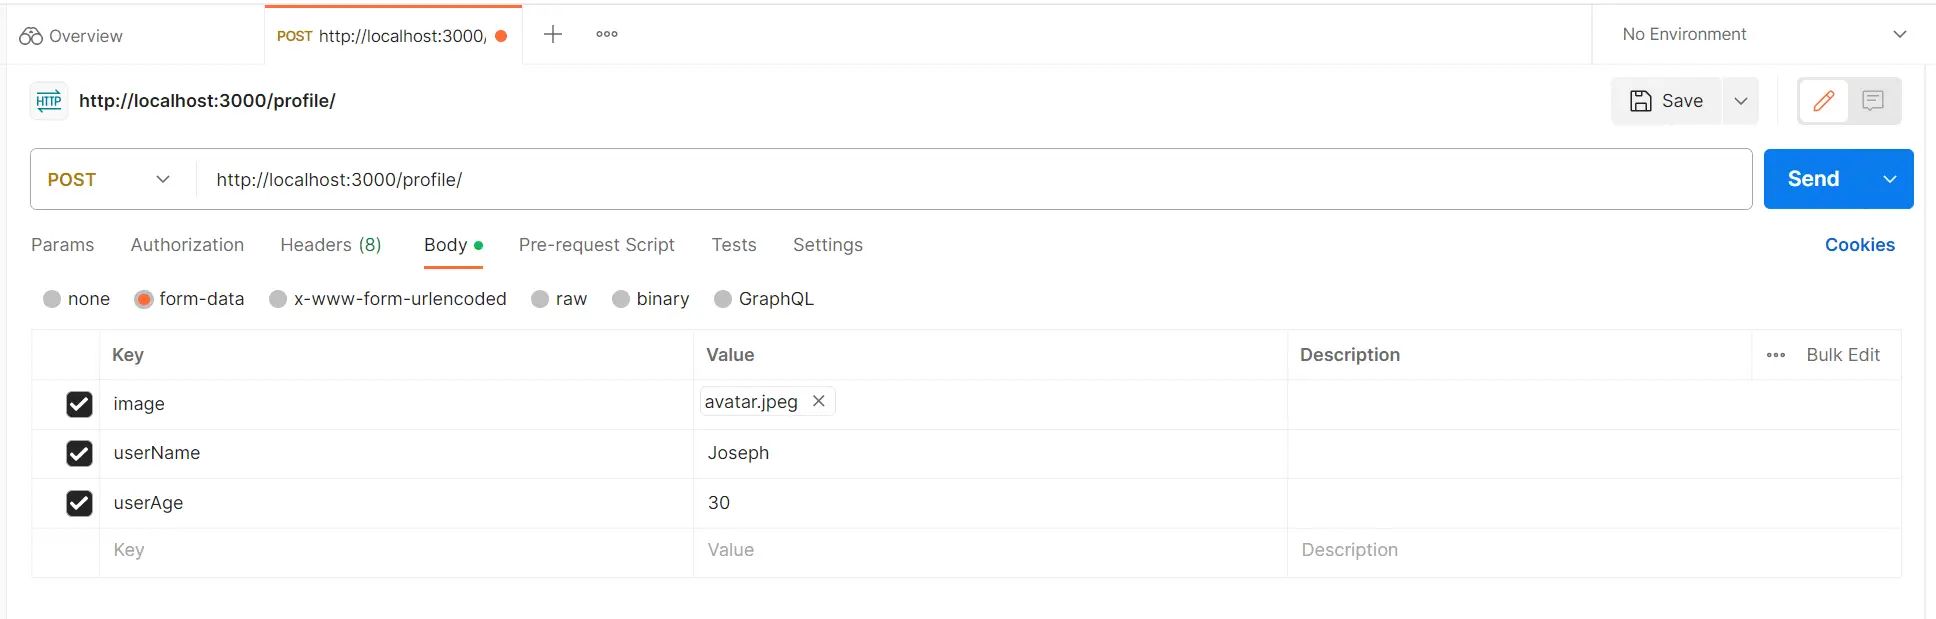
You test the API using Postman to check if all the endpoints are working. First, send a POST request to http://localhost:3000/profile/. This process involves uploading files, so you won’t send the POST request using raw data/ Payload. Here is how you should do it with Postman:
- Note how the fields are added:
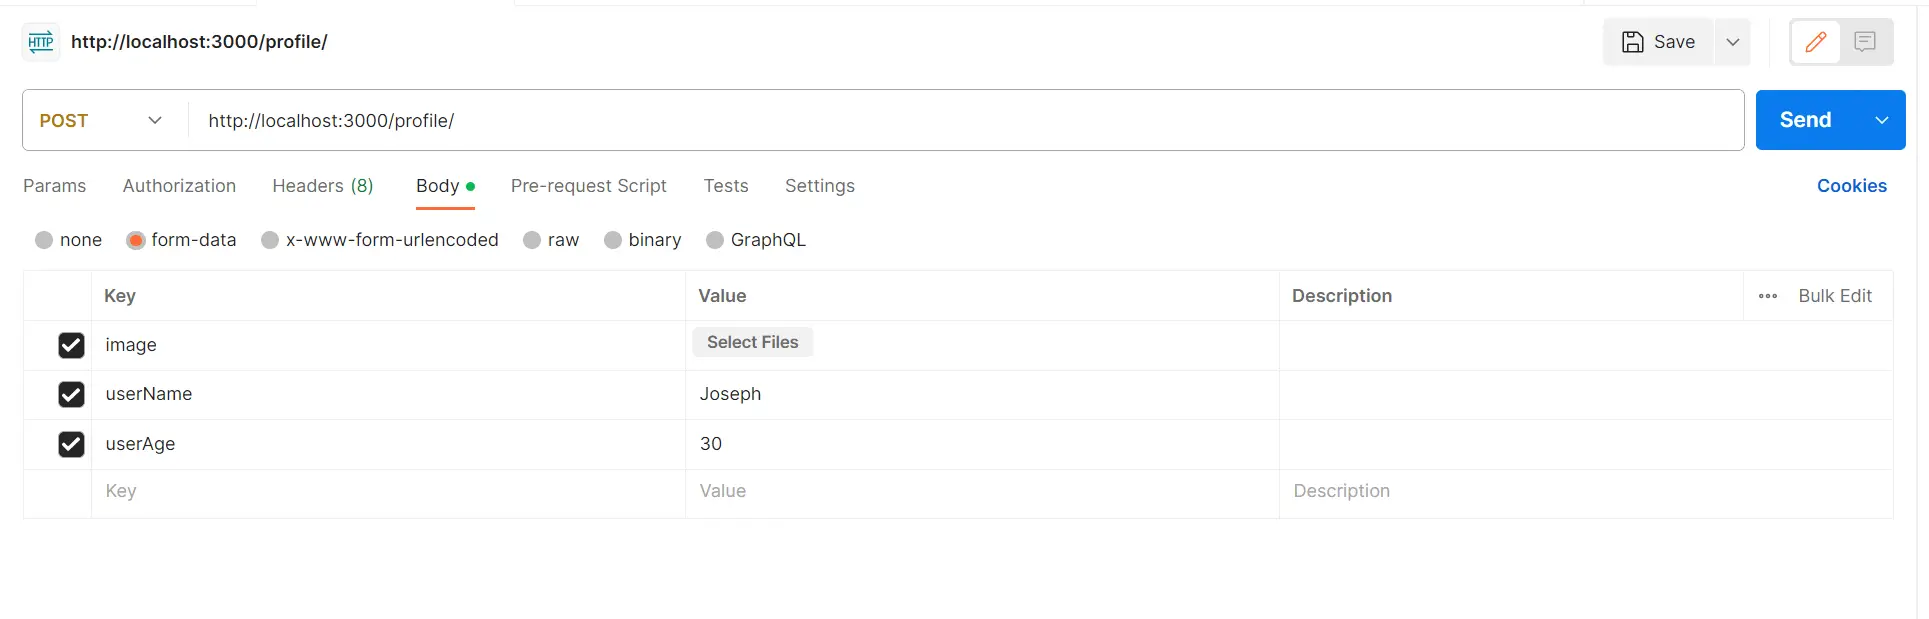
- Select the image you want Upload with Multer:
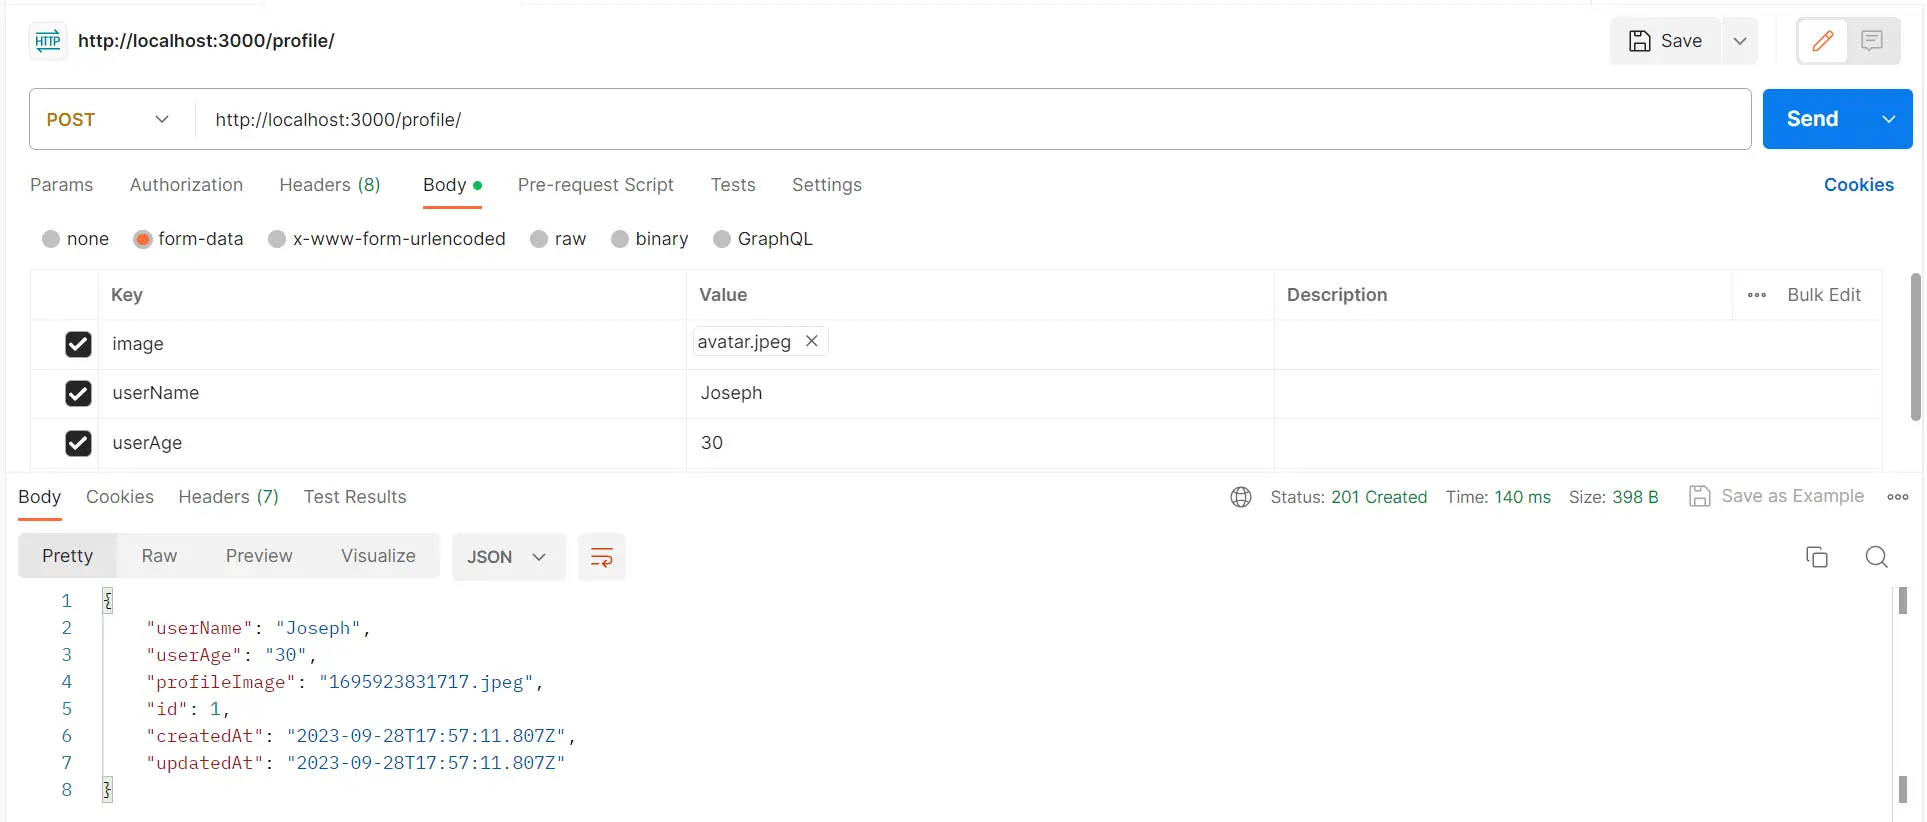
- Once you click SEND, you should have success Response as follows:
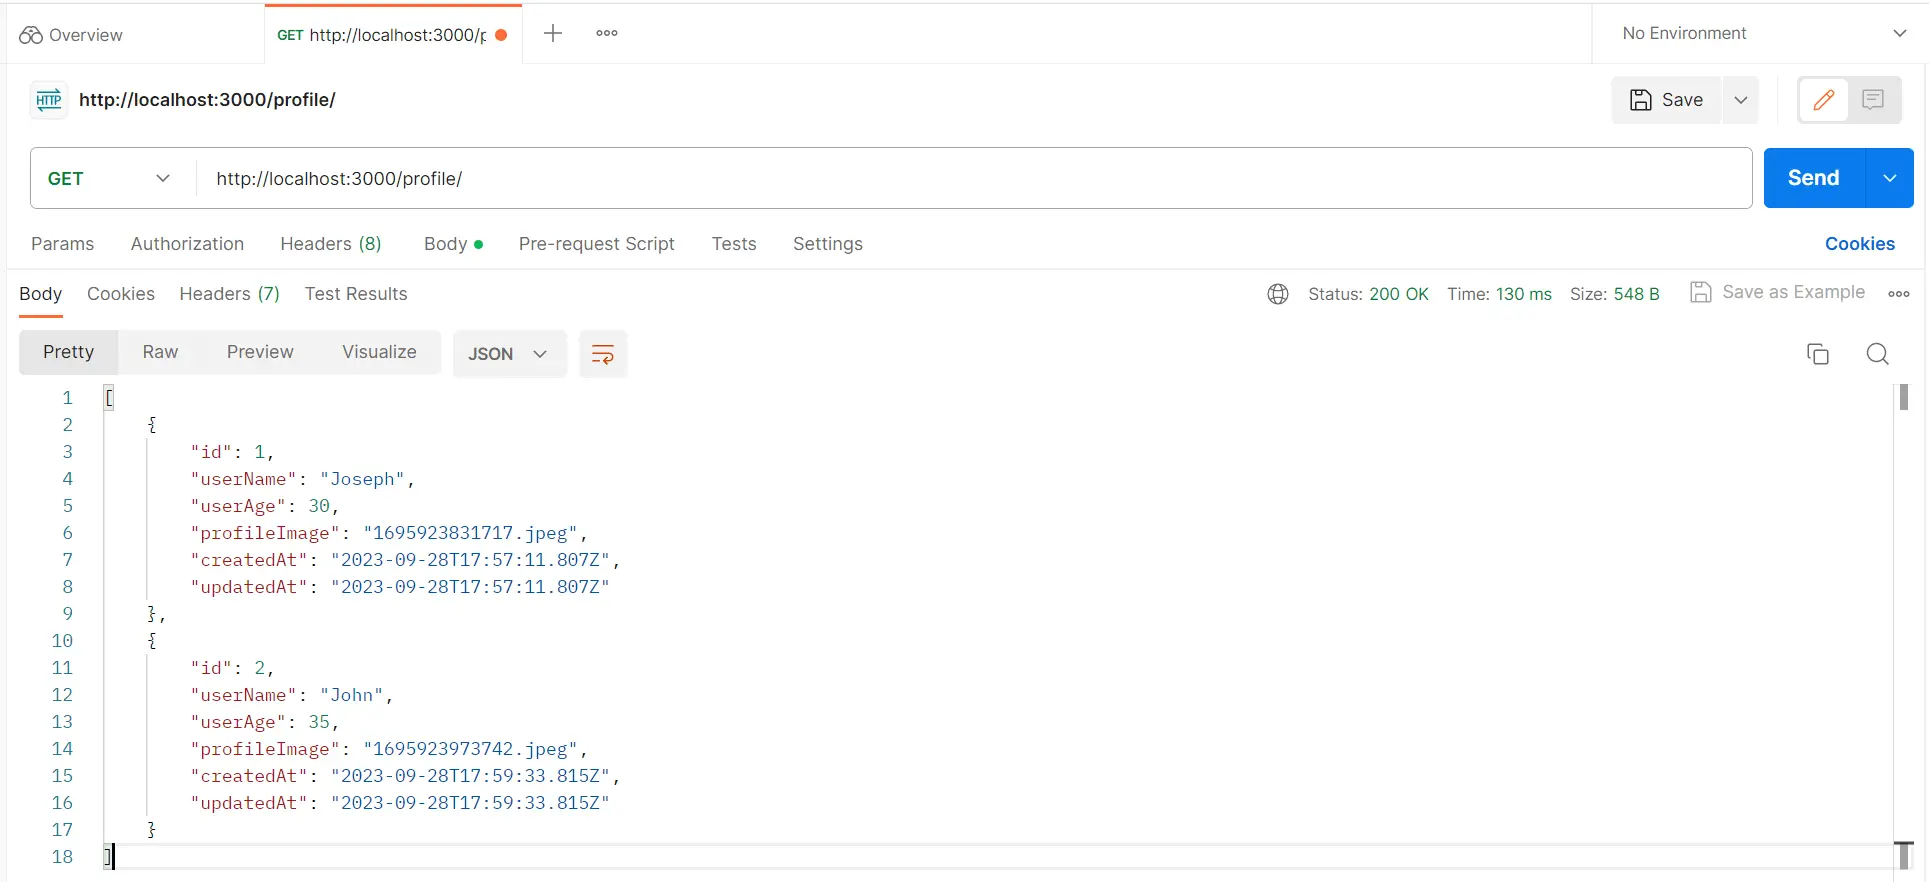
- Likewise, try sending a GET request to
http://localhost:3000/profile/:
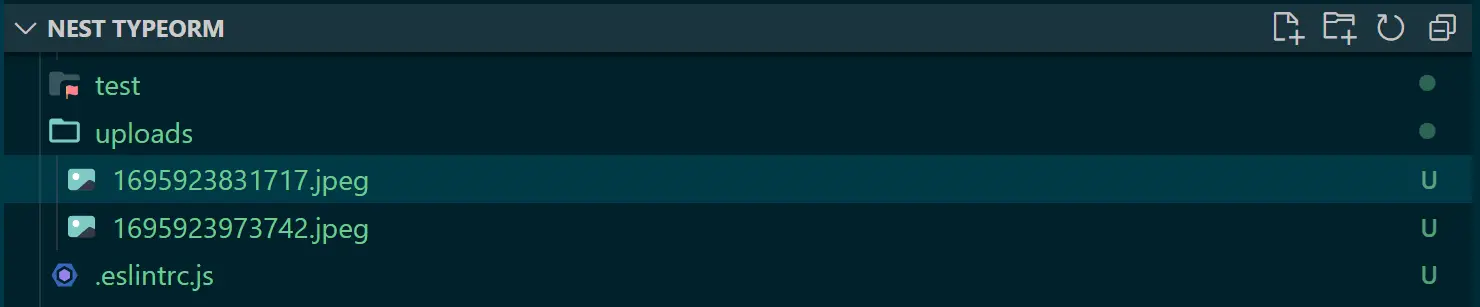
- Since you have used Multer, NestJS should create an upload folder and the files you have added to your database as follows:
- Now, if you check the database, you should have your records as follows:
Conclusion
You have used TypeScript TypeORM with Nest.js, MySQL, PostgreSQL, and Docker Compose. You created an API using TypeORM with Nest.js and Multer to upload images. Get the code used on this guide on this GitHub Repository
In summary, you have learned:
- How to create a handy Nest.js TypeORM MySQL tutorial
- Crafted a Nest.js TypeORM PostgreSQL example db connection
- Used Multer to Upload Images with Express FileInterceptor.
- Created a TypeScript Nest.js CRUD API
- learned how to get started using TypeORM with NestJS
- Used Docker Compose to run CRUD TypeORM and NestJS API with Docker
Do you have any Nest.js topics that you need help understanding? Let us know, and we will create a simplified Guide for you.
Written By: