NestJS with Sequelize ORM Example, MySQL and PostgreSQL🚀
Posted December 7, 2023

Dive into this NestJS Sequelize tutorial and learn how to use NestJS with Sequelize to create an example database connection to PostgreSQL, MySQL, and SQLite.
NestJS allows you to create out-of-the-box application architecture with Node.js and TypeScript. It integrates well with the Sequelize module. This way, you create models within your code, and Sequelize ORM handles database Operations for you using SQL DBs such as MySQL and PostgreSQL.
In this tutorial, I will show you how to build NestJS with Sequelize ORM, MySQL, and PostgreSQL. Sequelize as an ORM (Object-Relational Mapping) creates simple code structures to simplify interaction with relational databases such as SQLite MySQL and PostgreSQL.
What you will Learn
As I walk you through the journey of getting Nest.js and Sequelize ORM running together, you will build a RESTful API App and learn:
- How to model a NestJS entity utilizing the Sequelize module for Nest
- What you need to set up Sequelize with MySQL and Postgres Database within NestJS
- The best way to create Sequelize NestJS Powered CRUD RESTful API.
Dive in and take NestJS with MySQL, PostgreSQL and Sequelize ORM tutorial to the next level.
Prerequisites
As you follow along, ensure you have the following:
- Basic knowledge working with Nest.js
- Have Node.js installed on your computer.
- For databases, make sure you have MySQL or PostgreSQL ready.
Related: NestJS GraphQL API with TypeORM, Apollo Server and PostgreSQL Related: Guide to TypeORM with NestJS, Postgres, MySQL, Multer, Docker and Docker Compose
Step 1: Creating your First NestJS Sequelize ORM-Inspired App
In your project working directory, use the following command to create an out-of-the-box Nest.js App:
npm i -g @nestjs/cli
nest new nest-sequelize
Head over to the new application you have created:
cd nest-sequelize
Because we are creating a CRUD API:
- You will need a module for your API. This will create the forFeature module as the starting point Nest.js uses to build your API graph.
- You need a controller for listening to requests that Sequelize will use and communicate with your database to perform CRUD operations.
- Finally, a provider abstract complexity and logic of NestJS Sequelize ORM operations within your databases.
Use the following command to build your CRUD NestJS graph:
nest g module products
nest g service products --no-spec
nest g controller products --no-spec
This will create a Product module. This way, you can manage and group any unique module with its service, controller, entity, and everything related to it.
NestJS requires you to have Sequelize module for Node.js. This is a list of packages Sequelize needs to work within Nest.js-debug comfortably
Install the following Sequelize packages:
npm i --save @nestjs/sequelize sequelize-typescript sequelize
At the same time, the package for your database choice must be installed. Either MySQL, SQLite, or PostgreSQL, depending on what your choice is:
npm i mysql2 pg sqlite
Step 2: Constructing a NestJS Sequelize Model
A model (or an entity. Still means the same) is your Sequelize blueprint. Models allow you to define your Module table with attributes related to it. In this step, you use code to describe your database structure without using SQL queries.
Here is how Sequelize does this job with NestJS. Now, we are creating a Product app. So, you need attributes such as ID (for any relational database), product name, price, etc.
Head to your src/products folder and create a product.model.ts. You will use Sequelize and its functions, such as Table, Column, and Model, to create your entity as follows:
import { Table, Column, Model } from 'sequelize-typescript';

@Table
export class Product extends Model<Product> {
  @Column
  name: string;

  @Column
  description: string;

  @Column
  price: number;
}
This will instruct Sequelize to create a table Product. Each attribute is added using @Column with its data type as such.
You use sequelize-typescript to define these attributes based on this example. At the same time, you can use DataTypes, and Sequelize will model your attributes. However, you will need to manually add Sequelize TypeScript typechecks.
Step 3: Creating NestJS Sequelize ORM Database Connection with MySQL or PostgreSQL
Before Sequelize can apply your model, a database connection must be established. First, use SequelizeModule based on your specific Module to load your Model. In this case, go to the src/products/product.module.ts file and ensure forFeature can grab your Product entity as follows:
import { Module } from '@nestjs/common';
import { SequelizeModule } from '@nestjs/sequelize';
import { Product } from './product.model';
import { ProductsService } from './products.services';
import { ProductsController } from './products.controller';

@Module({
  imports: [SequelizeModule.forFeature([Product])],
  providers: [ProductsService],
  controllers: [ProductsController],
})
export class ProductsModule {}
NestJS will now use its main Module as the entry point to build your graph using app.module.ts. It’s here that NestJS must be able to use Sequelize ORM and Sequelize on the other side created database connection and model a table on your database.
In app.module.ts, ensure NestJS main Module can execute ProductsModule and SequelizeModule as follows:
import { Module } from '@nestjs/common';
import { AppController } from './app.controller';
import { AppService } from './app.service';
import { SequelizeModule } from '@nestjs/sequelize';
import { ProductsModule } from './products/products.module';

@Module({
  imports: [
    SequelizeModule.forRoot({
      dialect: 'postgres',
      host: 'localhost',
      port: 5432,
      username: 'postgres',
      password: 'pass',
      database: 'store',
      autoLoadModels: true,
      synchronize: true,
    }),
    ProductsModule,
  ],
  controllers: [AppController],
  providers: [AppService],
})
export class AppModule {}
Note:
- This will create a database connection to PostgreSQL.
dialect: 'postgres'Specifically tells Sequelize the database you are using. - Your database connection variables must be added as above.
- It’s key to note that Sequelize won’t asynchronously create a database. So, ensure you have a database
storecreated.
If you are using MySQL, you only need to change dialect: 'mysql' and change the connection attributes associated with MySQL as follows:
      dialect: 'mysql',
      host: 'localhost',
      port: 3306,
      username: 'root',
      password: 'pass',
      database: 'store',
      autoLoadModels: true,
      synchronize: true,
Step 4: Using NestJS Providers with Sequelize ORM
NestJS uses a @Injectable() class to abstract the complexity logic of the application. This way, you can create a service, a repository, or a factory to manage what you want Sequelize to do within NestJS.
In this example, you have a ProductsService. You will use it to abstract all communication to the database into the app with Sequelize. Navigate to your src/products/products.services.ts file and all the CRUD logic you need in your app to inject the repository layer as follows:
import { Injectable } from '@nestjs/common';
import { InjectModel } from '@nestjs/sequelize';
import { Product } from './product.model';

@Injectable()
export class ProductsService {
  constructor(
    @InjectModel(Product)
    private readonly productModel: typeof Product,
  ) {}

  async create(productData): Promise<Product> {
    const product = new Product(productData);
    return await product.save();
  }

  async findAll(): Promise<Product[]> {
    return this.productModel.findAll();
  }

  async findOne(id: number): Promise<Product> {
    return this.productModel.findOne({ where: { id } });
  }

  async update(id: number, productData): Promise<[number, Product[]]> {
    const [affectedCount, affectedRows] = await this.productModel.update(productData, {
      where: { id },
      returning: true,
    });
    return [affectedCount, affectedRows as Product[]];
  }

  async remove(id: number): Promise<number> {
    return this.productModel.destroy({ where: { id } });
  }
}
Step 5: Exposing Sequelize Operations using NestJS Controller
The @Controller() decorator allows you to add routes as a parameter to accessing your API. Because you have the above ProductsService, it will enable you to keep your controllers nice and clean when handling methods like GET, POST, DELETE, and PUT/PATCH as HTTP requests.
For example:
- You want your
findAll()method to handle GET HTTP requests to get all products. - The
createdecorator is yourProductsServiceand should allow your controller to use a POST request to add products to your database assisted by Sequelize.
In your src/products/products.controller.ts, handle the GET, POST, DELETE, PUT/PATCH HTTP requests as follows:
import { Controller, Get, Post, Put, Delete, Param, Body,Patch } from '@nestjs/common';
import { ProductsService } from './products.services';
import { Product } from './product.model';

@Controller('products')
export class ProductsController {
  constructor(private readonly productsService: ProductsService) {}

  @Post()
  create(@Body() productData): Promise<Product> {
    return this.productsService.create(productData);
  }

  @Get()
  findAll(): Promise<Product[]> {
    return this.productsService.findAll();
  }

  @Get(':id')
  findOne(@Param('id') id: string): Promise<Product> {
    return this.productsService.findOne(Number(id));
  }

  @Patch(':id')
  update(@Param('id') id: string, @Body() productData): Promise<[number, Product[]]> {
    return this.productsService.update(Number(id), productData);
  }

  @Delete(':id')
  remove(@Param('id') id: string): Promise<number> {
    return this.productsService.remove(Number(id));
  }
}
Step 6: Running NestJS Sequelize App
At this point, you should have your Sequelize NestJS app ready. Go ahead and run your app as follows:
npm run start:dev
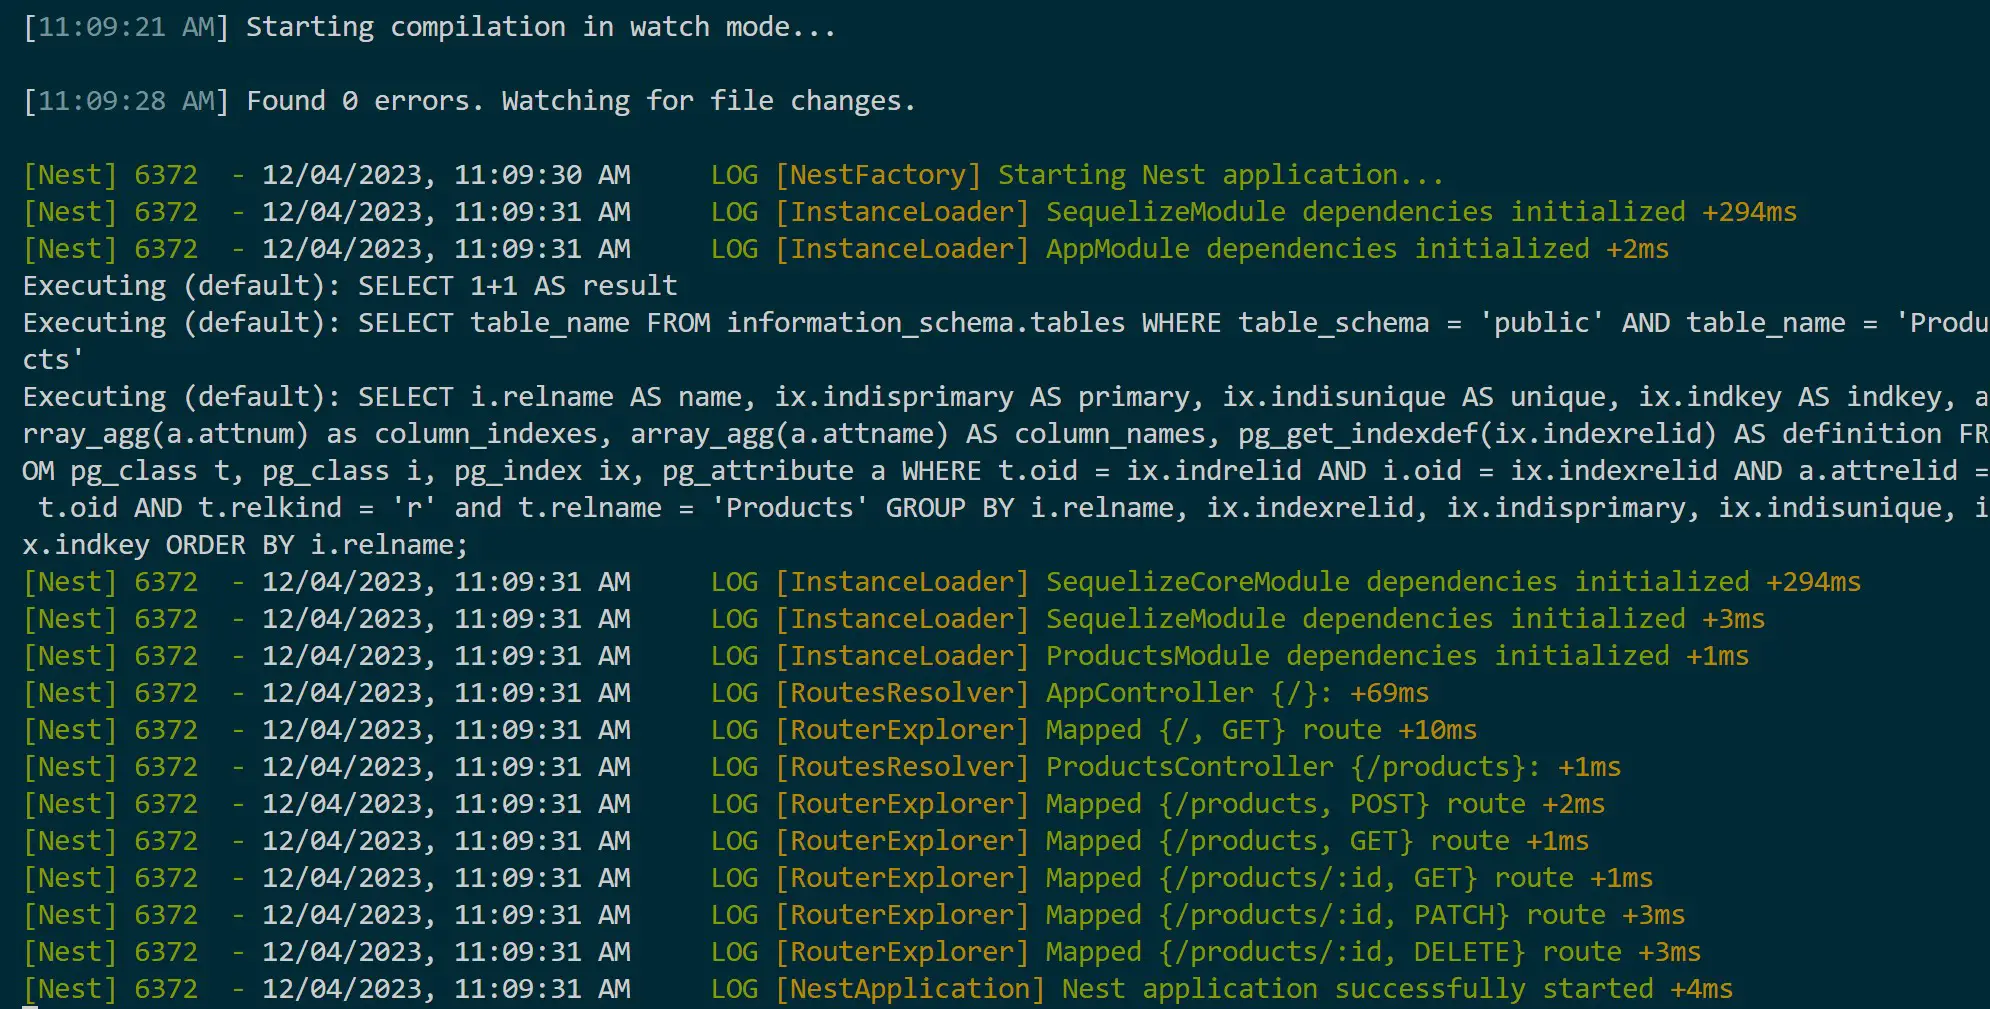
Sequelize will access your database and execute your entity to PostgreSQL or MySQL, while NestJS builds the application graph through your Product Service and Controller to create the API routes.
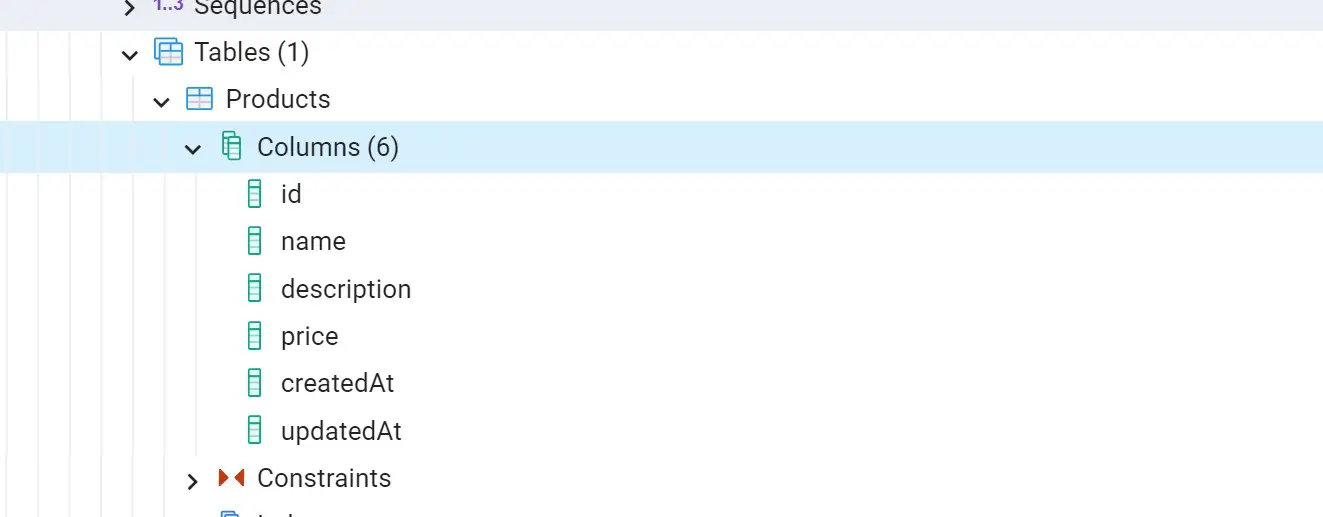
Go to your database and confirm the table and its attributes are ready. Here is how the PostgreSQL table looks:
Step 7: Testing NestJS CRUDs with Postman
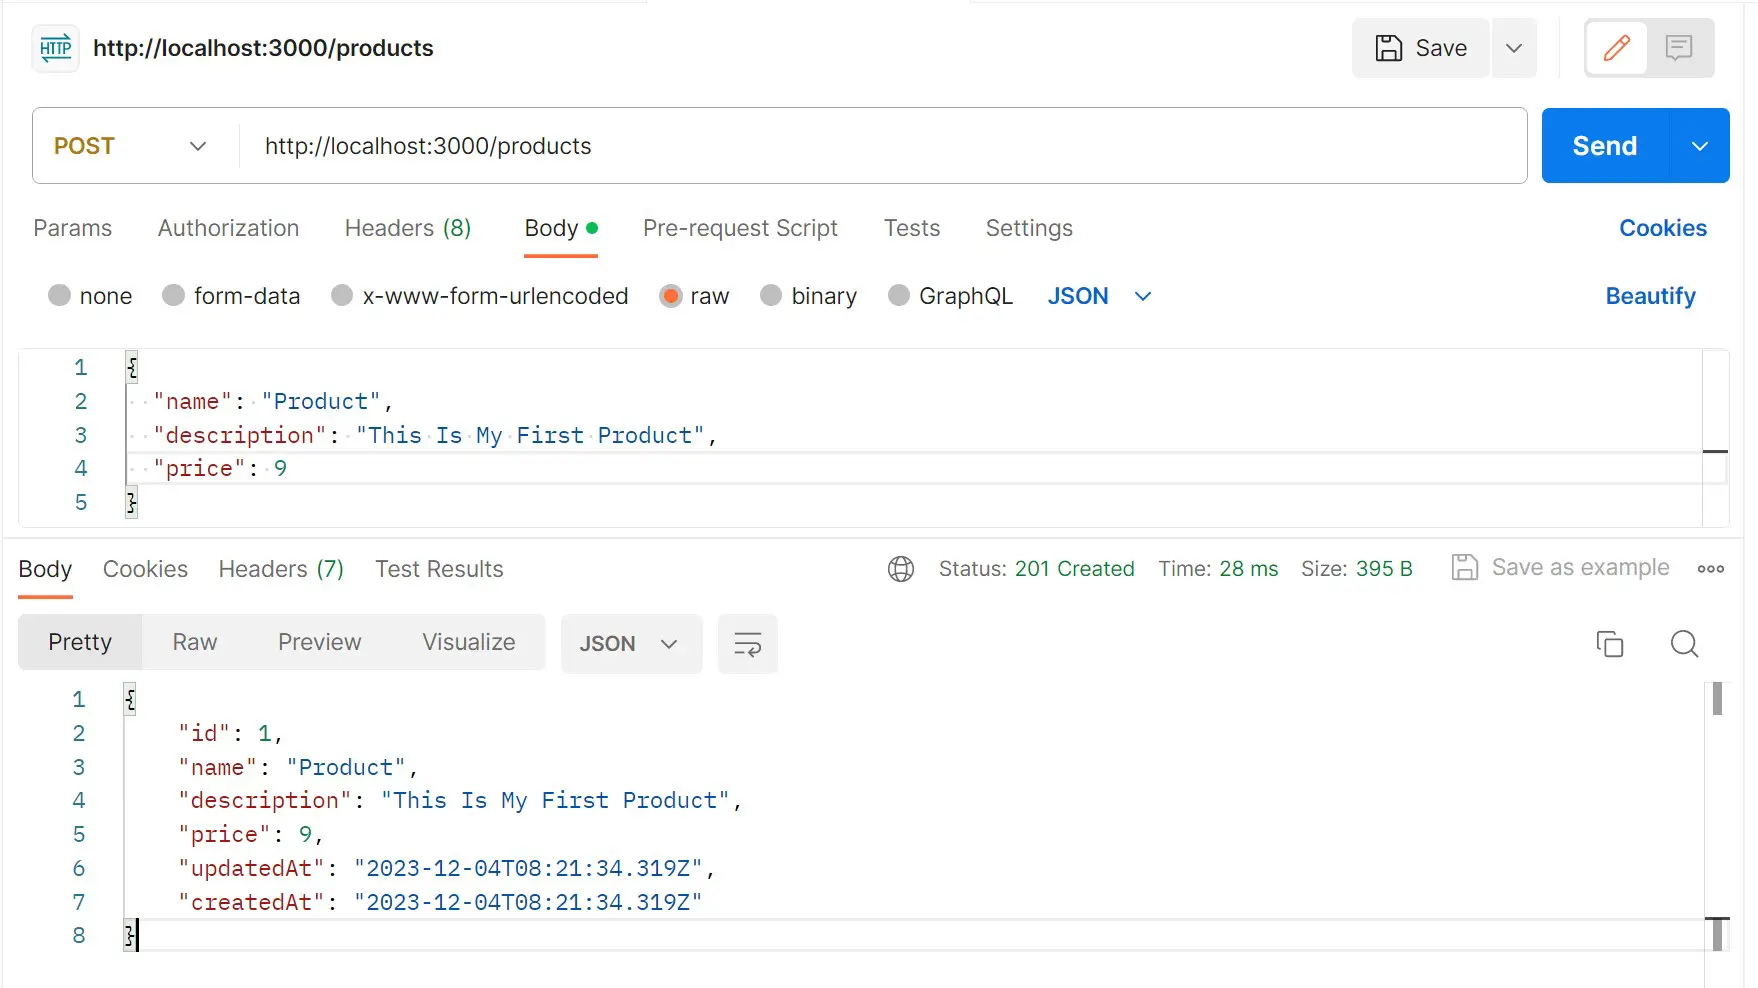
To make sure this app, let’s execute the API endpoints with the associated HTTP methods. Go to Postman and send a POST request to http://localhost:3000/products and create your first Sequelize NestJS Inspired app as follows:
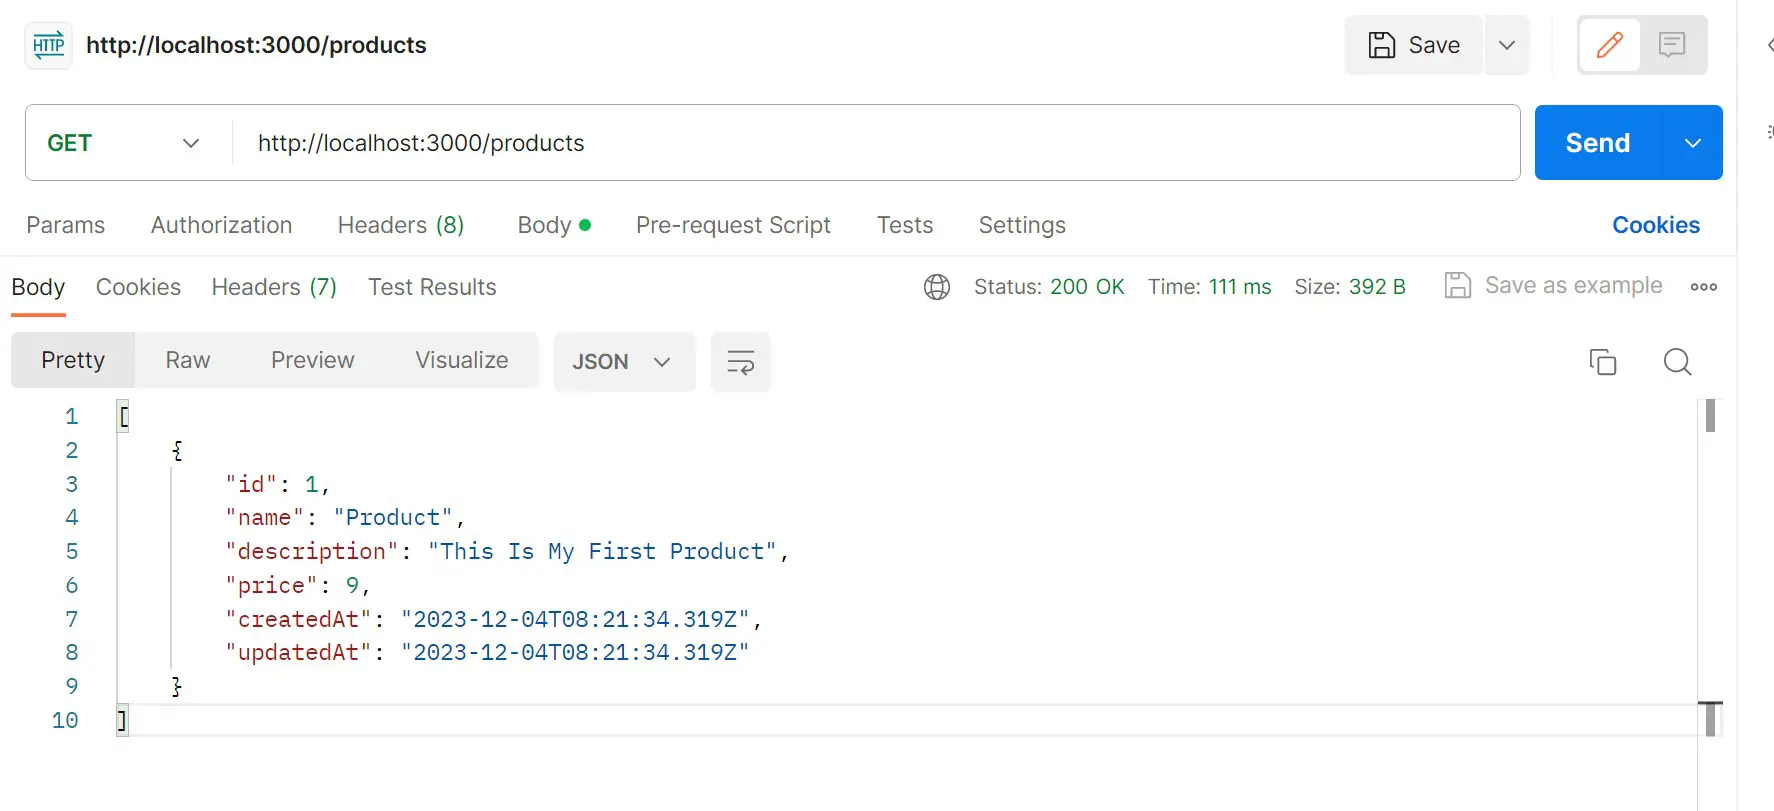
If you send a GET request to http://localhost:3000/products, you should be able to get what POST added:
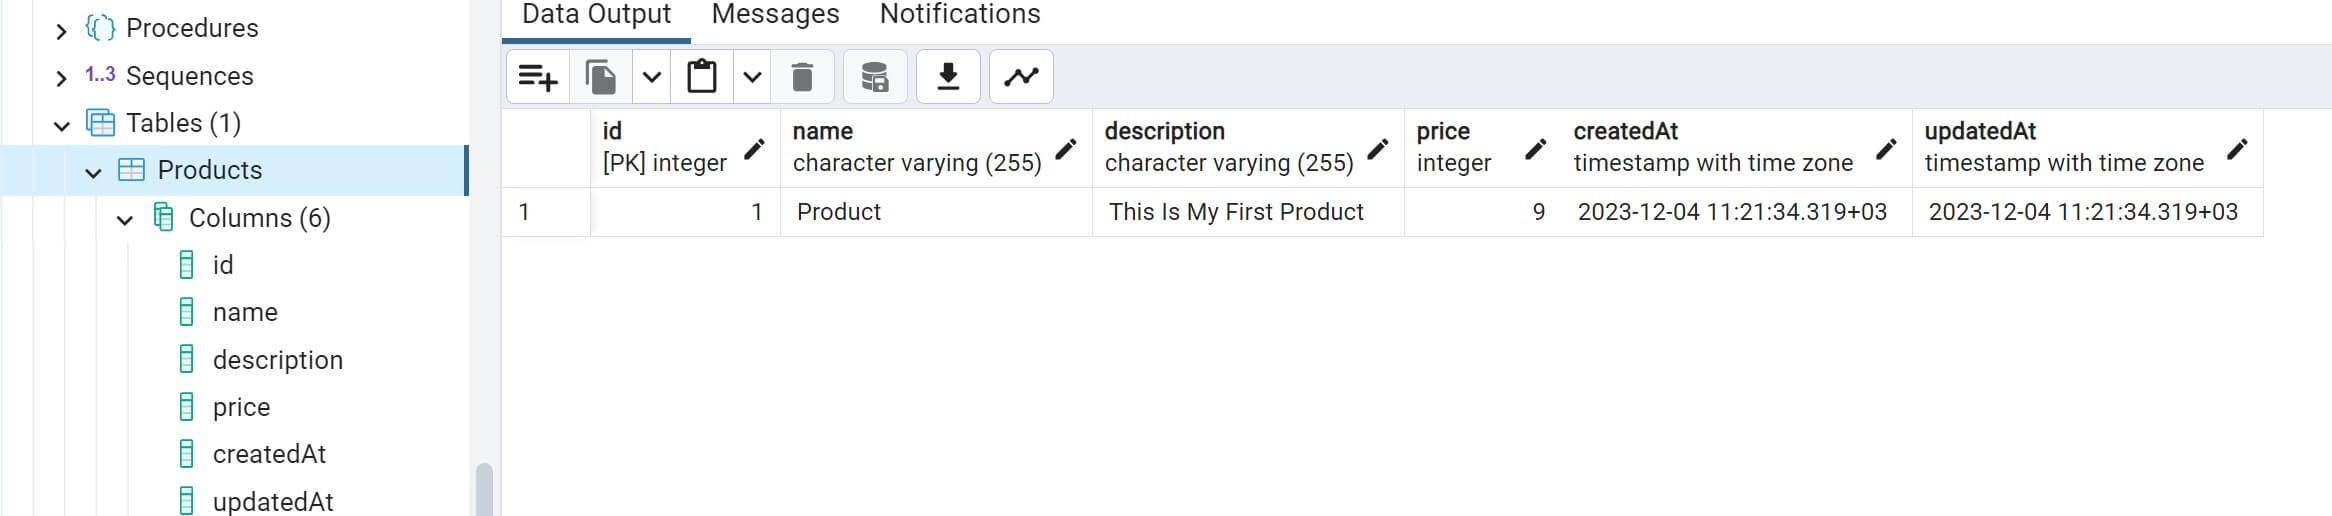
All changes you make must be correctly recorded in your database. Sequelize and MySQL should be able to handle this:
Conclusion
This was a simple yet more structured way of building your NestJS server-side apps with Sequelize and relational databases such as MySQL and PostgreSQL. I hope you found this tutorial helpful. Get the whole code on this GitHub Repo.
Written By: