Master Enabling NestJS CORS on GraphQL and WebSocket Gateway
Posted October 15, 2023

CORS allows your APIs like Nest.js to exchange data with client apps. Learn how to enable CORS in your NestJS GraphQL and WebSocket (Socket io) Gateway APIs. You will use CORS access control to allow the origin to enable related NestJS CORS options your APIs need.
You’ll learn the following:
- How to enable Nest.js GraphQL CORS.
- Enabling Nest.js WebSocket (Socket io) Gateway CORS.
- Use Nest.js CORS to enable and allow all or a list of origins.
- Adding CORS with cookie authentication and other headers.
Dive in and explore NestJS CORS and add access control to allow origins access to your GraphQL Apollo APIs and Web Sockets.
What is CORS and Why you Need it in NestJS GraphQL and WebSocket APIs
CORS (Cross-Origin Resource Sharing) browser security feature to manage access to your server. This way, the browser will detect and block clients without the correct headers from communicating with your server.
The concept of CORS uses origins to manage this security feature. This of origin as a domain (whether localhost or line URL). In this case, clients run on different sources from the server.
Here is an example:
# Same origin
http://localhost.com:3000/ <==> http://localhost.com:3000/

# Different origin (difference in domain, protocol, and port)
http://localhost.com:3000/ =X= http://exmaple.com:3001/
This is how the example works when represented in a diagram:
- Same origin:

- Different origin:

CORS will block origin with different domains from accessing each other. You need to enable this feature so a client and server running on different origin exchanges data.
Because browsers aren’t allowed to access resources outside their own domain, CORS policy will take full action to prevent different origins from accessing each other.
Digesting the NestJS CORS and Need for GraphQL and WebSocket
Now that you understand how CORS works in your NestJS GraphQL or WebSocket APIs go ahead and create a basic Nest.js application as follows:
npm i -g @nestjs/cli
nest new test-app
Change the directory to the newly created directory:
cd test-app
Run the following command to start the server:
npm start

Your server is running on http://localhost:3000 as its origin. Open that in your browser and check the Network header as follows:
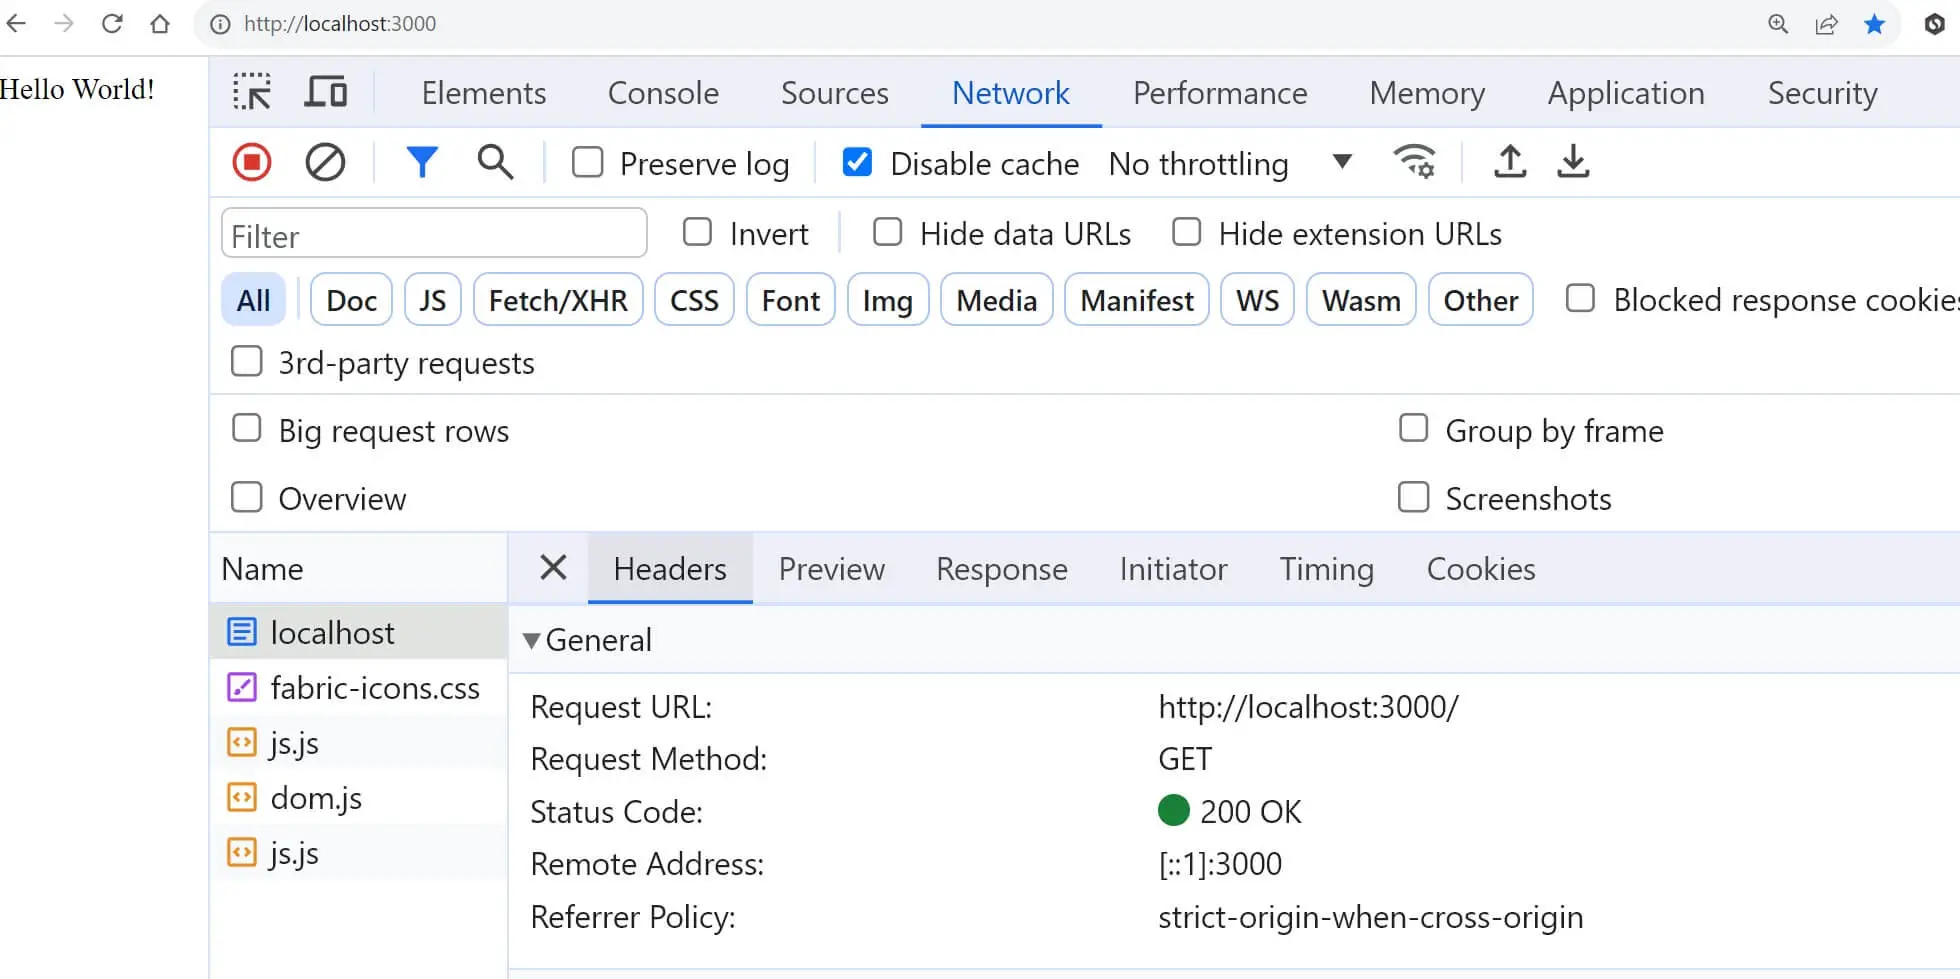
You have strict-origin-when-cross-origin as the policy to ensure Strick CORS access.
What if you try accessing your server origin http://localhost:3000 on a different origin? What will happen? I think you have already figured that out. CORS security will kick in right away.
But what does this security check look like? Try opening a new domain (let’s say https://thriveread.com/ or any URL of your choice). Use Chrome Console to send a Fetch request to http://localhost:3000 as follows:
fetch("http://localhost:3000")
  .then((req) => req.text())
  .then(console.log);
And here is your expected CORS expected security check:
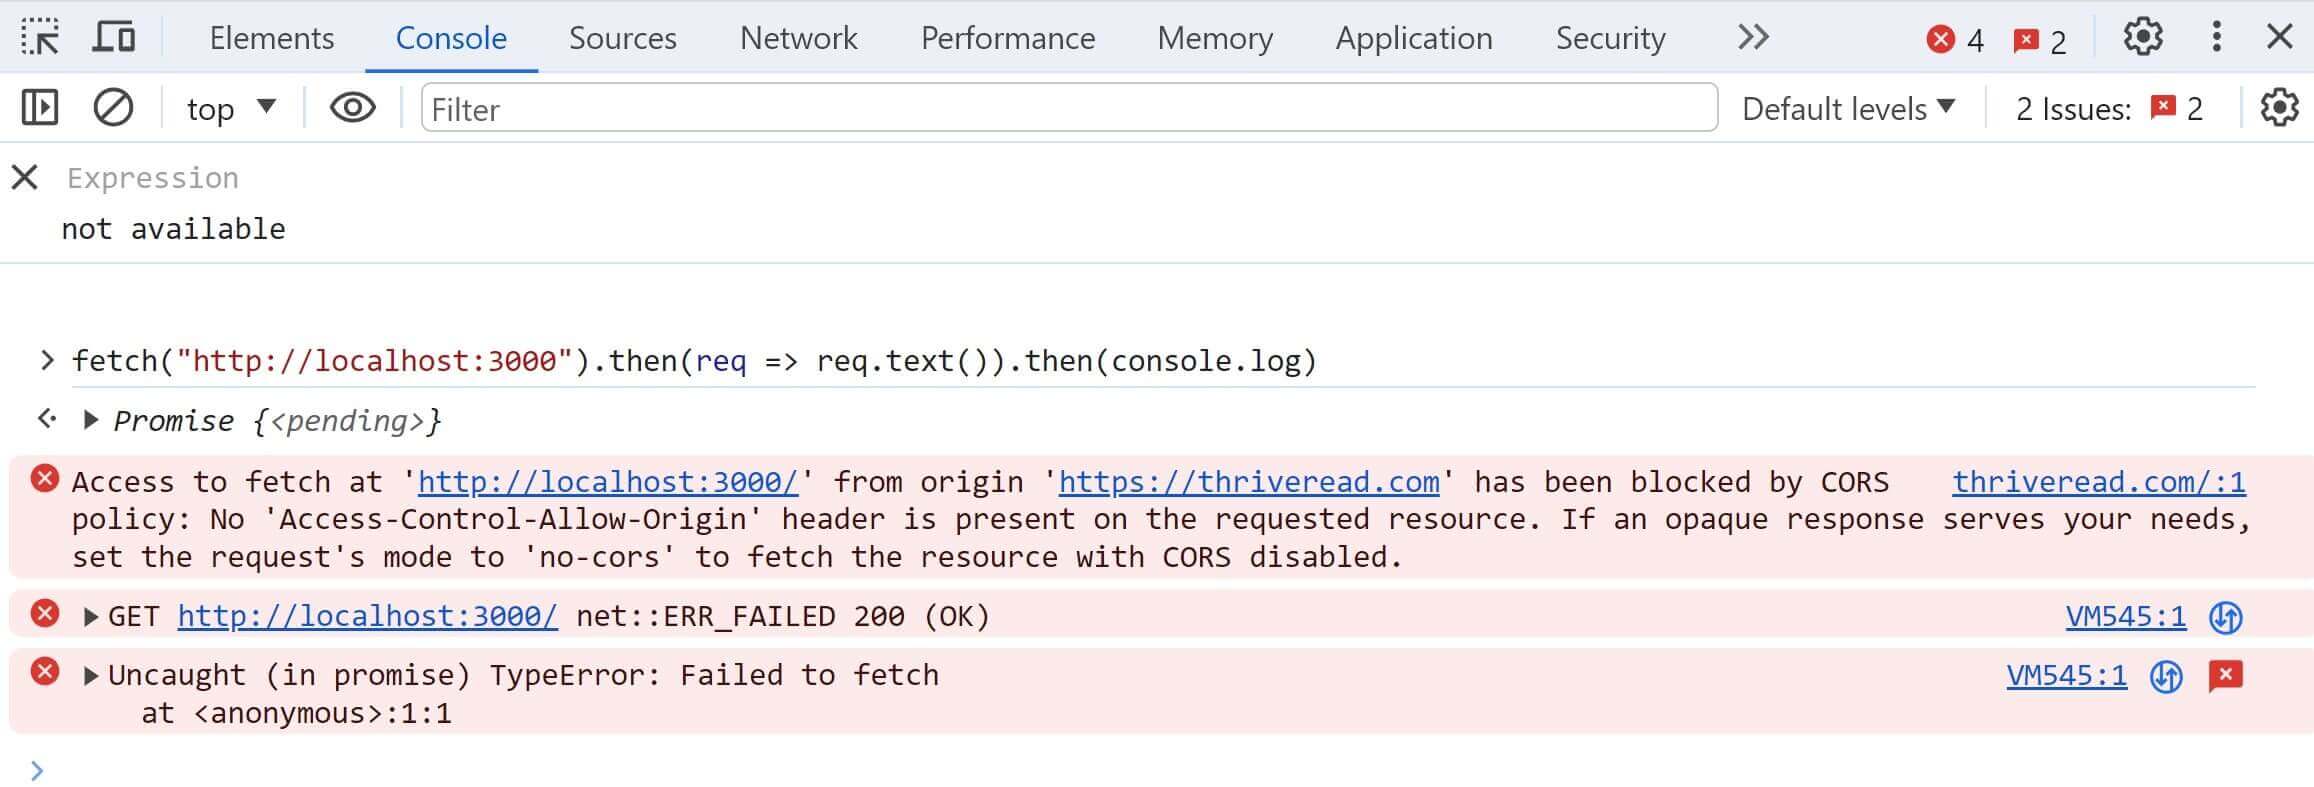
https://thriveread.com acts as a different origin from http://localhost:3000/. CORS policy will block its access to any data on http://localhost:3000/ as the No ‘Access-Control-Allow-Origin’ header is on the requested resource.
This means http://localhost:3000/ has no CORS header allowing different origins, such as https://thriveread.com.
This is the exact error you expect when using NestJS with GraphQL or Web Sockets. So, let’s dive in and add a CORS security policy to elevate access to resources you need for your client to have healthy communication with your server.
Enabling NestJS GraphQL API CORS
GraphQL communicates differently compared to REST APIs. This means How you add GraphQL CORS and REST APIs CORS differs.
If you’re exclusively using a NestJS GraphQL API, here is how you will enable CORS for the GraphQL server.
You need to add CORS configuration in the GraphQLModule.forRoot() as follows:
In your NestJS app, go to GraphQLModule.forRoot and add CORS as follows:
@Module({
  imports: [
    GraphQLModule.forRoot({
      cors: {
        origin: true, // Allow all origins
        credentials: true, // allows sending cookies
      },
    }),
  ],
})
export class AppModule {}
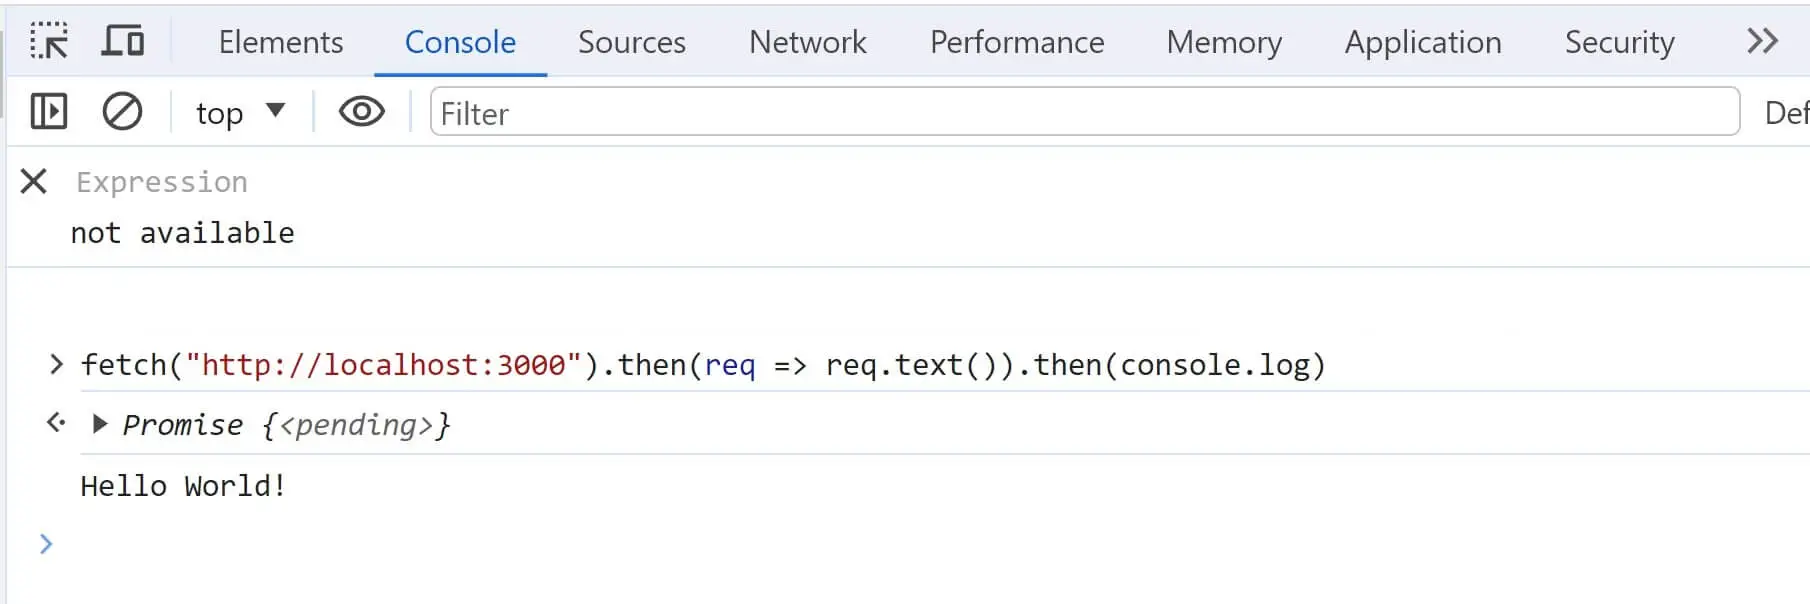
Try sending a fetch request again, and CORS will recognize your origin and allow it access to your server data:
fetch("http://localhost:3000")
  .then((req) => req.text())
  .then(console.log);
Using CORS to Manage NestJS GraphQL Origins Access
The above setup will open your GraphQL API and CORS header. The true option allows any origin to communicate with your API.
But if you want to Limit that, add more CORs options to GraphQL. CORS returns the following CORSOptions objects:
export type CORSOptions =
  | {
    // origin as an array of strings or a single string
      origin?: string[] | string
      // allowed HTTP methods
      methods?: string[]
      // allowed headers
      allowedHeaders?: string[]
      // exposed headers
      exposedHeaders?: string[]
      //If credentials are allowed
      credentials?: boolean
       // The max age for preflight requests
      maxAge?: number
    }
    // CORS options if false
  | false
This means you can add:
- Multiple origins as an array
- methods allowed in your headers
- The
allowedHeaders exposedHeaders
To enable a specific CORS origin, here is the ideal example to do that
GraphQLModule.forRoot({
  cors: {
    origin: 'http://localhost:4000',// frontend URL
    credentials: true,
  },
}),
- To enable multiple origins, add an array list as follows:
GraphQLModule.forRoot({
  cors: {
    origin: [
      "https://thriveread.com/",
      "http://localhost:4000/",
      "http://yourclient.com",
    ],
    credentials: true,
  },
}),
- To add allowed headers:
GraphQLModule.forRoot({
  cors: {
    origin: 'http://localhost:4000',
    credentials: true,
    allowedHeaders: ['Content-Type', 'Authorization'],
  },
}),
Adding CORS to NestJS GraphQL API Methods
You can also use CORS to manage which HTTP methods are exposed to your client as follows:
app.enableCors({
  origin: true,
  // CORS HTTP methods
  methods: ["POST"],
});
Enabling CORS for GraphQL Endpoints
Let’s check the final tip that you can use to add CORS TO GraphQL. The above option will apply the CORS globally for your API. However, you can enable CORS for GraphQL endpoints as follows:
Create a your corsOptions as follows:
const corsOptions: CorsOptions = {
  origin: ['http://allowed-origin.com', 'https://another-allowed-origin.com'],
  methods: 'GET,HEAD,PUT,PATCH,POST,DELETE',
  credentials: true,
};
Then, you will add the corsOptions to your endpoint as follows:
const apolloServer = app.get(HttpAdapterHost).getInstance().getHttpServer();

app.use('/graphql', (req, res, next) => {
  cors(corsOptions)(req, res, () => {
    next();
  });
});

apolloServer.applyMiddleware({ app, cors: false });
Enabling Nest.js WebSocket (Socket io) Gateway CORS
This DEMO creates WebSockets using the Socketio @nestjs/platform-socket.io package. This approach uses IoAdapter to create WebSocket gateways. You will enable NestJS WebSocket CORS on your main.ts as follows:
import { NestFactory } from '@nestjs/core';
import { AppModule } from './app.module';
import { IoAdapter } from '@nestjs/platform-socket.io';
import * as socketio from 'socket.io';

async function bootstrap() {
  const app = await NestFactory.create(AppModule);

  app.useWebSocketAdapter(new IoAdapter(app, {
    cors: {
      origin: 'http://example.com', //your frontend URL
      methods: ['GET', 'POST'],
      credentials: true, // Allow cookies
    },
  }));

  await app.listen(3000);
}
bootstrap();
This will allow the WebSocket adapter to access the CORS globally. However, if you only want a specific module to use CORS, head over to the module file, for example, app.module.ts, and configure CORS using SocketIoModule in your GraphQLModule.forRoot() as follows:
import { Module } from '@nestjs/common';
import { AppGateway } from './app.gateway';
import { IoAdapter, SocketIoModule } from '@nestjs/platform-socket.io';

@Module({
  imports: [
    SocketIoModule.forRoot({
      cors: {
        origin: true, // allow all origins
        methods: ['GET', 'POST'], // Allow methods
        credentials: true, // Allow cookies
      },
    }),
  ],
  providers: [AppGateway],// If AppGateway is your WebSocket Gateway
})
export class AppModule {}
If your socketio server executes as a constructor, you add CORS as follows:
constructor() {
// Initialize the Socket.io server with CORS
  const io = new socketio.Server({
    cors: {
      origin: 'http://example.com',
      methods: ['GET', 'POST'],
      credentials: true,
    },
  });
}
Conclusion
This guide helped you enable Nest.js CORS for your Nest.js GraphQL WebSocket (Socket io) gateway APIs. Now, your server can process and allow cross-origin requests from frontend domains and exchange data.
Written By: