How to Create Nest.js PostgreSQL API Without ORM
Posted April 30, 2024

ORMs are great. They let you access and manage the database with code. This gives you an easier way to change them and manipulate the database while still using code without the need to modify a database manually.
You might need to use Nest.js without an ORM and still create your API with a PostgreSQL database. This guide explains all the steps you need to create a CRUD Nest.js API without ORM while using PostgreSQL
Why Create Nest.js PostgreSQL API Without ORM
Some reasons make ORM stand out. But still consider the trade-offs. Using Nest.js PostgreSQL API without ORM means you will use raw SQL queries. More code is needed to handle PostgreSQL database interactions. However, without ORM you get:
- Performance benefits, especially, if you just need a simple API. SQL has control over the queries executed against the database for better performance.
- An ORM abstracts away the database operations. You might have an issue with inefficient queries.
- You have full control over the changes applied to the database schema.
- ORM adds a layer of abstraction. For a simple CRUD, avoid unnecessary abstractions.
To me, the main reason I will Nest.js and PostgreSQL API without ORM is to learn the bare metals of how the code works. In this scenario, you try to keep the codebase as lean as possible to deepen your understanding.
Setting Up Nest.js PostgreSQL API Without ORM
Before getting a Nest.js app ready, ensure Nest.js CLI is installed globally. Use the following command to be sure:
npm i -g @nestjs/cli
In your working directory, create your Nest.js PostgreSQL app with the following command:
nest new nestjs-postgres-without-orm
If ready, head over to the newly created app:
cd nestjs-postgres-without-orm
Now, you need to get Nest.js ready to use PostgreSQL but without ORM. The only thing you need is to add a PostgreSQL driver to your app as such:
npm install pg
pg is the only package you need to use Nest.js and PostgreSQL but without ORM.
Creating PostgreSQL DB Without ORM
ORM will create a database table for you. However, Without ORM Nest.js cant. Therefore you will need to create your whole database table before designing your API. In this post, you will use a task API as the demo.
Ensure you have PostgreSQL ready. You can use PostgreSQL with Docker if you like containers.
Related: Run Adminer with Docker Compose for Postgres Container
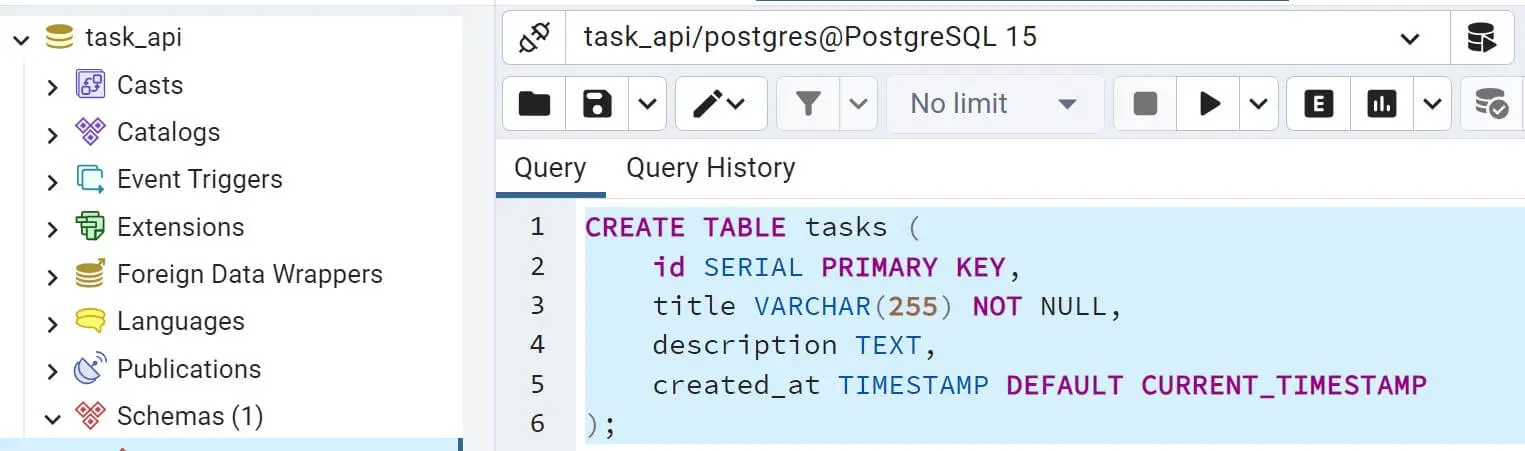
Once ready, create a database. Name it task_api. Now use the following SQL query to create a database table and add the tasks fields as such:
CREATE TABLE tasks (
    id SERIAL PRIMARY KEY,
    title VARCHAR(255) NOT NULL,
    description TEXT,
    created_at TIMESTAMP DEFAULT CURRENT_TIMESTAMP
);
To connect to Postgres, Nest.js will use a database connection string as follows:
postgresql://postgres:password@localhost:5432/database_name
This URI should now get filled with your Database password and the Database you just created, for example:
postgresql://postgres:password@localhost:5432/task_api
Make sure you have the correct Postgres URI as such.
Creating Nest.js Task Module
Like you have created a Tasks table and database, you will need a task module on your Nest.js app. Modules encapsulate different features of your application. Each module typically has its controller(s), service(s), and other components. In this case, you will create a Task Module using the following commands:
nest g module task
nest g service task --no-spec
nest g controller task --no-spec
Up to now, your src folder should contain a task directory with these files
src\task\task.service.tssrc\task\task.module.tssrc\task\task.controller.ts
Also not that the TaskModule (src\task\task.module.ts) is available in your app.module.ts.:
imports: [TaskModule],
This file is the root module of your application. All other modules should be imported here.
Connecting Nest.js to Postgres Without ORM
ORM provides a template that you use to create a database connection. Without one you will need to directly use drivers such as pg PostgreSQL client to create your DB connection.
In this case, pg gives you a Pool class. The Pool class represents a pool of PostgreSQL client connections. This way, you manage database connections and create an instance of it to establish connections to your PostgreSQL database to execute queries.
In your src folder create a database.providers.ts file and use Poll to connect to Postgres as follows:
import { Pool } from 'pg';
import { Logger } from '@nestjs/common';

// Exporting databaseProviders
export const databaseProviders = [
  {
    // The token for the database connection provider
    provide: 'DATABASE_CONNECTION',
    //Configure the database connection asynchronously
    useFactory: async () => {
      const logger = new Logger('DatabaseConnection');
      try {
        // Create a new Pool instance with the connection string
        const pool = new Pool({
          connectionString:
            'postgresql://postgres:pass@localhost:5432/task_api',
        });
        // Establish a connection to the database
        await pool.connect();
        // Log a successful database connection message
        logger.log('Database connection successful');

        return pool;
      } catch (error) {
        logger.error('Database connection error', error.stack);
        throw error;
      }
    },
  },
];
The key point here is to make sure you have the correct connectionString. Update this URI to match your Postgres connection details.
Adding Postgres Connection to Nest.js
To run this database connection provider (databaseProviders ), you will need to make sure Nest.js execute it once the app runs. Now, you add databaseProviders to your app.module.ts file, as follows:
//other modules
import { databaseProviders } from './database.providers';

@Module({
  imports: [TaskModule],
  controllers: [AppController],
  providers: [...databaseProviders, AppService],
})
export class AppModule {}
The TaskModule module Also needs access to databaseProviders. Edit the src\task\task.module.ts file as such:
//other modules
import { databaseProviders } from '../database.providers';

@Module({
  providers: [TaskService,
    ...databaseProviders
  ],
  controllers: [TaskController]
})
export class TaskModule {}
The databaseProviders object uses a Logger to track the database connection state. Go to your src/main.ts file and run the Logger:
import { NestFactory } from '@nestjs/core';
import { AppModule } from './app.module';
import { Logger } from '@nestjs/common';

async function bootstrap() {
  const logger = new Logger('Bootstrap');
  const app = await NestFactory.create(AppModule);
  await app.listen(3000);
  logger.log('Application started');
}
bootstrap();
Once you have everything correct, let’s now handle CRUD operations for tasks.
Adding Tasks to PostgreSQL with Nest.js
The connection is created. Now, it’s time to send an HTTP request to run queries through Nest.js to Postgres. Go to your src\task\task.service.ts and:
- You have Pool from
pg - Ensure
TaskServiceis Injectable. - Add a constructor with the
DATABASE_CONNECTIONtoken for the database connection provider - The Pool constructor should be ready as such.
- Add a
createmethod that communicates with the Postgres client to run anINSERTquery to thetaskstable. - Create a
findAllmethod to fetch tasks while running aSELECTquery.
Your whole code for this file should be ready as follows:
import { Injectable, Inject } from '@nestjs/common';
import { Pool } from 'pg';

@Injectable()
export class TaskService {
  constructor(
    @Inject('DATABASE_CONNECTION')
    private pool: Pool,
  ) {}

  async findAll(): Promise<any[]> {
    const client = await this.pool.connect();
    try {
      const result = await client.query('SELECT * FROM tasks');
      return result.rows;
    } finally {
      client.release();
    }
  }

  async create(task: any): Promise<any> {
    const client = await this.pool.connect();
    try {
      const result = await client.query('INSERT INTO tasks (title, description) VALUES ($1, $2) RETURNING *', [task.title, task.description]);
      return result.rows[0];
    } finally {
      client.release();
    }
  }
}
Running the Nest.js Controllers
Controllers create the routes you need to get HTTP methods ready. Here you will let Nest.js run your POST and GET methods using HTTP endpoints.
In your src\task\task.controller.ts file:
- You will execute the methods created in your
TaskService. - Each method should be annotated with its respective HTTP methods
This way, your controller will be ready as follows:
import { Controller, Get, Post, Body, Param, Put, Delete } from '@nestjs/common';
import { TaskService } from './task.service';

@Controller('tasks')
export class TaskController {
  constructor(private readonly tasksService: TaskService) {}

  @Get()
  async findAll() {
    return this.tasksService.findAll();
  }

  @Post()
  async create(@Body() task: any) {
    return this.tasksService.create(task);
  }
}
Running the Nest.js Postgres API
This app is almost ready. Let’s first run the app and make sure the POST and PUT methods are working as expected. In your project directory, run the following command:
npm run start:dev
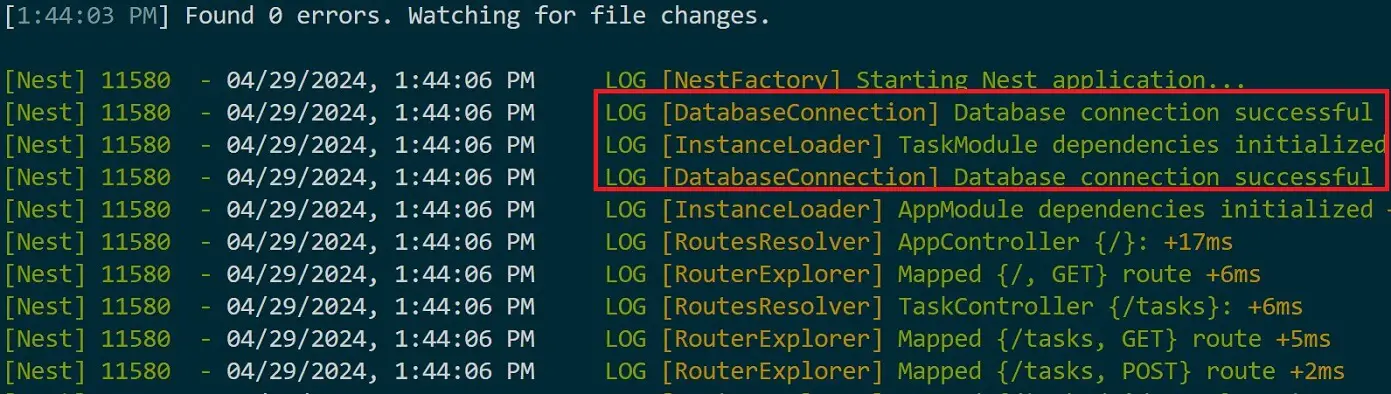
At first:
- Nest.js will run the app entry point Starting Nest application… then run DatabaseConnection and show Database connection successful.
- The TaskModule will get executed (TaskModule dependencies initialized) and a Database connection successful message should get logged again.
This shows you have successfully used Nest.js to connect to PostgreSQL Without using an ORM. Now, go ahead and test the /tasks endpoint to test POST and GET as such.
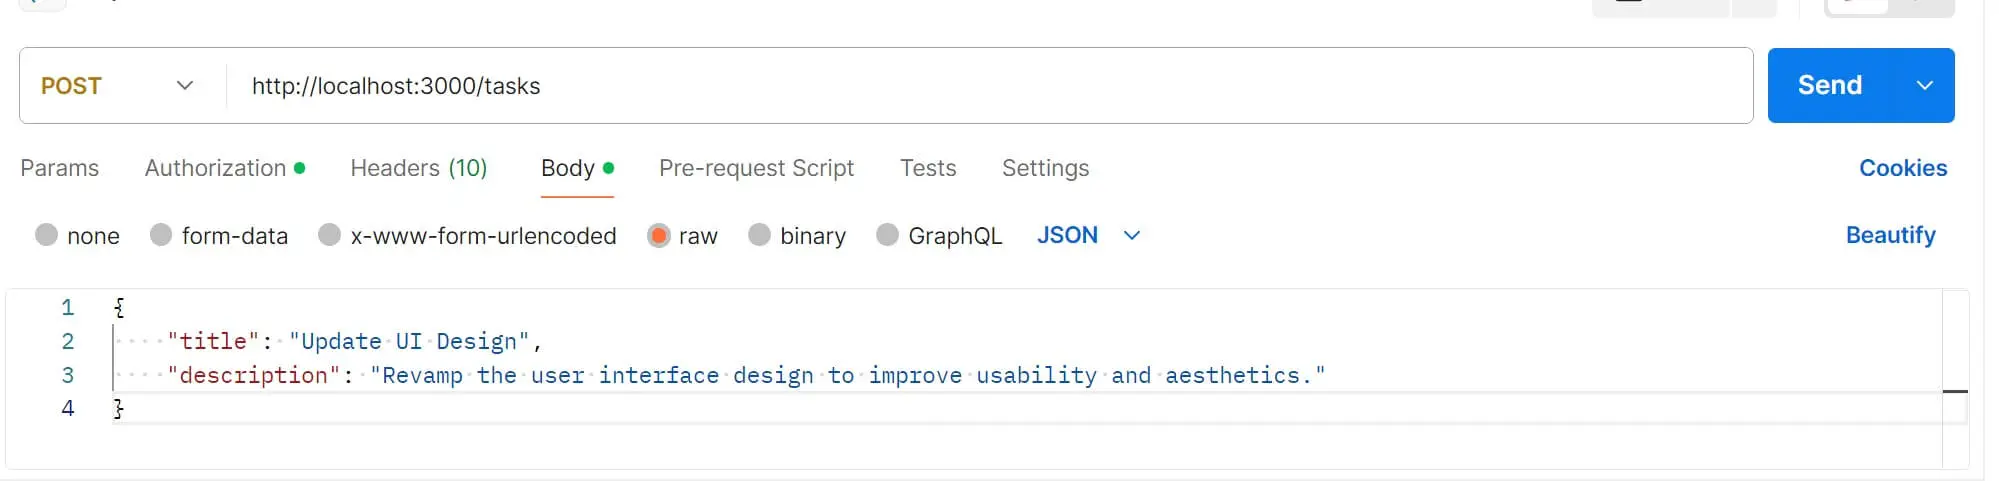
Use Postman or any other REST client and send a POST request to http://localhost:3000/tasks as follows:
{
    "title": "Update UI Design",
    "description": "Revamp the user interface design to improve usability and aesthetics."
}
If you love using cURL, here is an example for you and the cURL POST request:
curl -X POST \
  -H "Content-Type: application/json" \
  -d '{
        "title": "Update UI Design",
        "description": "Revamp the user interface design to improve usability and aesthetics."
      }' \
  http://localhost:3000/tasks
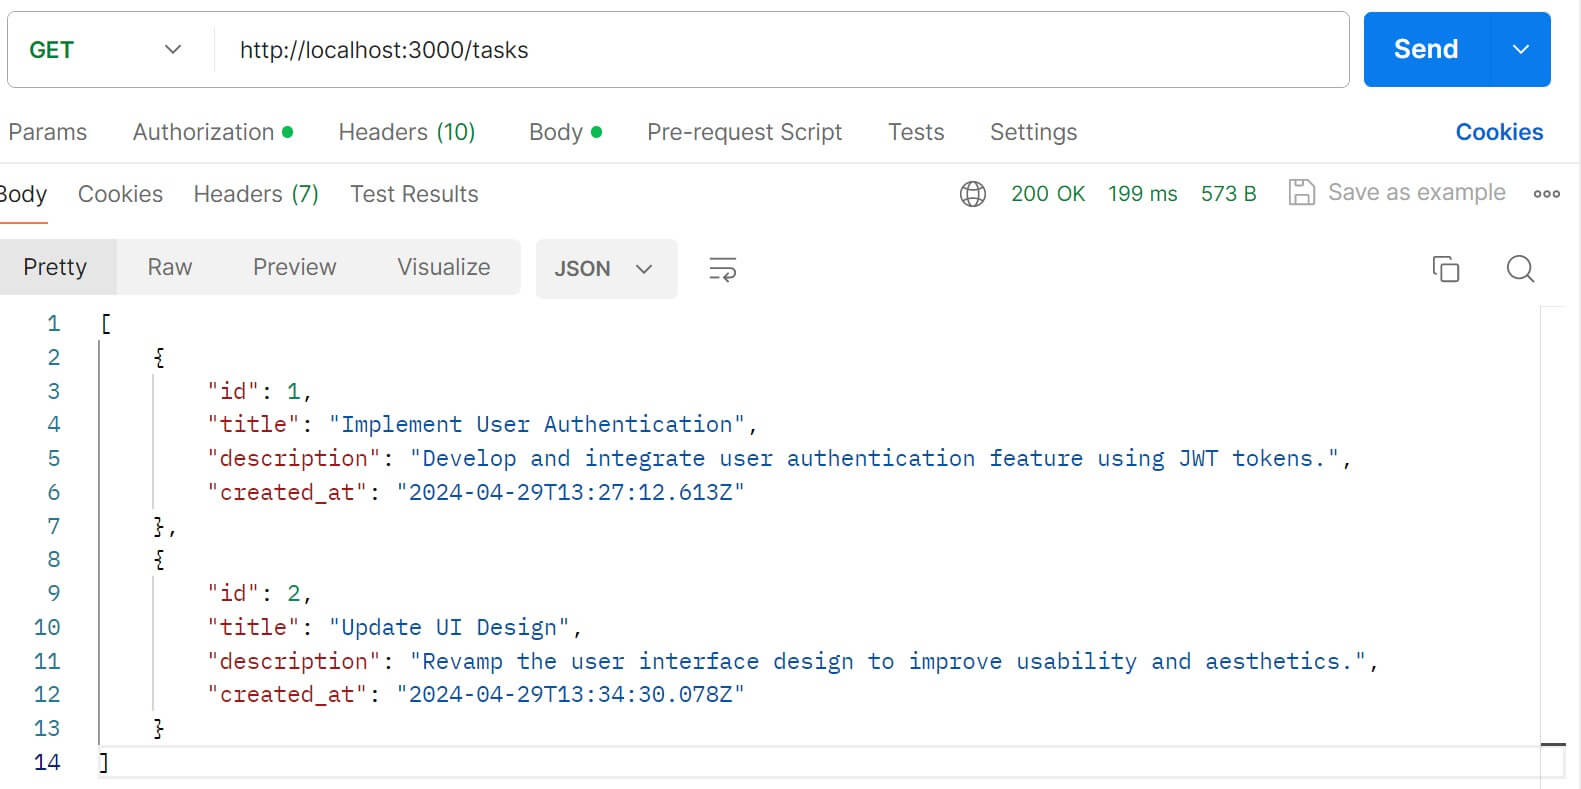
To make sure the data is added, send a GET request to http://localhost:3000/tasks. You’ll get the added task as follows:
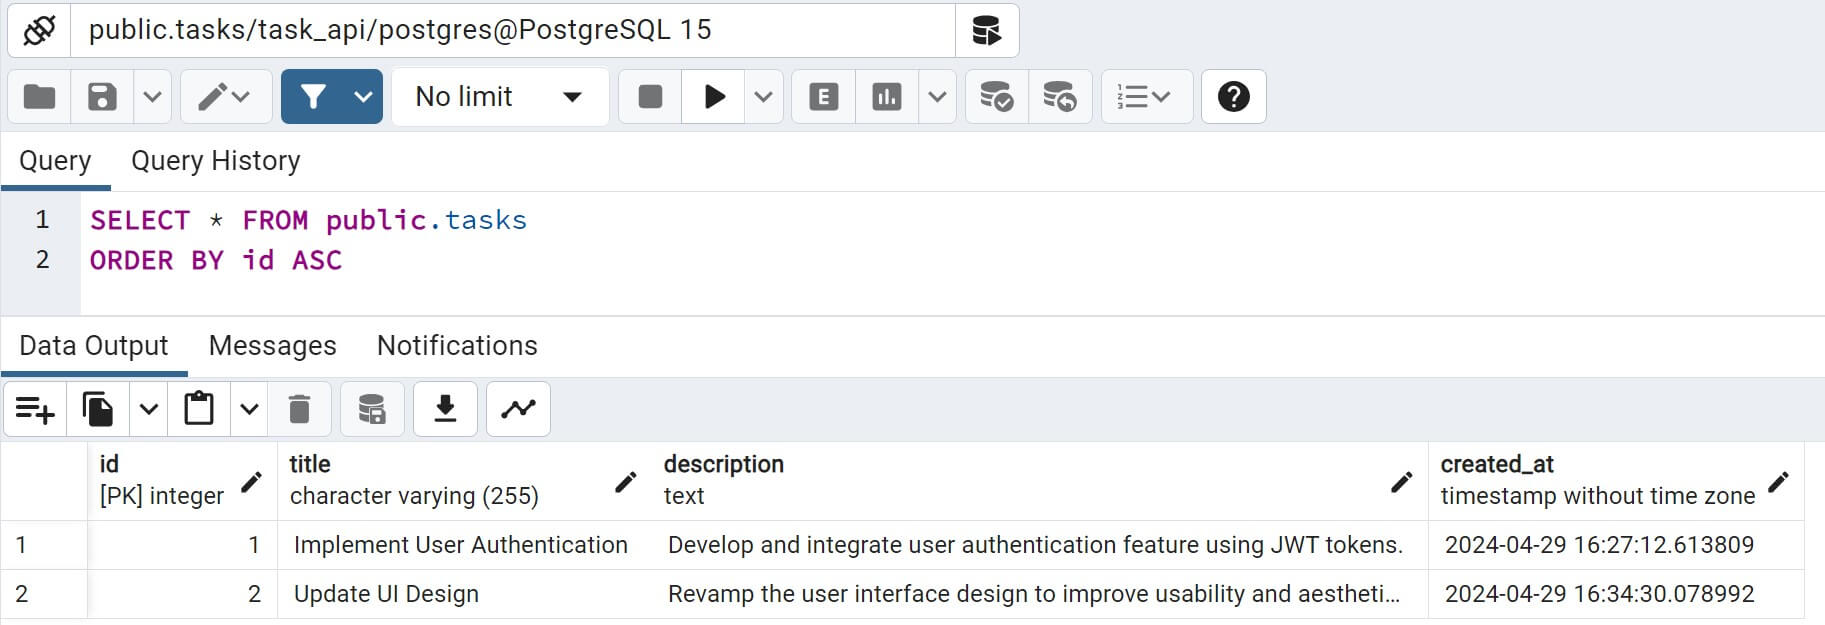
The same items and records should be present in your PostgreSQL task_api database:
Adding Parameterized Queries to Nest.js and Postgres
To complete this CRUD API, you will need to use parameters for your endpoints. In this, you will use this scenario to:
- Get a single task (GET)
- Update a task (PUT)
- Delete items from the database (DELETE)
To facilitate these changes, update the src\task\task.service.ts file with the following methods:
  async findOne(id: number): Promise<any> {
    const client = await this.pool.connect();
    try {
      const result = await client.query('SELECT * FROM tasks WHERE id = $1', [id]);
      return result.rows[0];
    } finally {
      client.release();
    }
  }

  async update(id: number, task: any): Promise<any> {
    const client = await this.pool.connect();
    try {
      const result = await client.query('UPDATE tasks SET title = $1, description = $2 WHERE id = $3 RETURNING *', [task.title, task.description, id]);
      return result.rows[0];
    } finally {
      client.release();
    }
  }

  async delete(id: number): Promise<any> {
    const client = await this.pool.connect();
    try {
      const result = await client.query('DELETE FROM tasks WHERE id = $1 RETURNING *', [id]);
      return result.rows[0];
    } finally {
      client.release();
    }
  }
At the same time, the src\task\task.controller.ts file should execute these methods as follows:
  @Get(':id')
  async findOne(@Param('id') id: string) {
    return this.tasksService.findOne(+id);
  }


  @Put(':id')
  async update(@Param('id') id: string, @Body() task: any) {
    return this.tasksService.update(+id, task);
  }

  @Delete(':id')
  async remove(@Param('id') id: string) {
    return this.tasksService.delete(+id);
  }
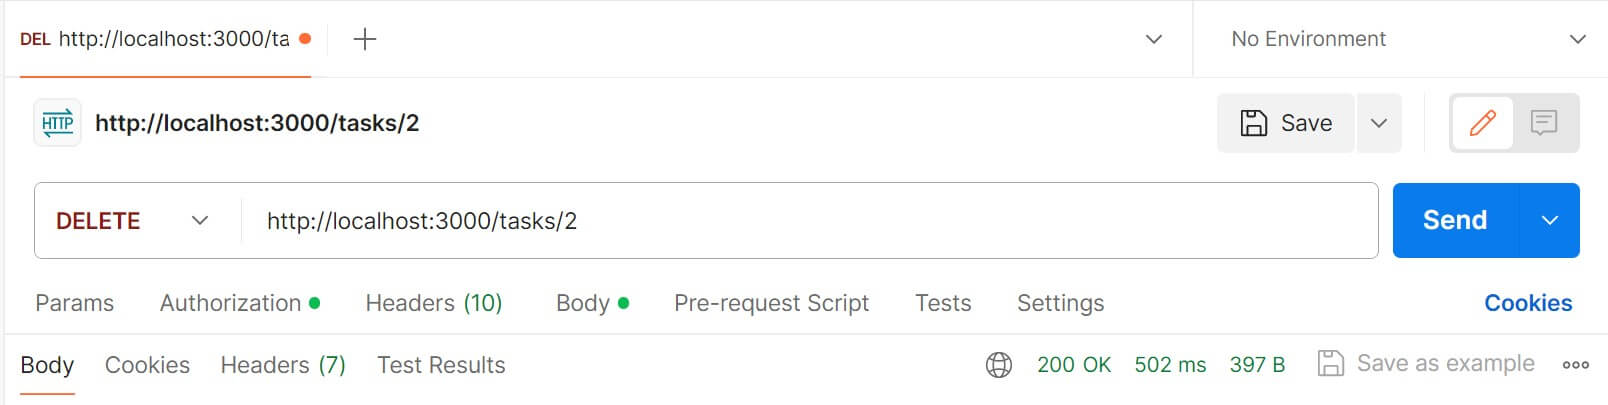
All you need now is to send your request with an ID as are endpoint parameter. for example, let’s say to delete a task with id 2. Your URL will be http://localhost:3000/tasks/2 and will execute as follows:
Conclusion
This comprehensive guide taught you to create a Nest.js PostgreSQL API Without ORM. You need to remember that ORM are great. They let you create your API with added advantages. You don’t even need to use AQL queries directly, among other benefits.
I hope, you learned something but are still willing to embrace different ORMs. Check the following guide and explore how to use Nest.js and Postgres with ORMs such as TypeORM.
Written By: