Guide To TypeORM MSSQL With Nest.js and Typescript
Posted October 2, 2023

This guide uses TypeORM with Microsoft SQL Server (MSSQL) in your Nest.js and Typescript apps. You will create a TypeORM MSSQL connection Example and use it in Nest.js. TypeORM creates ORM for TypeScript and JavaScript so you can interact with relational databases using TypeScript classes and decorators.
Dive in and set up TypeORM and MSSQL with Nest.js. This way, you only need your Nest.js decorators, and TypeORM will handle all MSSQL database operations.
Prerequisites
To follow along and create a TypeORM MSSQL connection for your Nest.js example app, ensure you have the following:
- Node.js and NPM installed on your computer.
- Basic Knowledge using Nest.js.
Related: Guide to TypeORM with Nest.js, Postgres, MySQL, Multer, Docker, and Docker Compose
- Microsoft SQL Server installed and running on your machine. You can access a remote MSSQL server if you have one
- Nest.js CLI installed globally using:
npm install -g @nestjs/cli
Related: Guide To TypeORM SQLite With Nest.js and Typescript
Let’s now get into this guide and create a TypeORM MSSQL CRUD API.
Create a Nest.js app with TypeORM and MSSQL
To get ready, ensure you have the Nest.js app. If not, run the following command:
nest new typeorm-mssql
Change the directory to the typeorm-mssql folder:
cd typeorm-mssql
You can test your app running npm run start, and you should be served with the Hello World Nest.js app on http://localhost:3000/.
Now, to get your TypeORM MSSQL connection right, you will use the following libraries:
- TypeORM and @nestjs/typeorm for adding ORM Modules to Nest.js
- MSSQL client for Microsoft SQL Server database drivers
- Class-validator for creating decorator validations
Install the above packages using the following command:
npm i typeorm @nestjs/typeorm mssql class-validator
It’s time to create your CRUD API, so run the following commands to generate Note modules:
nest g module note
nest g service note --no-spec
nest g controller note --no-spec
Note that this should generate a src/note folder with note.module.ts, note.service.ts, and note.controller.ts files. So, let’s now create the app logic.
Creating a TypeORM Entity Class for MSSQL Server
An entity works as the blueprint of your database table. You have TypeORM to manage it for you. TypeORM uses it to create your database tables and add all related Columns with properties you want.
Create a note.entity.ts file in your src/note folder to set up one. Here is how you create an Entity:
- Import entity properties you want from TypeORM:
import { Column, Entity, PrimaryGeneratedColumn } from 'typeorm';
- Create your table as an entity. In this case, the parameter
notesmaps to your database to create anotestable:
@Entity('notes') //This maps the notes entity to the 'notes' table in your DB
- Add decorators to create your table columns as follows:
export class Note {
  @PrimaryGeneratedColumn('uuid')
  id: string;

  @Column({ name: 'title', length: 60, nullable: false })
  title: string;

  @Column({ name: 'content', length: 160, nullable: false })
  content: string;

  @Column({ name: 'rating', type: 'int', nullable: true })
  rating: number;
}
Here:
- You are creating a table with id, title, content, and rating representing a notes table.
- The
PrimaryGeneratedColumndecorator allows TypeORM to instruct MSSQL that the Column id is your primary key. - Each entry is created using the
@Columndecorator. It takes the argument that creates the properties of the specific column. For example, theratingfield is of type integer, and it can be NULL, so{ name: 'rating', type: 'int', nullable: true }will do the job
Below is a complete overview of your full Entity code in your src/note/note.entity.ts file:
import { Column, Entity, PrimaryGeneratedColumn } from 'typeorm';

@Entity('notes')
export class Note {
  @PrimaryGeneratedColumn('uuid')
  id: string;

  @Column({ name: 'title', length: 60, nullable: false })
  title: string;

  @Column({ name: 'content', length: 160, nullable: false })
  content: string;

  @Column({ name: 'rating', type: 'int', nullable: true })
  rating: number;
}
Creating your TypeORM MSSQL Connection with Nest.js
The above entity reflects how your table should look on the MSSQL server. For this to work, TypeORM must establish a connection to your database. Let’s implement this step.
- First, ensure your Note module can access your entity. So go ahead and update the
src/note/note.module.tsfile as follows:
import { Module } from '@nestjs/common';
import { NotesController } from './note.controller';
import { NotesService } from './note.service';
import { TypeOrmModule } from '@nestjs/typeorm';
import { Note } from './note.entity';

@Module({
  // access Note entity using TypeOrmModule
  imports: [TypeOrmModule.forFeature([Note])],
  controllers: [NotesController],
  providers: [NotesService],
})
export class NotesModule {}
- Head over to the Nest.js entry point now. This should be your
src/app.module.ts, and ensure you have the following imports:
import { Module } from '@nestjs/common';
import { NotesModule } from './note/note.module';
import { TypeOrmModule } from '@nestjs/typeorm';
import { Note } from './note/note.entity';
- Create TypeORM MSSQL connection with Nest.js as follows:
@Module({
  imports: [
    TypeOrmModule.forRoot({
      type: 'mssql',
      host: 'localhost',
      port: 1433,
      username: 'add_username',
      password: 'add_password',
      database: 'add_dbName',
      options: {
        encrypt: false, // MSSQL-specific option
      },
      synchronize: true, //use this with development environment
      entities: [Note],
    }),
    NotesModule,
  ],
})
export class AppModule {}
You must replace add_username, add_password, and add_dbName with your respective information. In this case, add_dbName should be an existing database in MSSQL. So, make sure you create one and add it to your database.
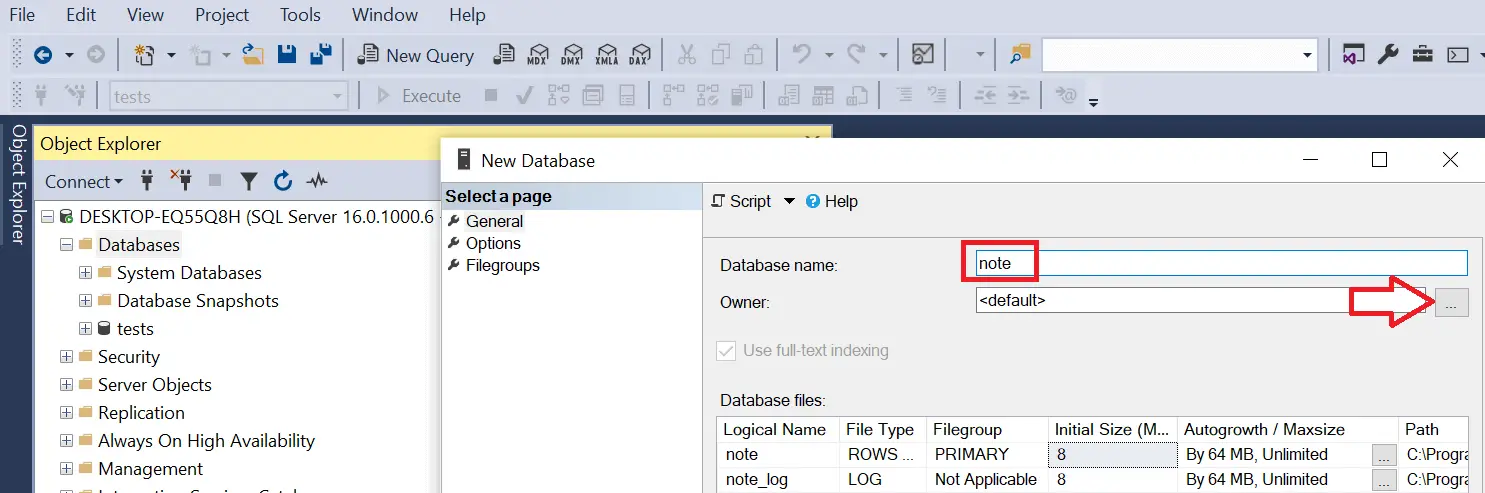
When creating your database, ensure you assign it the username added in your code as follows:
- Add your database name and select the owner you want to assign it to:
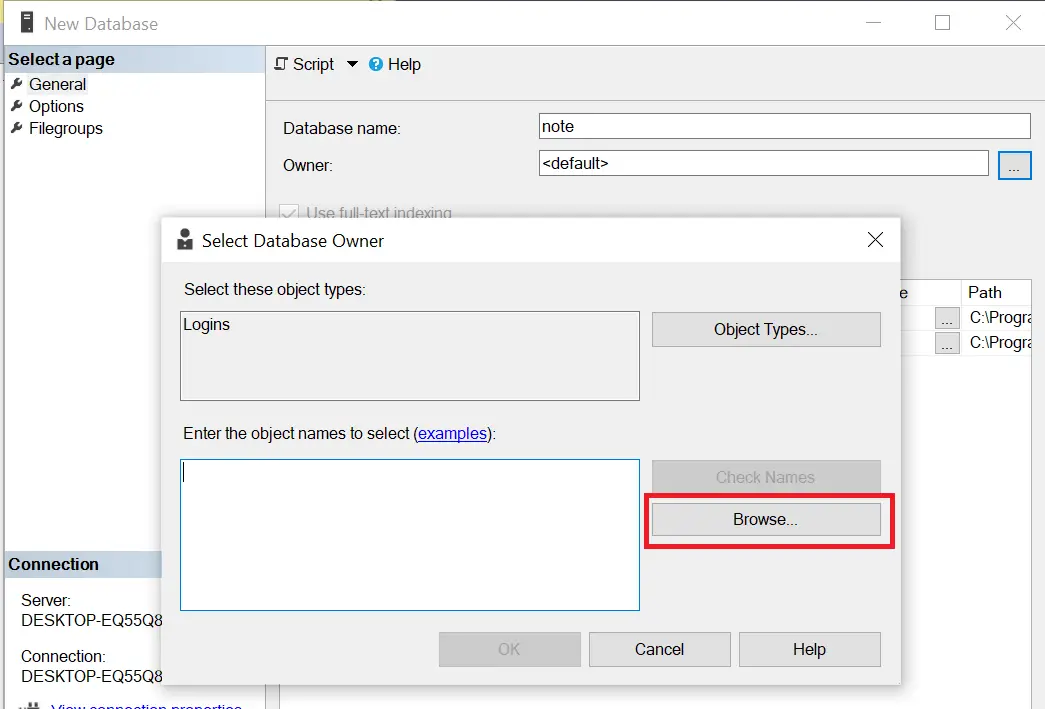
- Browse the owner:
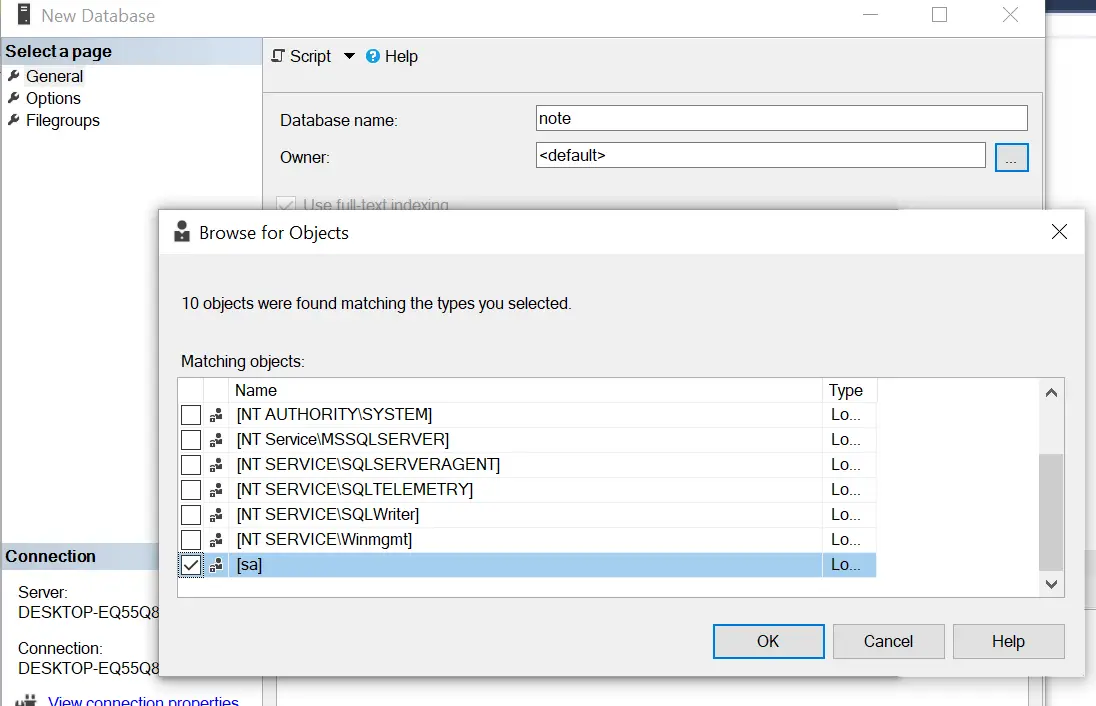
- Select your owner that reflects the username and password you have added.
This connection will execute entities: [Note] and allow TypeORM to check if your mssql is running on port 1433. To check if the connection is working, run the following command:
npm run start
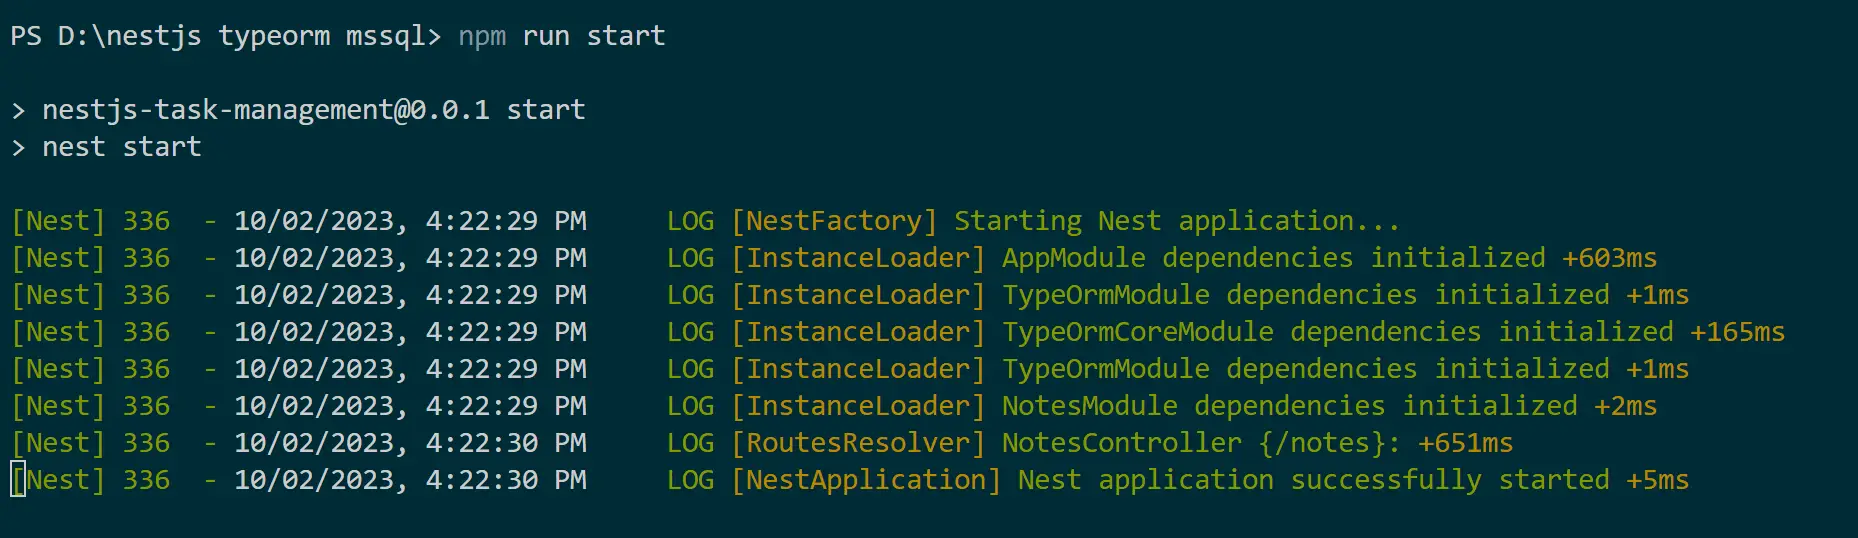
This should be enough to create a database notes and its related fields on your MSSQL server database as follows (Make sure you Refresh your database first):
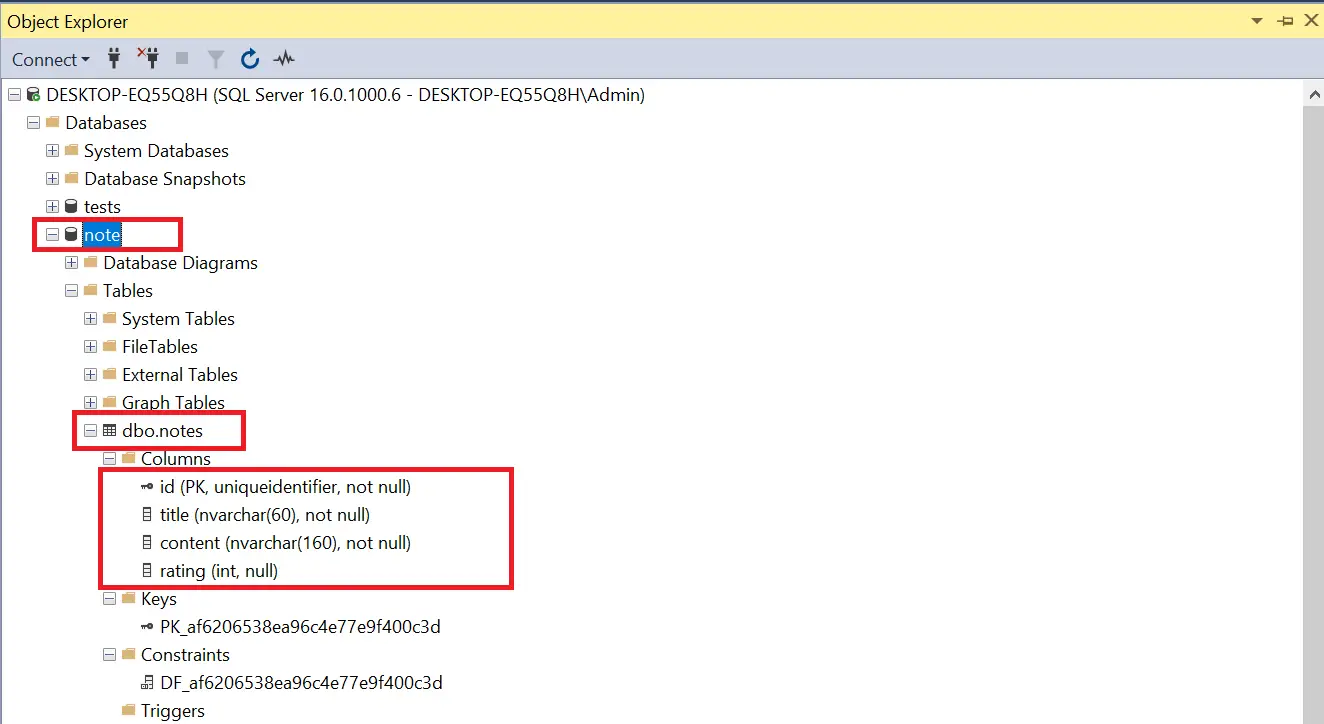
There you have it. Your TypeORM MSSQL connection is working.
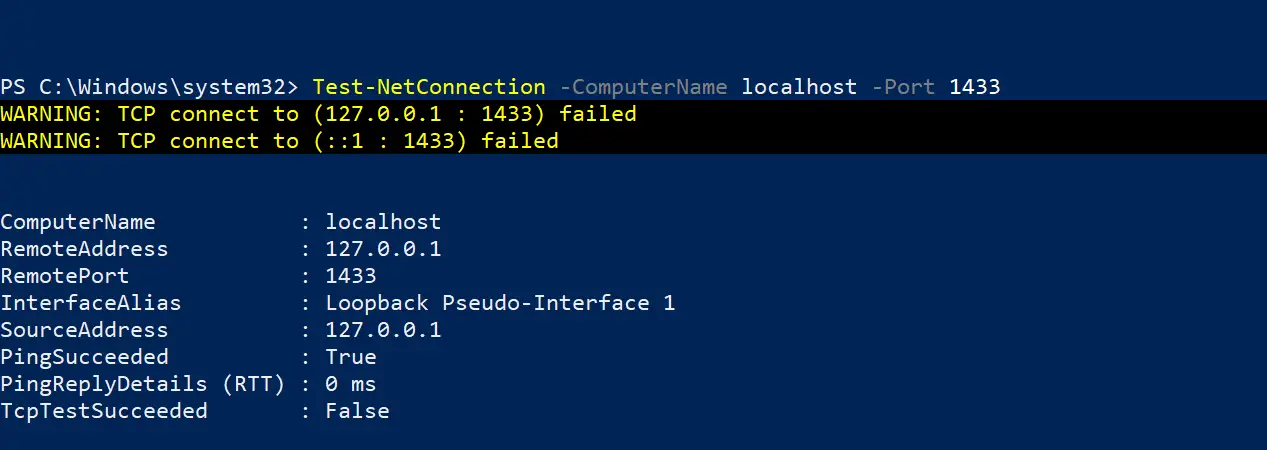
Troubleshooting a TypeORM MSSQL Connection Error
Was the above step successful? If you encounter an error as follows:

This might happen if you are running MSSQL as a fresh installation to solve it, check if port 1433 is open connections:
# PowerShell (Windows):
Test-NetConnection -ComputerName localhost -Port 1433

# Linux/macOS/
nmap -p 1433 localhost
If you get the TcpTestSucceeded : False results, check the next steps:
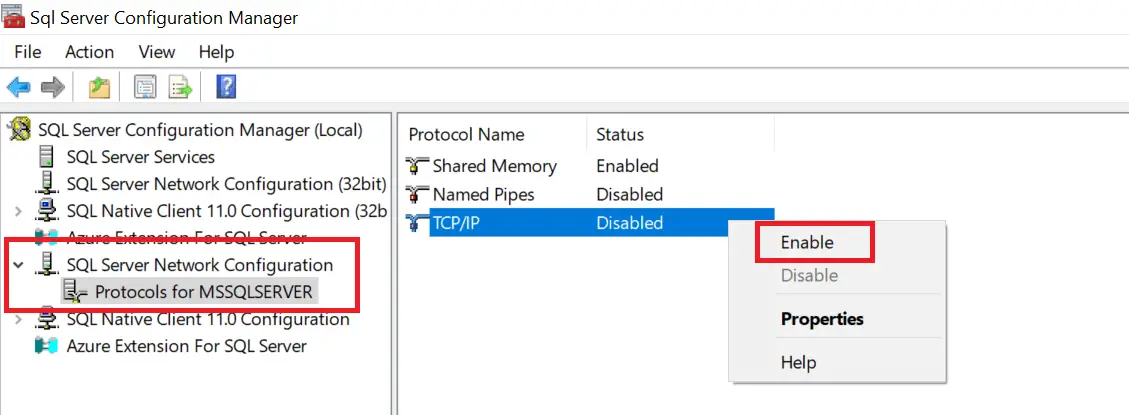
- Go to SQL Server Configuration Manager on the Windows Start menu:

- Right-click and Enable TCP/IP:
- Restart your MSSQL server (Open a command prompt as an administrator):
# Windows Command Prompt (as Administrator)
net stop MSSQLSERVER
net start MSSQLSERVER

# Linux (using systemctl)
sudo systemctl stop mssql-server
sudo systemctl start mssql-server

# macOS (using brew services)
brew services stop mssql-server
brew services start mssql-server
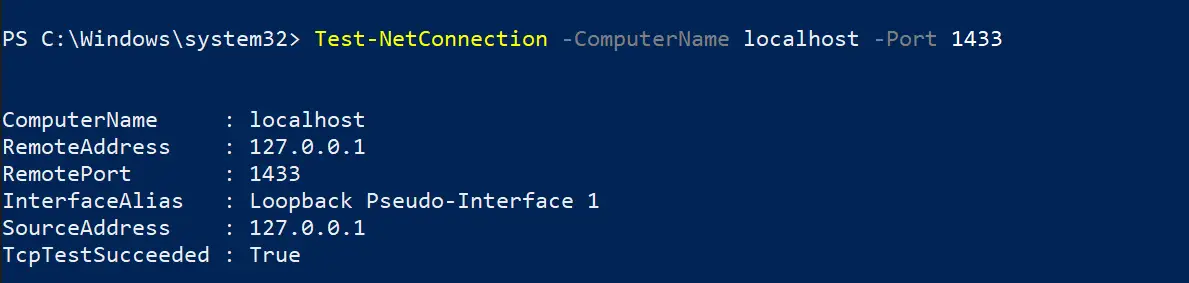
This time TcpTestSucceeded should return True:
You can rerun your app using npm run start and check if the error is resolved.
If you have any errors, comment on this post, and we’ll address them ASAP.
Now, why not dive deeper and add data to this database? Let’s create a TypeORM MSSQL Nest.js-inspired CRUD API.
Setting up TypeORM MSSQL DTO
DTO tells Nest.js which fields a request should have. In this case, you will create DTO for adding and creating a note as your GET and POST request Data Objects.
Head to your src/note folder, create a dto folder, and add two files as follows:
create-note.dto.ts
import { IsNotEmpty, IsInt } from 'class-validator';

export class CreateNoteDto {
  @IsNotEmpty({ message: 'title field cannot be empty' })
  title: string;

  @IsNotEmpty({ message: 'content field cannot be empty' })
  content: string;

  @IsNotEmpty({ message: 'The field rating cannot be empty' })
  @IsInt({ message: 'rating must be of type number' })
  rating: number;
}
update-note.dto.ts
import { IsNotEmpty, IsInt } from 'class-validator';

export class UpdateNoteDto {
  @IsNotEmpty({ message: 'title field cannot be empty' })
  title: string;

  @IsNotEmpty({ message: 'content field cannot be empty' })
  content: string;

  @IsNotEmpty({ message: 'The field rating cannot be empty' })
  @IsInt({ message: 'rating must be of type number' })
  rating: number;
}
These DTOs will use a class-validator to ensure your request payload contains the required fields.
Implementing TypeORM MSSQL CRUD methods Using Nest.js Providers
TypeORM uses a repository design pattern that gets database data sources for your current scope. This means you can use Providers to create a repository containing all the CRUD logic you want to use. This way, you will create Controllers to handle HTTP requests while your providers handle the more complex tasks.

Navigate to src/note/note.service.ts and create your providers as follows:
- Add your imports:
import { Injectable, NotFoundException } from '@nestjs/common';
import { CreateNoteDto } from './dto/create-note.dto';
import { UpdateNoteDto } from './dto/update-note.dto';
import { InjectRepository } from '@nestjs/typeorm';
import { Note } from './note.entity';
import { Repository } from 'typeorm';
- Modify your Repository with
@Injectable()decorator as follows:
@Injectable()
export class NotesService {
  constructor(
    @InjectRepository(Note)
    private notesRepository: Repository<Note>,
  ) {}
  // You add all CRUD logics here
}
This way, all the next CRUD functions you create will be added in the above Repository (// You add all CRUD logic here)
- Fetch all notes
  // Fetch all notes from the database
  async fetchNotes(): Promise<Note[]> {
    return this.notesRepository.find();
  }
- Fetch a single note by ID
  // Fetch a single note by ID from db
  async fetchNoteById(id: string): Promise<Note> {
    const found = await this.notesRepository.findOne({ where: { id: id } });
    if (!found) {
      throw new NotFoundException(`Note "${id}" not found`);
    }
    return found;
  }
- Add a new note to the database
  // Add a new note to the database
  async addNote(createNoteDto: CreateNoteDto): Promise<Note> {
    const { title, content, rating } = createNoteDto;
    const note = this.notesRepository.create({
      title,
      content,
      rating
    });
    await this.notesRepository.save(note);
    return note;
  }
- Remove a note by ID from the database
  // Remove a note by ID from the database
  async removeNote(id: string) {
    const result = await this.notesRepository.delete(id);
    if (result.affected === 0) {
      throw new NotFoundException(`A note "${id}" was not found`);
    }
    return { message: 'Note successfully deleted' };
  }
- Update a note by ID with new data
  // Update a note by ID with new data
  async updateNote(id: string, updateNoteDto: UpdateNoteDto) {
    const hasNote = await this.fetchNoteById(id);
    if (!hasNote) throw new Error(`A note "${id}" was not found`);
    await this.notesRepository.update(id, updateNoteDto);
  }
Creating TypeORM MSSQL HTTP Routing
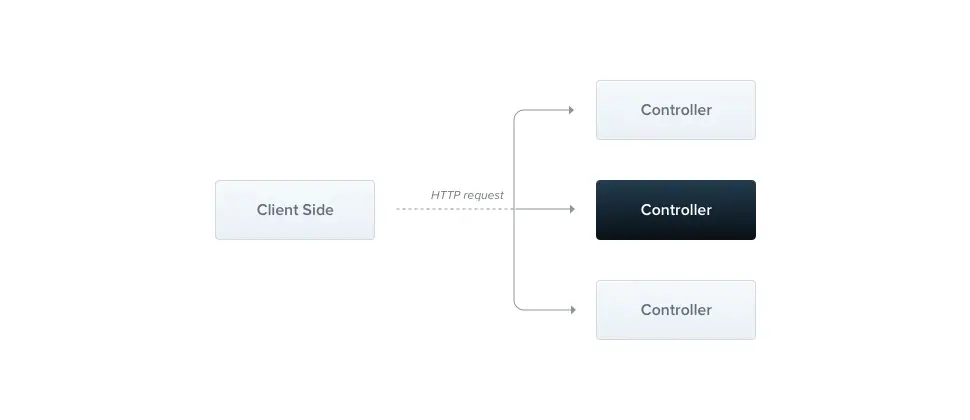
You need to create a controller to access these methods over the HTTP. It controls the routing mechanism when the application receives requests. It executes CRUD HTTP methods such as GET, POTS, DELETE, and PUT:
Navigate to src/note/note.controller.ts and create your controllers as follows:
import { Body, Controller, Delete, Get, Param, Post,Put} from '@nestjs/common';
import { NotesService } from './note.service';
import { CreateNoteDto } from './dto/create-note.dto';
import { UpdateNoteDto } from './dto/update-note.dto';
import { Note } from './note.entity';

@Controller('notes')
export class NotesController {
  constructor(private readonly notesService: NotesService) {}

  // Retrieve all notes
  @Get()
  getNotes() {
    return this.notesService.fetchNotes();
  }

  // Create a new note
  @Post()
  createNote(@Body() createNoteDto: CreateNoteDto): Promise<Note> {
    return this.notesService.addNote(createNoteDto);
  }

  // Retrieve a note by ID
  @Get('/:id')
  getNoteById(@Param('id') id: string): Promise<Note> {
    return this.notesService.fetchNoteById(id);
  }

  // Delete a note by ID
  @Delete('/:id')
  delete(@Param('id') id: string) {
    return this.notesService.removeNote(id);
  }

  // Update a note by ID
  @Put('/:id')
  async updateNote(@Param('id') id: string, @Body() data: UpdateNoteDto) {
    const note = new Note();
    Object.assign(note, data);
    await this.notesService.updateNote(id, note);
    return { message: 'Note info successfully updated', id };
  }
}
Now you will be able to access your API over http://localhost:3000/notes
Testing TypeORM MSSQL Nest.js Integration with Postman
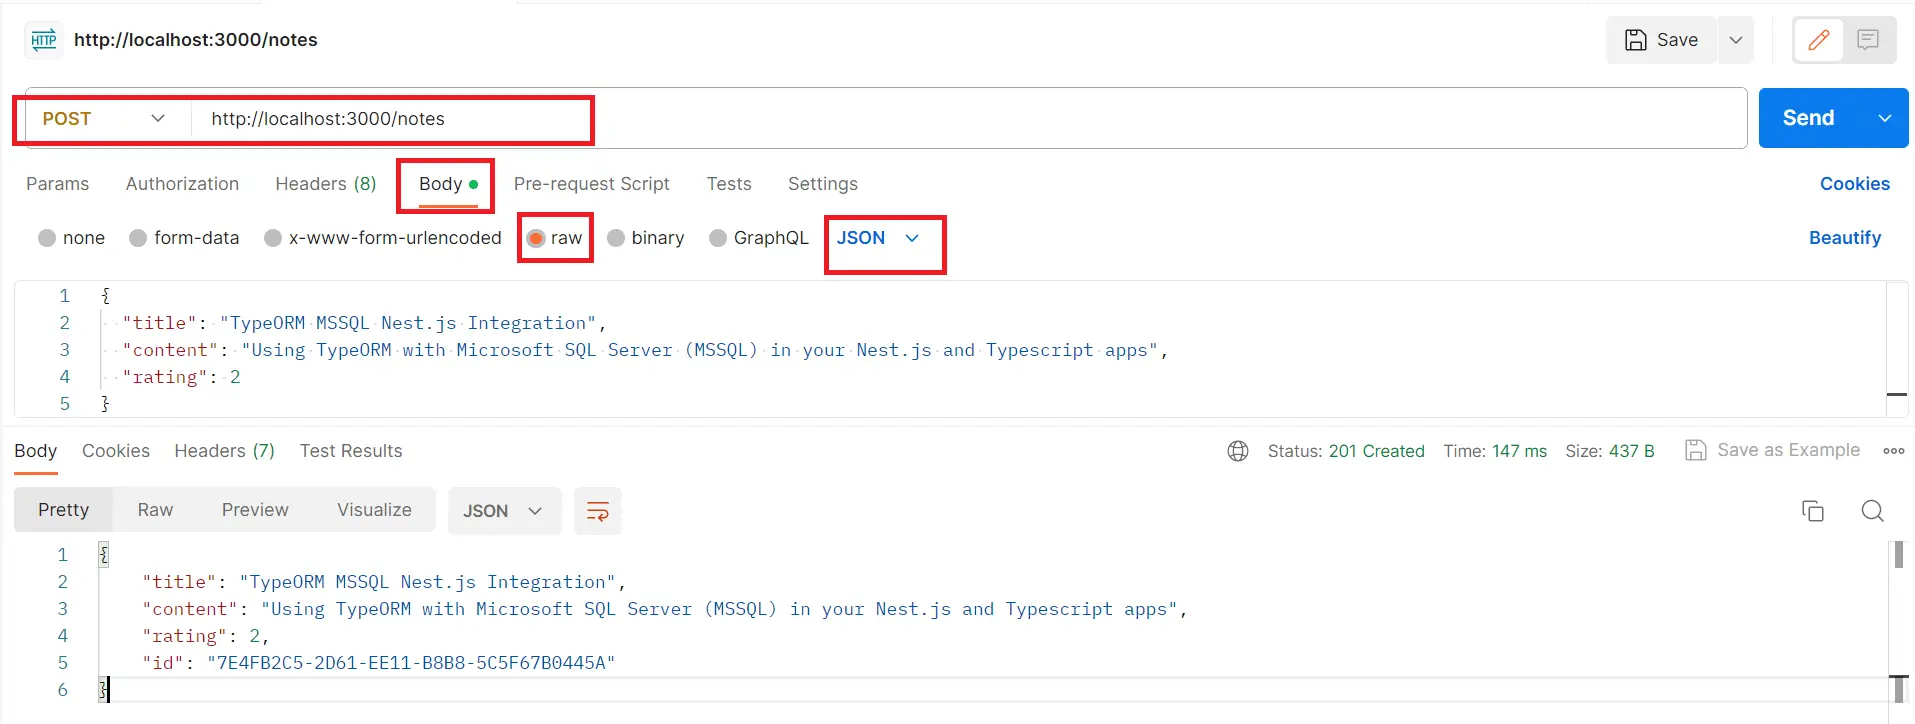
It’s time to test what we have so far. Go to Postman and send your first POST request. Run the following command:
npm run start
Make sure you have your JSON payload ready as follows:
{
  "title": "TypeORM MSSQL Nest.js Integration",
  "content": "Using TypeORM with Microsoft SQL Server (MSSQL) in your Nest.js and Typescript apps",
  "rating": 2
}
SEND your POST request as follows:
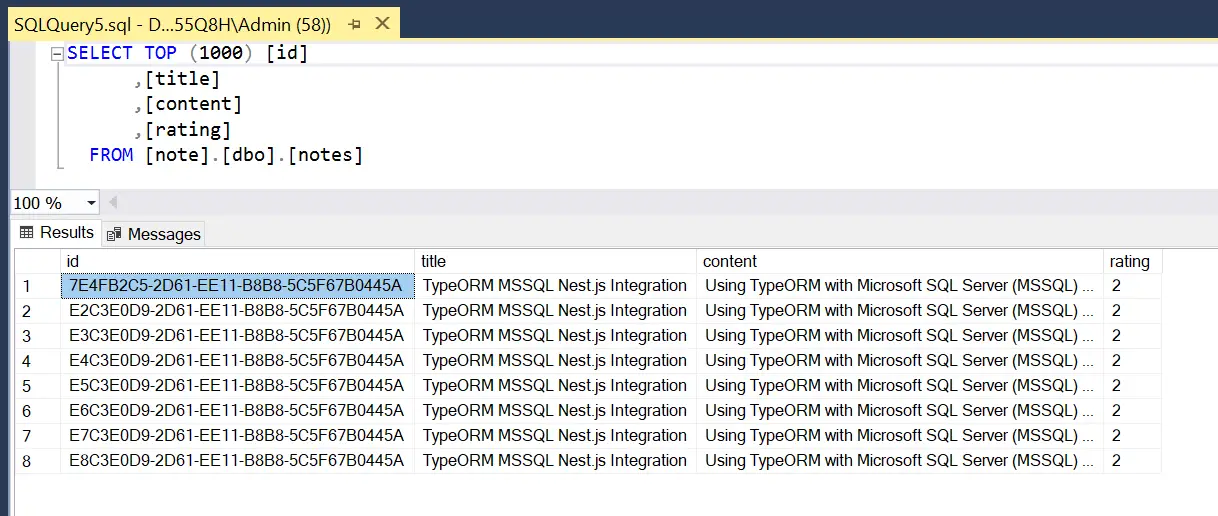
The changes you add should be reflected on your MSSQL database:
Now you can go further and send requests to the other methods:
- To get all notes:
http://localhost:3000/notes - To fetch one note:
http://localhost:3000/notes/id - Update a note:
http://localhost:3000/notes/id - Delete a note:
http://localhost:3000/notes/id
ID should be replaced with the Note ID you are trying to access.
Conclusion
I hope this guide successfully taught you how to set up TypeORM and MSSQL in a Nest.js app using TypeScript to handle all database operations.
All code used to create this Nest.js TypeORM MSSQL tutorial is hosted on GitHub Repository
Written By: